Page 444 of 3115
H21415
H21412
H04829
- BODYREAR DOOR
BO-17
2591 Author�: Date�:
2004 LAND CRUISER (RM1071U)
�At the time of reassembly, apply MP grease to the window
regulator.
NOTICE:
At the time of reassembly, please refer to the following
item.
Do not apply grease to the spring of the window regulator.
15. REMOVE DOOR LOCK
(a) Remove the screw.
(b) Disconnect the connector.
(c) Disconnect the link from outside handle.
(d) Using a torx wrench, remove the 3 screws and door lock
through the service hole.
Torx wrench: T30 (Part No. 09042-00010 or locally
manufactured tool)
Torque: 5.0 N´m (51 kgf´cm, 44 in.´lbf)
HINT:
At the time of reassembly:
�Apply adhesive to the 3 screws.
Part No. 08833-00070, THREE BOND 1324 or equiva-
lent.
�Remove the protector, and apply MP grease to the sliding
and rotating parts of the door lock.
16. REMOVE OUTSIDE HANDLE
Remove the 2 bolts and outside handle.
Torque: 5.0 N´m (51 kgf´cm, 44 in.´lbf)
Page 479 of 3115

H04094
A
B
H04098
SST
SST
R13455
10 m (33 ft) or more BO-146
- BODYSEAT BELT PRETENSIONER
2720 Author�: Date�:
2004 LAND CRUISER (RM1071U)
(6) Disconnect the pretensioner connector in the order
ºAº and ºBº as shown in the illustration.
(c) Install the SST.
(1) Connect the 2 SST each other, then connect them
to the seat belt pretensioner.
SST 09082-00700, 09082-00740
NOTICE:
To avoid damaging the SST connector and wire harness,
do not lock secondary lock of the twin lock.
(2) Move the SST to at least 10 m (33 ft) away from the
front of the vehicle.
(3) Close all the doors and windows of the vehicle.
NOTICE:
Take care not to damage the SST wire harness.
(4) Connect the SST red clip to the battery positive (+)
terminal and the black clip to the negative (-) termi-
nal.
(d) Activate seat belt pretensioner.
(1) Confirm that no one is inside the vehicle or within 10
m (33 ft) area around the vehicle.
(2) Press the SST activation switch and activate the
seat belt pretensioner.
HINT:
The seat belt pretensioner operates simultaneously as the LED
of the SST activation switch lights up.
(e) Dispose of the front seat outer belt (with seat belt preten-
sioner).
CAUTION:
�The front seat outer belt is very hot when the seat belt
pretensioner is activated, so leave it alone for at least
30 minutes after activation.
�Use gloves and safety glasses when handling a front
seat outer belt with activated seat belt pretensioner.
�Always wash your hands with water after completing
the operation.
�Do not apply water, etc. to a front seat outer belt with
activated seat belt pretensioner.
2. ACTIVATION WHEN DISPOSING OF FRONT SEAT
OUTER BELT ONLY
Page 616 of 3115

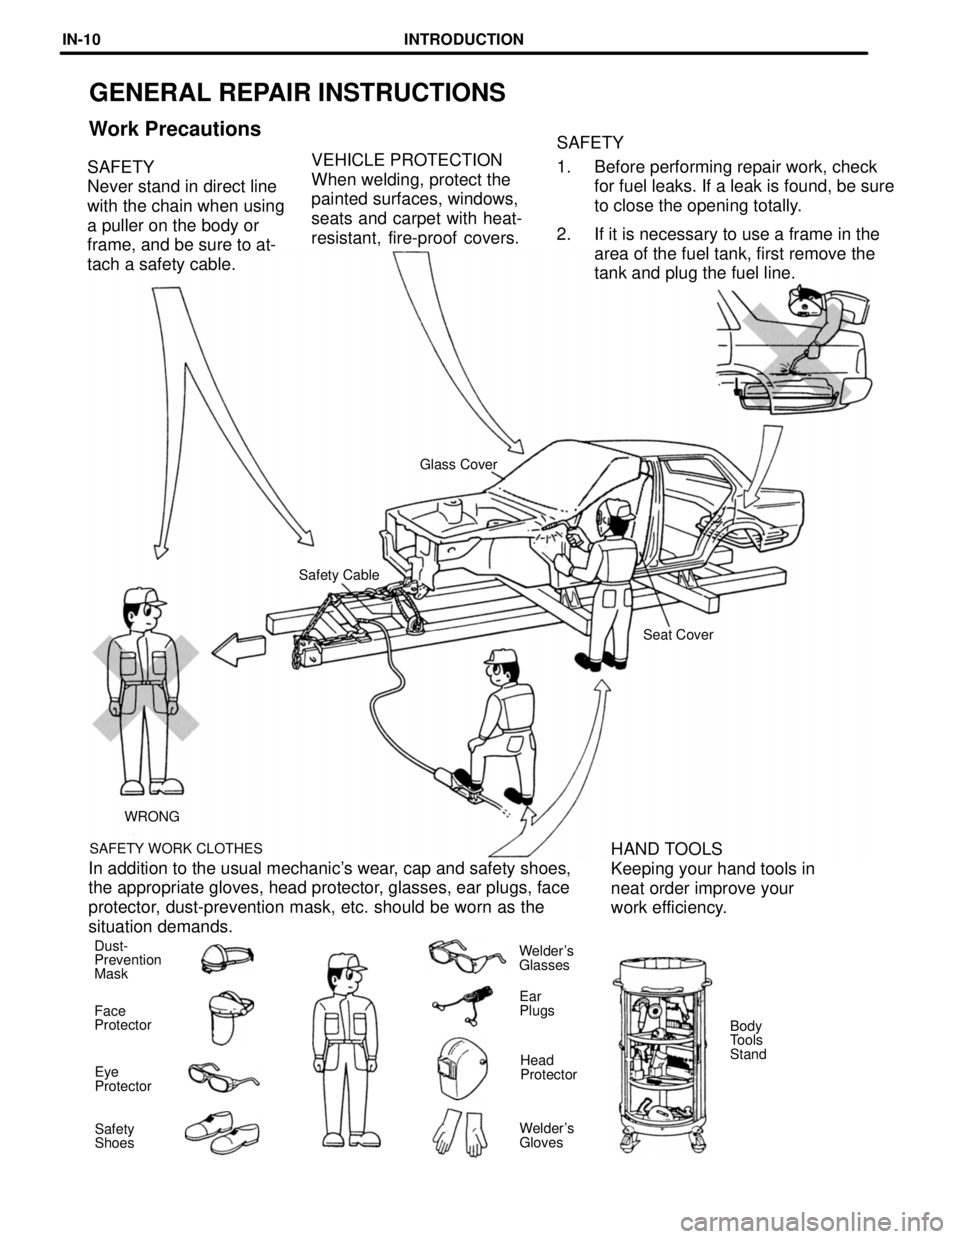
GENERAL REPAIR INSTRUCTIONS
Work PrecautionsSAFETY
1. Before performing repair work, check
for fuel leaks. If a leak is found, be sure
to close the opening totally.
2. If it is necessary to use a frame in the
area of the fuel tank, first remove the
tank and plug the fuel line. SAFETY
Never stand in direct line
with the chain when using
a puller on the body or
frame, and be sure to at-
tach a safety cable.VEHICLE PROTECTION
When welding, protect the
painted surfaces, windows,
seats and carpet with heat-
resistant, fire-proof covers.
Glass Cover
Safety Cable
Seat Cover
WRONG
SAFETY WORK CLOTHES
HAND TOOLS
Keeping your hand tools in
neat order improve your
work efficiency. In addition to the usual mechanic's wear, cap and safety shoes,
the appropriate gloves, head protector, glasses, ear plugs, face
protector, dust-prevention mask, etc. should be worn as the
situation demands.
Dust-
Prevention
MaskWelder's
Glasses
Ear
Plugs
Face
Protector
Body
Tools
Stand
Head
Protector Eye
Protector
Welder's
Gloves Safety
Shoes
INTRODUCTIONIN-10
Page 705 of 3115
INSTALLATION
Foamed Material
Application Area
Body Sealer
Swing Type Back Door only:
Cloth Tape
Roof Drip No. 2 Channel
Wooden Hammer
2. Bend the flange hem with a wooden hammer
and dolly.
HINT: Perform hemming three steps, being careful
not to warp the panel.
3. After installing the new parts, apply foamed
materials. Before temporarily installing the new parts, apply
body sealer to the windshield header panel, roof
panel reinforcement and back window frame.
HINT:
1) Apply just enough sealer for the new parts to
make contact.
2) For other sealing points, refer to Section AR.
BODY PANEL REPLACEMENTRE-71
Page 1915 of 3115

2004 LAND CRUISER (EWD548U)
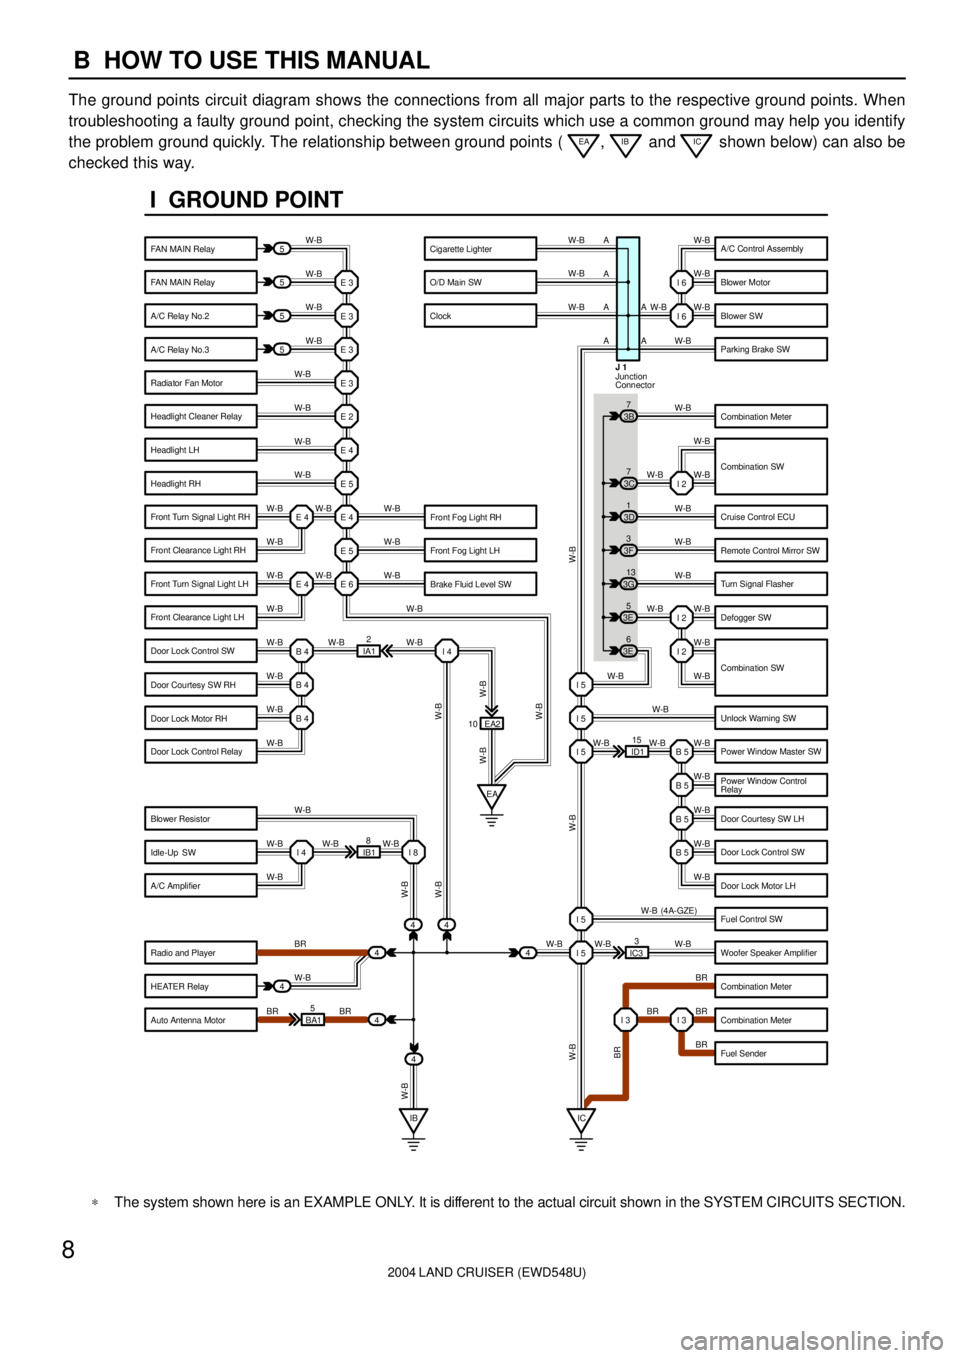
8B HOW TO USE THIS MANUAL
The ground points circuit diagram shows the connections from all major parts to the respective ground points. When
troubleshooting a faulty ground point, checking the system circuits which use a common ground may help you identify
the problem ground quickly. The relationship between ground points (
EA, IB and IC shown below) can also be
checked this way.
5
5
5
5
4
44
4
4 BA15IB18EA2
ID115
IC33 IA12 E 3
W-BW-B W-B W-B W-B
W-B
W-B
W-B
W-B W-B
W-B
W-B W-B
W-B
W-B W-B W-BW-B W-B W-B W-B
W-B
W-B
W-B
W-B W-B W-B
W-B
BR
W-B
BR BRW-BW-B W-B
W-B
W-B
W-B
W-B W-B W-B
W-B
W-B W-B
W-B
W-B
BR W-B
BR BR
BR W-B (4A-GZE)
W-B W-BI 2
I 2
B 5 I 5 I 5 I 5
B 5
B 5
B 5
I 5
I 5
I 3 I 3 E 3
E 3
E 3
E 2
E 4
E 5
E 4
E 5
E 6 E 4 E 4
B 4
EA I 4
B 4
B 4
I 4 I 8
IB IC 443E5
3E6 3G13 3F3 3D1 3B7W-B
W-B
W-B W-B W-B
W-B
W-B
W-B
W-B
W-B
W-B
W-B
W-B
W-B W-BI 6
I 6
I 2 3C7
10A A A A
A
A
Junction
Connector J 1
W-B
W-B
W-B W-B
BR W-B W-B
W-B
W-B W-B
W-B
I GROUND POINT
FAN MAIN Relay
FAN MAIN Relay
A/C Relay No.2
A/C Relay No.3
Radiator Fan Motor
Headlight Cleaner Relay
Headlight LH
Headlight RH
Front Fog Light LH
Brake Fluid Level SW Front Fog Light RH Front Turn Signal Light RH
Front Clearance Light RH
Front Turn Signal Light LH
Front Clearance Light LH
Door Lock Control SW
Door Courtesy SW RH
Door Lock Motor RH
Door Lock Control Relay
Blower Resistor
Idle-Up SW
A/C Amplifier
Radio and Player
HEATER Relay
Auto Antenna MotorA/C Control Assembly
Blower Motor
Blower SW
Parking Brake SW
Combination Meter
Combination SW
Cruise Control ECU
Remote Control Mirror SW
Turn Signal Flasher
Defogger SW
Unlock Warning SW
Power Window Master SW
Power Window Control
Relay
Door Courtesy SW LH
Door Lock Control SW
Door Lock Motor LH
Fuel Control SW
Woofer Speaker Amplifier
Combination Meter
Combination Meter
Fuel Sender Cigarette Lighter
O/D Main SW
Clock
Combination SW
*The system shown here is an EXAMPLE ONLY. It is different to the actual circuit shown in the SYSTEM CIRCUITS SECTION.
Page 1952 of 3115

2004 LAND CRUISER (EWD548U)
71 G
Position of Parts in Instrument Panel
J 1 Junction Connector
J 2 Junction Connector
J 3 Junction Connector
J 4 Junction Connector
J 5 Junction Connector
J 6 Junction Connector
J 7 Junction Connector
J 8 Junction Connector
J 9 Junction Connector
J 10 Junction Connector
J 11 Junction Connector
J 12 Junction Connector
J 13 Junction Connector
J 14 Junction Connector
J 15 Junction Connector
J 16 Junction Connector
J 17 Junction Connector
J 18 Junction Connector
J 19 Junction Connector
J 20 Junction Connector
J 21 Junction Connector
K 3 Key Interlock Solenoid
M 5 Multi-Display
M 6 Multi-Display
M 7 Multi-Display
M 9 Multi-Display
P 4 Power Outlet (Front)
P 5 Power Outlet (Rear Console Box)
P 6 Power Quarter Window SW LH
P 7 Power Quarter Window SW RHR 5 Remote Control Mirror SW
R 6 Rheostat
R 7 Room Temp. Sensor (Front)
R 36 Radio and Player
R 37 Radio and Player
R 38 Radio and Player
R 39 Rear Seat Audio Controller
R 40 Roll Sensing of Curtain Shield Airbags Cutoff SW
S 3 Seat Heater SW (Driver's Seat)
S 4 Seat Heater SW (Front Passenger's Seat)
S 5 Stop Light SW
T 4 Telescopic Motor
T 5 Theft Deterrent ECU
T 7 Tilt and Telescopic ECU
T 8 Tilt and Telescopic ECU
T 9 Tilt Motor
T 10 Ignition Key Cylinder Light
Transponder Key Amplifier
T 11 Turn Signal Flasher
T 18 Towing Brake Controller
T 19 Transponder Key Computer
U 1 Unlock Warning SW
V 8 VSC Warning Buzzer
Y 1 Yaw Rate Sensor
Z 1 Option Connector (Glass Breakage Sensor)
Page 1954 of 3115

2004 LAND CRUISER (EWD548U)
73 G
Position of Parts in Body
P 8 Parking Brake SW
P 9 Power Outlet (Luggage Compartment)
P 10 Power Vent Window Motor LH
P 11 Power Vent Window Motor RH
P 12 Power Window Master SW
P 14 Power Window Motor Front LH
P 15 Power Window Motor Front RH
P 16 Power Window Motor Rear LH
P 17 Power Window Motor Rear RH
P 18 Power Window Control SW Front RH
P 19 Power Window Control SW Rear LH
P 20 Power Window Control SW Rear RH
P 21 Pretensioner LH
P 22 Pretensioner RH
R 8 Rear A/C Control SW
R 9 Rear Air Mix Control Servo Motor
R 10 Rear Combination Light LH
R 11 Rear Combination Light LH
R 12 Rear Combination Light RH
R 13 Rear Combination Light RH
R 14 Rear Cooler Blower Motor
R 15 Rear Cooler Magnetic Valve
R 16 Rear Cooler Power Transistor
R 17 Rear Cooler Relay
R 19 Rear Door Speaker LH
R 20 Rear Door Speaker RH
R 21 Rear Evaporator Temp. Sensor
R 22 Rear Heater Blower Motor
R 25 Rear Heater Power Transistor
R 26 Rear Inlet Air Temp. SensorR 27 Rear Interior Light
R 28 Rear Window Defogger
R 29 Rear Window Defogger
R 30 Rear Wiper Motor
R 31 Rear Wiper Relay
R 32 Remote Control Mirror LH
R 33 Remote Control Mirror RH
R 34 Room Temp. Sensor (Rear)
S 6 Stereo Component Amplifier
S 7 Stereo Component Amplifier
S 11 Side Airbag Sensor Front LH
S 12 Side Airbag Sensor Front RH
S 13 Side Airbag Sensor Rear LH
S 14 Side Airbag Sensor Rear RH
T 12 Trailer Socket
T 13 Tweeter LH
T 14 Tweeter RH
T 15 Towing Converter Relay
T 20 Television Camera
T 21 Television Camera ECU
T 22 Television Camera ECU
T 23 Towing Hitch Relay
V 1 Vapor Pressure Sensor
V 6 Vanity Light LH
V 7 Vanity Light RH
V 10 VSV (Pressure Switching Valve)
W 4 Woofer (Speaker)
Page 1959 of 3115

2004 LAND CRUISER (EWD548U)
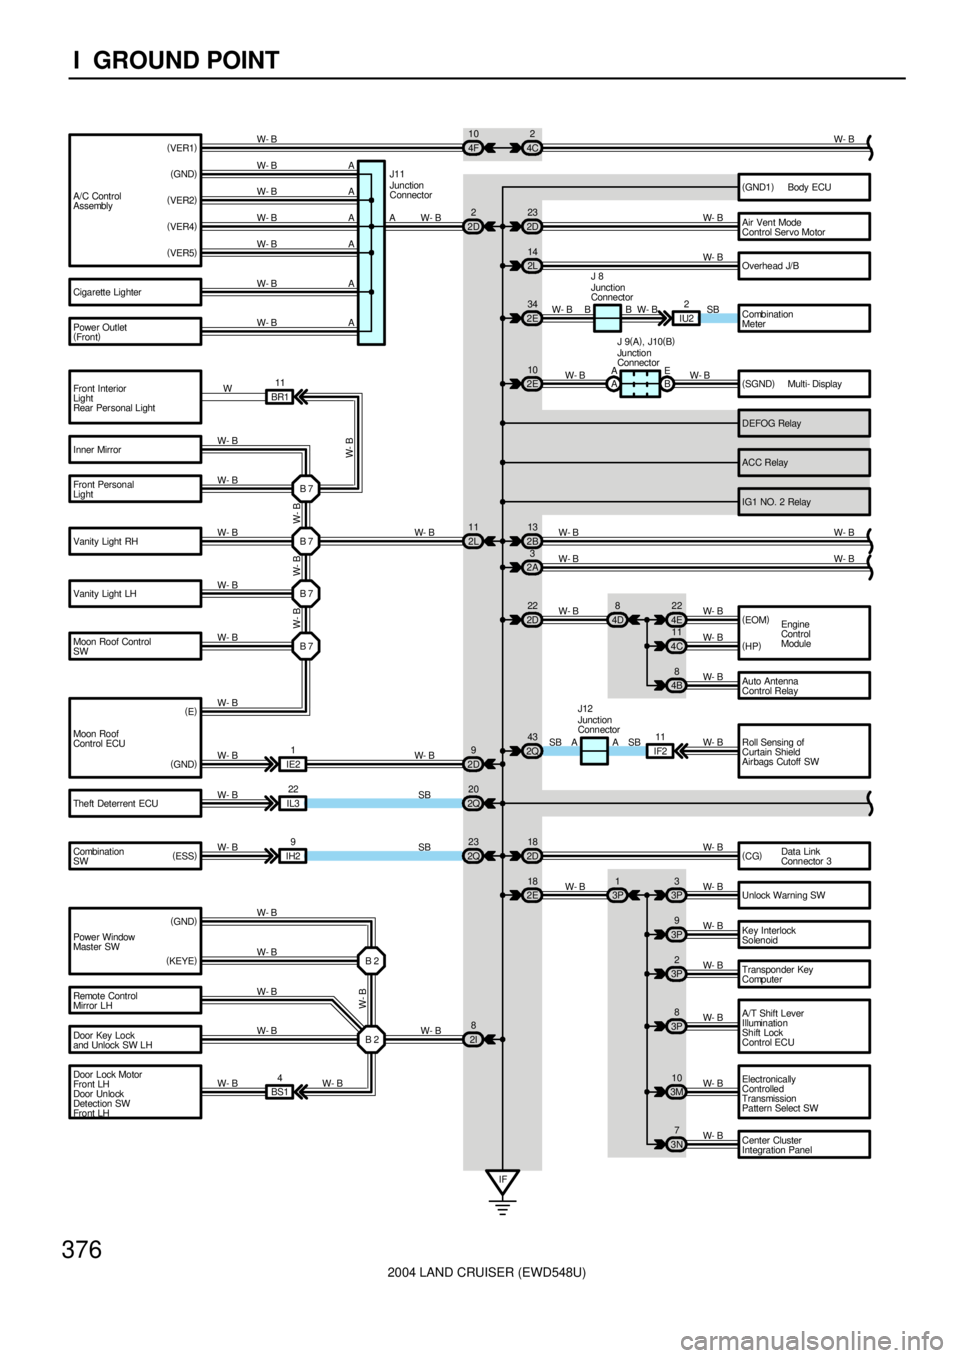
376I GROUND POINT
(
VER4) (
GND) (
VER1)
A/C Control
Assembly(
VER2)
Air Vent Mode
Control Ser vo Motor
Overhead J/B
Unlock Warning SWEngine
Control
Module Cigarette Lighter
Power Outlet
(
Fron t)
Electronically
Controlled
Transmission
Pattern Select SW W- B
W- B
W- B W- B
Auto Antenna
Control Relay W- B A
AAJ11 W- B
W- B
Key Interlock
Solenoid W- B
Transponder Key
Computer A W- B
W- B4C2
2D23
2L 14
3P3
3P9
3P2 (
VER5)W- B2D2 4F 10
Body ECU (
GND1)
3P8 3P1
2E18 A
A
A W- B
W- B
3M10
IF W- B
W- B
W- B
W- B
W- B 2D22
4E22
4C11
4B8 4D8
(
EOM)
(
HP) W- BW- B
Inner Mirror
Front Personal
Light
Vanity Light RH
Vanity Light LH
Moon Roof Control
SW
Door Key Lock
and Unlock SW LH
Door Lock Motor
Fro nt LH
Door Unlock
Detection SW
Fro nt LHB 7
B 7 W- B
W- B
W- B
W- B
W- B W- B
W- B Remote Control
Mirror LH2E34
SB
Combination
Meter
18
2DW- B
Data Link
Connector 3 (
CG) IU22
B B W- B W- B
W- B
W- B
W- B Power Window
Master SW(
GND)
(
KEYE)
B 2
B 2
W- B
W- B
2I8
BS14
W- B W- BIE21
W- B (
E)
Moon Roof
Control ECU
(
GND) Front Interior
Light
Rear Per sonal Light
B 7
2L 11
W- B BR111
W
W- B
B 72A3 2B13
W- B
W- B W- B
W- B
Combination
SW Theft Deterrent ECU
IH29
2Q23 2Q20
IL322
W- B
W- BSB
SBDEFOG Relay
ACC Relay
IG1 NO. 2 Relay
Center Cluster
Integration Panel 3N7
W- B W- B
2D9
W- B
(
ESS)
W- B W- B W- B
Junction
Connector
A/T Shift Lever
Illumination
Shift Lock
Control ECU 2Q43
W- B Roll Sensing of
Curtain Shield
Air bags Cutoff SW AA
IF211
SB SBJunction
Connector J12 W- B 10
2EW- B
A A
B E Ju nctio n
Connector J 9(
A)
, J10(
B) Junction
Connector J 8
Multi- Display (
SGND)