Page 335 of 3115

BE01J-17
BE-2
- BODY ELECTRICALTROUBLESHOOTING
2375 Author�: Date�:
2004 LAND CRUISER (RM1071U)
TROUBLESHOOTING
PROBLEM SYMPTOMS TABLE
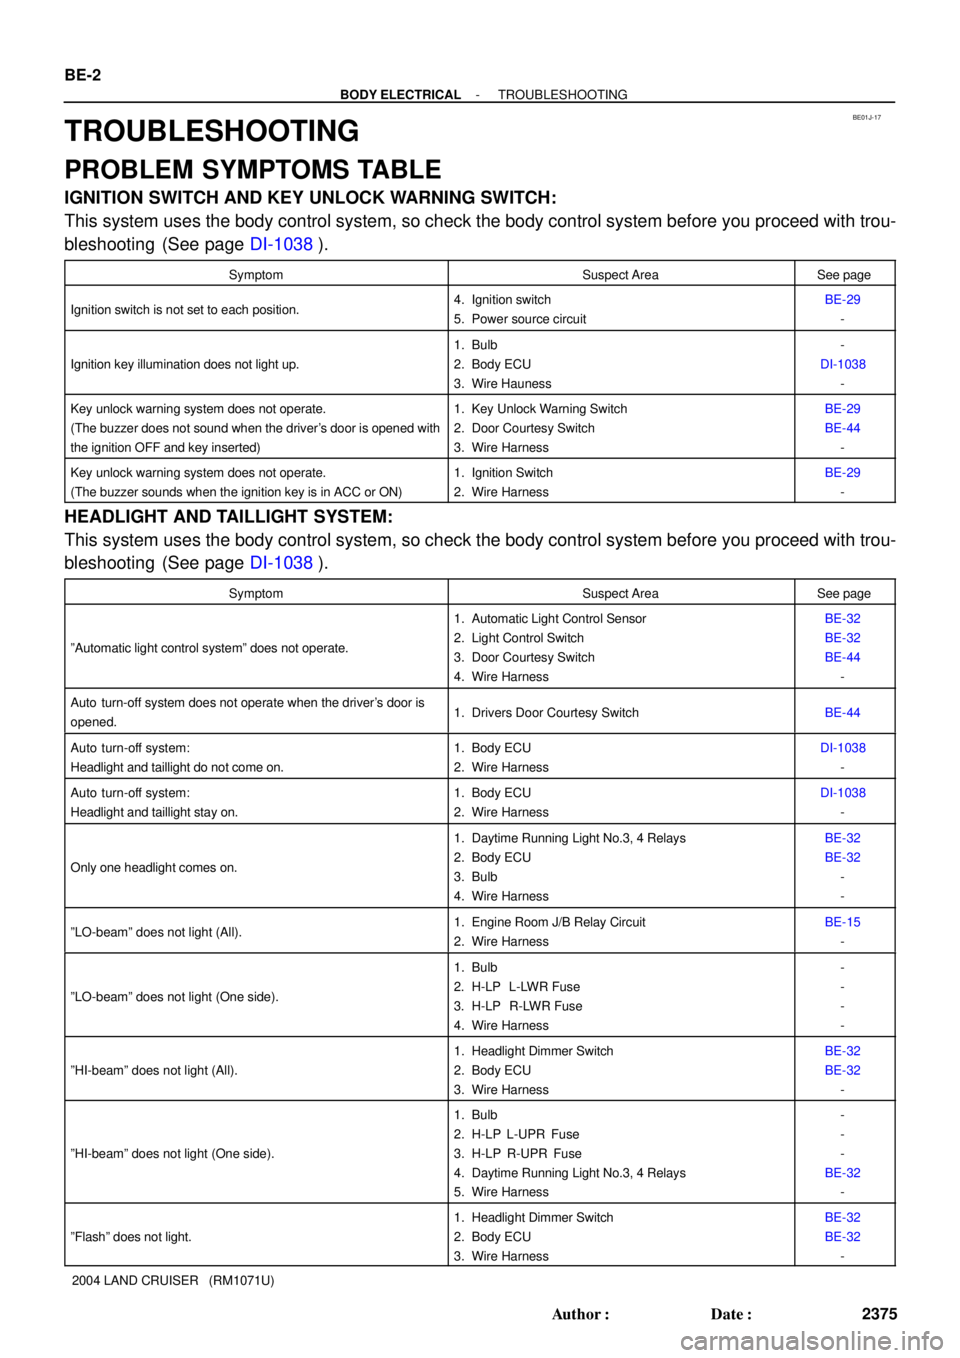
IGNITION SWITCH AND KEY UNLOCK WARNING SWITCH:
This system uses the body control system, so check the body control system before you proceed with trou-
bleshooting (See page DI-1038).
SymptomSuspect AreaSee page
Ignition switch is not set to each position.4. Ignition switch
5. Power source circuitBE-29
-
Ignition key illumination does not light up.
1. Bulb
2. Body ECU
3. Wire Hauness-
DI-1038
-
Key unlock warning system does not operate.
(The buzzer does not sound when the driver's door is opened with
the ignition OFF and key inserted)1. Key Unlock Warning Switch
2. Door Courtesy Switch
3. Wire HarnessBE-29
BE-44
-
Key unlock warning system does not operate.
(The buzzer sounds when the ignition key is in ACC or ON)1. Ignition Switch
2. Wire HarnessBE-29
-
HEADLIGHT AND TAILLIGHT SYSTEM:
This system uses the body control system, so check the body control system before you proceed with trou-
bleshooting (See page DI-1038).
SymptomSuspect AreaSee page
ºAutomatic light control systemº does not operate.
1. Automatic Light Control Sensor
2. Light Control Switch
3. Door Courtesy Switch
4. Wire HarnessBE-32
BE-32
BE-44
-
Auto turn-off system does not operate when the driver's door is
opened.1. Drivers Door Courtesy SwitchBE-44
Auto turn-off system:
Headlight and taillight do not come on.1. Body ECU
2. Wire HarnessDI-1038
-
Auto turn-off system:
Headlight and taillight stay on.1. Body ECU
2. Wire HarnessDI-1038
-
Only one headlight comes on.
1. Daytime Running Light No.3, 4 Relays
2. Body ECU
3. Bulb
4. Wire HarnessBE-32
BE-32
-
-
ºLO-beamº does not light (All).1. Engine Room J/B Relay Circuit
2. Wire HarnessBE-15
-
ºLO-beamº does not light (One side).
1. Bulb
2. H-LP L-LWR Fuse
3. H-LP R-LWR Fuse
4. Wire Harness-
-
-
-
ºHI-beamº does not light (All).
1. Headlight Dimmer Switch
2. Body ECU
3. Wire HarnessBE-32
BE-32
-
ºHI-beamº does not light (One side).
1. Bulb
2. H-LP L-UPR Fuse
3. H-LP R-UPR Fuse
4. Daytime Running Light No.3, 4 Relays
5. Wire Harness-
-
-
BE-32
-
ºFlashº does not light.
1. Headlight Dimmer Switch
2. Body ECU
3. Wire HarnessBE-32
BE-32
-
Page 339 of 3115

BE-6
- BODY ELECTRICALTROUBLESHOOTING
2379 Author�: Date�:
2004 LAND CRUISER (RM1071U) Rear washer motor does not operate.
1. Rear Washer Motor
2. Rear Washer Switch
3. Wire HarnessBE-52
BE-52
-
Washer fluid does not operate.1. Washer Hose and Nozzle-
*1: Inspect wiper arm and blade set positions.
COMBINATION METER (Meter Gauges and Illumination):
SymptomSuspect AreaSee page
Tachometer, fuel gauge and engine coolant temperature gauge do
not operate.1. GAUGE2 Fuse
2. Combination Meter
3. Wire Harness-
BE-58
-
Speedometer does not operate.
1. Speed Sensor
2. Combination Meter
3. Wire HarnessBE-63
BE-58
-
Tachometer does not operate.
1. Igniter
2. Combination Meter
3. Wire HarnessIG-1
BE-58
-
Fuel gauge does not operate or is in abnormal operation.
1. Fuel Receiver Gauge
2. Fuel Sender Gauge
3. Combination Meter
4. Wire HarnessBE-63
BE-63
BE-58
-
Oil pressure gauge does not operate.
1. Oil Pressure Receiver Gauge
2. Oil Pressure Sender Gauge
3. Combination Meter
4. Wire HarnessBE-63
BE-63
BE-58
-
Voltmeter does not operate.
1. Voltmeter
2. Combination Meter
3. Wire HarnessBE-63
BE-58
-
Engine coolant temperature gauge does not operate or is in ab-
normal operation
1. Engine Coolant Temperature Receiver Gauge
2. Engine Coolant Temperature Sender Gauge
3. Combination Meter
4. Wire HarnessBE-63
BE-63
BE-58
-
All illumination lights do not light up.1. Light Control Rheostat
2. Wire HarnessBE-63
-
Brightness does not change even when rheostat is turned.1. Bulb
2. Wire Harness-
-
Only one illumination light does not light up.1. Bulb
2. Wire Harness-
-
COMBINATION METER (Warning Light):
SymptomSuspect AreaSee page
Warning lights do not light up. (Except discharge, open door and
SRS)1. GAUGE1 Fuse
2. Combination Meter
3. Wire Harness-
BE-58
-
Fuel level warning light does not light up.
1. LED
2. Combination Meter
3. Fuel Sender Gauge
4. Wire Harness-
BE-58
BE-63
-
ABS warning light does not light up.
1. LED
2. ABS ECU
3. Wire Harness-
DI-502
-
Page 340 of 3115

- BODY ELECTRICALTROUBLESHOOTING
BE-7
2380 Author�: Date�:
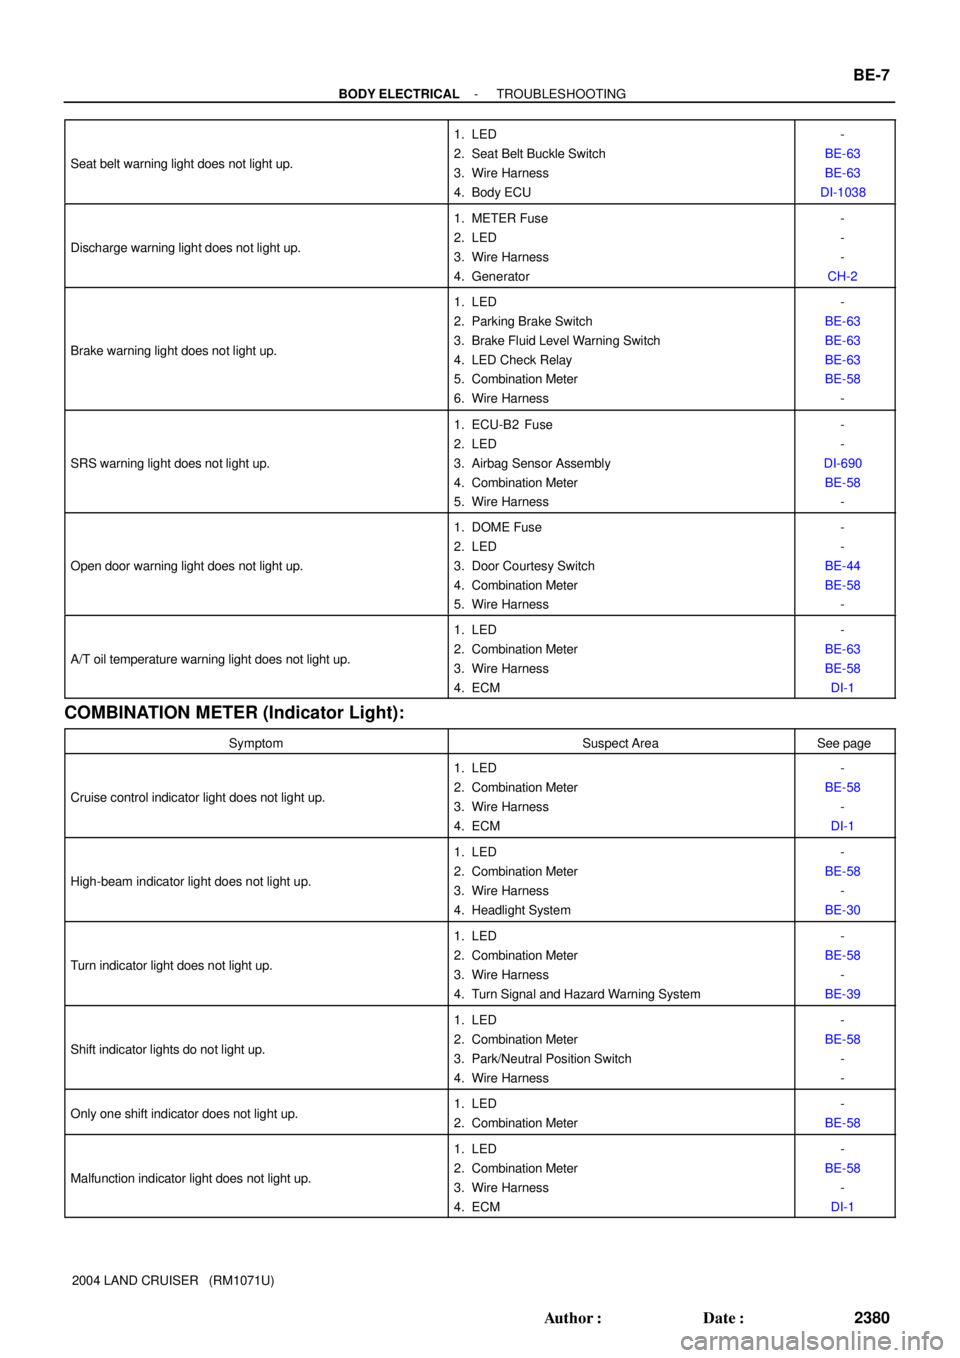
2004 LAND CRUISER (RM1071U) Seat belt warning light does not light up.
1. LED
2. Seat Belt Buckle Switch
3. Wire Harness
4. Body ECU-
BE-63
BE-63
DI-1038
Discharge warning light does not light up.
1. METER Fuse
2. LED
3. Wire Harness
4. Generator-
-
-
CH-2
Brake warning light does not light up.
1. LED
2. Parking Brake Switch
3. Brake Fluid Level Warning Switch
4. LED Check Relay
5. Combination Meter
6. Wire Harness-
BE-63
BE-63
BE-63
BE-58
-
SRS warning light does not light up.
1. ECU-B2 Fuse
2. LED
3. Airbag Sensor Assembly
4. Combination Meter
5. Wire Harness-
-
DI-690
BE-58
-
Open door warning light does not light up.
1. DOME Fuse
2. LED
3. Door Courtesy Switch
4. Combination Meter
5. Wire Harness-
-
BE-44
BE-58
-
A/T oil temperature warning light does not light up.
1. LED
2. Combination Meter
3. Wire Harness
4. ECM-
BE-63
BE-58
DI-1
COMBINATION METER (Indicator Light):
SymptomSuspect AreaSee page
Cruise control indicator light does not light up.
1. LED
2. Combination Meter
3. Wire Harness
4. ECM-
BE-58
-
DI-1
High-beam indicator light does not light up.
1. LED
2. Combination Meter
3. Wire Harness
4. Headlight System-
BE-58
-
BE-30
Turn indicator light does not light up.
1. LED
2. Combination Meter
3. Wire Harness
4. Turn Signal and Hazard Warning System-
BE-58
-
BE-39
Shift indicator lights do not light up.
1. LED
2. Combination Meter
3. Park/Neutral Position Switch
4. Wire Harness-
BE-58
-
-
Only one shift indicator does not light up.1. LED
2. Combination Meter-
BE-58
Malfunction indicator light does not light up.
1. LED
2. Combination Meter
3. Wire Harness
4. ECM-
BE-58
-
DI-1
Page 386 of 3115

BO1KT-04
H18928
Headrest
Headrest Support
Seatback Board
Lumber Support Seatback Frame
Seatback Pad Armrest
Seat Cushion Cover
Seat Cushion Pad
Seat Cushion Frame
Seat Cushion
Inner Shield
Front Seat Inner BeltReclining Adjuster Inside Shield
Lower Seat Cushion Shield
Seat Cushion
Outer Shield
Power Seat
Switch Knob Power Seat SwitchLumber Support Switch
Front Seat
Cushion ShieldSeat Position Control Relay Seatback Cover� Hog Ring
� Hog Ring
: Specified torqueN´m (kgf´cm, ft´lbf)
� Non-reusable part
Seat HeaterSeat Heater
Seat WireSeat Wire
Seat Adjuster Assembly
w/ Side Airbag:
Side Airbag Assembly
37 (380, 27)
21 (210, 15)
21 (210, 15)
43 (440, 32)
21 (210, 15)
42 (430, 31)
8.0 (82, 71 in.´lbf)
Seat Position Sensor Driver's Side:
42 (430, 31)
�
42 (430, 31)
42 (430, 31)
Armrest Cap
Armrest Bush
Spacer
4.7 (48, 42 in.´lbf)
w/ Side Airbag:
5.5 (56, 49 in.´lbf)
5.5 (56, 49 in.´lbf)
42 (430, 31)
43 (440, 32)
BO-104
- BODYFRONT SEAT
2678 Author�: Date�:
2004 LAND CRUISER (RM1071U)
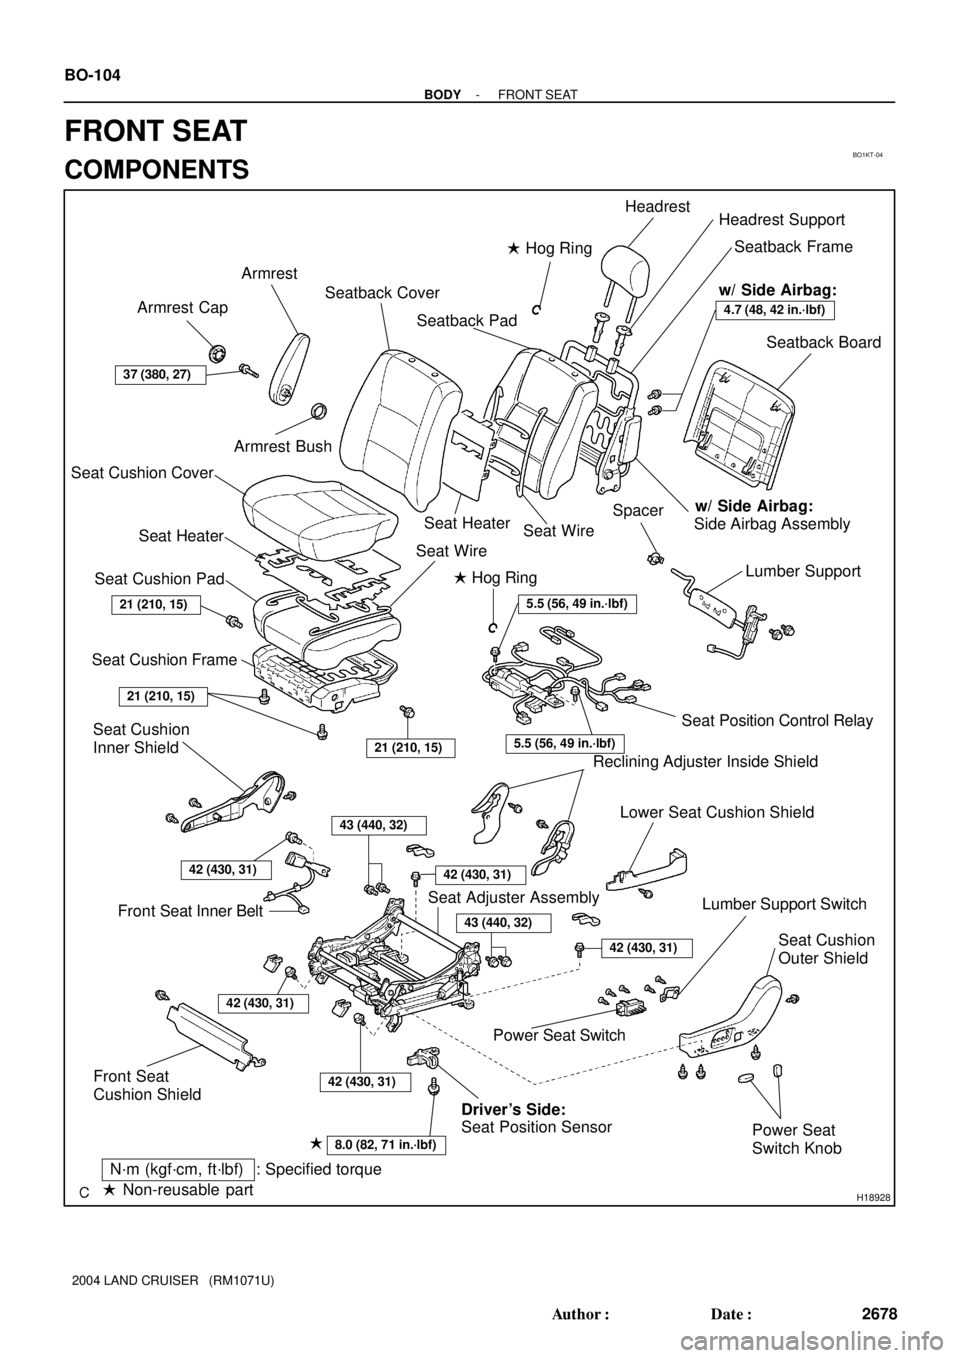
FRONT SEAT
COMPONENTS
Page 390 of 3115
H04468
H04785
H18929
- BODYFRONT SEAT
BO-109
2683 Author�: Date�:
2004 LAND CRUISER (RM1071U)
16. REMOVE LUMBER SUPPORT
Remove the 2 bolts, the lumber support and the spacer.
17. REMOVE SEATBACK COVER
Remove the hog rings and the seatback cover from the seat-
back pad.
18. IF NECESSARY, REPLACE SEATBACK HEATER
(See page BO-1 10)
19. REMOVE SEAT POSITION CONTROL RELAY
(a) Disconnect the connectors.
(b) Remove the 2 bolts and the seat position control relay.
20. Driver 's Side:
REMOVE SEAT POSITION SENSOR
Remove the bolt and the seat position sensor then disconnect
the connector.
Page 392 of 3115
BO4J3-01
H18929
H04785
H04468
H21292
BO-1 14
- BODYFRONT SEAT
2688 Author�: Date�:
2004 LAND CRUISER (RM1071U)
REASSEMBLY
1. Driver 's Side:
INSTALL SEAT POSITION SENSOR
Install the seat position sensor with a new bolt, then connect the
connector.
Part No.:
Bolt: 90119-06871
Torque: 8.0 N´m (82 kgf´cm, 71 in.´lbf)
2. INSTALL SEAT POSITION CONTROL RELAY
Install the seat position control relay with the 2 bolts, then con-
nect the connectors.
Torque: 5.5 N´m (56 kgf´cm, 49 in.´lbf)
3. INSTALL SEATBACK COVER
Install the seatback cover to the seatback pad with new hog
rings.
4. INSTALL LUMBER SUPPORT
Install the lumber support and the spacer with the 2 bolts.
5. w/o Side Airbag:
INSTALL SEATBACK FRAME
(a) Install the seatback cover to the seatback frame.
(b) Install new hog rings.
(c) Install the 2 headrest supports.
Page 465 of 3115

BO1KP-04
H18921
Dome Light
Lens
Roof Headlining
Rear Trim
Roof Headlining Double Visor
Map Lamp
Center Pillar Garnish
Rear Mat
Set Plate
Striker Plate
Upper Roof
Side Inner Garnish Assist Grip
Cowl Side Trim Front Door Scuff Plate
Center Pillar Lower
Garnish CoverRear Door
Scuff PlateQuarter Trim PanelQuarter Trim
Jack Cover
Front Pillar Garnish Front Door
Opening TrimRear Door
Opening Trim Sun Visor
Holder
Assist Grip
Plug
Overhead
Console Box
Striker Plate
Center Pillar
Lower Garnish
Front Assist Grip
Front Assist Grip
Center Assist Gripw/ Curtain Shield Airbag:
42 (430, 31)
Adjustable
AnchorRear A/C Register
Rear A/C Register
Rear A/C Control Panel Rear A/C Register
Striker Plate
Striker Plate
Center Assist Grip
Center Assist Grip
Assist Grip
Rear
Assist Grip
x5Striker Plate
Center Assist Grip w/ Curtain Shield Airbag:
Adjustable
Anchor
Center Pillar Garnish
Center
Pillar
Garnish
: Specified torqueN´m (kgf´cm, ft´lbf)Rear Mat42 (430, 31)
Cap
Cap
Holder
rear
Assist Grip
w/ Curtain Shield Airbag:
Assist Grip
Assist Grip
Assist Grip Plug
w/ Curtain Shield Airbag:
Assist
Grip
Assist Grip Plug
Assist Grip
42 (430, 31)
Lens
Room Temperature
Sensor
BO-96
- BODYROOF HEADLINING
2670 Author�: Date�:
2004 LAND CRUISER (RM1071U)
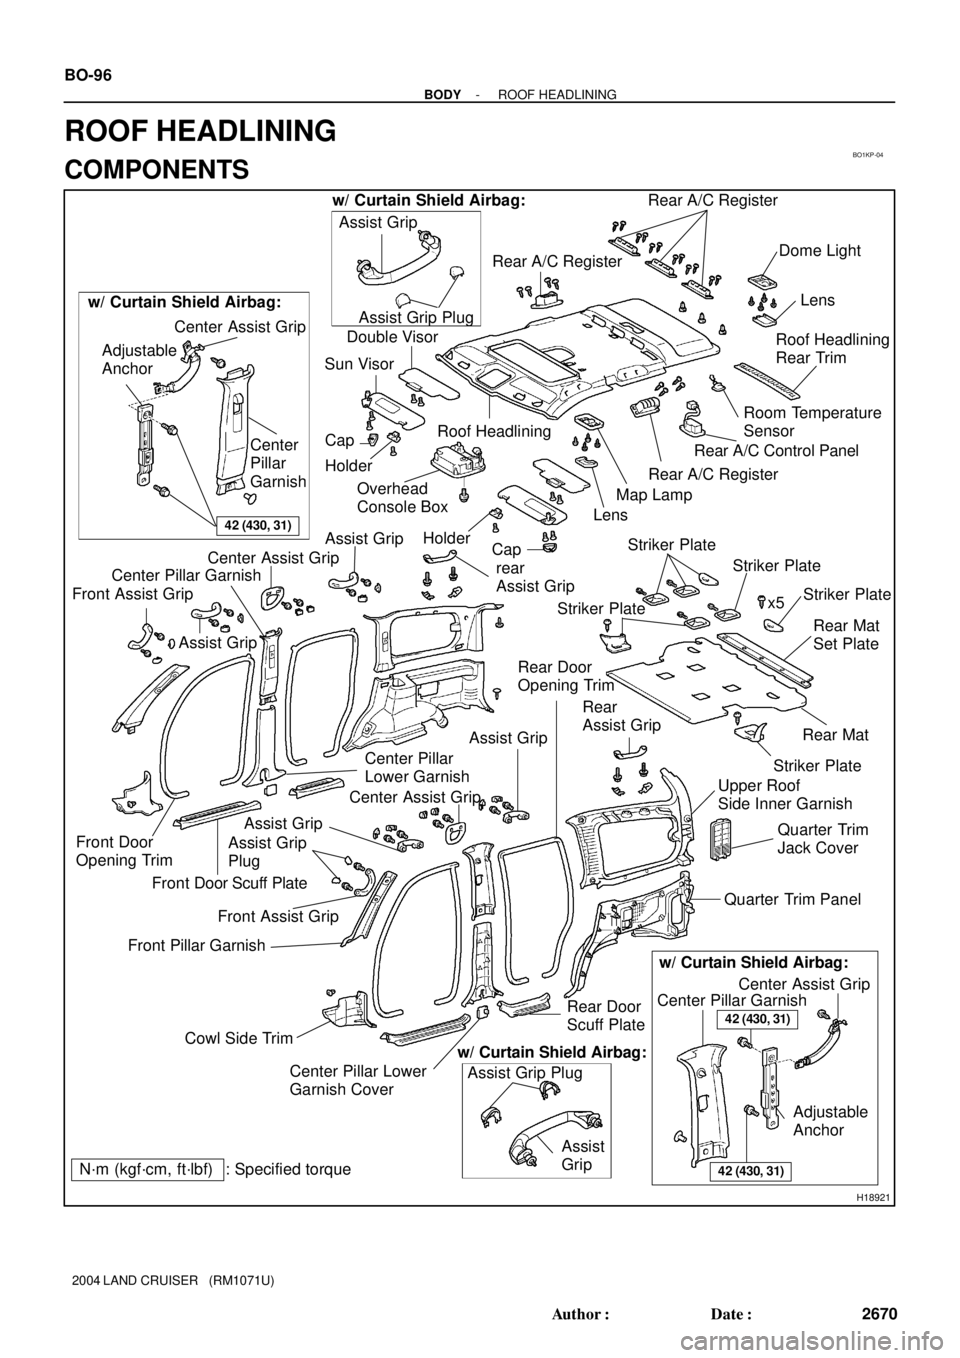
ROOF HEADLINING
COMPONENTS
Page 470 of 3115

H05268
H05270
H21423
4 Clips
H18926
BO-100
- BODYROOF HEADLINING
2674 Author�: Date�:
2004 LAND CRUISER (RM1071U)
25. REMOVE DOME LIGHT
(a) Using a screwdriver, remove the lens as shown in the il-
lustration.
HINT:
Tape up the screwdriver tip before use.
(b) Remove the 4 screws and the dome light, then disconnect
the connector.
26. REMOVE MAP LAMP
(a) Using a screwdriver, remove the lens as shown in the il-
lustration.
HINT:
Tape up the screwdriver tip before use.
(b) Remove the 4 screws and the map lamp, then disconnect
the connector.
27. REMOVE OVERHEAD CONSOLE BOX
(a) Remove the bolt.
(b) Using a screwdriver, remove the overhead console box,
then disconnect the connector.
HINT:
Tape up the screwdriver tip before use.
28. REMOVE REAR A/C CONTROL PANEL
Using a screwdriver, release the 4 claws and pull out the rear
A/C control panel, then disconnect the connector.
HINT:
Tape up the screwdriver tip before use.
29. REMOVE ROOM TEMPERATURE SENSOR
Using a scrwedriver, pull out the room temperature sensor, then
disconnect the connector.
HINT:
Tape up the screwdriver tip before use.
30. REMOVE ASSIST GRIPS
31. w/o Curtain Shield Airbag:
REMOVE CENTER ASSIST GRIPS
32. REMOVE ROOF HEADLINING
Using a clip remover, remove the 3 clips and the roof headlining.
33. REMOVE REAR A/C REGISTER
34. w/ Curtain Shield Airbag:
REMOVE ADJUSTABLE ANCHOR
Remove the 2 bolts and the adjustable anchor.
Torque: 42 N´m (430 kgf´cm, 31 ft´lbf)
35. w/ Curtain Shield Airbag:
REMOVE CENTER ASSIST GRIPS