Page 2449 of 3115
LU08O-02
B04490Engine Under Cover No.3
B04609
B04481
Service Hole Cover
LU-2
- LUBRICATIONOIL AND FILTER
1783 Author�: Date�:
2004 LAND CRUISER (RM1071U)
REPLACEMENT
CAUTION:
�Prolonged and repeated contact with mineral oil will
result in the removal of natural fats from the skin,
leading to dryness, irritation and dermatitis. In addi-
tion, used engine oil contains potentially harmful
contaminants which may cause skin cancer.
�Care should be taken, therefore, when changing en-
gine oil to minimize the frequency and length of time
your skin is exposed to used engine oil. Protective
clothing and gloves that cannot be penetrated by oil
should be worn. The skin should be thoroughly
washed with soap and water, or use water-less hand
cleaner, to remove any used engine oil. Do not use
gasoline, thinners, or solvents.
�In order to preserve the environment, used oil and
used oil filters must be disposed of only at desig-
nated disposal sites.
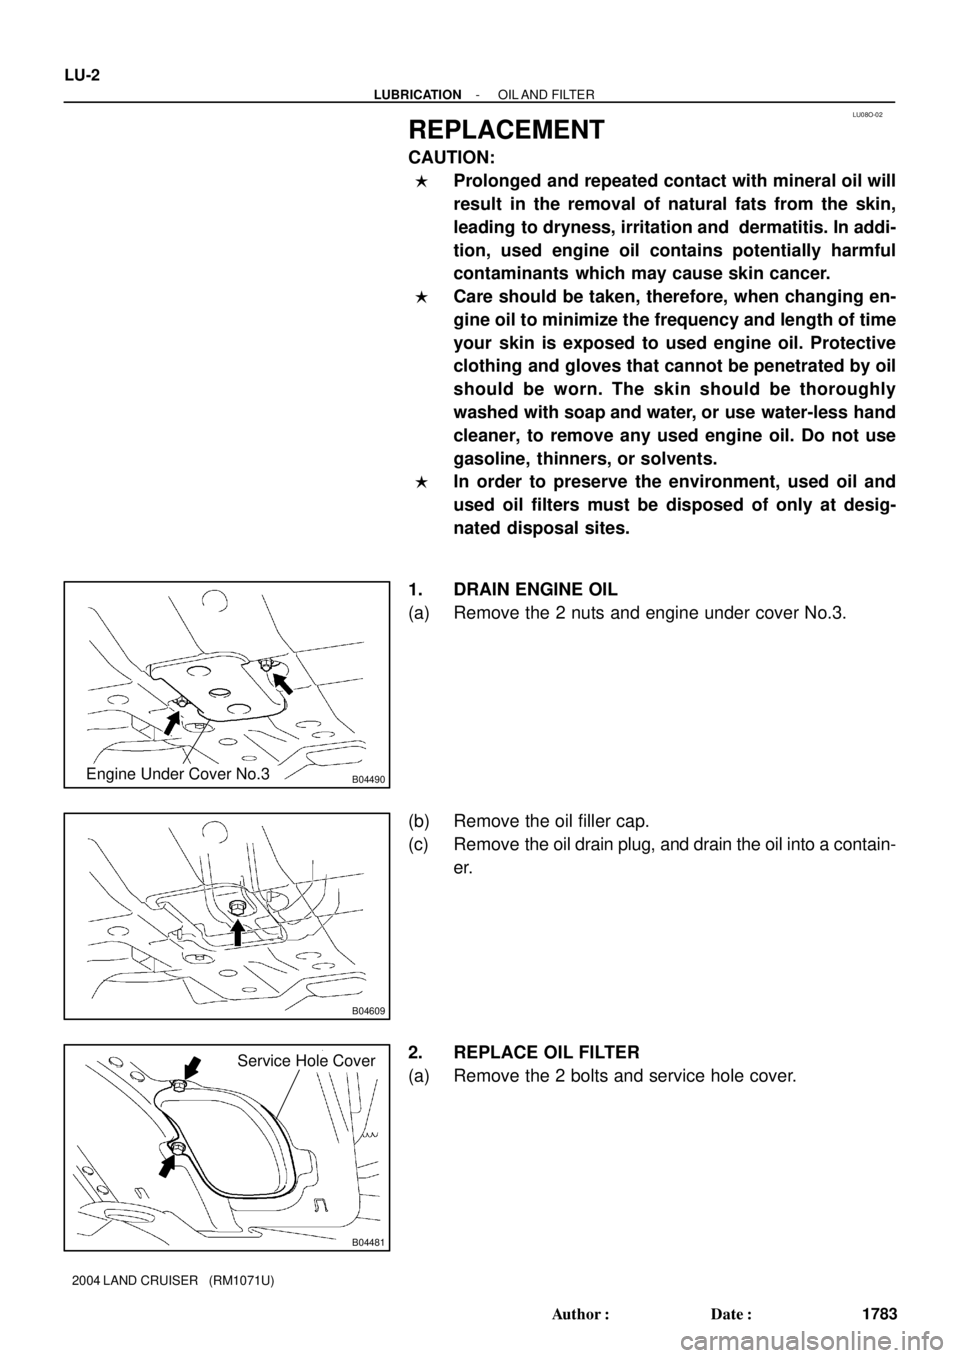
1. DRAIN ENGINE OIL
(a) Remove the 2 nuts and engine under cover No.3.
(b) Remove the oil filler cap.
(c) Remove the oil drain plug, and drain the oil into a contain-
er.
2. REPLACE OIL FILTER
(a) Remove the 2 bolts and service hole cover.
Page 2450 of 3115
B04482
SST
B04483
B04484
SST
3/4 Turn
- LUBRICATIONOIL AND FILTER
LU-3
1784 Author�: Date�:
2004 LAND CRUISER (RM1071U)
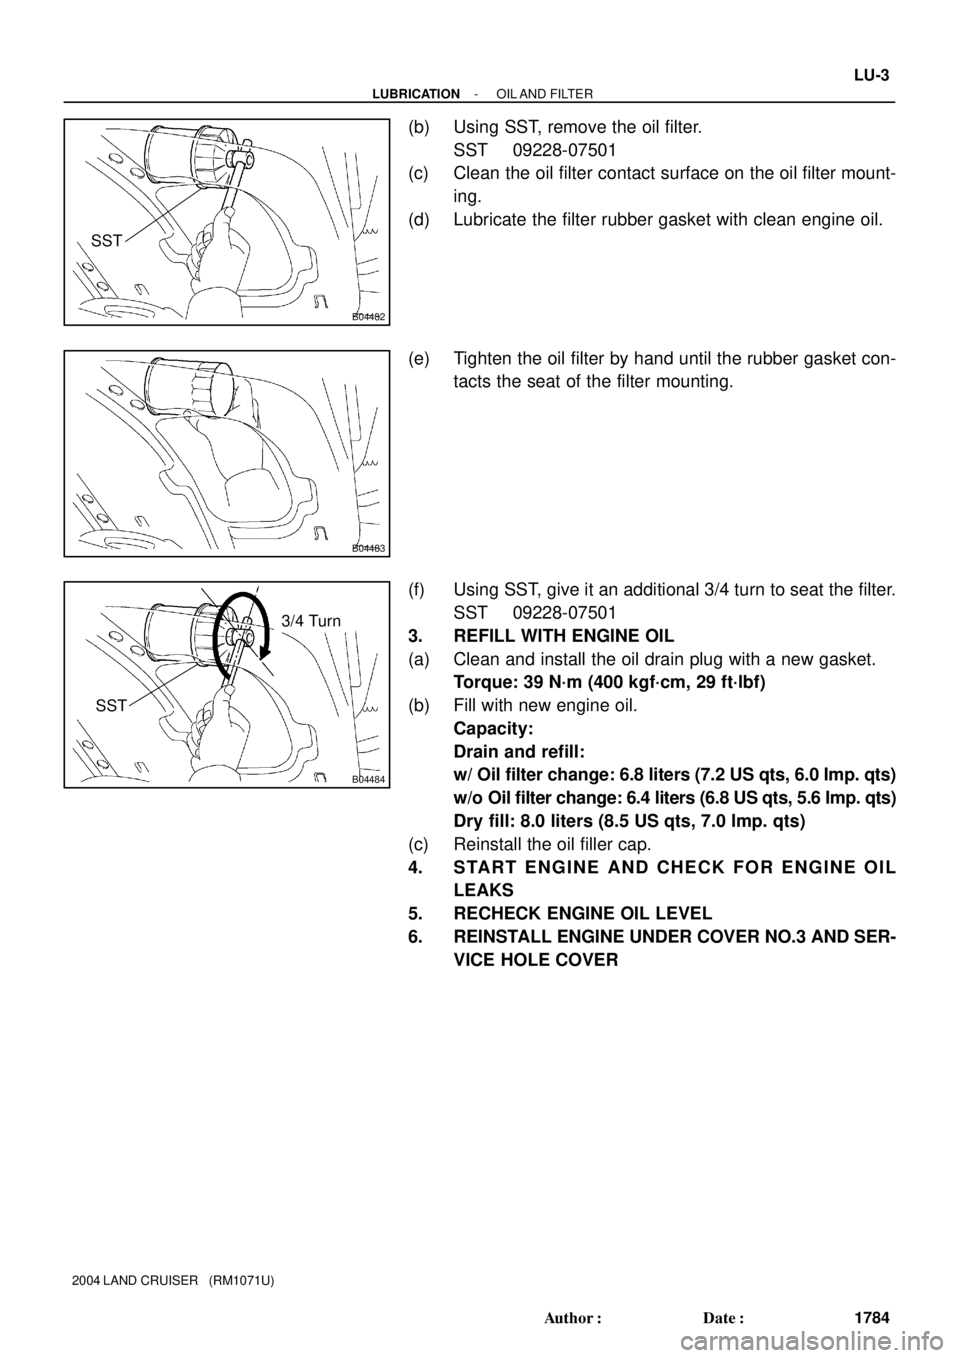
(b) Using SST, remove the oil filter.
SST 09228-07501
(c) Clean the oil filter contact surface on the oil filter mount-
ing.
(d) Lubricate the filter rubber gasket with clean engine oil.
(e) Tighten the oil filter by hand until the rubber gasket con-
tacts the seat of the filter mounting.
(f) Using SST, give it an additional 3/4 turn to seat the filter.
SST 09228-07501
3. REFILL WITH ENGINE OIL
(a) Clean and install the oil drain plug with a new gasket.
Torque: 39 N´m (400 kgf´cm, 29 ft´lbf)
(b) Fill with new engine oil.
Capacity:
Drain and refill:
w/ Oil filter change: 6.8 liters (7.2 US qts, 6.0 Imp. qts)
w/o Oil filter change: 6.4 liters (6.8 US qts, 5.6 Imp. qts)
Dry fill: 8.0 liters (8.5 US qts, 7.0 Imp. qts)
(c) Reinstall the oil filler cap.
4. START ENGINE AND CHECK FOR ENGINE OIL
LEAKS
5. RECHECK ENGINE OIL LEVEL
6. REINSTALL ENGINE UNDER COVER NO.3 AND SER-
VICE HOLE COVER
Page 2451 of 3115
LU08W-08
B04473
Oil Cooler Hose
� O-Ring
Oil Cooler
Plate Washer
Union Bolt
Oil Filter
N´m (kgf´cm, ft´lbf): Specified torque
� Non-reusable part
68.6 (700, 51)
- LUBRICATIONOIL COOLER
LU-19
1800 Author�: Date�:
2004 LAND CRUISER (RM1071U)
OIL COOLER
COMPONENTS
Page 2453 of 3115
LU08Z-08
B04611
New O-Ring
B04612
LU-22
- LUBRICATIONOIL COOLER
1803 Author�: Date�:
2004 LAND CRUISER (RM1071U)
INSTALLATION
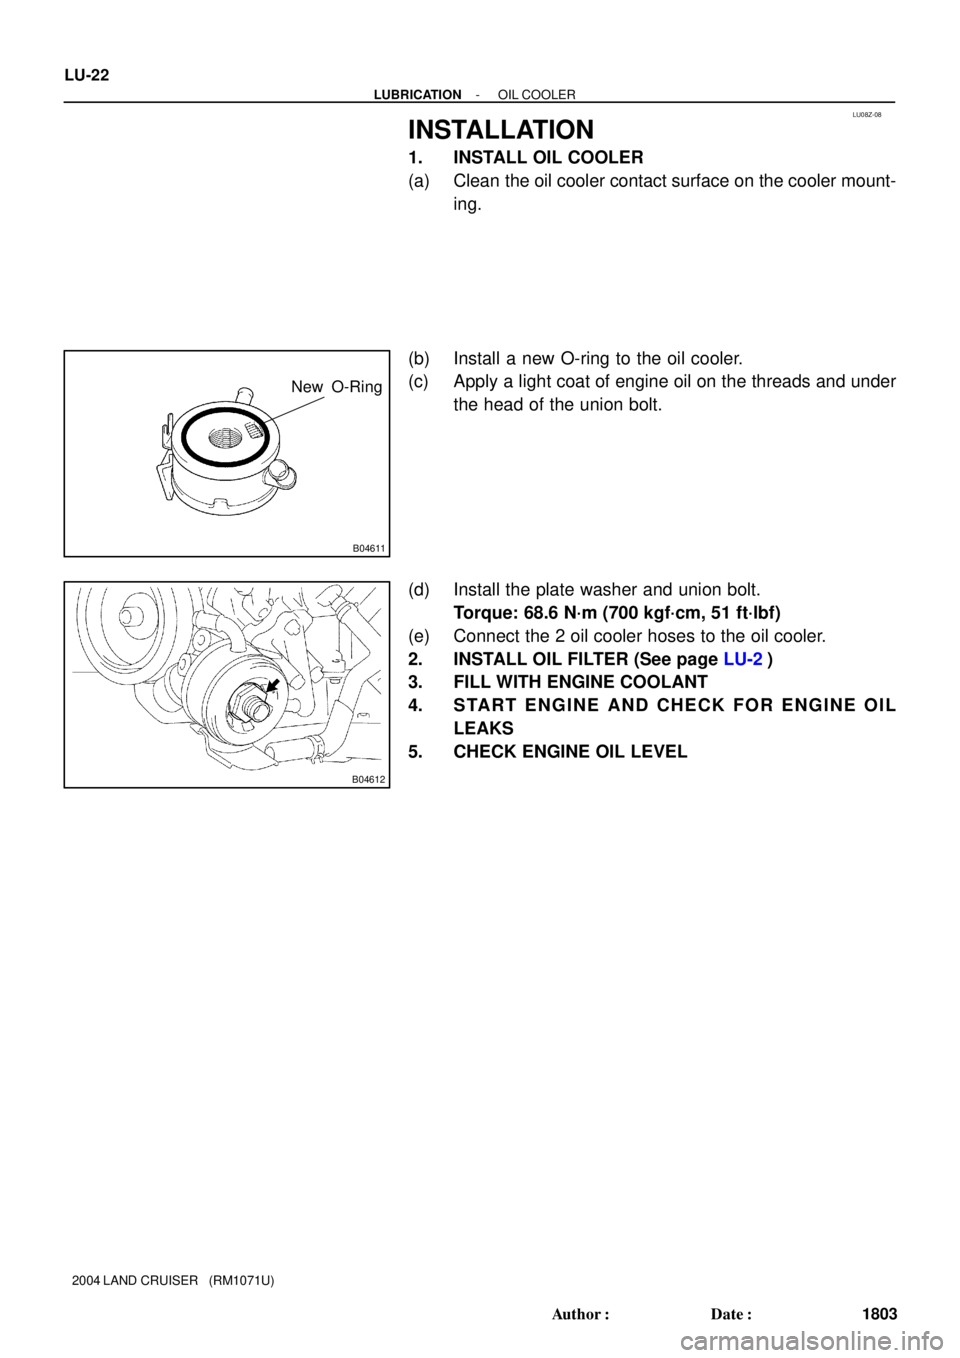
1. INSTALL OIL COOLER
(a) Clean the oil cooler contact surface on the cooler mount-
ing.
(b) Install a new O-ring to the oil cooler.
(c) Apply a light coat of engine oil on the threads and under
the head of the union bolt.
(d) Install the plate washer and union bolt.
Torque: 68.6 N´m (700 kgf´cm, 51 ft´lbf)
(e) Connect the 2 oil cooler hoses to the oil cooler.
2. INSTALL OIL FILTER (See page LU-2)
3. FILL WITH ENGINE COOLANT
4. START ENGINE AND CHECK FOR ENGINE OIL
LEAKS
5. CHECK ENGINE OIL LEVEL
Page 2454 of 3115
LU08X-06
B04612
LU-20
- LUBRICATIONOIL COOLER
1801 Author�: Date�:
2004 LAND CRUISER (RM1071U)
REMOVAL
1. DRAIN ENGINE COOLANT
2. REMOVE OIL FILTER (See page LU-2)
3. REMOVE OIL COOLER
(a) Disconnect the 2 oil cooler hoses from the oil cooler.
(b) Remove the union bolt, plate washer and the oil cooler.
(c) Remove the O-ring from the oil cooler.
Page 2457 of 3115
B04485
Oil Pump
Crankshaft Position
Sensor Connector Crankshaft
Position Sensor
Oil Filter, Oil Cooler and
Filter Bracket AssemblyOil Cooler HoseClamp
Oil StrainerOil Dipstick
Guide and
Dipstick � O-Ring
� Gasket
No.1 Oil Pan
No.2 Oil Pan Oil Pan Baffle PlateClamp
� Gasket
Drain Plugx 20
N´m (kgf´cm, ft´lbf) : Specified torque
� Non-reusable part� Gasket
30.5 (310, 22)
15.5 (160, 11)
� O-Ring
15.5 (160, 11)
x 4
x 8
28 (290, 21)
7.5 (80, 66 in.´lbf)
7.5 (80, 66 in.´lbf)
7.5 (80, 66 in.´lbf)
7.5 (80, 66 in.´lbf)
39 (400, 29)
7.5 (80, 66 in.´lbf)
18 (185,13)
15 (153,11)
LU-6
- LUBRICATIONOIL PUMP
1787 Author�: Date�:
2004 LAND CRUISER (RM1071U)
Page 2464 of 3115
B04486
Push New O-Ring
LU-18
- LUBRICATIONOIL PUMP
1799 Author�: Date�:
2004 LAND CRUISER (RM1071U)
�Parts must be assembled within 5 minutes of ap-
plication. Otherwise the material must be removed
and reapplied.
�Immediately remove nozzle from the tube and rein-
stall cap.
(c) Install the No.2 oil pan with the 20 bolts and 2 nuts. Uni-
formly tighten the bolts and nuts in several passes.
Torque: 7.5 N´m (80 kgf´cm, 66 in.´lbf)
HINT:
Use bolts 14 mm (0.55 in.) in length.
6. INSTALL CRANKSHAFT POSITION SENSOR
(See page IG-13)
7. INSTALL OIL FILTER, OIL COOLER AND FILTER
BRACKET ASSEMBLY
(a) Install the a new gasket to the oil filter bracket.
(b) Install the oil filter, oil cooler and filter bracket assembly
with the 2 bolts and nut.
Torque: 18 N´m (185 kgf´cm, 13 ft´lbf)
(c) Connect the oil pressure switch connector.
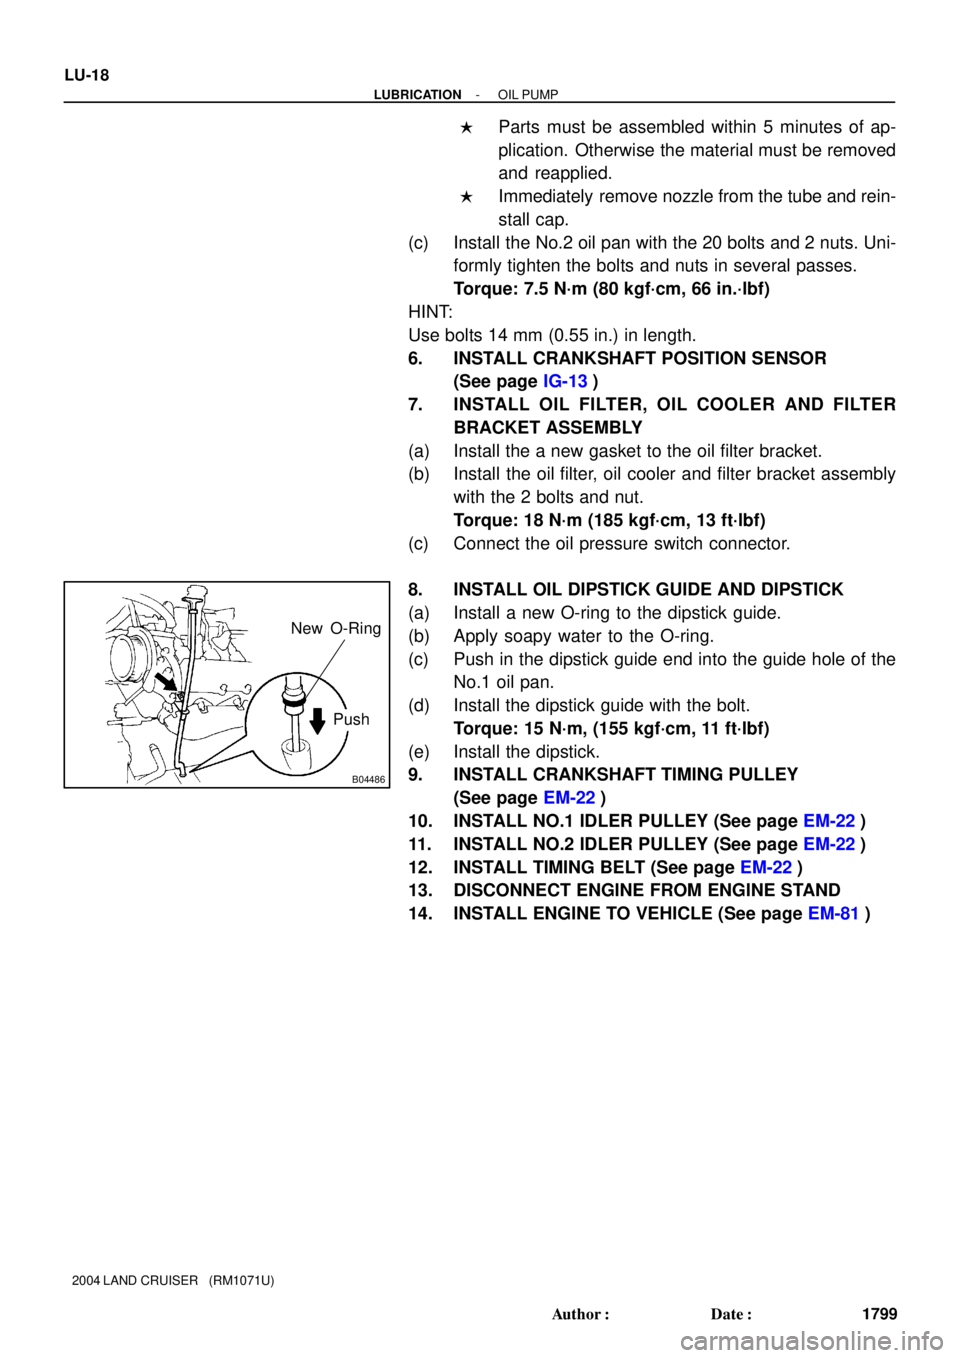
8. INSTALL OIL DIPSTICK GUIDE AND DIPSTICK
(a) Install a new O-ring to the dipstick guide.
(b) Apply soapy water to the O-ring.
(c) Push in the dipstick guide end into the guide hole of the
No.1 oil pan.
(d) Install the dipstick guide with the bolt.
Torque: 15 N´m, (155 kgf´cm, 11 ft´lbf)
(e) Install the dipstick.
9. INSTALL CRANKSHAFT TIMING PULLEY
(See page EM-22)
10. INSTALL NO.1 IDLER PULLEY (See page EM-22)
11. INSTALL NO.2 IDLER PULLEY (See page EM-22)
12. INSTALL TIMING BELT (See page EM-22)
13. DISCONNECT ENGINE FROM ENGINE STAND
14. INSTALL ENGINE TO VEHICLE (See page EM-81)
Page 2466 of 3115
LU08Q-08
B04486
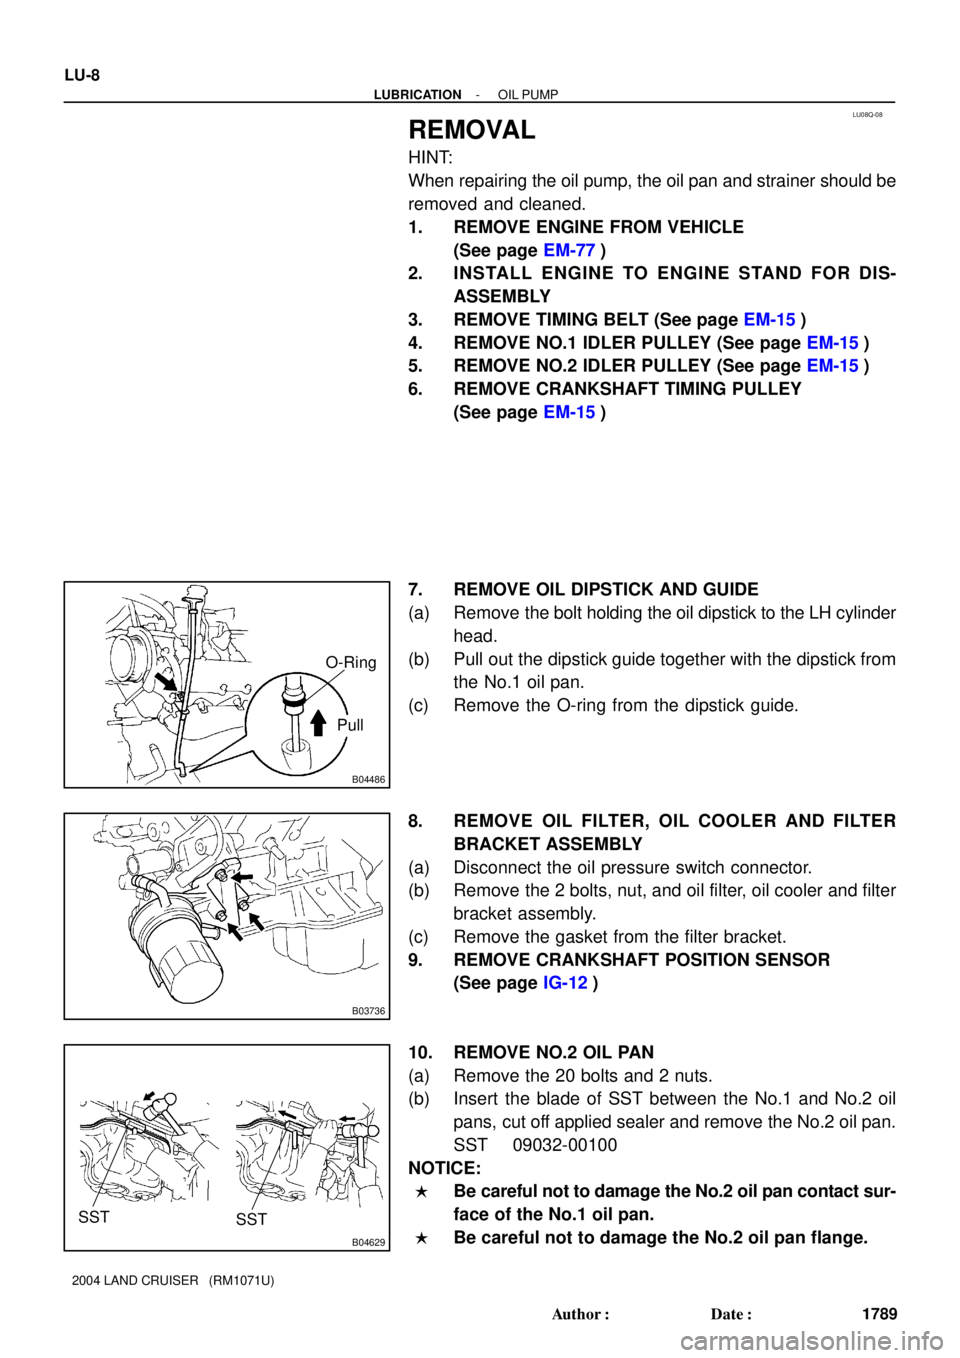
Pull O-Ring
B03736
B04629
SST SST
LU-8
- LUBRICATIONOIL PUMP
1789 Author�: Date�:
2004 LAND CRUISER (RM1071U)
REMOVAL
HINT:
When repairing the oil pump, the oil pan and strainer should be
removed and cleaned.
1. REMOVE ENGINE FROM VEHICLE
(See page EM-77)
2. INSTALL ENGINE TO ENGINE STAND FOR DIS-
ASSEMBLY
3. REMOVE TIMING BELT (See page EM-15)
4. REMOVE NO.1 IDLER PULLEY (See page EM-15)
5. REMOVE NO.2 IDLER PULLEY (See page EM-15)
6. REMOVE CRANKSHAFT TIMING PULLEY
(See page EM-15)
7. REMOVE OIL DIPSTICK AND GUIDE
(a) Remove the bolt holding the oil dipstick to the LH cylinder
head.
(b) Pull out the dipstick guide together with the dipstick from
the No.1 oil pan.
(c) Remove the O-ring from the dipstick guide.
8. REMOVE OIL FILTER, OIL COOLER AND FILTER
BRACKET ASSEMBLY
(a) Disconnect the oil pressure switch connector.
(b) Remove the 2 bolts, nut, and oil filter, oil cooler and filter
bracket assembly.
(c) Remove the gasket from the filter bracket.
9. REMOVE CRANKSHAFT POSITION SENSOR
(See page IG-12)
10. REMOVE NO.2 OIL PAN
(a) Remove the 20 bolts and 2 nuts.
(b) Insert the blade of SST between the No.1 and No.2 oil
pans, cut off applied sealer and remove the No.2 oil pan.
SST 09032-00100
NOTICE:
�Be careful not to damage the No.2 oil pan contact sur-
face of the No.1 oil pan.
�Be careful not to damage the No.2 oil pan flange.