1998 PONTIAC BONNEVILLE radio
[x] Cancel search: radioPage 169 of 395
NOTICE:
Before you add any sound equipment to your
vehicle
-- like a tape player, CB radio, mobile
telephone or two-way radio
-- be sure you can
add what you want.
If you can, it’s very
important to do it properly. Added sound
equipment may interfere with the operation of
your vehicle’s engine, Delco Electronics radio or
other systems, and even damage them. Your
vehicle’s systems may interfere with the
operation of sound equipment that has been
added improperly.
So, before adding sound equipment, check with
your dealer and be sure to check Federal rules
covering mobile radio and telephone units.
Care of Your Cassette Tape Player
A tape player that is not cleaned regularly can cause
reduced sound quality, ruined cassettes or a damaged
mechanism. Cassette tapes should be stored in their
cases away from contaminants, direct sunlight and
extreme heat.
If they aren’t, they may not operate
properly or may cause failure
of the tape player.
Your tape player should be cleaned regularly after every
50 hours of use. Your radio may display CLN to indicate
that
you have used your tape player for 50 hours without
resetting the tape clean timer.
If this message appears on
the display, your cassette tape player needs to be
cleaned. It will still play tapes, but you should clean it as
soon as possible to prevent damage to your tapes and
player. If
you notice a reduction in sound quality, try a
known good cassette to see
if it is the tape or the tape
player at fault. If this other cassette has no improvement
in sound quality, clean the tape player.
The recommended cleaning method for your cassette
tape player is the
use of a scrubbing action,
non-abrasive cleaning
cassette with pads which scrub
the tape head as
the hubs of the cleaner cassette turn.
The recommended cleaning cassette is available through
your dealership (GM Part No. 12344789).
3-28
Page 170 of 395
When using a scrubbing action, non-abrasive cleaning cassette, it is normal for the cassette to eject because
your unit is equipped with a cut tape detection feature
and a cleaning cassette may appear as a broken tape.
To
prevent the cleaning cassette from being ejected, use the
following steps.
1.
2.
3.
4.
5.
Turn the ignition to RUN or ACCESSORY.
Turn the radio
off.
Press and hold the TAPEPLAY button for three
seconds. The tape symbol on the display will flash
for two seconds.
Insert the scrubbing action cleaning cassette while
the tape symbol is flashing.
Eject the cleaning cassette after the manufacturer’s
recommended cleaning time.
When the cleaning cassette has been ejected, the cut tape
detection feature is active again.
You may
also choose a non-scrubbing action, wet-type
cleaner which uses a cassette with a fabric belt to clean
the tape head.
This type of cleaning cassette will not
eject on
its own. A non-scrubbing action cleaner may
not clean as thoroughly
as the scrubbing type cleaner.
The use of a non-scrubbing action, dry-type cleaning
cassette is not recommended. After you clean
the player, press and hold
EJECT for
five seconds to reset the CLN indicator. The radio will
display
--- to show the indicator was reset.
Cassettes are subject to wear and the sound quality may
degrade over time. Always make sure the cassette tape is
in good condition before you have your tape
player serviced.
Care of Your Compact Discs
Handle discs carefully. Store them in their original cases
or other protective cases and away from direct sunlight and dust.
If the surface of a disc is soiled, dampen a
clean, soft cloth in a mild, neutral detergent solution
and
clean it, wiping from the center to the edge.
Be sure never to touch
the signal surface when handling
discs. Pick up discs by grasping the outer edges or the
edge of the hole and the outer edge.
Care of Your Compact Disc Player
The use of CD lens cleaner discs is not advised, due to
the
risk of contaminating the lens of the CD optics with
lubricants internal to the CD mechanism.
3-29
Page 171 of 395
Fixed Mast Antenna
The fixed mast antenna can withstand most car washes
without being damaged. If the mast should ever become
slightly bent,
you can straighten it out by hand. If the
mast is badly bent, as it might be by vandals, you should
replace it.
Check every once in a while to be sure the mast
is still
tightened to the fender.
Power Antenna Mast Care
Your power antenna will look its best and work well
if it’s cleaned from time to time. To clean the
antenna mast:
1. Turn on the ignition and radio to raise the antenna.
2. Dampen a clean cloth with mineral spirits or
3. Wipe the cloth over the mast sections, removing
4. Wipe dry with a clean cloth.
5. Make the antenna go up and down by turning the
radio or ignition
off and on.
6. Repeat if necessary.
equivalent solvent.
any dirt.
NOTICE:
Don’t
lubricate the power antenna. Lubrication
could damage it.
NOTICE:
Before entering an automatic car wash, turn off
your radio to make the power antenna go down.
This will prevent the mast from possibly getting
damaged.
If the antenna does not go down when
you turn the radio
off, it may be damaged or
need to be cleaned. In either case, lower the
antenna by hand by carefully pressing the
antenna down.
If the mast portion of your antenna is damaged, you can
easily replace it. See your dealer for a replacement kit
and follow the instructions in the kit.
3-30
Page 217 of 395
2. Get the vehicles close enough so the jumper cables
can reach, but be sure the vehicles aren’t touching
each other.
If they are, it could cause a ground
connection you don’t want. You wouldn’t be able to
start your vehicle, and the bad grounding could
damage the electrical systems.
To avoid the possibility of the vehicles rolling, set
the parking brake
fiiy on both vehicles involved in
the jump
start procedure. Put an automatic transaxle
in PARK (P) before setting the parking brake.
3. Turn off the ignition on both vehicles. Unplug
unnecessary accessories plugged into the cigarette
I NOTICE:
If you leave your radio on, it could be badly
damaged. The repairs wouldn’t be covered by
your warranty.
4. Open the hoods and locate the batteries.
A CAUTION:
lighter. Tu& off all lam@ that aren’t needed as well
as radios. This will avoid sparks and help save both An electric fan can start up even when the engine
batteries. In addition, it could save your radio! is not running and can injure you. Keep hands,
clothing and tools away
from any underhood
electric fan.
5-4
Page 310 of 395
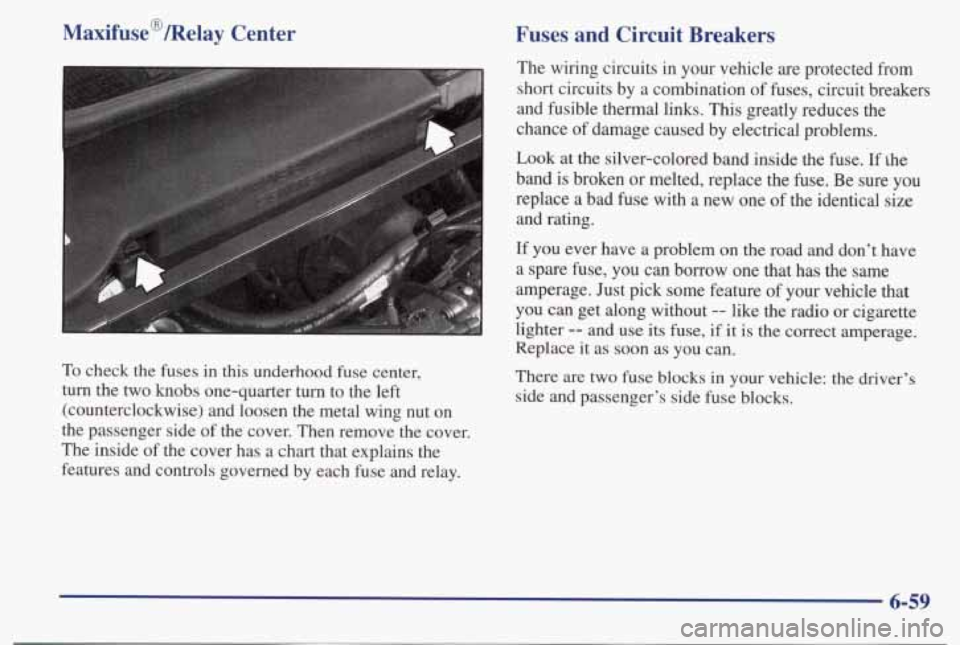
Maxifuse@/Relay Center
To check the fuses in this underhood fuse center,
turn the two
knobs one-quarter turn to the left
(counterclockwise) and loosen the metal wing
nut on
the passenger side of the cover. Then remove the cover.
The inside of the cover has
a chart that explains the
features and controls governed
by each fuse and relay.
Fuses and Circuit Breakers
The wiring circuits in your vehicle are protected from
short circuits by a combination of fuses, circuit breakers
and fusible thermal links. This greatly reduces the
chance
of damage caused by electrical problems.
Look at the silver-colored band inside the fuse. If
the
band is broken or melted, replace the fuse. Be sure you
replace a bad fuse with
a new one of the identical size
and rating.
If you ever have a problem on the road and don't have
a spare fuse,
you can borrow one that has the same
amperage. Just pick some feature
of your vehicle that
you
can get along without -- like the radio or cigarette
lighter
-- and use its fuse, if it is the correct amperage.
Replace
it as soon as you can.
There
are two fuse blocks in your vehicle: the driver's
side and passenger's side fuse blocks.
6-59
Page 312 of 395
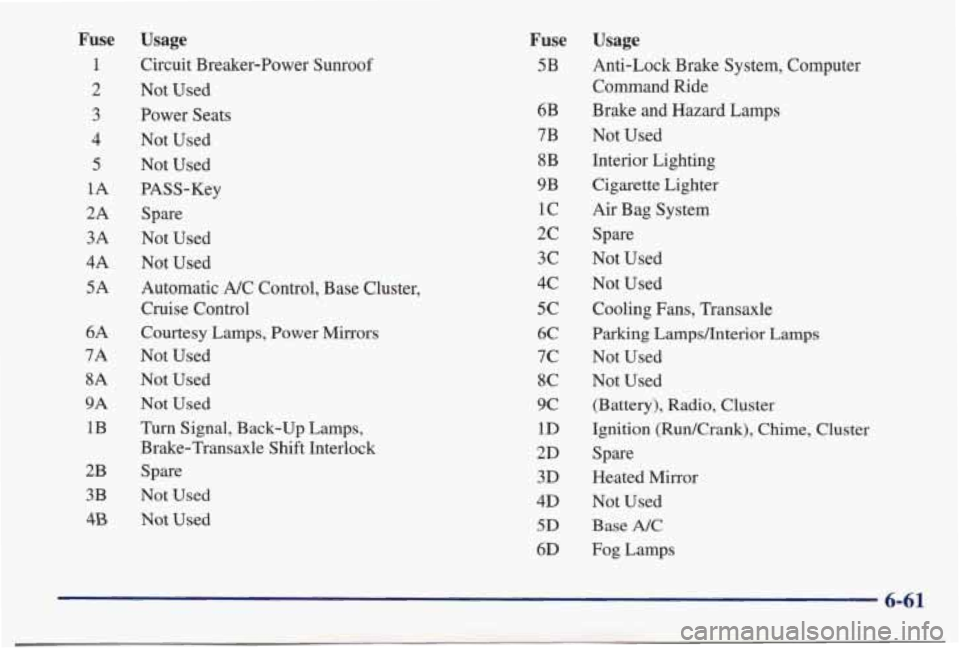
Fuse
1
2 3
4
5
1A
2A
3A
4A
5A
6A
7A
8A
9A
1B
2B
3B
4B
Usage
Circuit Breaker-Power Sunroof
Not Used
Power Seats
Not Used
Not Used
PASS-Key
Spare
Not Used
Not Used
Automatic A/C Control, Base Cluster,
Cruise Control
Courtesy Lamps, Power Mirrors
Not Used
Not Used
Not Used
Turn Signal, Back-up Lamps,
Brake-Transaxle Shift Interlock
Spare
Not Used
Not Used
Fuse Usage
5B Anti-Lock Brake System, Computer
6B
7B 8B
9B
1c
2c
3c
4c
5c 6C
7c
8C
9c
1D
2D
3D
4D
5D
6D
-
Command Ride
Brake and Hazard Lamps
Not Used
Interior Lighting
Cigarette Lighter
Air Bag System Spare
Not Used
Not Used
Cooling Fans, Transaxle
Parking Lampshterior Lamps
Not Used
Not Used
(Battery), Radio, Cluster
Ignition (RudCrank), Chime, Clu
Spare
Heated Mirror
Not Used
Base
NC
Fog Lamps
ste :r
Page 313 of 395
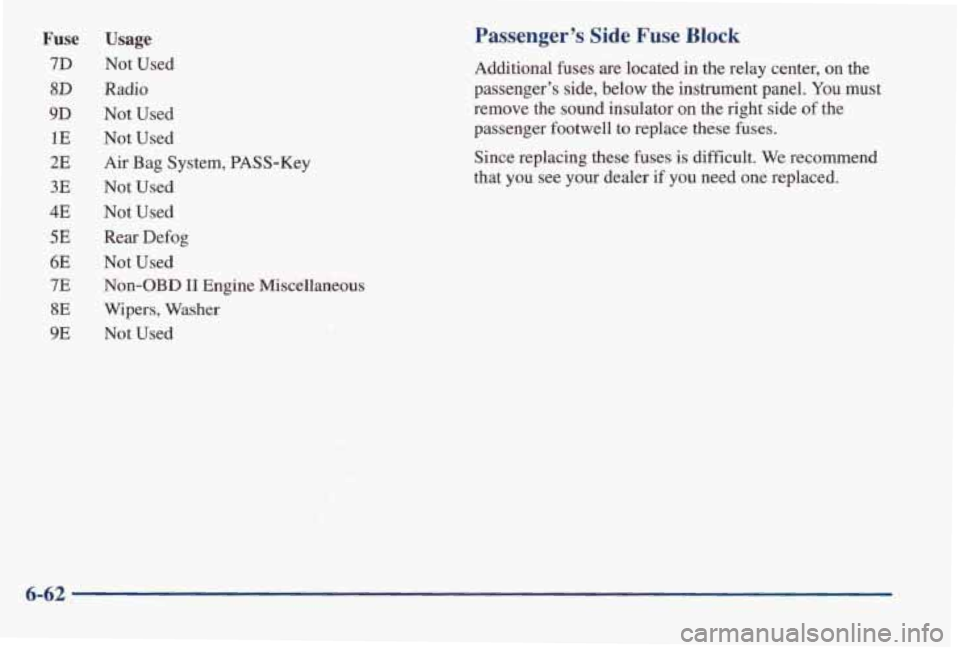
Fuse
7D
8D
9D
1E
2E
3E
4E
5E
6E
7E
8E
9E
Usage
Not Used
Radio
Not Used
Not Used
Air
Bag System, PASS-Key
Not Used
Not Used Rear Defog
Not Used Non-OBD
II Engine Miscellaneous
Wipers, Washer
Not Used
Passenger’s Side Fuse Block
Additional fuses are located in the relay center, on the
passenger’s side, below the instrument panel. You must
remove the sound insulator
on the right side of the
passenger footwell
to replace these fuses.
Since replacing these fuses is difficult. We recommend
that you see your dealer
if you need one replaced.
6-62
Page 381 of 395
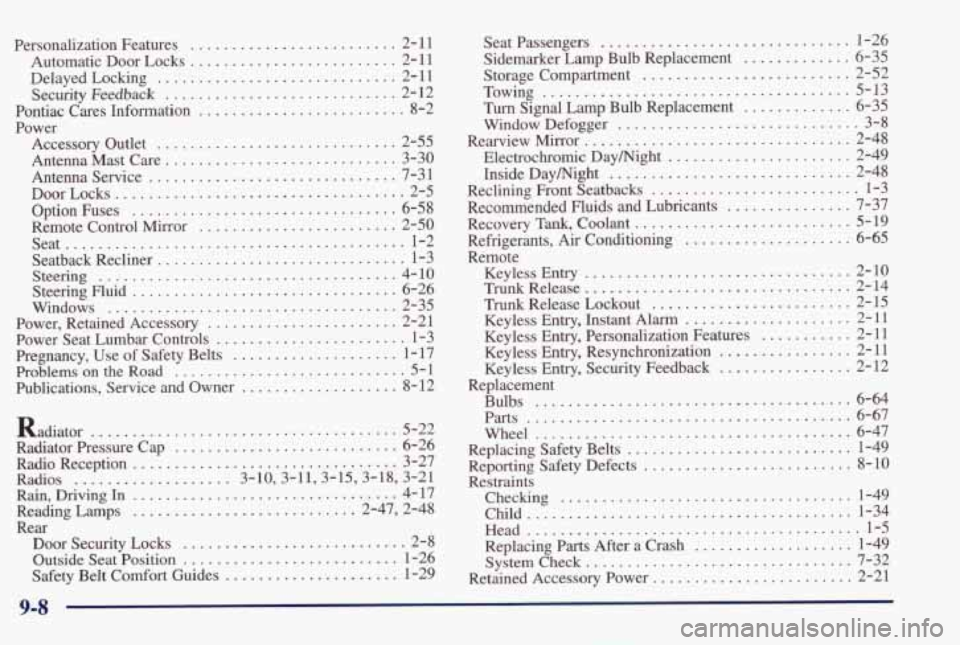
Personalization Features ......................... 2- 11
Automatic Door Locks
......................... 2- 11
Delayed Locking
............................. 2- 11
Security
Feedback ............................ 2- 12
Pontiac Cares Information
......................... 8-2
Power Accessorv Outlet
............................. 2-55 d
AntennaMastCare ............................ 3-30
AntennaService
.............................. 7-31
DoorLoc
ks ................................... 2-5
Remote Control Mirror
........................ 2-50
Seat
......................................... 1-2
Seatback Recliner
.............................. 1-3
Steering
.................................... 4-10
Steering Fluid ................................ 6-26
Windows
................................... 2-35
Power, Retained Accessory
....................... 2-21
Power Seat Lumbar Controls
....................... 1-3
Pregnancy, Use
of Safety Belts .................... 1-17
Problems
on the Road ............................ 5-1
Publications, Service and Owner
................... 8-12
Option Fuses
................................ 6-58
Radiator
................................... 5-22
Radiator Pressure Cap
........................... 6-26
RadioReception
................................ 3-27
Radios
................... 3.10.3.11.3.15.3.18. 3.21
Rain. Driving In ................................ 4-17
Reading Lamps
........................... 2.47. 2.48
Door Security Locks
........................... 2-8
Outside Seat
Position .......................... 1-26
Safety Belt Comfort Guides
..................... 1-29
Rear Seat Passengers
.............................. 1-26
Sidemarker Lamp Bulb Replacement
............. 6-35
Storage Compartment ......................... 2-52
'Ih Signal Lamp Bulb Replacement ............. 6-35
Window Defogger
............................. 3-8
Electrochromic Daymight
...................... 2-49
Inside Daymight
............................. 2-48
Reclining Front Seatbacks
......................... 1-3
Recommended Fluids and Lubricants
............... 7-37
Recovery
Tank, Coolant .......................... 5-19
Refrigerants, Air Conditioning .................... 6-65
Keyless
Entry ................................ 2-10
Trunk Release ................................ 2-14
Trunk Release Lockout ........................ 2-15
Keyless
Entry, Instant Alarm .................... 2-11
Keyless Entry, Personalization Features ........... 2-11
Keyless
Entry, Resynchronization ................ 2-11
Keyless
Entry, Security Feedback ................ 2-12
Towing
..................................... 5-13
RearviewMirror ................................ 2-48
Remote
Replacement Bulbs
...................................... 6-64
Parts ....................................... 6-67
Wheel 6-47
....................................
Replacing Safety Belts ............... ....... 1-49
Reporting Safety Defects
......................... 8-10
Restraints Checking
,..,............................... l-49
Child ....................................... l-34
Head ........................................ 1-5
Replacing
Parts After a Crash ................... 1-49
Retained Accessory Power
........................ 2-21
Systemcheck
................................ 7-32
9-8