1998 OPEL FRONTERA ad blue
[x] Cancel search: ad bluePage 2288 of 6000
TRANSMISSION CONTROL SYSTEM (4L30–E)7A1–43
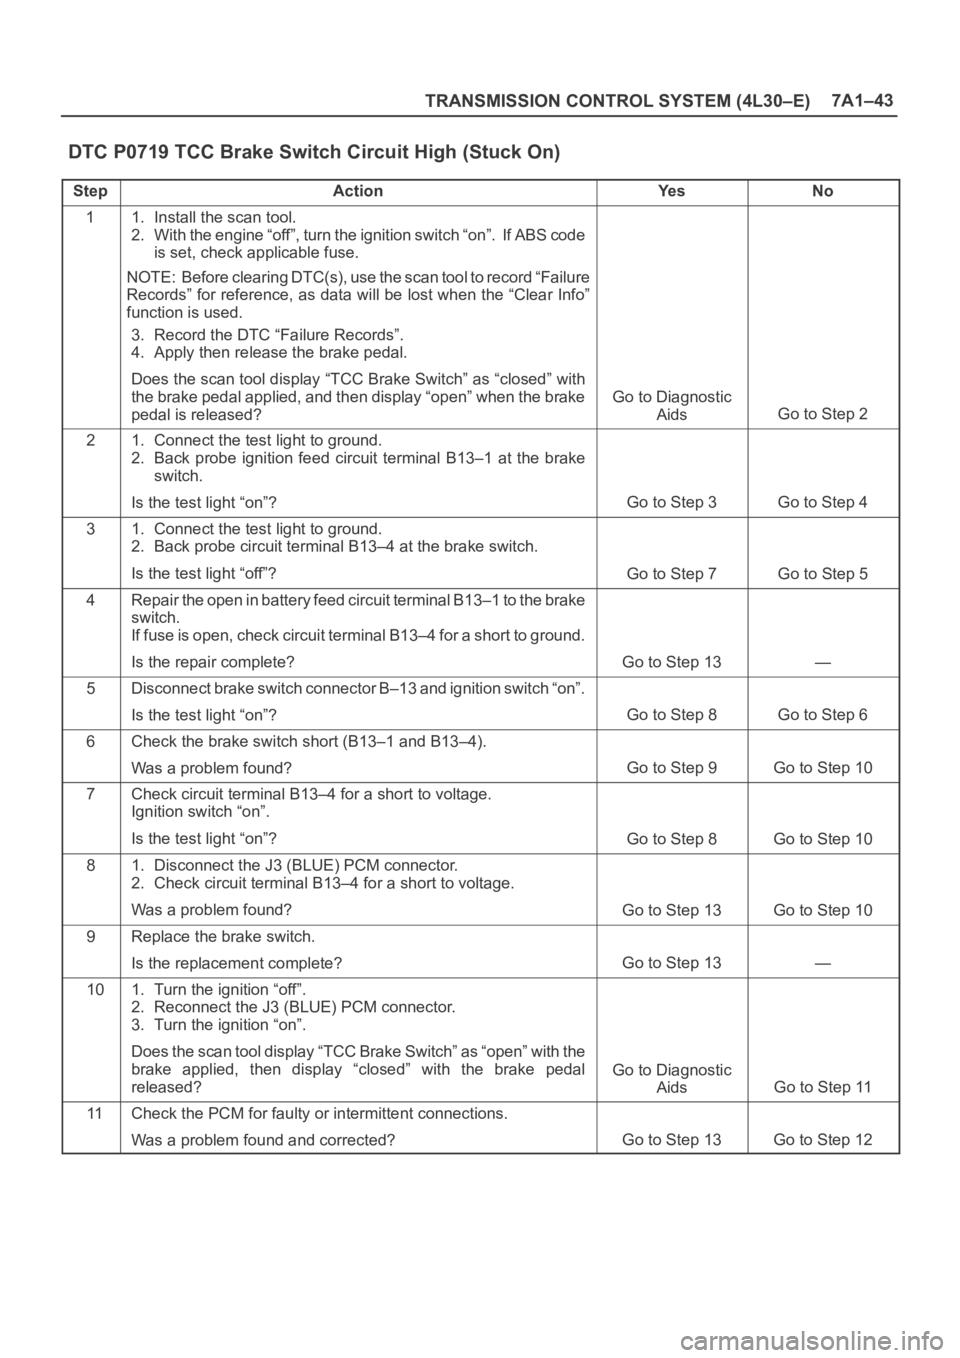
DTC P0719 TCC Brake Switch Circuit High (Stuck On)
StepActionYe sNo
11. Install the scan tool.
2. With the engine “off”, turn the ignition switch “on”. If ABS code
is set, check applicable fuse.
NOTE: Before clearing DTC(s), use the scan tool to record “Failure
Records” for reference, as data will be lost when the “Clear Info”
function is used.
3. Record the DTC “Failure Records”.
4. Apply then release the brake pedal.
Does the scan tool display “TCC Brake Switch” as “closed” with
the brake pedal applied, and then display “open” when the brake
pedal is released?
Go to Diagnostic
Aids
Go to Step 2
21. Connect the test light to ground.
2. Back probe ignition feed circuit terminal B13–1 at the brake
switch.
Is the test light “on”?
Go to Step 3Go to Step 4
31. Connect the test light to ground.
2. Back probe circuit terminal B13–4 at the brake switch.
Is the test light “off”?
Go to Step 7Go to Step 5
4Repair the open in battery feed circuit terminal B13–1 to the brake
switch.
If fuse is open, check circuit terminal B13–4 for a short to ground.
Is the repair complete?
Go to Step 13—
5Disconnect brake switch connector B–13 and ignition switch “on”.
Is the test light “on”?
Go to Step 8Go to Step 6
6Check the brake switch short (B13–1 and B13–4).
Was a problem found?
Go to Step 9Go to Step 10
7Check circuit terminal B13–4 for a short to voltage.
Ignition switch “on”.
Is the test light “on”?
Go to Step 8Go to Step 10
81. Disconnect the J3 (BLUE) PCM connector.
2. Check circuit terminal B13–4 for a short to voltage.
Was a problem found?
Go to Step 13Go to Step 10
9Replace the brake switch.
Is the replacement complete?
Go to Step 13—
101. Turn the ignition “off”.
2. Reconnect the J3 (BLUE) PCM connector.
3. Turn the ignition “on”.
Does the scan tool display “TCC Brake Switch” as “open” with the
brake applied, then display “closed” with the brake pedal
released?
Go to Diagnostic
Aids
Go to Step 11
11Check the PCM for faulty or intermittent connections.
Was a problem found and corrected?
Go to Step 13Go to Step 12
Page 2291 of 6000
7A1–46
TRANSMISSION CONTROL SYSTEM (4L30–E)
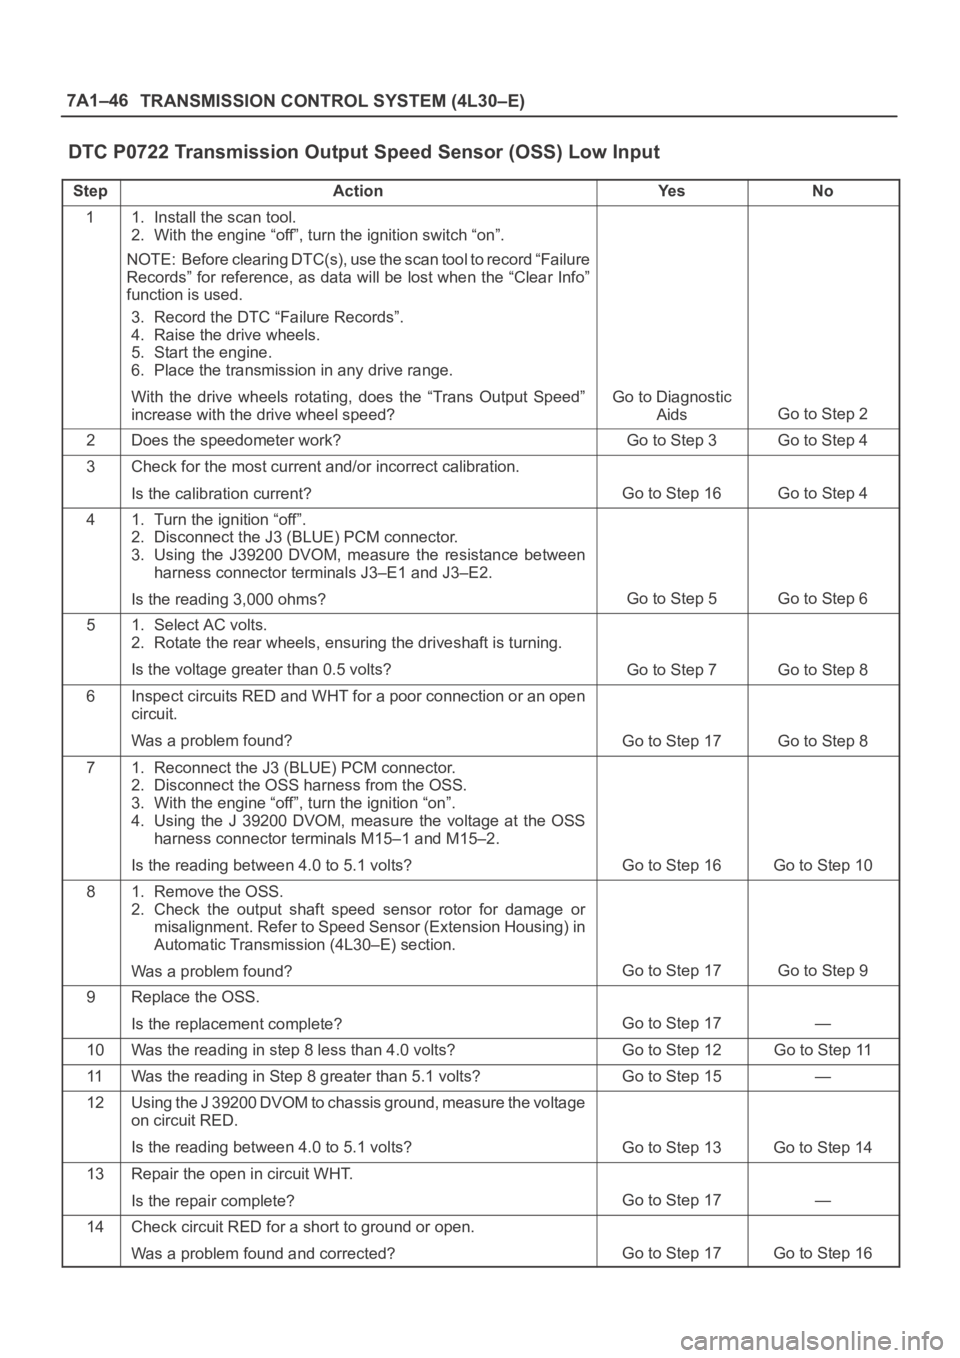
DTC P0722 Transmission Output Speed Sensor (OSS) Low Input
StepActionYe sNo
11. Install the scan tool.
2. With the engine “off”, turn the ignition switch “on”.
NOTE: Before clearing DTC(s), use the scan tool to record “Failure
Records” for reference, as data will be lost when the “Clear Info”
function is used.
3. Record the DTC “Failure Records”.
4. Raise the drive wheels.
5. Start the engine.
6. Place the transmission in any drive range.
With the drive wheels rotating, does the “Trans Output Speed”
increase with the drive wheel speed?
Go to Diagnostic
Aids
Go to Step 2
2Does the speedometer work?Go to Step 3Go to Step 4
3Check for the most current and/or incorrect calibration.
Is the calibration current?
Go to Step 16Go to Step 4
41. Turn the ignition “off”.
2. Disconnect the J3 (BLUE) PCM connector.
3. Using the J39200 DVOM, measure the resistance between
harness connector terminals J3–E1 and J3–E2.
Is the reading 3,000 ohms?
Go to Step 5Go to Step 6
51. Select AC volts.
2. Rotate the rear wheels, ensuring the driveshaft is turning.
Is the voltage greater than 0.5 volts?
Go to Step 7Go to Step 8
6Inspect circuits RED and WHT for a poor connection or an open
circuit.
Was a problem found?
Go to Step 17Go to Step 8
71. Reconnect the J3 (BLUE) PCM connector.
2. Disconnect the OSS harness from the OSS.
3. With the engine “off”, turn the ignition “on”.
4. Using the J 39200 DVOM, measure the voltage at the OSS
harness connector terminals M15–1 and M15–2.
Is the reading between 4.0 to 5.1 volts?
Go to Step 16Go to Step 10
81. Remove the OSS.
2. Check the output shaft speed sensor rotor for damage or
misalignment. Refer to Speed Sensor (Extension Housing) in
Automatic Transmission (4L30–E) section.
Was a problem found?
Go to Step 17Go to Step 9
9Replace the OSS.
Is the replacement complete?
Go to Step 17—
10Was the reading in step 8 less than 4.0 volts?Go to Step 12Go to Step 11
11Was the reading in Step 8 greater than 5.1 volts?Go to Step 15—
12Using the J 39200 DVOM to chassis ground, measure the voltage
on circuit RED.
Is the reading between 4.0 to 5.1 volts?
Go to Step 13Go to Step 14
13Repair the open in circuit WHT.
Is the repair complete?
Go to Step 17—
14Check circuit RED for a short to ground or open.
Was a problem found and corrected?
Go to Step 17Go to Step 16
Page 2294 of 6000
TRANSMISSION CONTROL SYSTEM (4L30–E)7A1–49
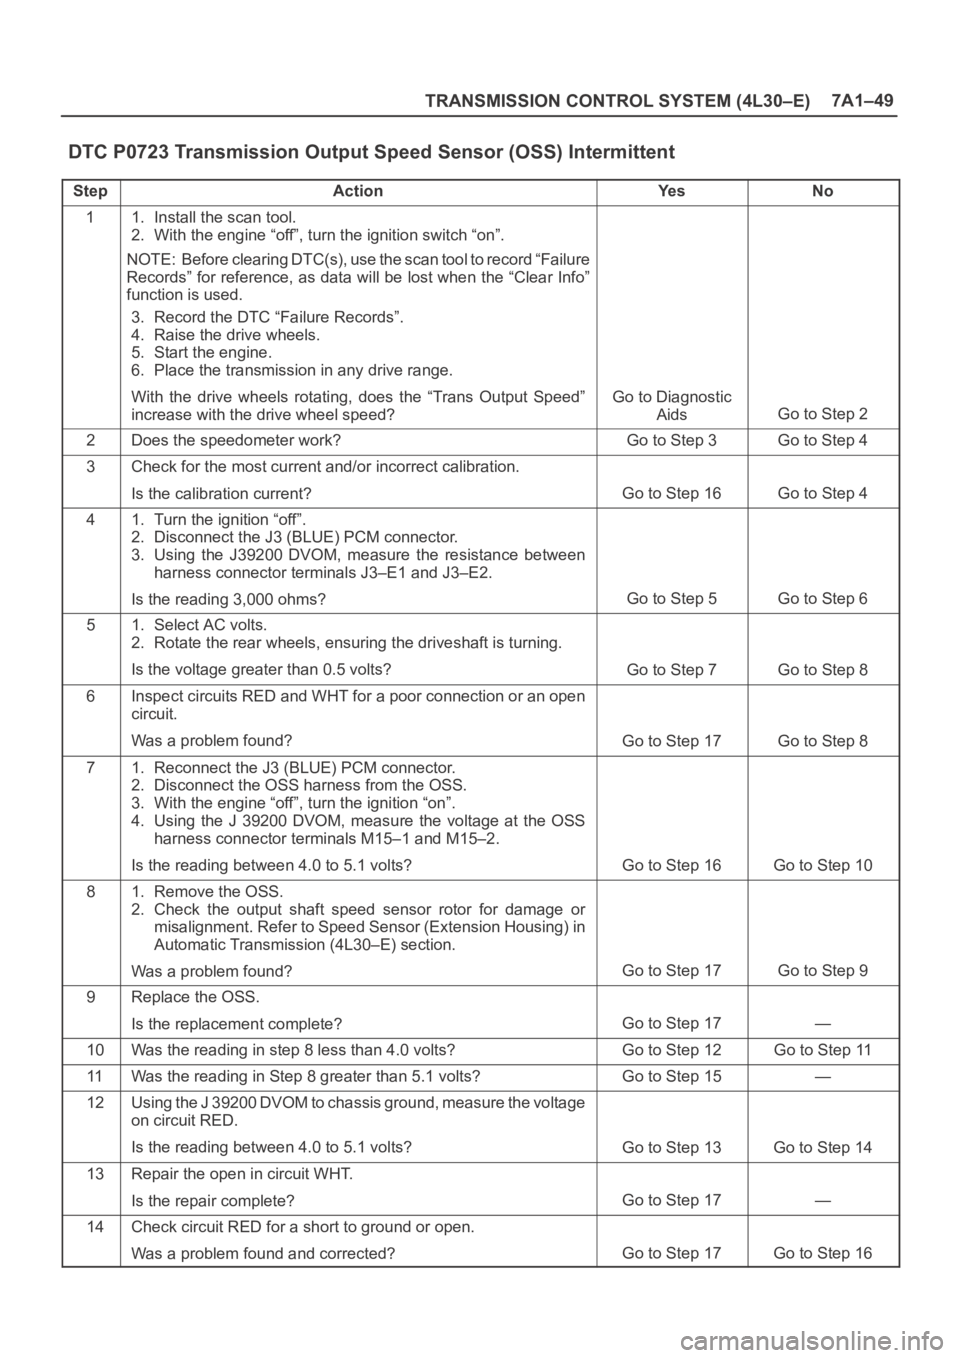
DTC P0723 Transmission Output Speed Sensor (OSS) Intermittent
StepActionYe sNo
11. Install the scan tool.
2. With the engine “off”, turn the ignition switch “on”.
NOTE: Before clearing DTC(s), use the scan tool to record “Failure
Records” for reference, as data will be lost when the “Clear Info”
function is used.
3. Record the DTC “Failure Records”.
4. Raise the drive wheels.
5. Start the engine.
6. Place the transmission in any drive range.
With the drive wheels rotating, does the “Trans Output Speed”
increase with the drive wheel speed?
Go to Diagnostic
Aids
Go to Step 2
2Does the speedometer work?Go to Step 3Go to Step 4
3Check for the most current and/or incorrect calibration.
Is the calibration current?
Go to Step 16Go to Step 4
41. Turn the ignition “off”.
2. Disconnect the J3 (BLUE) PCM connector.
3. Using the J39200 DVOM, measure the resistance between
harness connector terminals J3–E1 and J3–E2.
Is the reading 3,000 ohms?
Go to Step 5Go to Step 6
51. Select AC volts.
2. Rotate the rear wheels, ensuring the driveshaft is turning.
Is the voltage greater than 0.5 volts?
Go to Step 7Go to Step 8
6Inspect circuits RED and WHT for a poor connection or an open
circuit.
Was a problem found?
Go to Step 17Go to Step 8
71. Reconnect the J3 (BLUE) PCM connector.
2. Disconnect the OSS harness from the OSS.
3. With the engine “off”, turn the ignition “on”.
4. Using the J 39200 DVOM, measure the voltage at the OSS
harness connector terminals M15–1 and M15–2.
Is the reading between 4.0 to 5.1 volts?
Go to Step 16Go to Step 10
81. Remove the OSS.
2. Check the output shaft speed sensor rotor for damage or
misalignment. Refer to Speed Sensor (Extension Housing) in
Automatic Transmission (4L30–E) section.
Was a problem found?
Go to Step 17Go to Step 9
9Replace the OSS.
Is the replacement complete?
Go to Step 17—
10Was the reading in step 8 less than 4.0 volts?Go to Step 12Go to Step 11
11Was the reading in Step 8 greater than 5.1 volts?Go to Step 15—
12Using the J 39200 DVOM to chassis ground, measure the voltage
on circuit RED.
Is the reading between 4.0 to 5.1 volts?
Go to Step 13Go to Step 14
13Repair the open in circuit WHT.
Is the repair complete?
Go to Step 17—
14Check circuit RED for a short to ground or open.
Was a problem found and corrected?
Go to Step 17Go to Step 16
Page 2302 of 6000
TRANSMISSION CONTROL SYSTEM (4L30–E)7A1–57
When diagnosing for a possible intermittent short or
open condition, move the wiring harness while
observing test equipment for a change.
An open ignition feed circuit can cause multiple DTCs
to set.
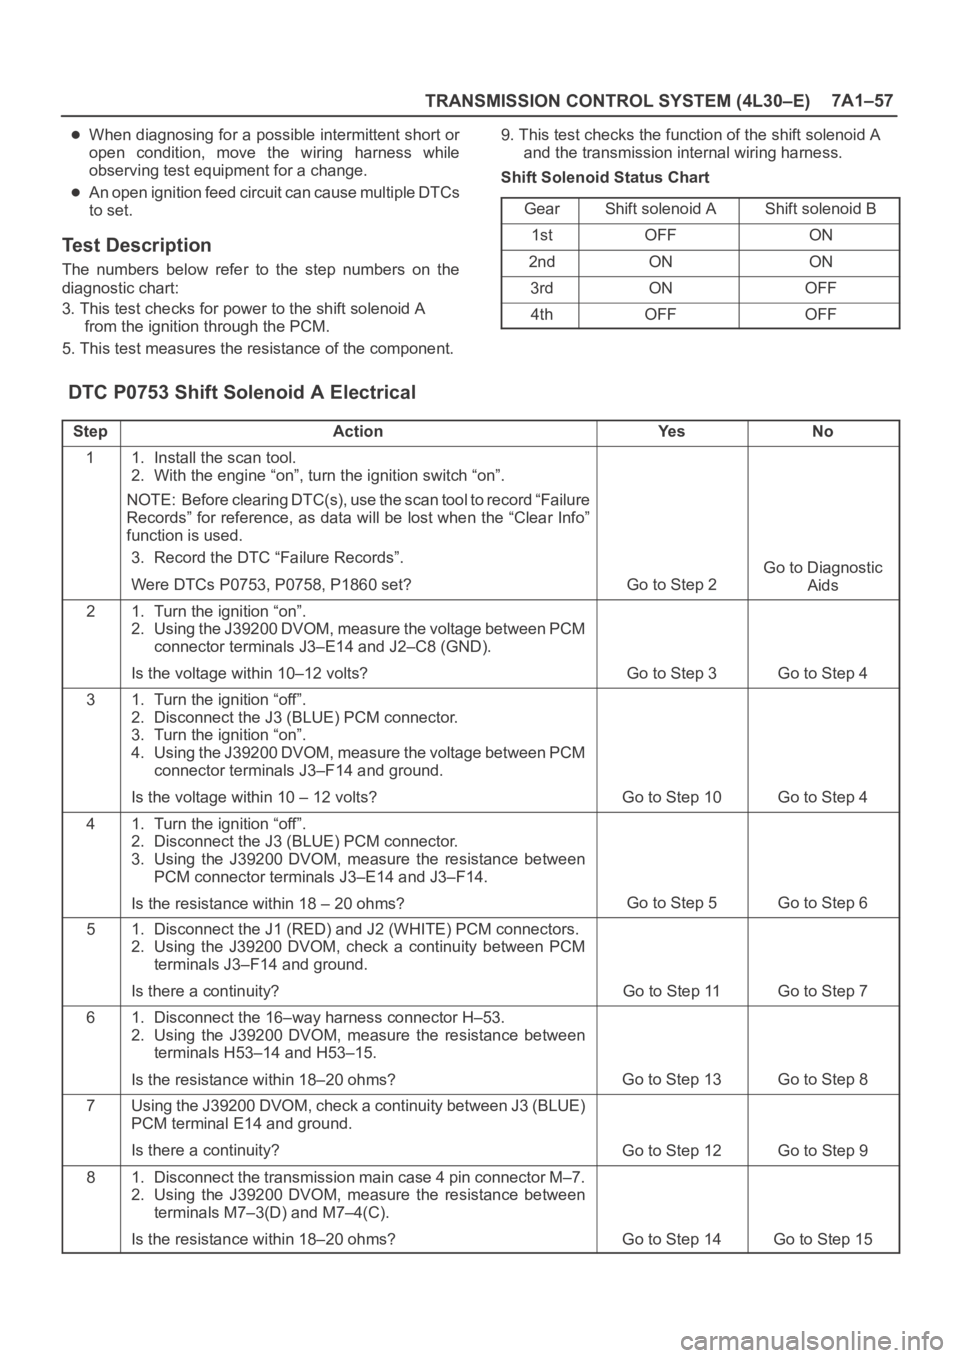
Test Description
The numbers below refer to the step numbers on the
diagnostic chart:
3. This test checks for power to the shift solenoid A
from the ignition through the PCM.
5. This test measures the resistance of the component.9. This test checks the function of the shift solenoid A
and the transmission internal wiring harness.
Shift Solenoid Status Chart
Gear
Shift solenoid AShift solenoid B
1stOFFON
2ndONON
3rdONOFF
4thOFFOFF
DTC P0753 Shift Solenoid A Electrical
StepActionYe sNo
11. Install the scan tool.
2. With the engine “on”, turn the ignition switch “on”.
NOTE: Before clearing DTC(s), use the scan tool to record “Failure
Records” for reference, as data will be lost when the “Clear Info”
function is used.
3. Record the DTC “Failure Records”.
Were DTCs P0753, P0758, P1860 set?
Go to Step 2
Go to Diagnostic
Aids
21. Turn the ignition “on”.
2. Using the J39200 DVOM, measure the voltage between PCM
connector terminals J3–E14 and J2–C8 (GND).
Is the voltage within 10–12 volts?
Go to Step 3Go to Step 4
31. Turn the ignition “off”.
2. Disconnect the J3 (BLUE) PCM connector.
3. Turn the ignition “on”.
4. Using the J39200 DVOM, measure the voltage between PCM
connector terminals J3–F14 and ground.
Is the voltage within 10 – 12 volts?
Go to Step 10Go to Step 4
41. Turn the ignition “off”.
2. Disconnect the J3 (BLUE) PCM connector.
3. Using the J39200 DVOM, measure the resistance between
PCM connector terminals J3–E14 and J3–F14.
Is the resistance within 18 – 20 ohms?
Go to Step 5Go to Step 6
51. Disconnect the J1 (RED) and J2 (WHITE) PCM connectors.
2. Using the J39200 DVOM, check a continuity between PCM
terminals J3–F14 and ground.
Is there a continuity?
Go to Step 11Go to Step 7
61. Disconnect the 16–way harness connector H–53.
2. Using the J39200 DVOM, measure the resistance between
terminals H53–14 and H53–15.
Is the resistance within 18–20 ohms?
Go to Step 13Go to Step 8
7Using the J39200 DVOM, check a continuity between J3 (BLUE)
PCM terminal E14 and ground.
Is there a continuity?
Go to Step 12Go to Step 9
81. Disconnect the transmission main case 4 pin connector M–7.
2. Using the J39200 DVOM, measure the resistance between
terminals M7–3(D) and M7–4(C).
Is the resistance within 18–20 ohms?
Go to Step 14Go to Step 15
Page 2305 of 6000
7A1–60
TRANSMISSION CONTROL SYSTEM (4L30–E)
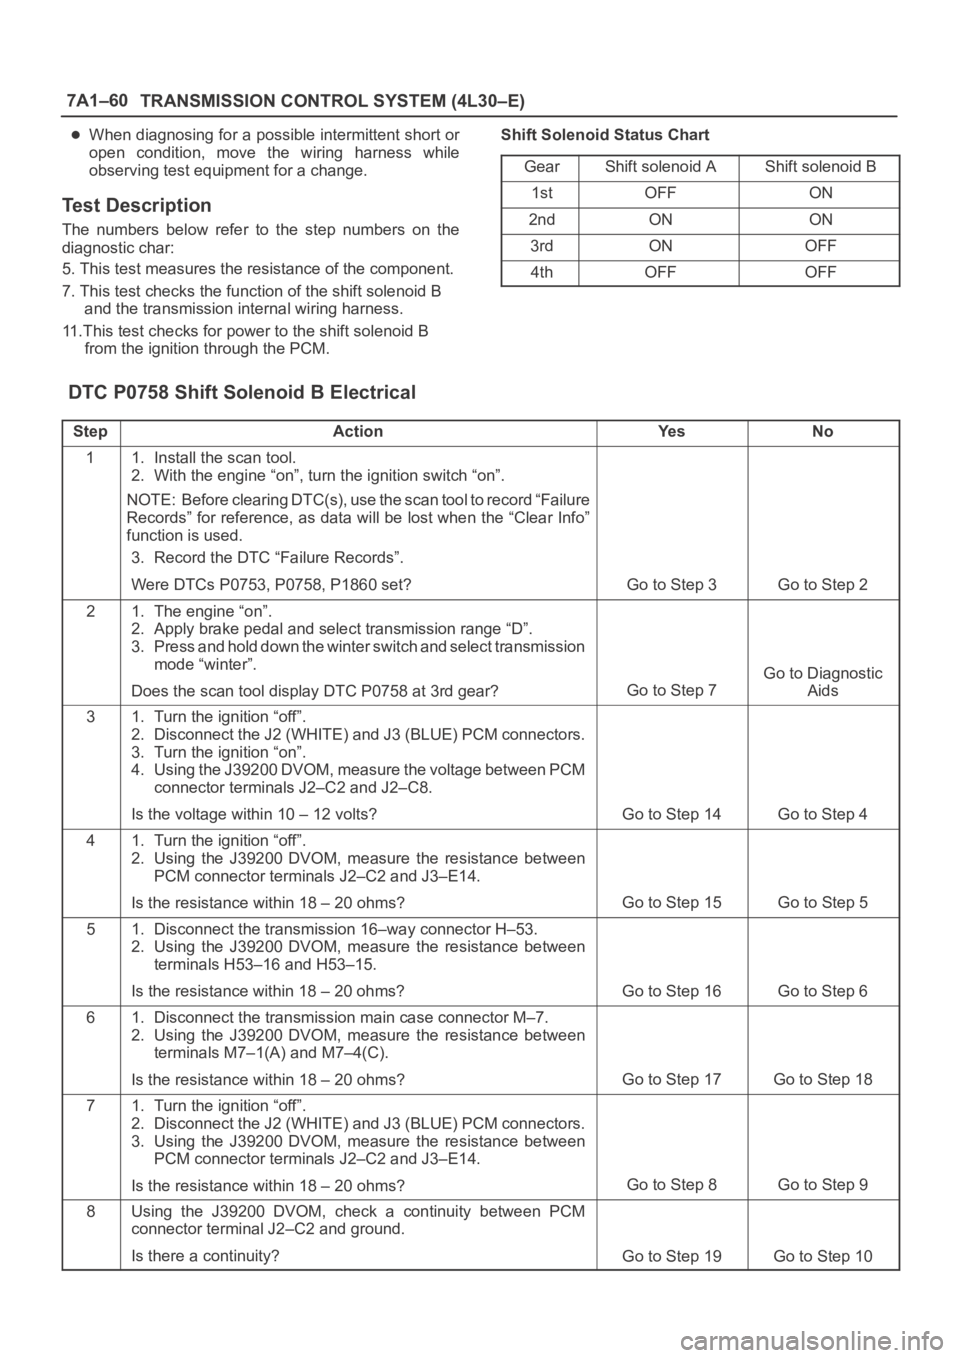
When diagnosing for a possible intermittent short or
open condition, move the wiring harness while
observing test equipment for a change.
Test Description
The numbers below refer to the step numbers on the
diagnostic char:
5. This test measures the resistance of the component.
7. This test checks the function of the shift solenoid B
and the transmission internal wiring harness.
11.This test checks for power to the shift solenoid B
from the ignition through the PCM.Shift Solenoid Status Chart
Gear
Shift solenoid AShift solenoid B
1stOFFON
2ndONON
3rdONOFF
4thOFFOFF
DTC P0758 Shift Solenoid B Electrical
StepActionYe sNo
11. Install the scan tool.
2. With the engine “on”, turn the ignition switch “on”.
NOTE: Before clearing DTC(s), use the scan tool to record “Failure
Records” for reference, as data will be lost when the “Clear Info”
function is used.
3. Record the DTC “Failure Records”.
Were DTCs P0753, P0758, P1860 set?
Go to Step 3Go to Step 2
21. The engine “on”.
2. Apply brake pedal and select transmission range “D”.
3. Press and hold down the winter switch and select transmission
mode “winter”.
Does the scan tool display DTC P0758 at 3rd gear?
Go to Step 7
Go to Diagnostic
Aids
31. Turn the ignition “off”.
2. Disconnect the J2 (WHITE) and J3 (BLUE) PCM connectors.
3. Turn the ignition “on”.
4. Using the J39200 DVOM, measure the voltage between PCM
connector terminals J2–C2 and J2–C8.
Is the voltage within 10 – 12 volts?
Go to Step 14Go to Step 4
41. Turn the ignition “off”.
2. Using the J39200 DVOM, measure the resistance between
PCM connector terminals J2–C2 and J3–E14.
Is the resistance within 18 – 20 ohms?
Go to Step 15Go to Step 5
51. Disconnect the transmission 16–way connector H–53.
2. Using the J39200 DVOM, measure the resistance between
terminals H53–16 and H53–15.
Is the resistance within 18 – 20 ohms?
Go to Step 16Go to Step 6
61. Disconnect the transmission main case connector M–7.
2. Using the J39200 DVOM, measure the resistance between
terminals M7–1(A) and M7–4(C).
Is the resistance within 18 – 20 ohms?
Go to Step 17Go to Step 18
71. Turn the ignition “off”.
2. Disconnect the J2 (WHITE) and J3 (BLUE) PCM connectors.
3. Using the J39200 DVOM, measure the resistance between
PCM connector terminals J2–C2 and J3–E14.
Is the resistance within 18 – 20 ohms?
Go to Step 8Go to Step 9
8Using the J39200 DVOM, check a continuity between PCM
connector terminal J2–C2 and ground.
Is there a continuity?
Go to Step 19Go to Step 10
Page 2306 of 6000
TRANSMISSION CONTROL SYSTEM (4L30–E)7A1–61
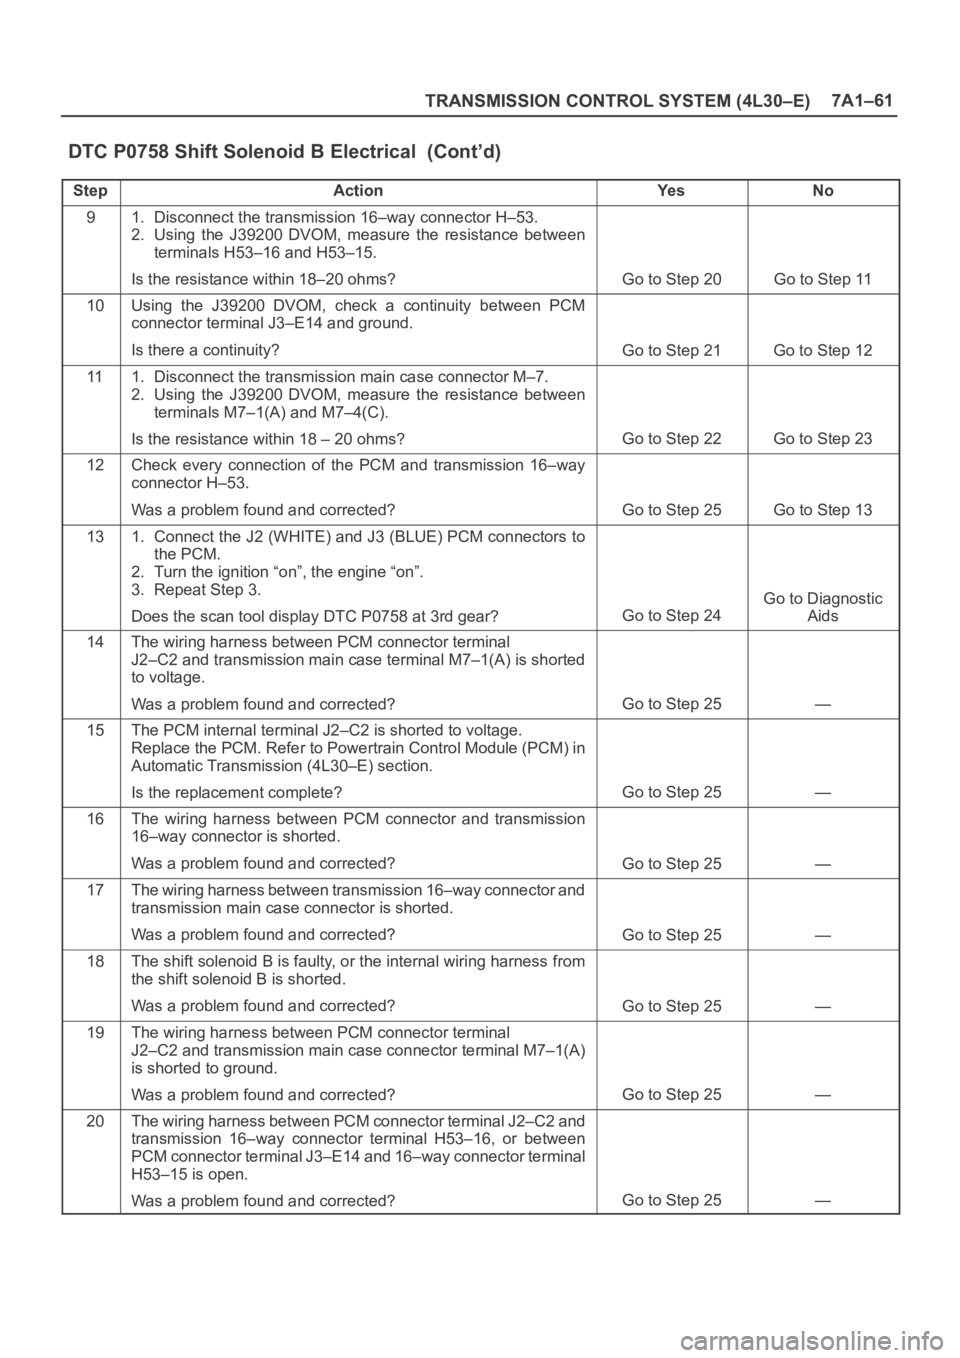
DTC P0758 Shift Solenoid B Electrical (Cont’d)
StepNo Ye s Action
91. Disconnect the transmission 16–way connector H–53.
2. Using the J39200 DVOM, measure the resistance between
terminals H53–16 and H53–15.
Is the resistance within 18–20 ohms?
Go to Step 20Go to Step 11
10Using the J39200 DVOM, check a continuity between PCM
connector terminal J3–E14 and ground.
Is there a continuity?
Go to Step 21Go to Step 12
111. Disconnect the transmission main case connector M–7.
2. Using the J39200 DVOM, measure the resistance between
terminals M7–1(A) and M7–4(C).
Is the resistance within 18 – 20 ohms?
Go to Step 22Go to Step 23
12Check every connection of the PCM and transmission 16–way
connector H–53.
Was a problem found and corrected?
Go to Step 25Go to Step 13
131. Connect the J2 (WHITE) and J3 (BLUE) PCM connectors to
the PCM.
2. Turn the ignition “on”, the engine “on”.
3. Repeat Step 3.
Does the scan tool display DTC P0758 at 3rd gear?
Go to Step 24
Go to Diagnostic
Aids
14The wiring harness between PCM connector terminal
J2–C2 and transmission main case terminal M7–1(A) is shorted
to voltage.
Was a problem found and corrected?
Go to Step 25—
15The PCM internal terminal J2–C2 is shorted to voltage.
Replace the PCM. Refer to Powertrain Control Module (PCM) in
Automatic Transmission (4L30–E) section.
Is the replacement complete?
Go to Step 25—
16The wiring harness between PCM connector and transmission
16–way connector is shorted.
Was a problem found and corrected?
Go to Step 25—
17The wiring harness between transmission 16–way connector and
transmission main case connector is shorted.
Was a problem found and corrected?
Go to Step 25—
18The shift solenoid B is faulty, or the internal wiring harness from
the shift solenoid B is shorted.
Was a problem found and corrected?
Go to Step 25—
19The wiring harness between PCM connector terminal
J2–C2 and transmission main case connector terminal M7–1(A)
is shorted to ground.
Was a problem found and corrected?
Go to Step 25—
20The wiring harness between PCM connector terminal J2–C2 and
transmission 16–way connector terminal H53–16, or between
PCM connector terminal J3–E14 and 16–way connector terminal
H53–15 is open.
Was a problem found and corrected?
Go to Step 25—
Page 2311 of 6000
7A1–66
TRANSMISSION CONTROL SYSTEM (4L30–E)
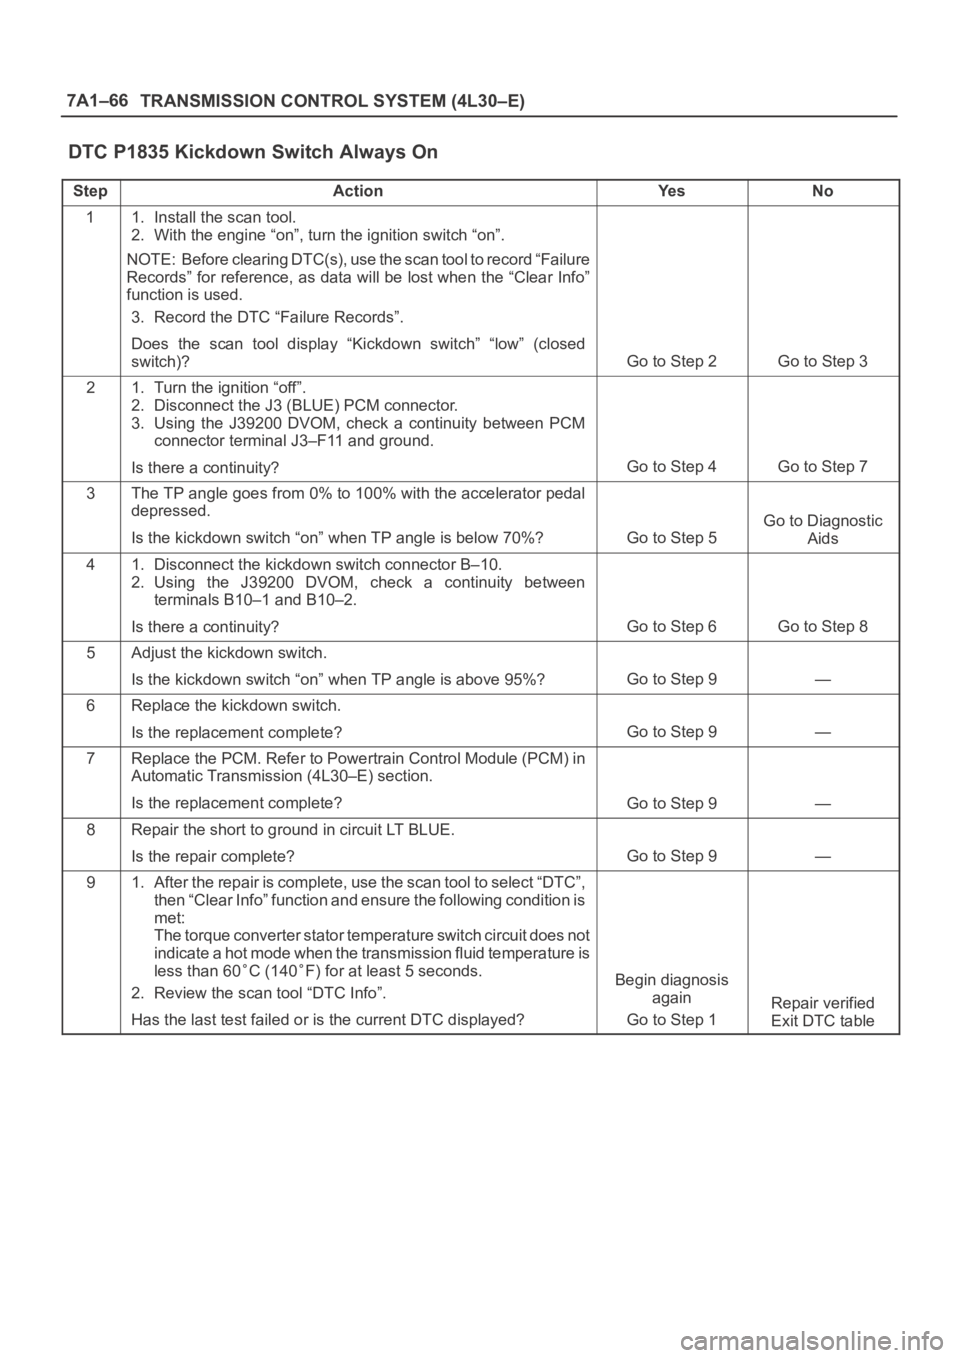
DTC P1835 Kickdown Switch Always On
StepActionYe sNo
11. Install the scan tool.
2. With the engine “on”, turn the ignition switch “on”.
NOTE: Before clearing DTC(s), use the scan tool to record “Failure
Records” for reference, as data will be lost when the “Clear Info”
function is used.
3. Record the DTC “Failure Records”.
Does the scan tool display “Kickdown switch” “low” (closed
switch)?
Go to Step 2Go to Step 3
21. Turn the ignition “off”.
2. Disconnect the J3 (BLUE) PCM connector.
3. Using the J39200 DVOM, check a continuity between PCM
connector terminal J3–F11 and ground.
Is there a continuity?
Go to Step 4Go to Step 7
3The TP angle goes from 0% to 100% with the accelerator pedal
depressed.
Is the kickdown switch “on” when TP angle is below 70%?
Go to Step 5
Go to Diagnostic
Aids
41. Disconnect the kickdown switch connector B–10.
2. Using the J39200 DVOM, check a continuity between
terminals B10–1 and B10–2.
Is there a continuity?
Go to Step 6Go to Step 8
5Adjust the kickdown switch.
Is the kickdown switch “on” when TP angle is above 95%?
Go to Step 9—
6Replace the kickdown switch.
Is the replacement complete?
Go to Step 9—
7Replace the PCM. Refer to Powertrain Control Module (PCM) in
Automatic Transmission (4L30–E) section.
Is the replacement complete?
Go to Step 9—
8Repair the short to ground in circuit LT BLUE.
Is the repair complete?
Go to Step 9—
91. After the repair is complete, use the scan tool to select “DTC”,
then “Clear Info” function and ensure the following condition is
met:
The torque converter stator temperature switch circuit does not
indicate a hot mode when the transmission fluid temperature is
less than 60
C (140F) for at least 5 seconds.
2. Review the scan tool “DTC Info”.
Has the last test failed or is the current DTC displayed?Begin diagnosis
again
Go to Step 1
Repair verified
Exit DTC table
Page 2313 of 6000
7A1–68
TRANSMISSION CONTROL SYSTEM (4L30–E)
Diagnostic Aids
Inspect the wiring for poor electrical connection at the
PCM and at the transmission 16–way connector.
Look for possible bent, backed out, deformed or
damaged terminals. Check for weak terminal tension
as well. Also check for a chafed wire that could short
to bare metal or other wiring. Inspect for a broken wire
inside the insulation.
When diagnosing for a possible intermittent short or
open condition, move the wiring harness while
observing test equipment for a change.
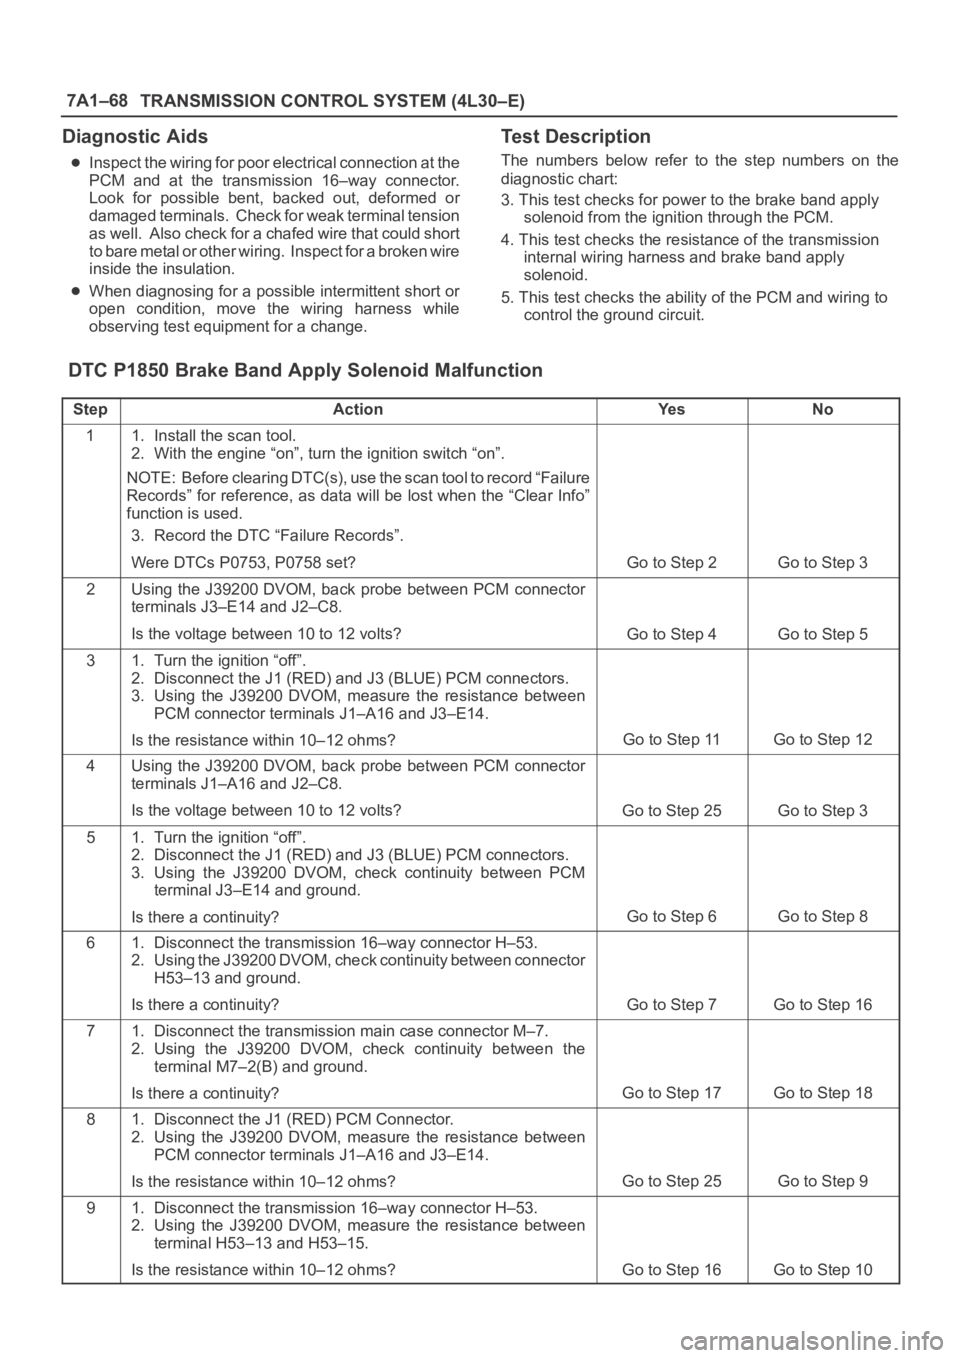
Test Description
The numbers below refer to the step numbers on the
diagnostic chart:
3. This test checks for power to the brake band apply
solenoid from the ignition through the PCM.
4. This test checks the resistance of the transmission
internal wiring harness and brake band apply
solenoid.
5. This test checks the ability of the PCM and wiring to
control the ground circuit.
DTC P1850 Brake Band Apply Solenoid Malfunction
StepActionYe sNo
11. Install the scan tool.
2. With the engine “on”, turn the ignition switch “on”.
NOTE: Before clearing DTC(s), use the scan tool to record “Failure
Records” for reference, as data will be lost when the “Clear Info”
function is used.
3. Record the DTC “Failure Records”.
Were DTCs P0753, P0758 set?
Go to Step 2Go to Step 3
2Using the J39200 DVOM, back probe between PCM connector
terminals J3–E14 and J2–C8.
Is the voltage between 10 to 12 volts?
Go to Step 4Go to Step 5
31. Turn the ignition “off”.
2. Disconnect the J1 (RED) and J3 (BLUE) PCM connectors.
3. Using the J39200 DVOM, measure the resistance between
PCM connector terminals J1–A16 and J3–E14.
Is the resistance within 10–12 ohms?
Go to Step 11Go to Step 12
4Using the J39200 DVOM, back probe between PCM connector
terminals J1–A16 and J2–C8.
Is the voltage between 10 to 12 volts?
Go to Step 25Go to Step 3
51. Turn the ignition “off”.
2. Disconnect the J1 (RED) and J3 (BLUE) PCM connectors.
3. Using the J39200 DVOM, check continuity between PCM
terminal J3–E14 and ground.
Is there a continuity?
Go to Step 6Go to Step 8
61. Disconnect the transmission 16–way connector H–53.
2. Using the J39200 DVOM, check continuity between connector
H53–13 and ground.
Is there a continuity?
Go to Step 7Go to Step 16
71. Disconnect the transmission main case connector M–7.
2. Using the J39200 DVOM, check continuity between the
terminal M7–2(B) and ground.
Is there a continuity?
Go to Step 17Go to Step 18
81. Disconnect the J1 (RED) PCM Connector.
2. Using the J39200 DVOM, measure the resistance between
PCM connector terminals J1–A16 and J3–E14.
Is the resistance within 10–12 ohms?
Go to Step 25Go to Step 9
91. Disconnect the transmission 16–way connector H–53.
2. Using the J39200 DVOM, measure the resistance between
terminal H53–13 and H53–15.
Is the resistance within 10–12 ohms?
Go to Step 16Go to Step 10