1998 OPEL FRONTERA lock
[x] Cancel search: lockPage 3001 of 6000

8D–408 WIRING SYSTEM
Step Action Yes No
The control unit makes lock/unlock response once with interval of
one second.
Is the response complete?
The control unit makes lock/unlock response three times with
interval of one second.
Is the response complete? 12
13Finished
Finished—
—
Step Action Yes No
1. Open the driver’s side door.
2. Turn the starter switch off.
Is the action complete?
Turn the starter switch to ACC position and then off three times
within five seconds after step 1.
Is the action complete within five seconds?
Close the door and then open it two times within ten seconds after
step 2.
Is the action complete within ten seconds?
1. Turn the starter switch to ACC position and then off.
2. Close the door and then open it.
NOTE: This step must be performed within ten seconds after step
3.
Is the action complete?
The control unit makes lock/unlock response twice as many the
number of registered ID code with interval of two seconds. (In case
of no registered code, the response is made ten times.)
Is the response complete? 1
2
3
4
5Go to Step 2
Go to Step 3
Go to Step 4
Go to Step 5
Finished—
Finished
Finished
Finished
—
This procedure checks how many kinds of ID code are
registered.
Step Action Yes No
Open the driver’s side door.
Is the action complete?
Lock the door and then unlock it three times within ten seconds
after step 1.
Is the action complete within five seconds?
Close the door and then open it two times within ten seconds after
step 2.
Is the action complete within ten seconds? 1
2
3Go to Step 2
Go to Step 3
Go to Step 4—
Finished
Finished Anti–theft horn, as an answer back function for the
transmitter operation, changes from available into
unavailing or from unavailing into available by this
procedure.
Page 3002 of 6000
WIRING SYSTEM 8D–409
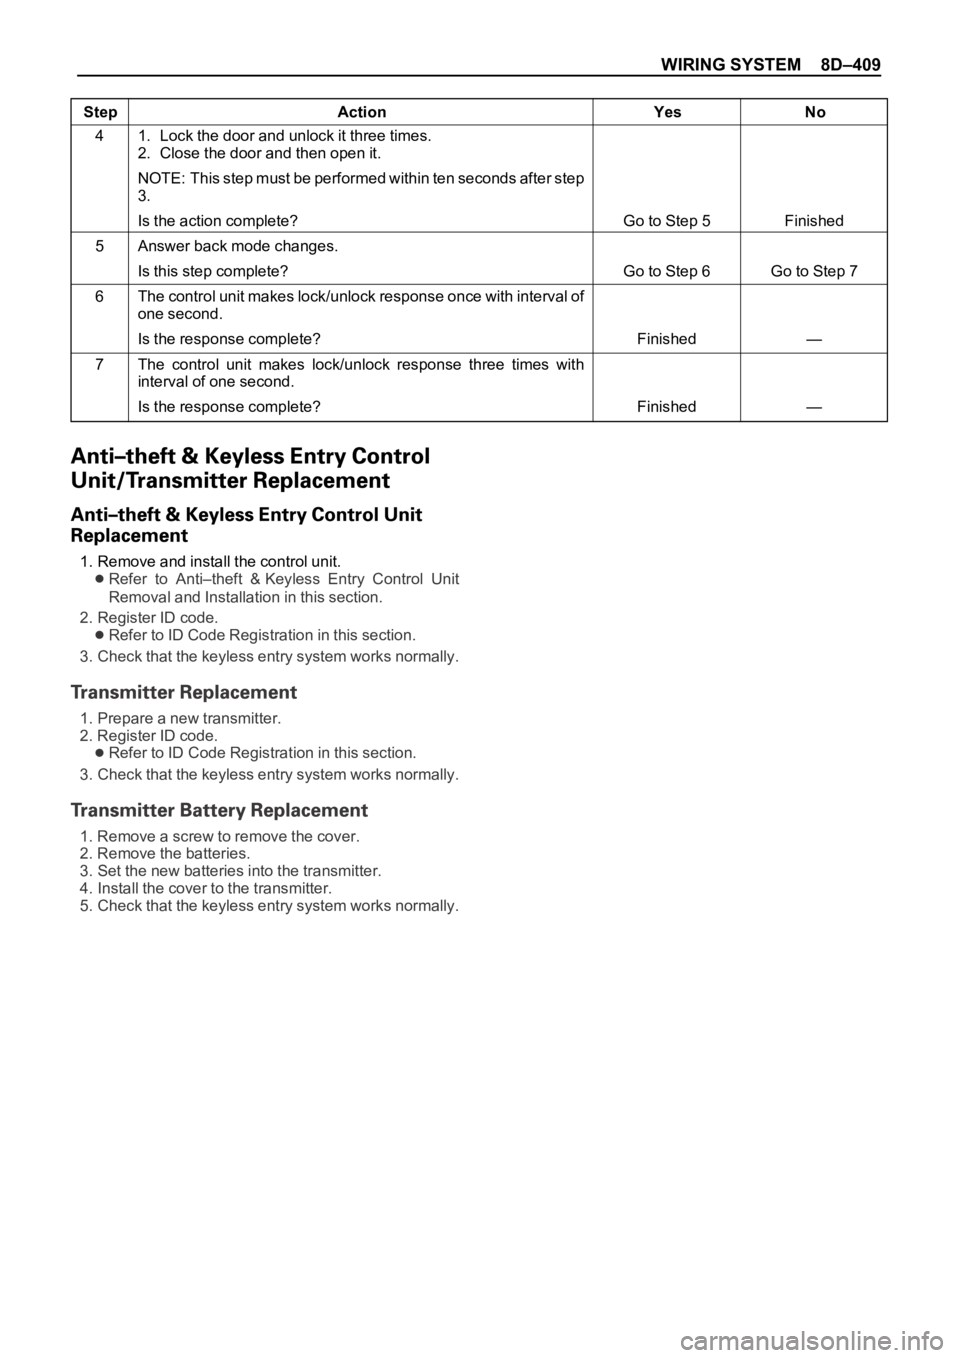
Step Action Yes No
1. Lock the door and unlock it three times.
2. Close the door and then open it.
NOTE: This step must be performed within ten seconds after step
3.
Is the action complete?
Answer back mode changes.
Is this step complete?
The control unit makes lock/unlock response once with interval of
one second.
Is the response complete?
The control unit makes lock/unlock response three times with
interval of one second.
Is the response complete? 4
5
6
7Go to Step 5
Go to Step 6
Finished
FinishedFinished
Go to Step 7
—
—
1. Remove and install the control unit.
Refer to Anti–theft & Keyless Entry Control Unit
Removal and Installation in this section.
2. Register ID code.
Refer to ID Code Registration in this section.
3. Check that the keyless entry system works normally.
1. Prepare a new transmitter.
2. Register ID code.
Refer to ID Code Registration in this section.
3. Check that the keyless entry system works normally.
1. Remove a screw to remove the cover.
2. Remove the batteries.
3. Set the new batteries into the transmitter.
4. Install the cover to the transmitter.
5. Check that the keyless entry system works normally.
Page 3178 of 6000
METER AND GAUGE8E–1
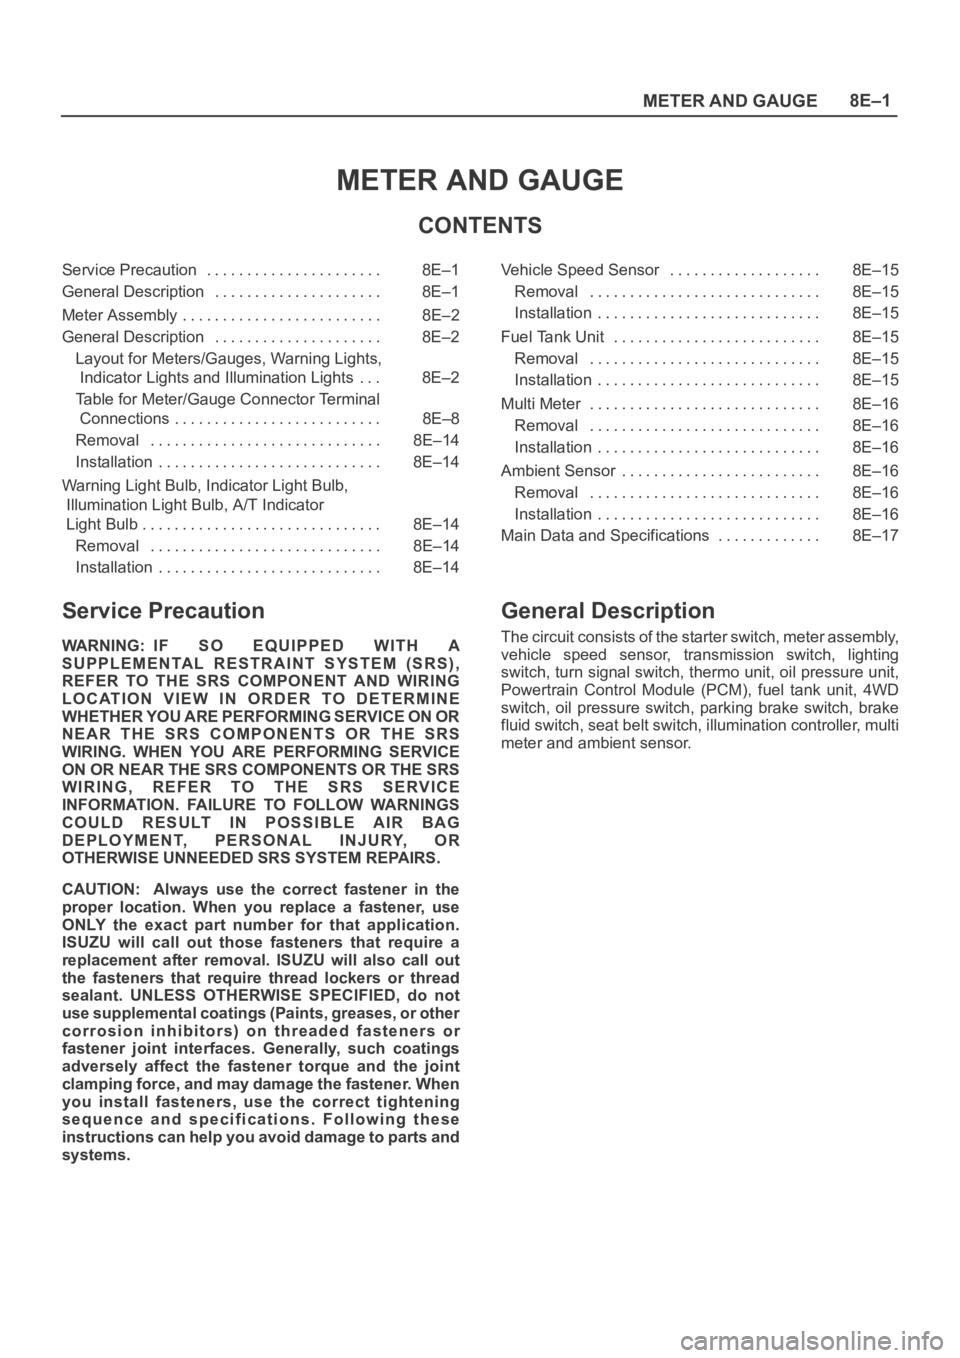
METER AND GAUGE
CONTENTS
Service Precaution 8E–1. . . . . . . . . . . . . . . . . . . . . .
General Description 8E–1. . . . . . . . . . . . . . . . . . . . .
Meter Assembly 8E–2. . . . . . . . . . . . . . . . . . . . . . . . .
General Description 8E–2. . . . . . . . . . . . . . . . . . . . .
Layout for Meters/Gauges, Warning Lights,
Indicator Lights and Illumination Lights 8E–2. . .
Table for Meter/Gauge Connector Terminal
Connections 8E–8. . . . . . . . . . . . . . . . . . . . . . . . . .
Removal 8E–14. . . . . . . . . . . . . . . . . . . . . . . . . . . . .
Installation 8E–14. . . . . . . . . . . . . . . . . . . . . . . . . . . .
Warning Light Bulb, Indicator Light Bulb,
Illumination Light Bulb, A/T Indicator
Light Bulb 8E–14. . . . . . . . . . . . . . . . . . . . . . . . . . . . . .
Removal 8E–14. . . . . . . . . . . . . . . . . . . . . . . . . . . . .
Installation 8E–14. . . . . . . . . . . . . . . . . . . . . . . . . . . . Vehicle Speed Sensor 8E–15. . . . . . . . . . . . . . . . . . .
Removal 8E–15. . . . . . . . . . . . . . . . . . . . . . . . . . . . .
Installation 8E–15. . . . . . . . . . . . . . . . . . . . . . . . . . . .
Fuel Tank Unit 8E–15. . . . . . . . . . . . . . . . . . . . . . . . . .
Removal 8E–15. . . . . . . . . . . . . . . . . . . . . . . . . . . . .
Installation 8E–15. . . . . . . . . . . . . . . . . . . . . . . . . . . .
Multi Meter 8E–16. . . . . . . . . . . . . . . . . . . . . . . . . . . . .
Removal 8E–16. . . . . . . . . . . . . . . . . . . . . . . . . . . . .
Installation 8E–16. . . . . . . . . . . . . . . . . . . . . . . . . . . .
Ambient Sensor 8E–16. . . . . . . . . . . . . . . . . . . . . . . . .
Removal 8E–16. . . . . . . . . . . . . . . . . . . . . . . . . . . . .
Installation 8E–16. . . . . . . . . . . . . . . . . . . . . . . . . . . .
Main Data and Specifications 8E–17. . . . . . . . . . . . .
Service Precaution
WARNING: IF SO EQUIPPED WITH A
SUPPLEMENTAL RESTRAINT SYSTEM (SRS),
REFER TO THE SRS COMPONENT AND WIRING
LOCATION VIEW IN ORDER TO DETERMINE
WHETHER YOU ARE PERFORMING SERVICE ON OR
NEAR THE SRS COMPONENTS OR THE SRS
WIRING. WHEN YOU ARE PERFORMING SERVICE
ON OR NEAR THE SRS COMPONENTS OR THE SRS
WIRING, REFER TO THE SRS SERVICE
INFORMATION. FAILURE TO FOLLOW WARNINGS
COULD RESULT IN POSSIBLE AIR BAG
DEPLOYMENT, PERSONAL INJURY, OR
OTHERWISE UNNEEDED SRS SYSTEM REPAIRS.
CAUTION: Always use the correct fastener in the
proper location. When you replace a fastener, use
ONLY the exact part number for that application.
ISUZU will call out those fasteners that require a
replacement after removal. ISUZU will also call out
the fasteners that require thread lockers or thread
sealant. UNLESS OTHERWISE SPECIFIED, do not
use supplemental coatings (Paints, greases, or other
corrosion inhibitors) on threaded fasteners or
fastener joint interfaces. Generally, such coatings
adversely affect the fastener torque and the joint
clamping force, and may damage the fastener. When
you install fasteners, use the correct tightening
sequence and specifications. Following these
instructions can help you avoid damage to parts and
systems.
General Description
The circuit consists of the starter switch, meter assembly,
vehicle speed sensor, transmission switch, lighting
switch, turn signal switch, thermo unit, oil pressure unit,
Powertrain Control Module (PCM), fuel tank unit, 4WD
switch, oil pressure switch, parking brake switch, brake
fluid switch, seat belt switch, illumination controller, multi
meter and ambient sensor.
Page 3191 of 6000
8E–14METER AND GAUGE
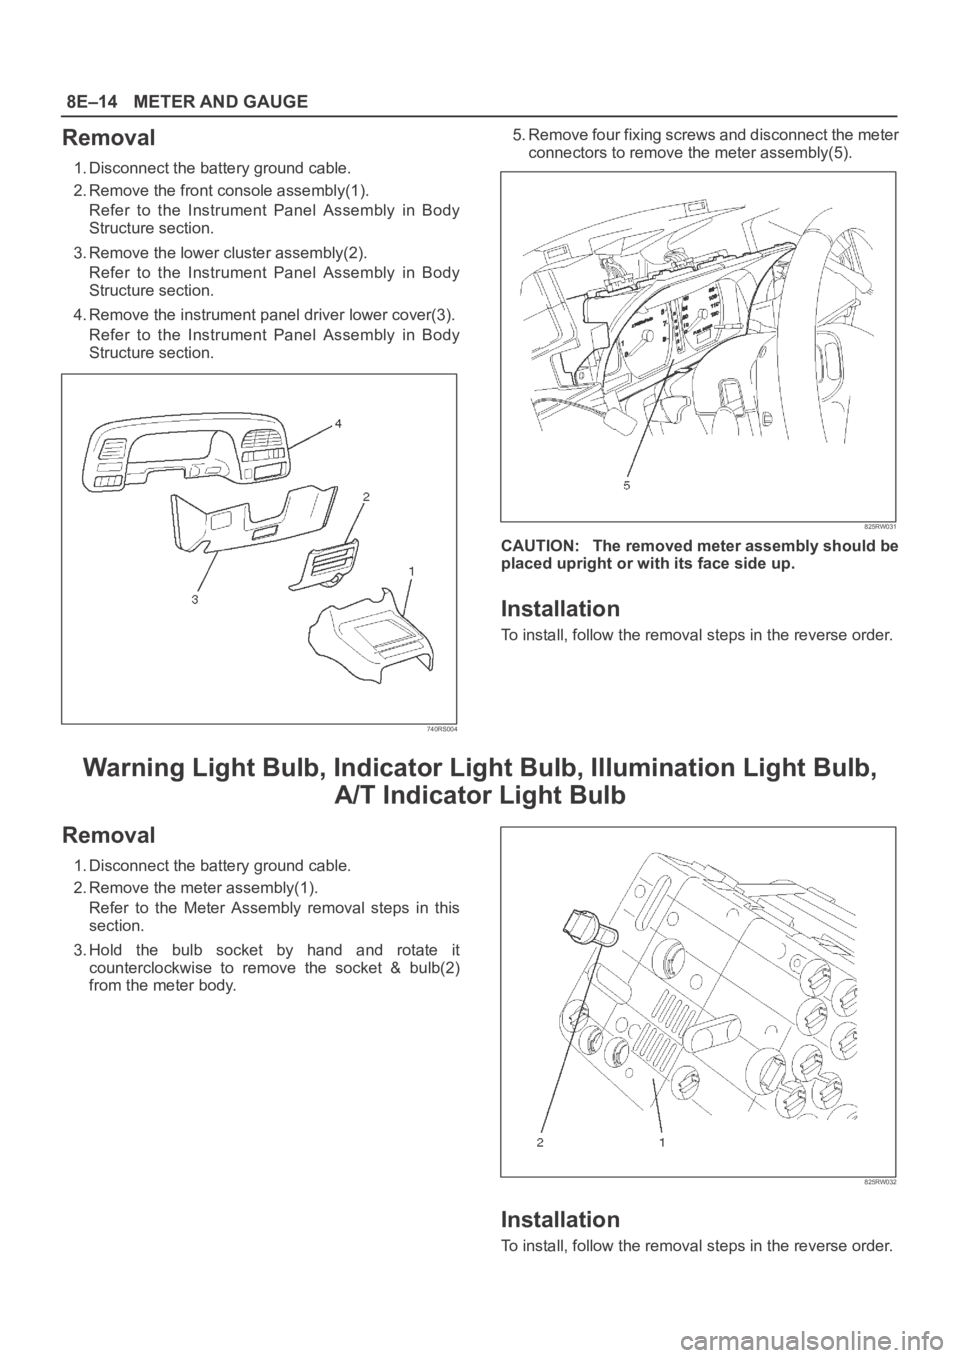
Removal
1. Disconnect the battery ground cable.
2. Remove the front console assembly(1).
Refer to the Instrument Panel Assembly in Body
Structure section.
3. Remove the lower cluster assembly(2).
Refer to the Instrument Panel Assembly in Body
Structure section.
4. Remove the instrument panel driver lower cover(3).
Refer to the Instrument Panel Assembly in Body
Structure section.
740RS004
5. Remove four fixing screws and disconnect the meter
connectors to remove the meter assembly(5).
825RW031
CAUTION: The removed meter assembly should be
placed upright or with its face side up.
Installation
To install, follow the removal steps in the reverse order.
Warning Light Bulb, Indicator Light Bulb, Illumination Light Bulb,
A/T Indicator Light Bulb
Removal
1. Disconnect the battery ground cable.
2. Remove the meter assembly(1).
Refer to the Meter Assembly removal steps in this
section.
3. Hold the bulb socket by hand and rotate it
counterclockwise to remove the socket & bulb(2)
from the meter body.
825RW032
Installation
To install, follow the removal steps in the reverse order.
Page 3196 of 6000
8F–1 BODY STRUCTURE
BODY AND ACCESSORIES
BODY STRUCTURE
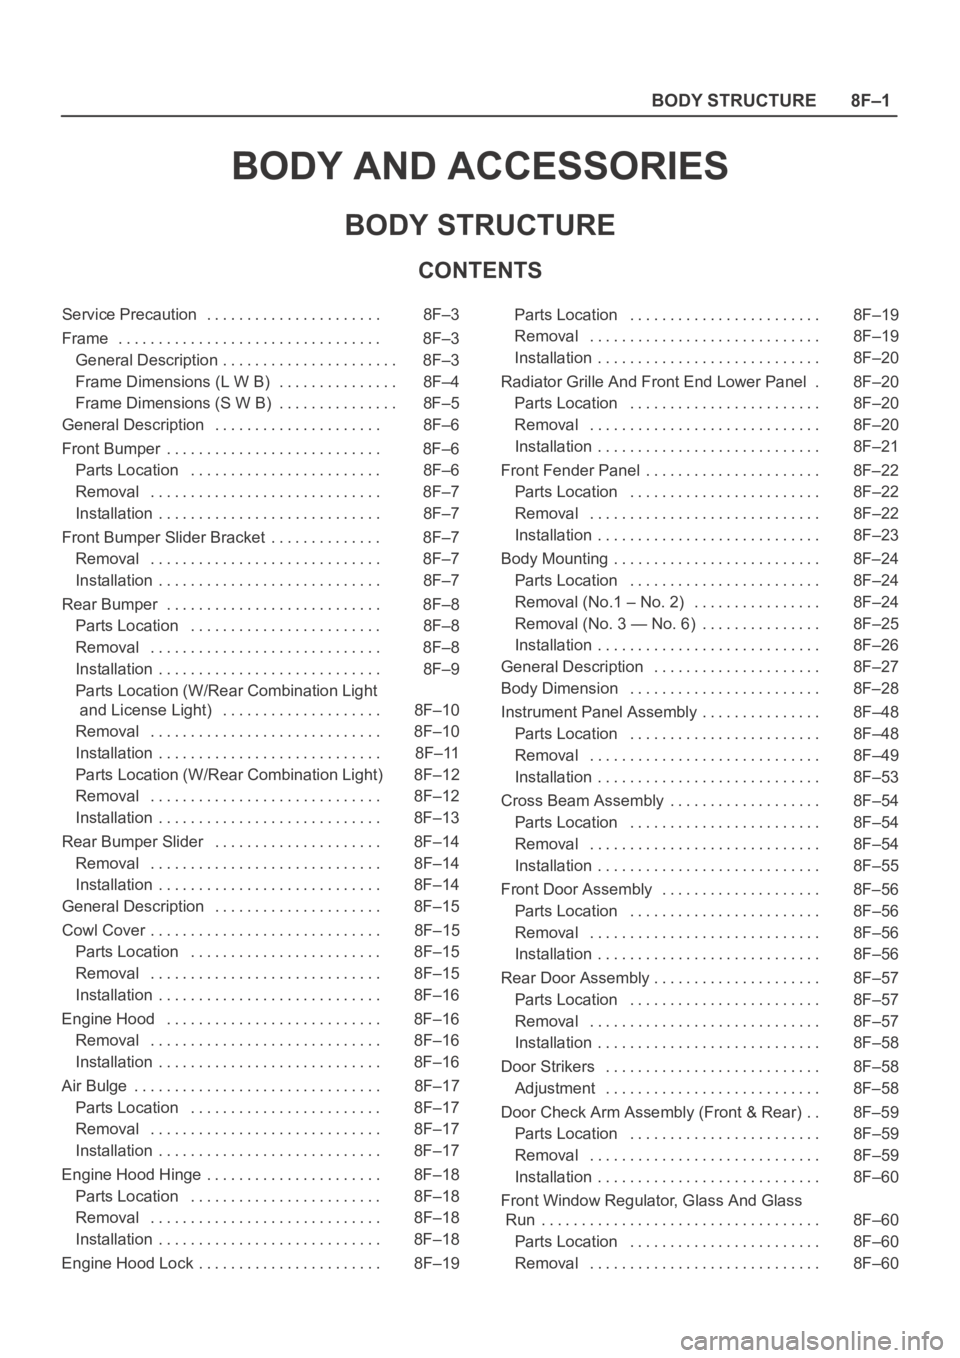
CONTENTS
Service Precaution 8F–3. . . . . . . . . . . . . . . . . . . . . .
Frame 8F–3. . . . . . . . . . . . . . . . . . . . . . . . . . . . . . . . .
General Description 8F–3. . . . . . . . . . . . . . . . . . . . . .
Frame Dimensions (L W B) 8F–4. . . . . . . . . . . . . . .
Frame Dimensions (S W B) 8F–5. . . . . . . . . . . . . . .
General Description 8F–6. . . . . . . . . . . . . . . . . . . . .
Front Bumper 8F–6. . . . . . . . . . . . . . . . . . . . . . . . . . .
Parts Location 8F–6. . . . . . . . . . . . . . . . . . . . . . . .
Removal 8F–7. . . . . . . . . . . . . . . . . . . . . . . . . . . . .
Installation 8F–7. . . . . . . . . . . . . . . . . . . . . . . . . . . .
Front Bumper Slider Bracket 8F–7. . . . . . . . . . . . . .
Removal 8F–7. . . . . . . . . . . . . . . . . . . . . . . . . . . . .
Installation 8F–7. . . . . . . . . . . . . . . . . . . . . . . . . . . .
Rear Bumper 8F–8. . . . . . . . . . . . . . . . . . . . . . . . . . .
Parts Location 8F–8. . . . . . . . . . . . . . . . . . . . . . . .
Removal 8F–8. . . . . . . . . . . . . . . . . . . . . . . . . . . . .
Installation 8F–9. . . . . . . . . . . . . . . . . . . . . . . . . . . .
Parts Location (W/Rear Combination Light
and License Light) 8F–10. . . . . . . . . . . . . . . . . . . .
Removal 8F–10. . . . . . . . . . . . . . . . . . . . . . . . . . . . .
Installation 8F–11. . . . . . . . . . . . . . . . . . . . . . . . . . . .
Parts Location (W/Rear Combination Light) 8F–12
Removal 8F–12. . . . . . . . . . . . . . . . . . . . . . . . . . . . .
Installation 8F–13. . . . . . . . . . . . . . . . . . . . . . . . . . . .
Rear Bumper Slider 8F–14. . . . . . . . . . . . . . . . . . . . .
Removal 8F–14. . . . . . . . . . . . . . . . . . . . . . . . . . . . .
Installation 8F–14. . . . . . . . . . . . . . . . . . . . . . . . . . . .
General Description 8F–15. . . . . . . . . . . . . . . . . . . . .
Cowl Cover 8F–15. . . . . . . . . . . . . . . . . . . . . . . . . . . . .
Parts Location 8F–15. . . . . . . . . . . . . . . . . . . . . . . .
Removal 8F–15. . . . . . . . . . . . . . . . . . . . . . . . . . . . .
Installation 8F–16. . . . . . . . . . . . . . . . . . . . . . . . . . . .
Engine Hood 8F–16. . . . . . . . . . . . . . . . . . . . . . . . . . .
Removal 8F–16. . . . . . . . . . . . . . . . . . . . . . . . . . . . .
Installation 8F–16. . . . . . . . . . . . . . . . . . . . . . . . . . . .
Air Bulge 8F–17. . . . . . . . . . . . . . . . . . . . . . . . . . . . . . .
Parts Location 8F–17. . . . . . . . . . . . . . . . . . . . . . . .
Removal 8F–17. . . . . . . . . . . . . . . . . . . . . . . . . . . . .
Installation 8F–17. . . . . . . . . . . . . . . . . . . . . . . . . . . .
Engine Hood Hinge 8F–18. . . . . . . . . . . . . . . . . . . . . .
Parts Location 8F–18. . . . . . . . . . . . . . . . . . . . . . . .
Removal 8F–18. . . . . . . . . . . . . . . . . . . . . . . . . . . . .
Installation 8F–18. . . . . . . . . . . . . . . . . . . . . . . . . . . .
Engine Hood Lock 8F–19. . . . . . . . . . . . . . . . . . . . . . . Parts Location 8F–19. . . . . . . . . . . . . . . . . . . . . . . .
Removal 8F–19. . . . . . . . . . . . . . . . . . . . . . . . . . . . .
Installation 8F–20. . . . . . . . . . . . . . . . . . . . . . . . . . . .
Radiator Grille And Front End Lower Panel 8F–20.
Parts Location 8F–20. . . . . . . . . . . . . . . . . . . . . . . .
Removal 8F–20. . . . . . . . . . . . . . . . . . . . . . . . . . . . .
Installation 8F–21. . . . . . . . . . . . . . . . . . . . . . . . . . . .
Front Fender Panel 8F–22. . . . . . . . . . . . . . . . . . . . . .
Parts Location 8F–22. . . . . . . . . . . . . . . . . . . . . . . .
Removal 8F–22. . . . . . . . . . . . . . . . . . . . . . . . . . . . .
Installation 8F–23. . . . . . . . . . . . . . . . . . . . . . . . . . . .
Body Mounting 8F–24. . . . . . . . . . . . . . . . . . . . . . . . . .
Parts Location 8F–24. . . . . . . . . . . . . . . . . . . . . . . .
Removal (No.1 – No. 2) 8F–24. . . . . . . . . . . . . . . .
Removal (No. 3 — No. 6) 8F–25. . . . . . . . . . . . . . .
Installation 8F–26. . . . . . . . . . . . . . . . . . . . . . . . . . . .
General Description 8F–27. . . . . . . . . . . . . . . . . . . . .
Body Dimension 8F–28. . . . . . . . . . . . . . . . . . . . . . . .
Instrument Panel Assembly 8F–48. . . . . . . . . . . . . . .
Parts Location 8F–48. . . . . . . . . . . . . . . . . . . . . . . .
Removal 8F–49. . . . . . . . . . . . . . . . . . . . . . . . . . . . .
Installation 8F–53. . . . . . . . . . . . . . . . . . . . . . . . . . . .
Cross Beam Assembly 8F–54. . . . . . . . . . . . . . . . . . .
Parts Location 8F–54. . . . . . . . . . . . . . . . . . . . . . . .
Removal 8F–54. . . . . . . . . . . . . . . . . . . . . . . . . . . . .
Installation 8F–55. . . . . . . . . . . . . . . . . . . . . . . . . . . .
Front Door Assembly 8F–56. . . . . . . . . . . . . . . . . . . .
Parts Location 8F–56. . . . . . . . . . . . . . . . . . . . . . . .
Removal 8F–56. . . . . . . . . . . . . . . . . . . . . . . . . . . . .
Installation 8F–56. . . . . . . . . . . . . . . . . . . . . . . . . . . .
Rear Door Assembly 8F–57. . . . . . . . . . . . . . . . . . . . .
Parts Location 8F–57. . . . . . . . . . . . . . . . . . . . . . . .
Removal 8F–57. . . . . . . . . . . . . . . . . . . . . . . . . . . . .
Installation 8F–58. . . . . . . . . . . . . . . . . . . . . . . . . . . .
Door Strikers 8F–58. . . . . . . . . . . . . . . . . . . . . . . . . . .
Adjustment 8F–58. . . . . . . . . . . . . . . . . . . . . . . . . . .
Door Check Arm Assembly (Front & Rear) 8F–59. .
Parts Location 8F–59. . . . . . . . . . . . . . . . . . . . . . . .
Removal 8F–59. . . . . . . . . . . . . . . . . . . . . . . . . . . . .
Installation 8F–60. . . . . . . . . . . . . . . . . . . . . . . . . . . .
Front Window Regulator, Glass And Glass
Run 8F–60. . . . . . . . . . . . . . . . . . . . . . . . . . . . . . . . . . .
Parts Location 8F–60. . . . . . . . . . . . . . . . . . . . . . . .
Removal 8F–60. . . . . . . . . . . . . . . . . . . . . . . . . . . . .
Page 3198 of 6000
8F–3 BODY STRUCTURE
Removal 8F–101. . . . . . . . . . . . . . . . . . . . . . . . . . . . .
Installation 8F–102. . . . . . . . . . . . . . . . . . . . . . . . . . . .
Tailgate Glass 8F–104. . . . . . . . . . . . . . . . . . . . . . . . . .
Parts Location 8F–104. . . . . . . . . . . . . . . . . . . . . . . . Removal 8F–104. . . . . . . . . . . . . . . . . . . . . . . . . . . . .
Installation 8F–105. . . . . . . . . . . . . . . . . . . . . . . . . . . .
Main Data and Specifications 8F–106. . . . . . . . . . . . .
Special Tools 8F–117. . . . . . . . . . . . . . . . . . . . . . . . . . .
Service Precaution
WARNING: THIS VEHICLE HAS A SUPPLEMENTAL
RESTRAINT SYSTEM (SRS). REFER TO THE SRS
COMPONENT AND WIRING LOCATION VIEW IN
ORDER TO DETERMINE WHETHER YOU ARE
PERFORMING SERVICE ON OR NEAR THE SRS
COMPONENTS OR THE SRS WIRING. WHEN YOU
ARE PERFORMING SERVICE ON OR NEAR THE SRS
COMPONENTS OR THE SRS WIRING, REFER TO
THE SRS SERVICE INFORMATION. FAILURE TO
FOLLOW WARNINGS COULD RESULT IN POSSIBLE
AIR BAG DEPLOYMENT, PERSONAL INJURY, OR
OTHERWISE UNNEEDED SRS SYSTEM REPAIRS.CAUTION: Always use the correct fastener in the
proper location. When you replace a fastener, use
ONLY the exact part number for that application.
ISUZU will call out those fasteners that require a
replacement after removal. ISUZU will also call out
the fasteners that require thread lockers or thread
sealant. UNLESS OTHERWISE SPECIFIED, do not
use supplemental coatings (Paints, greases, or other
corrosion inhibitors) on threaded fasteners or
fastener joint interfaces. Generally, such coatings
adversely affect the fastener torque and the joint
clamping force, and may damage the fastener. When
you install fasteners, use the correct tightening
sequence and specifications. Following these
instructions can help you avoid damage to parts and
systems.
Frame
General Description
Proper frame alignment is important to assure normal
vehicle life and performance of many other parts of thevehicle. If the vehicle has been involved in a fire, collision
or has been overloaded, it is necessary to check the
frame alignment.
Page 3211 of 6000
8F–16BODY STRUCTURE
5. Remove cowl cover.
Disconnect three screws.
6. Remove cowl cover seals.
7. Remove front window lower molding.8. Remove cowl cover stoppers.
Installation
To install, follow the removal steps in reverse order.
Engine Hood
Removal
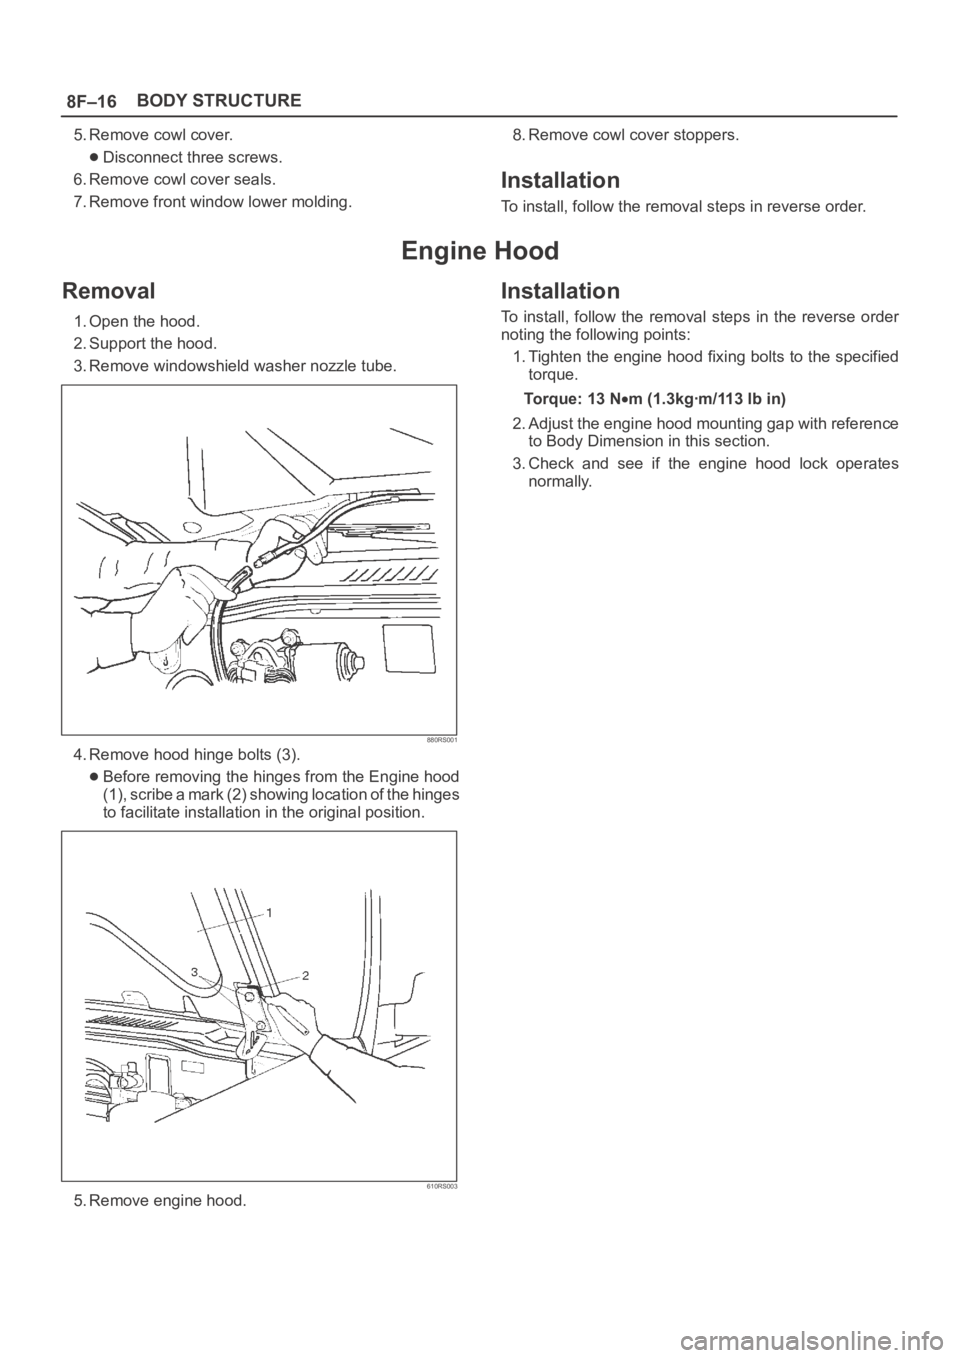
1. Open the hood.
2. Support the hood.
3. Remove windowshield washer nozzle tube.
880RS001
4. Remove hood hinge bolts (3).
Before removing the hinges from the Engine hood
(1), scribe a mark (2) showing location of the hinges
to facilitate installation in the original position.
610RS003
5. Remove engine hood.
Installation
To install, follow the removal steps in the reverse order
noting the following points:
1. Tighten the engine hood fixing bolts to the specified
torque.
To r q u e : 1 3 N
m (1.3kgꞏm/113 lb in)
2. Adjust the engine hood mounting gap with reference
to Body Dimension in this section.
3. Check and see if the engine hood lock operates
normally.
Page 3214 of 6000
8F–19 BODY STRUCTURE
Engine Hood Lock
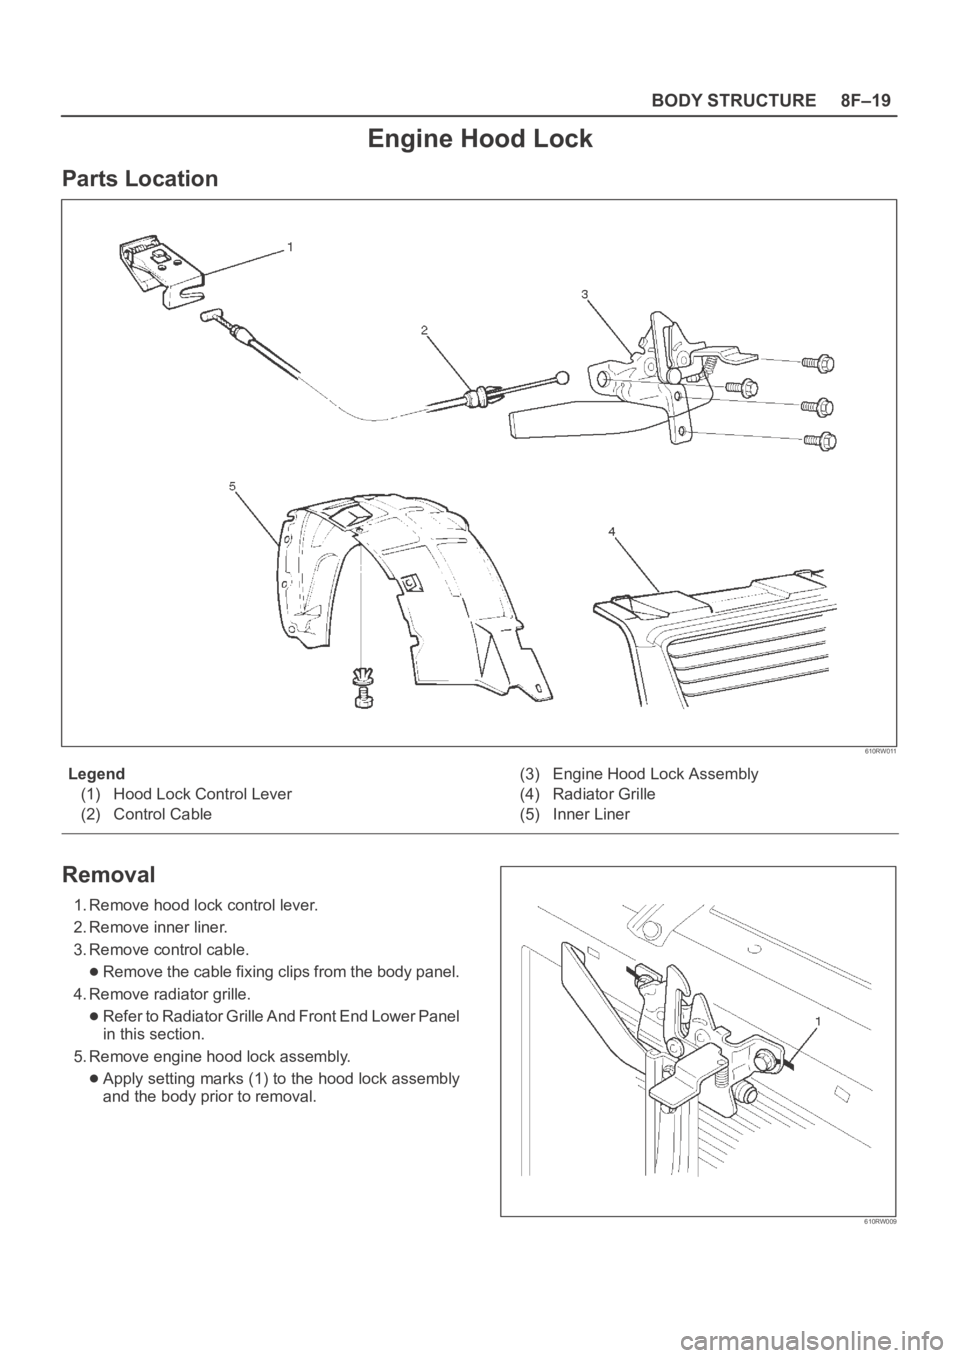
Parts Location
610RW011
Legend
(1) Hood Lock Control Lever
(2) Control Cable(3) Engine Hood Lock Assembly
(4) Radiator Grille
(5) Inner Liner
Removal
1. Remove hood lock control lever.
2. Remove inner liner.
3. Remove control cable.
Remove the cable fixing clips from the body panel.
4. Remove radiator grille.
Refer to Radiator Grille And Front End Lower Panel
in this section.
5. Remove engine hood lock assembly.
Apply setting marks (1) to the hood lock assembly
and the body prior to removal.
610RW009