1998 OPEL FRONTERA brake sensor
[x] Cancel search: brake sensorPage 875 of 6000

5B–3 ANTI–LOCK BRAKE SYSTEM
G-Sensor
Removal
350RX001
1. Remove center console.
Refer to Consoles in Body and Accessories
section.
2. Remove clip from G-sensor connector (1), then
disconnect connector.
3. Remove G-sensor assembly fixing bolt (2).
4. Remove G-sensor assembly (3).
Inspection and Repair
Refer to Chart B-5 in Brake Control System section.
Installation
1. Install G-sensor assembly (3).
Care should be taken so that the G-sensor is not
installed in the wrong direction.
2. Install G-sensor assembly fixing bolt (2).
Tighten the fixing bolt to the specified torque.
Torque : 10 Nꞏm (1.0kgꞏm/87 lb in)
3. Install G-sensor wiring connector (1).
4. Install center console.
Refer to Consoles in Body and Accessories
section.
Page 876 of 6000

5B–4ANTI–LOCK BRAKE SYSTEM
Front Wheel Speed Sensor
Front Wheel Speed Sensor and Associated Parts
350RW012
Legend
(1) Speed Sensor Connector
(2) Sensor Cable Fixing Bolt (Upper side)(3) Sensor Cable Fixing Bolt (Lower side)
(4) Sensor Cable Fixing Bolt (Sensor side)
(5) Speed Sensor
Removal
1. Remove speed sensor connector.
2. Remove sensor cable fixing bolt (Upper side).
3. Remove sensor cable fixing bolt (Lower side).
4. Remove the speed sensor cable fixing bolts (1) and
caliper fixing bolt (2) from caliper side speed sensor
cable bracket (3).
350RW010
5. Remove speed sensor.
Page 877 of 6000

5B–5 ANTI–LOCK BRAKE SYSTEM
Inspection and Repair
1. Check the speed sensor pole piece for presence of
foreign materials; remove any dirt, etc.
2. Check the pole piece for damage; replace speed
sensor if necessary.
3. Check the speed sensor cable for short or open
circuit, and replace with a new one if necessary.
To check for cable short or open, bend or stretch the
cable while checking for continuity.
4. Check the sensor ring for damage including tooth
chipping, and if damaged, replace the sensor ring
assembly. Refer to Front Hub and Disc in Drive Shaft
System section.
Installation
1. Install speed sensor and take care not to hit the speed
sensor pole piece during installation.
2. Install speed sensor fixing bolt and tighten the fixing
bolt to the specified torque.
Torque
Sensor side : 8 Nꞏm (0.8kgꞏm/69 lb in)
Caliper side : 155 Nꞏm (15.8kgꞏm/115 lb ft)
350RW011
Legend
(1) Caliper Fixing Bolt
(2) Bracket
(3) Sensor Fixing Bolt
(4) Sensor
(5) Knuckle
(6) Brake Caliper
3. Install speed sensor cable fixing bolt (Lower side) and
tighten the fixing bolt to the specified torque.
Torque : 24 Nꞏm (2.4kgꞏm/18 lb ft)
4. Install speed sensor cable fixing bolt (Upper side) and
tighten the fixing bolt to the specified torque.
Torque : 6 Nꞏm (0.6kgꞏm/52 lb in)NOTE: Confirm that a white line marked on the cable is
not twisted when connecting the speed sensor cable.
5. Install speed sensor connector.
Page 878 of 6000

5B–6ANTI–LOCK BRAKE SYSTEM
Rear Wheel Speed Sensor
Rear Wheel Speed Sensor and Associated Parts
350RW008
Legend
(1) Speed Sensor Connector
(2) Sensor Cable Fixing Bolt(3) Clip (11 pieces)
(4) Speed Sensor
(5) Sensor Fixing Bolt
Removal
1. Remove speed sensor connector.
2. Remove clip.
3. Remove sensor cable fixing bolt.
4. Remove sensor fixing bolt.
5. Remove speed sensor.
350RS035
Inspection and Repair
1. Check the speed sensor pole piece for presence of
foreign materials; remove any dirt, etc.2. Check the pole piece for damage, and replace the
speed sensor if necessary.
3. Check the speed sensor cable for a short or an open,
and replace with a new one if necessary. To check for
cable short or open, bend or stretch the cable while
checking for continuity.
4. Check the sensor ring for damage including tooth
chipping. If damaged replace the axle shaft assembly.
Refer to Front Hub and Disc in Drive Shaft System
section.
Installation
1. Install the speed sensor and take care not to hit the
speed sensor pole piece during installation.
2. Install the sensor fixing bolt and tighten it to the
specified torque.
Torque : 18 Nꞏm (1.8kgꞏm/13 lb ft)
3. Install the sensor cable fixing bolt and tighten it to the
specified torque.
Torque : 24 Nꞏm (2.4kgꞏm/18 lb ft)
NOTE: Confirm that the cable is not twisted when
connecting the speed sensor cable.
4. Install clip.
5. Install speed sensor connector.
Page 967 of 6000

6A–11
ENGINE MECHANICAL
Condition CorrectionPossible cause
Engine overheatingLevel of Engine Coolant too lowReplenish
Fan clutch defectiveReplace
Incorrect fan installedReplace
Thermostat defectiveReplace
Engine Coolant pump defectiveCorrect or replace
Radiator cloggedClean or replace
Radiator filler cap defectiveReplace
Level of oil in engine crankcase too
low or wrong engine oilChange or replenish
Resistance in exhaust system
increasedClean exhaust system or replace
defective parts
Throttle Position Sensor adjustment
incorrectReplace with Throttle Valve ASM
Throttle Position Sensor circuit open
or shortedCorrect or replace
Cylinder head gasket damagedReplace
Engine overcoolingThermostat defectiveReplace (Use a thermostat set to
open at 82
C (180F))
Engine lacks compression————Refer to Hard Start
OthersTire inflation pressure abnormalAdjust to recommended pressures
Brake dragAdjust
Clutch slippingAdjust or replace
Level of oil in engine crankcase too
highCorrect level of engine oil
Exhaust Gas Recirculation Valve
defectiveReplace
Engine Noisy
Abnormal engine noise often consists of various noises
originating in rotating parts, sliding parts and othermoving parts of the engine. It is, therefore, advisable to
locate the source of noise systematically.
Condition
Possible causeCorrection
Noise from crank journals or from
crank bearings
(Faulty crank journals and crankOil clearance increased due to worn
crank journals or crank bearingsReplace crank bearings and
crankshaft or regrind crankshaft and
install the undersize bearing
yj
bearings usually make dull noise that
becomes more evident when
accelerating)Crankshaft out of roundReplace crank bearings and
crankshaft or regrind crankshaft and
install the undersize bearing
Crank bearing seizedCrank bearing seized. Replace crank
bearings and crankshaft or regrind
crankshaft and install the undersize
bearing
Troubleshooting Procedure
Short out each spark plug in sequence using insulated
spark plug wire removers. Locate cylinder with defectivebearing by listening for abnormal noise that stops when
spark plug is shorted out.
Page 974 of 6000

6A–18
ENGINE MECHANICAL
Cylinder Head Cover LH
Removal
1. Disconnect battery ground cable.
2. Drain engine coolant from faucet bottom of radiator.
3. Remove engine cover from the dowels on the
common chamber.
F06RW018
4. Remove air cleaner duct assembly (3) and air cleaner
element (4).
130RW001
Legend
(1) Positive Crankcase Ventilation Hose Connector
(2) Intake Air Temperature Sensor
(3) Air Cleaner Duct Assembly
(4) Air Cleaner Element
(5) Mass Air Flow Sensor
NOTE: Disconnect the mass air flow (MAF) sensor
connector, intake air temperature (IAT) sensor connector,
and positive crankcase ventilation (PCV) hose before
hand the air cleaner duct assembly is removed.5. Disconnect following wiring connectors and bonding
cable:
Manifold Absolute Pressure (MAP) sensor
Vacuum Switching Valve (VSV) for Induction Air
Control Valve (IACV) actuator
Ignition coils for left bank
Fuel injectors for left bank
Idle air control (IAC) valve
Throttle position sensor (TPS)
Bonding cable
Others as necessitated
6. Disconnect following vacuum hoses:
Brake master VAC
Canister
VSV for IACV actuator
Duty solenoid valve
PCV
7. Disconnect radiator upper and lower hoses
8. Remove engine harness from the cylinder head
cover.
9. Remove the upper fan guide.
10. Remove cooling fan and clutch assembly.
11. Remove drive belt by pushing down the auto
tensioner using spanner as illustrated.
F06RW019
Page 1134 of 6000

6E–17 ENGINE DRIVEABILITY AND EMISSIONS
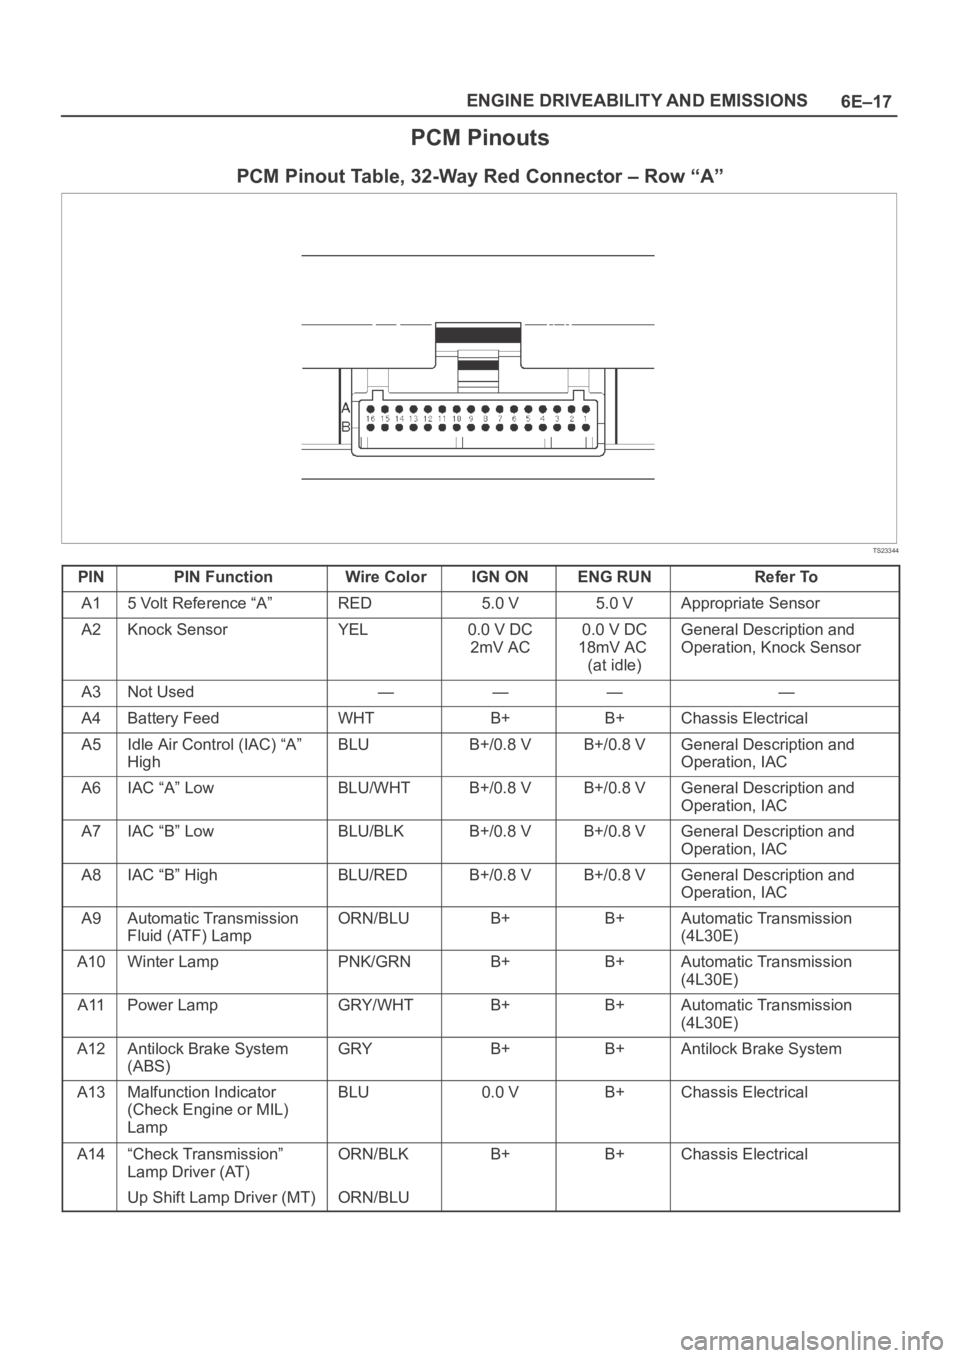
PCM Pinouts
PCM Pinout Table, 32-Way Red Connector – Row “A”
TS23344
PINPIN FunctionWire ColorIGN ONENG RUNRefer To
A15 Volt Reference “A”RED5.0 V5.0 VAppropriate Sensor
A2Knock SensorYEL0.0 V DC
2mV AC0.0 V DC
18mV AC
(at idle)General Description and
Operation, Knock Sensor
A3Not Used————
A4Battery FeedWHTB+B+Chassis Electrical
A5Idle Air Control (IAC) “A”
HighBLUB+/0.8 VB+/0.8 VGeneral Description and
Operation, IAC
A6IAC “A” LowBLU/WHTB+/0.8 VB+/0.8 VGeneral Description and
Operation, IAC
A7IAC “B” LowBLU/BLKB+/0.8 VB+/0.8 VGeneral Description and
Operation, IAC
A8IAC “B” HighBLU/REDB+/0.8 VB+/0.8 VGeneral Description and
Operation, IAC
A9Automatic Transmission
Fluid (ATF) LampORN/BLUB+B+Automatic Transmission
(4L30E)
A10Winter LampPNK/GRNB+B+Automatic Transmission
(4L30E)
A11Power LampGRY/WHTB+B+Automatic Transmission
(4L30E)
A12Antilock Brake System
(ABS)GRYB+B+Antilock Brake System
A13Malfunction Indicator
(Check Engine or MIL)
LampBLU0.0 VB+Chassis Electrical
A14“Check Transmission”
Lamp Driver (AT)ORN/BLKB+B+Chassis Electrical
Up Shift Lamp Driver (MT)ORN/BLU
Page 1187 of 6000

6E–70
ENGINE DRIVEABILITY AND EMISSIONS
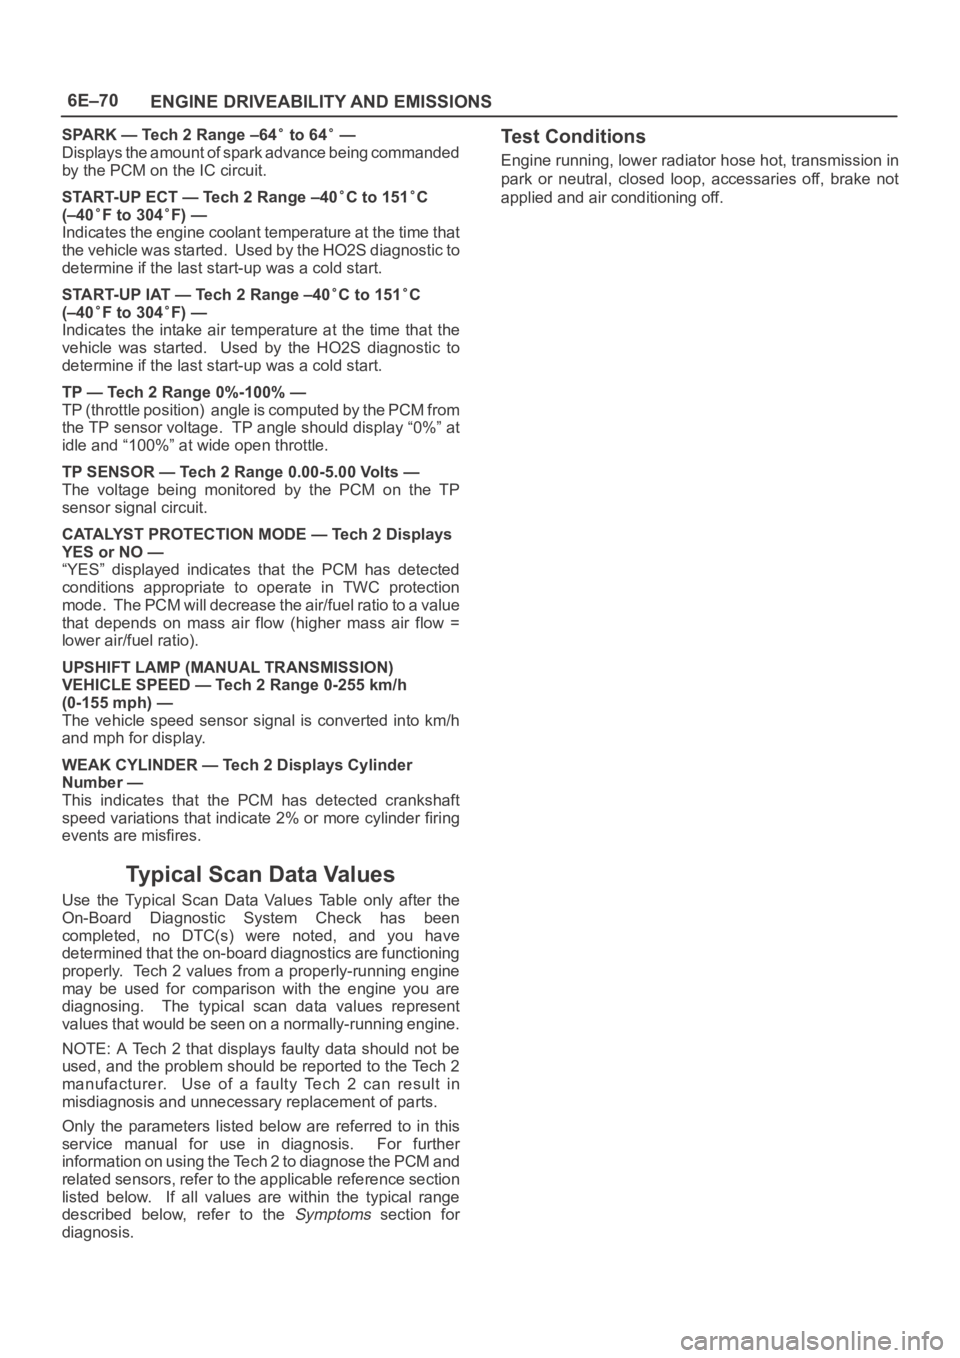
SPARK — Tech 2 Range –64 to 64 —
Displays the amount of spark advance being commanded
by the PCM on the IC circuit.
START-UP ECT — Tech 2 Range –40
C to 151C
(–40
F to 304F) —
Indicates the engine coolant temperature at the time that
the vehicle was started. Used by the HO2S diagnostic to
determine if the last start-up was a cold start.
START-UP IAT — Tech 2 Range –40
C to 151C
(–40
F to 304F) —
Indicates the intake air temperature at the time that the
vehicle was started. Used by the HO2S diagnostic to
determine if the last start-up was a cold start.
TP — Tech 2 Range 0%-100% —
TP (throttle position) angle is computed by the PCM from
the TP sensor voltage. TP angle should display “0%” at
idle and “100%” at wide open throttle.
TP SENSOR — Tech 2 Range 0.00-5.00 Volts —
The voltage being monitored by the PCM on the TP
sensor signal circuit.
CATALYST PROTECTION MODE — Tech 2 Displays
YES or NO —
“YES” displayed indicates that the PCM has detected
conditions appropriate to operate in TWC protection
mode. The PCM will decrease the air/fuel ratio to a value
that depends on mass air flow (higher mass air flow =
lower air/fuel ratio).
UPSHIFT LAMP (MANUAL TRANSMISSION)
VEHICLE SPEED — Tech 2 Range 0-255 km/h
(0-155 mph) —
The vehicle speed sensor signal is converted into km/h
and mph for display.
WEAK CYLINDER — Tech 2 Displays Cylinder
Number —
This indicates that the PCM has detected crankshaft
speed variations that indicate 2% or more cylinder firing
events are misfires.
Typical Scan Data Values
Use the Typical Scan Data Values Table only after the
On-Board Diagnostic System Check has been
completed, no DTC(s) were noted, and you have
determined that the on-board diagnostics are functioning
properly. Tech 2 values from a properly-running engine
may be used for comparison with the engine you are
diagnosing. The typical scan data values represent
values that would be seen on a normally-running engine.
NOTE: A Tech 2 that displays faulty data should not be
used, and the problem should be reported to the Tech 2
manufacturer. Use of a faulty Tech 2 can result in
misdiagnosis and unnecessary replacement of parts.
Only the parameters listed below are referred to in this
service manual for use in diagnosis. For further
information on using the Tech 2 to diagnose the PCM and
related sensors, refer to the applicable reference section
listed below. If all values are within the typical range
described below, refer to the
Symptoms section for
diagnosis.
Test Conditions
Engine running, lower radiator hose hot, transmission in
park or neutral, closed loop, accessaries off, brake not
applied and air conditioning off.