1998 OPEL FRONTERA Measurements
[x] Cancel search: MeasurementsPage 3533 of 6000
RESTRAINT CONTROL SYSTEM 9J1–46
warning lamp is performing the bulb check. When a scan
tool “Clear Codes” command is issued and themalfunction is still present, the DTC will not reappear until
the next ignition cycle.
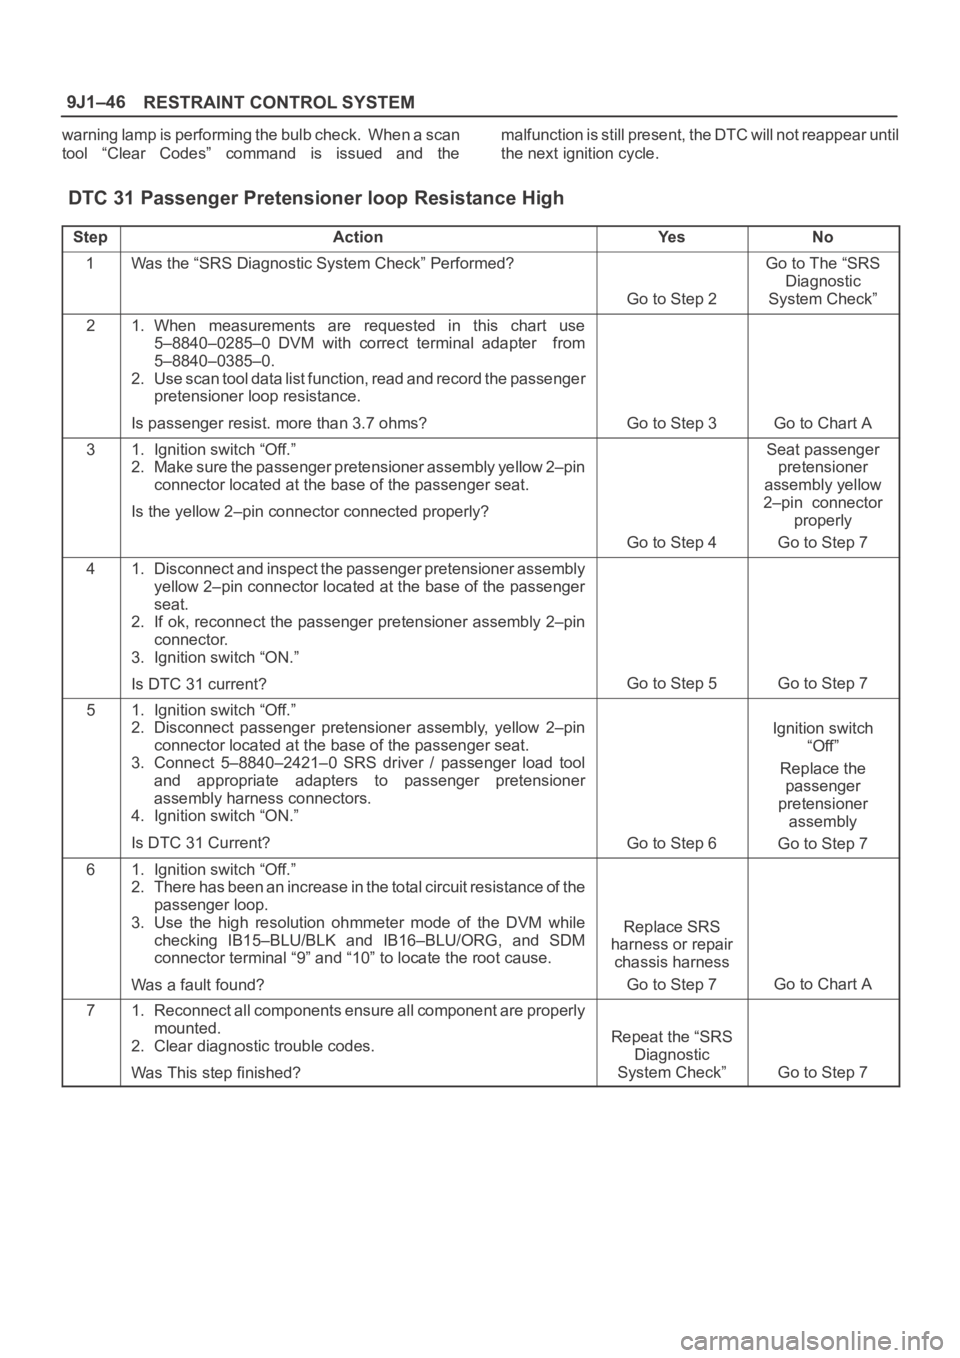
DTC 31 Passenger Pretensioner loop Resistance High
StepActionYe sNo
1Was the “SRS Diagnostic System Check” Performed?
Go to Step 2
Go to The “SRS
Diagnostic
System Check”
21. When measurements are requested in this chart use
5–8840–0285–0 DVM with correct terminal adapter from
5–8840–0385–0.
2. Use scan tool data list function, read and record the passenger
pretensioner loop resistance.
Is passenger resist. more than 3.7 ohms?
Go to Step 3Go to Chart A
31. Ignition switch “Off.”
2. Make sure the passenger pretensioner assembly yellow 2–pin
connector located at the base of the passenger seat.
Is the yellow 2–pin connector connected properly?
Go to Step 4
Seat passenger
pretensioner
assembly yellow
2–pin connector
properly
Go to Step 7
41. Disconnect and inspect the passenger pretensioner assembly
yellow 2–pin connector located at the base of the passenger
seat.
2. If ok, reconnect the passenger pretensioner assembly 2–pin
connector.
3. Ignition switch “ON.”
Is DTC 31 current?
Go to Step 5Go to Step 7
51. Ignition switch “Off.”
2. Disconnect passenger pretensioner assembly, yellow 2–pin
connector located at the base of the passenger seat.
3. Connect 5–8840–2421–0 SRS driver / passenger load tool
and appropriate adapters to passenger pretensioner
assembly harness connectors.
4. Ignition switch “ON.”
Is DTC 31 Current?
Go to Step 6
Ignition switch
“Off”
Replace the
passenger
pretensioner
assembly
Go to Step 7
61. Ignition switch “Off.”
2. There has been an increase in the total circuit resistance of t h e
passenger loop.
3. Use the high resolution ohmmeter mode of the DVM while
checking IB15–BLU/BLK and IB16–BLU/ORG, and SDM
connector terminal “9” and “10” to locate the root cause.
Was a fault found?
Replace SRS
harness or repair
chassis harness
Go to Step 7
Go to Chart A
71. Reconnect all components ensure all component are properly
mounted.
2. Clear diagnostic trouble codes.
Was This step finished?
Repeat the “SRS
Diagnostic
System Check”
Go to Step 7
Page 3535 of 6000
RESTRAINT CONTROL SYSTEM 9J1–48
performing the bulb check. When a scan tool “Clear
Codes” command is issued and the malfunction is stillpresent, the DTC will not reappear until the next ignition
cycle.
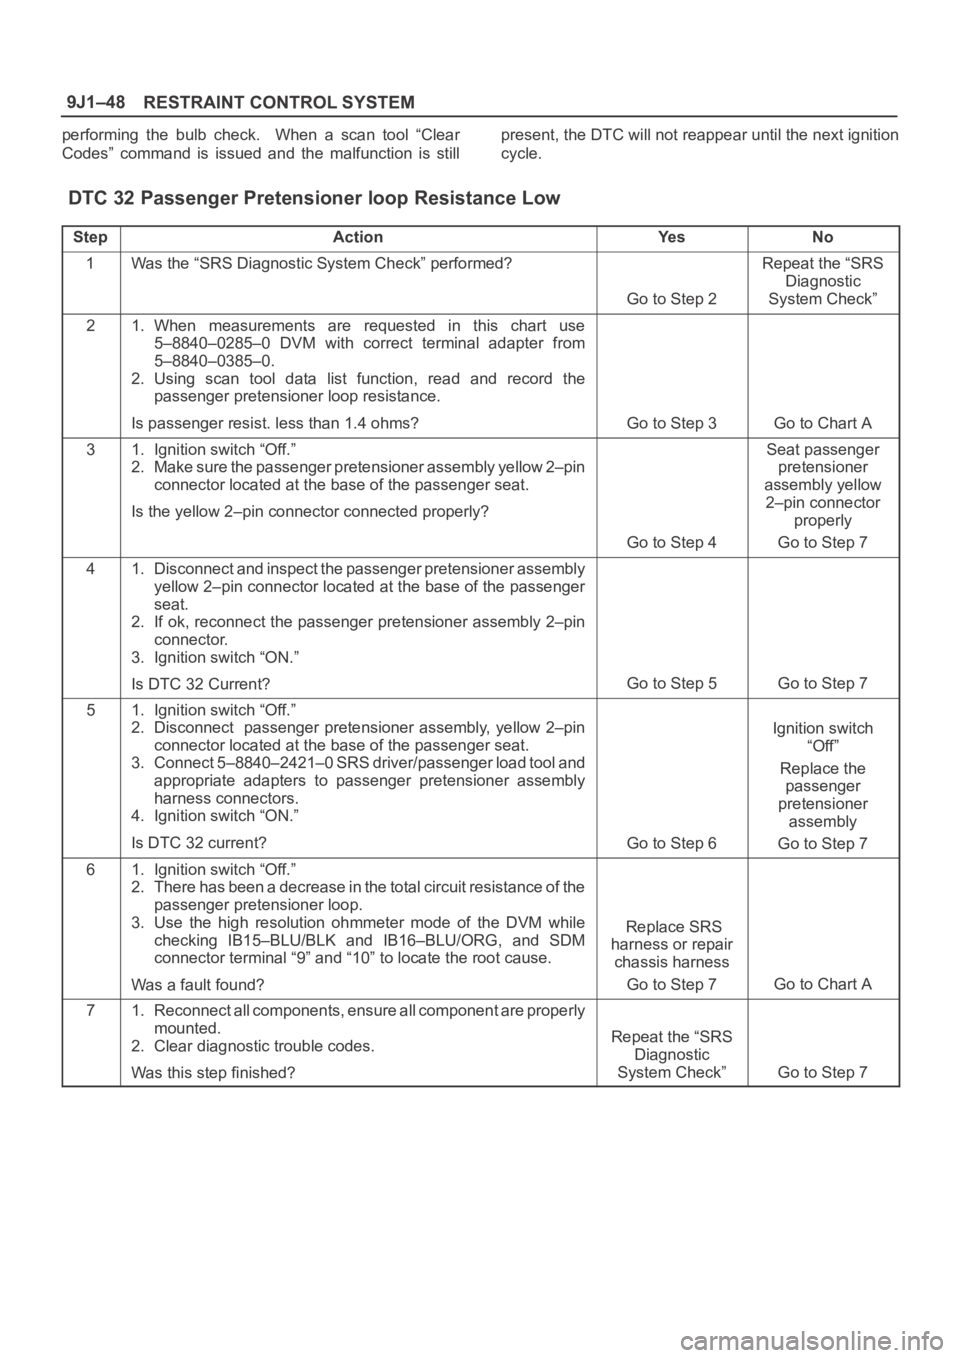
DTC 32 Passenger Pretensioner loop Resistance Low
StepActionYe sNo
1Was the “SRS Diagnostic System Check” performed?
Go to Step 2
Repeat the “SRS
Diagnostic
System Check”
21. When measurements are requested in this chart use
5–8840–0285–0 DVM with correct terminal adapter from
5–8840–0385–0.
2. Using scan tool data list function, read and record the
passenger pretensioner loop resistance.
Is passenger resist. less than 1.4 ohms?
Go to Step 3Go to Chart A
31. Ignition switch “Off.”
2. Make sure the passenger pretensioner assembly yellow 2–pin
connector located at the base of the passenger seat.
Is the yellow 2–pin connector connected properly?
Go to Step 4
Seat passenger
pretensioner
assembly yellow
2–pin connector
properly
Go to Step 7
41. Disconnect and inspect the passenger pretensioner assembly
yellow 2–pin connector located at the base of the passenger
seat.
2. If ok, reconnect the passenger pretensioner assembly 2–pin
connector.
3. Ignition switch “ON.”
Is DTC 32 Current?
Go to Step 5Go to Step 7
51. Ignition switch “Off.”
2. Disconnect passenger pretensioner assembly, yellow 2–pin
connector located at the base of the passenger seat.
3. Connect 5–8840–2421–0 SRS driver/passenger load tool and
appropriate adapters to passenger pretensioner assembly
harness connectors.
4. Ignition switch “ON.”
Is DTC 32 current?
Go to Step 6
Ignition switch
“Off”
Replace the
passenger
pretensioner
assembly
Go to Step 7
61. Ignition switch “Off.”
2. There has been a decrease in the total circuit resistance of the
passenger pretensioner loop.
3. Use the high resolution ohmmeter mode of the DVM while
checking IB15–BLU/BLK and IB16–BLU/ORG, and SDM
connector terminal “9” and “10” to locate the root cause.
Was a fault found?
Replace SRS
harness or repair
chassis harness
Go to Step 7
Go to Chart A
71. Reconnect all components, ensure all component are properly
mounted.
2. Clear diagnostic trouble codes.
Was this step finished?
Repeat the “SRS
Diagnostic
System Check”
Go to Step 7
Page 3537 of 6000
RESTRAINT CONTROL SYSTEM 9J1–50
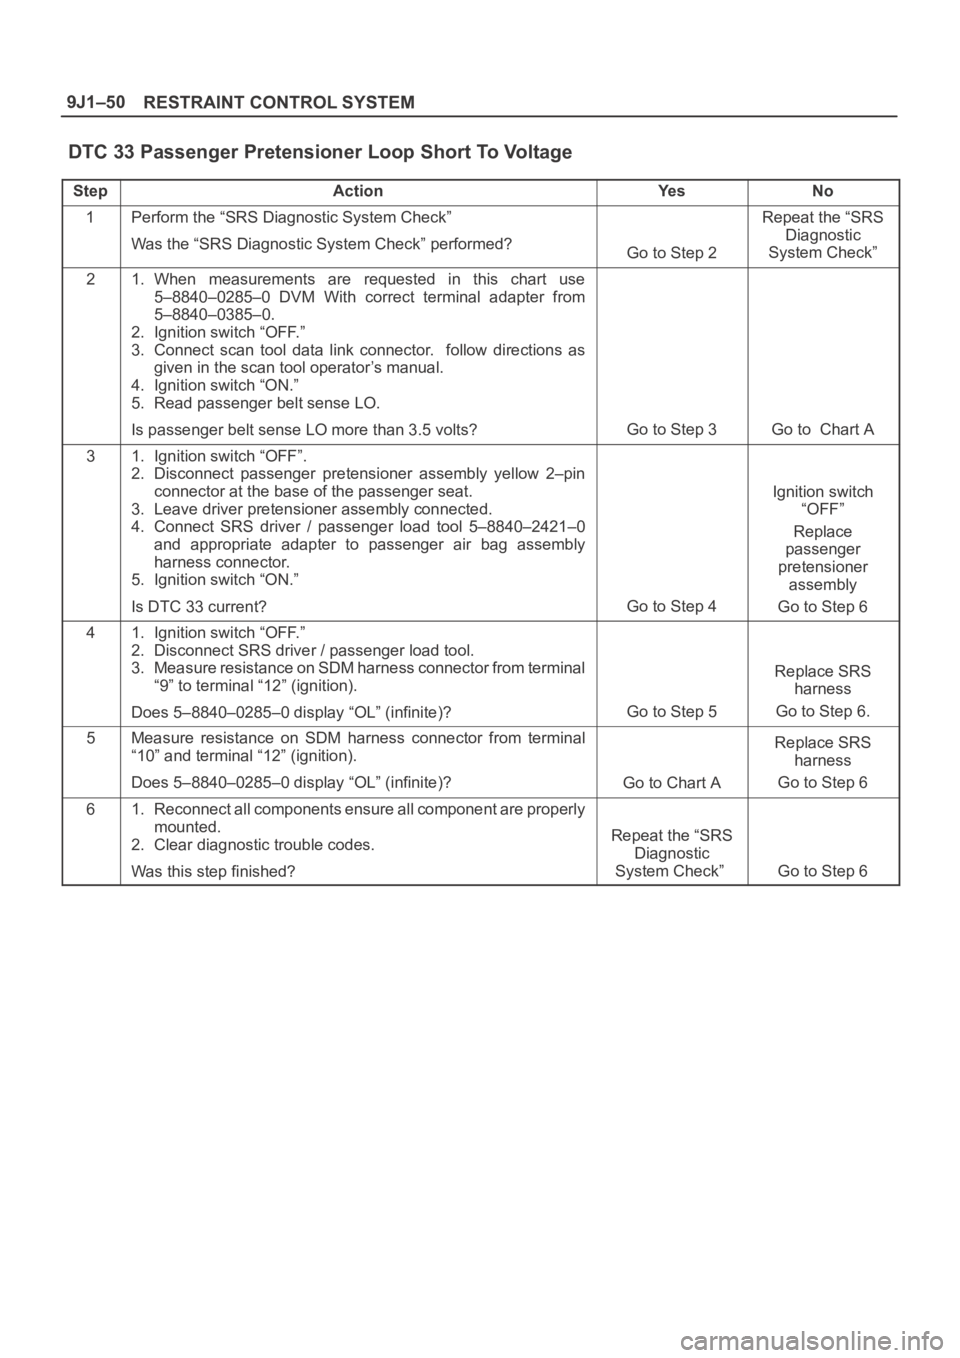
DTC 33 Passenger Pretensioner Loop Short To Voltage
StepActionYe sNo
1Perform the “SRS Diagnostic System Check”
Was the “SRS Diagnostic System Check” performed?
Go to Step 2
Repeat the “SRS
Diagnostic
System Check”
21. When measurements are requested in this chart use
5–8840–0285–0 DVM With correct terminal adapter from
5–8840–0385–0.
2. Ignition switch “OFF.”
3. Connect scan tool data link connector. follow directions as
given in the scan tool operator’s manual.
4. Ignition switch “ON.”
5. Read passenger belt sense LO.
Is passenger belt sense LO more than 3.5 volts?
Go to Step 3Go to Chart A
31. Ignition switch “OFF”.
2. Disconnect passenger pretensioner assembly yellow 2–pin
connector at the base of the passenger seat.
3. Leave driver pretensioner assembly connected.
4. Connect SRS driver / passenger load tool 5–8840–2421–0
and appropriate adapter to passenger air bag assembly
harness connector.
5. Ignition switch “ON.”
Is DTC 33 current?
Go to Step 4
Ignition switch
“OFF”
Replace
passenger
pretensioner
assembly
Go to Step 6
41. Ignition switch “OFF.”
2. Disconnect SRS driver / passenger load tool.
3. Measure resistance on SDM harness connector from terminal
“9” to terminal “12” (ignition).
Does 5–8840–0285–0 display “OL” (infinite)?
Go to Step 5
Replace SRS
harness
Go to Step 6.
5Measure resistance on SDM harness connector from terminal
“10” and terminal “12” (ignition).
Does 5–8840–0285–0 display “OL” (infinite)?
Go to Chart A
Replace SRS
harness
Go to Step 6
61. Reconnect all components ensure all component are properly
mounted.
2. Clear diagnostic trouble codes.
Was this step finished?
Repeat the “SRS
Diagnostic
System Check”
Go to Step 6
Page 3539 of 6000
RESTRAINT CONTROL SYSTEM 9J1–52
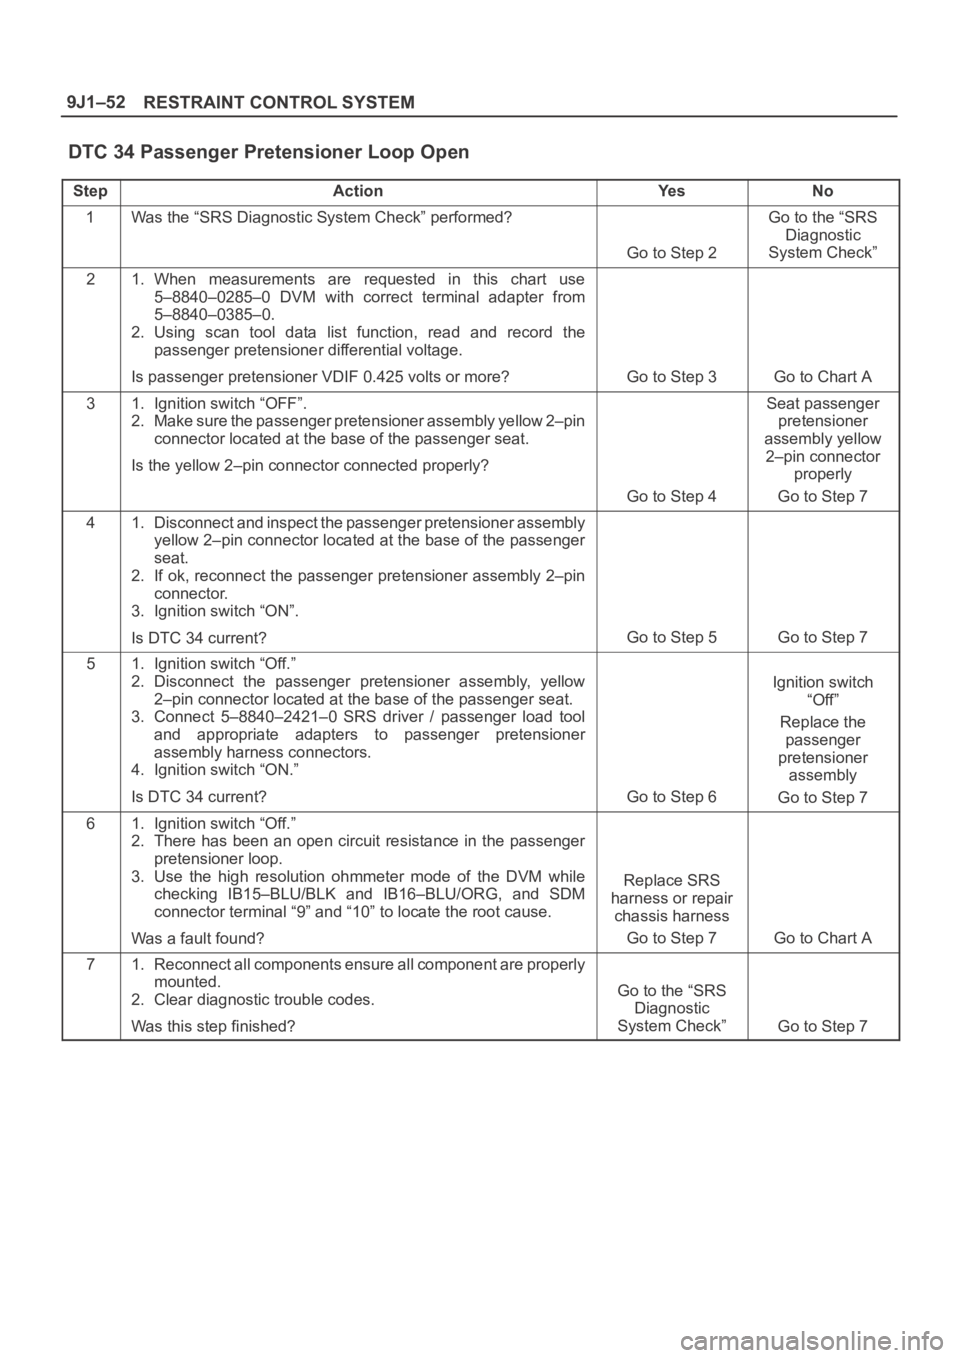
DTC 34 Passenger Pretensioner Loop Open
StepActionYe sNo
1Was the “SRS Diagnostic System Check” performed?
Go to Step 2
Go to the “SRS
Diagnostic
System Check”
21. When measurements are requested in this chart use
5–8840–0285–0 DVM with correct terminal adapter from
5–8840–0385–0.
2. Using scan tool data list function, read and record the
passenger pretensioner differential voltage.
Is passenger pretensioner VDIF 0.425 volts or more?
Go to Step 3Go to Chart A
31. Ignition switch “OFF”.
2. Make sure the passenger pretensioner assembly yellow 2–pin
connector located at the base of the passenger seat.
Is the yellow 2–pin connector connected properly?
Go to Step 4
Seat passenger
pretensioner
assembly yellow
2–pin connector
properly
Go to Step 7
41. Disconnect and inspect the passenger pretensioner assembly
yellow 2–pin connector located at the base of the passenger
seat.
2. If ok, reconnect the passenger pretensioner assembly 2–pin
connector.
3. Ignition switch “ON”.
Is DTC 34 current?
Go to Step 5Go to Step 7
51. Ignition switch “Off.”
2. Disconnect the passenger pretensioner assembly, yellow
2–pin connector located at the base of the passenger seat.
3. Connect 5–8840–2421–0 SRS driver / passenger load tool
and appropriate adapters to passenger pretensioner
assembly harness connectors.
4. Ignition switch “ON.”
Is DTC 34 current?
Go to Step 6
Ignition switch
“Off”
Replace the
passenger
pretensioner
assembly
Go to Step 7
61. Ignition switch “Off.”
2. There has been an open circuit resistance in the passenger
pretensioner loop.
3. Use the high resolution ohmmeter mode of the DVM while
checking IB15–BLU/BLK and IB16–BLU/ORG, and SDM
connector terminal “9” and “10” to locate the root cause.
Was a fault found?
Replace SRS
harness or repair
chassis harness
Go to Step 7
Go to Chart A
71. Reconnect all components ensure all component are properly
mounted.
2. Clear diagnostic trouble codes.
Was this step finished?
Go to the “SRS
Diagnostic
System Check”
Go to Step 7
Page 3541 of 6000
RESTRAINT CONTROL SYSTEM 9J1–54
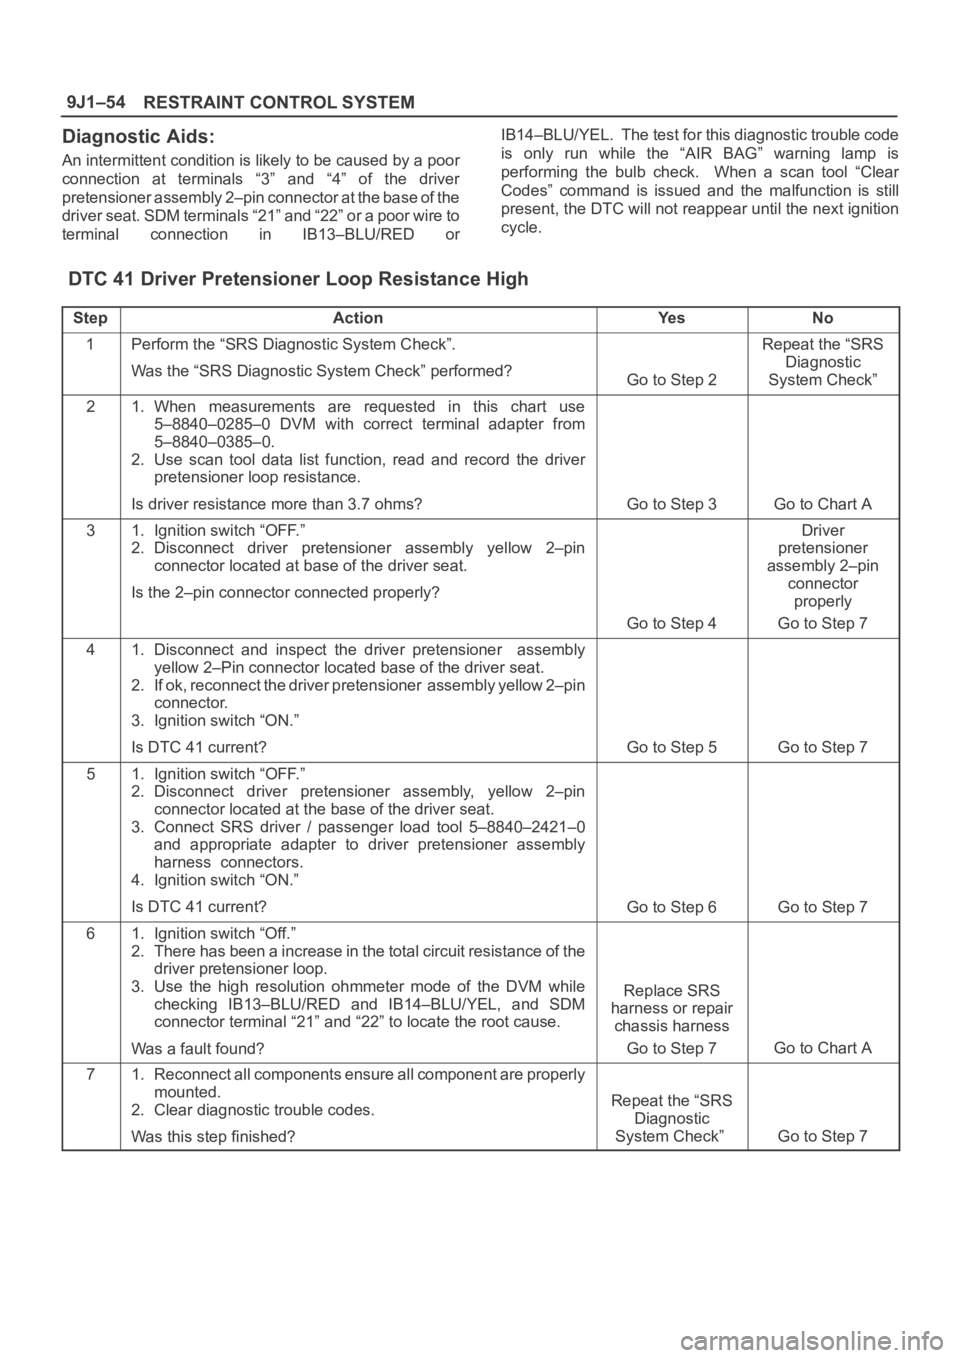
Diagnostic Aids:
An intermittent condition is likely to be caused by a poor
connection at terminals “3” and “4” of the driver
pretensioner assembly 2–pin connector at the base of the
driver seat. SDM terminals “21” and “22” or a poor wire to
terminal connection in IB13–BLU/RED orIB14–BLU/YEL. The test for this diagnostic trouble code
is only run while the “AIR BAG” warning lamp is
performing the bulb check. When a scan tool “Clear
Codes” command is issued and the malfunction is still
present, the DTC will not reappear until the next ignition
cycle.
DTC 41 Driver Pretensioner Loop Resistance High
StepActionYe sNo
1Perform the “SRS Diagnostic System Check”.
Was the “SRS Diagnostic System Check” performed?
Go to Step 2
Repeat the “SRS
Diagnostic
System Check”
21. When measurements are requested in this chart use
5–8840–0285–0 DVM with correct terminal adapter from
5–8840–0385–0.
2. Use scan tool data list function, read and record the driver
pretensioner loop resistance.
Is driver resistance more than 3.7 ohms?
Go to Step 3Go to Chart A
31. Ignition switch “OFF.”
2. Disconnect driver pretensioner assembly yellow 2–pin
connector located at base of the driver seat.
Is the 2–pin connector connected properly?
Go to Step 4
Driver
pretensioner
assembly 2–pin
connector
properly
Go to Step 7
41. Disconnect and inspect the driver pretensioner assembly
yellow 2–Pin connector located base of the driver seat.
2. If ok, reconnect the driver pretensioner assembly yellow 2–pin
connector.
3. Ignition switch “ON.”
Is DTC 41 current?
Go to Step 5Go to Step 7
51. Ignition switch “OFF.”
2. Disconnect driver pretensioner assembly, yellow 2–pin
connector located at the base of the driver seat.
3. Connect SRS driver / passenger load tool 5–8840–2421–0
and appropriate adapter to driver pretensioner assembly
harness connectors.
4. Ignition switch “ON.”
Is DTC 41 current?
Go to Step 6Go to Step 7
61. Ignition switch “Off.”
2. There has been a increase in the total circuit resistance of the
driver pretensioner loop.
3. Use the high resolution ohmmeter mode of the DVM while
checking IB13–BLU/RED and IB14–BLU/YEL, and SDM
connector terminal “21” and “22” to locate the root cause.
Was a fault found?
Replace SRS
harness or repair
chassis harness
Go to Step 7
Go to Chart A
71. Reconnect all components ensure all component are properly
mounted.
2. Clear diagnostic trouble codes.
Was this step finished?
Repeat the “SRS
Diagnostic
System Check”
Go to Step 7
Page 3543 of 6000
RESTRAINT CONTROL SYSTEM 9J1–56
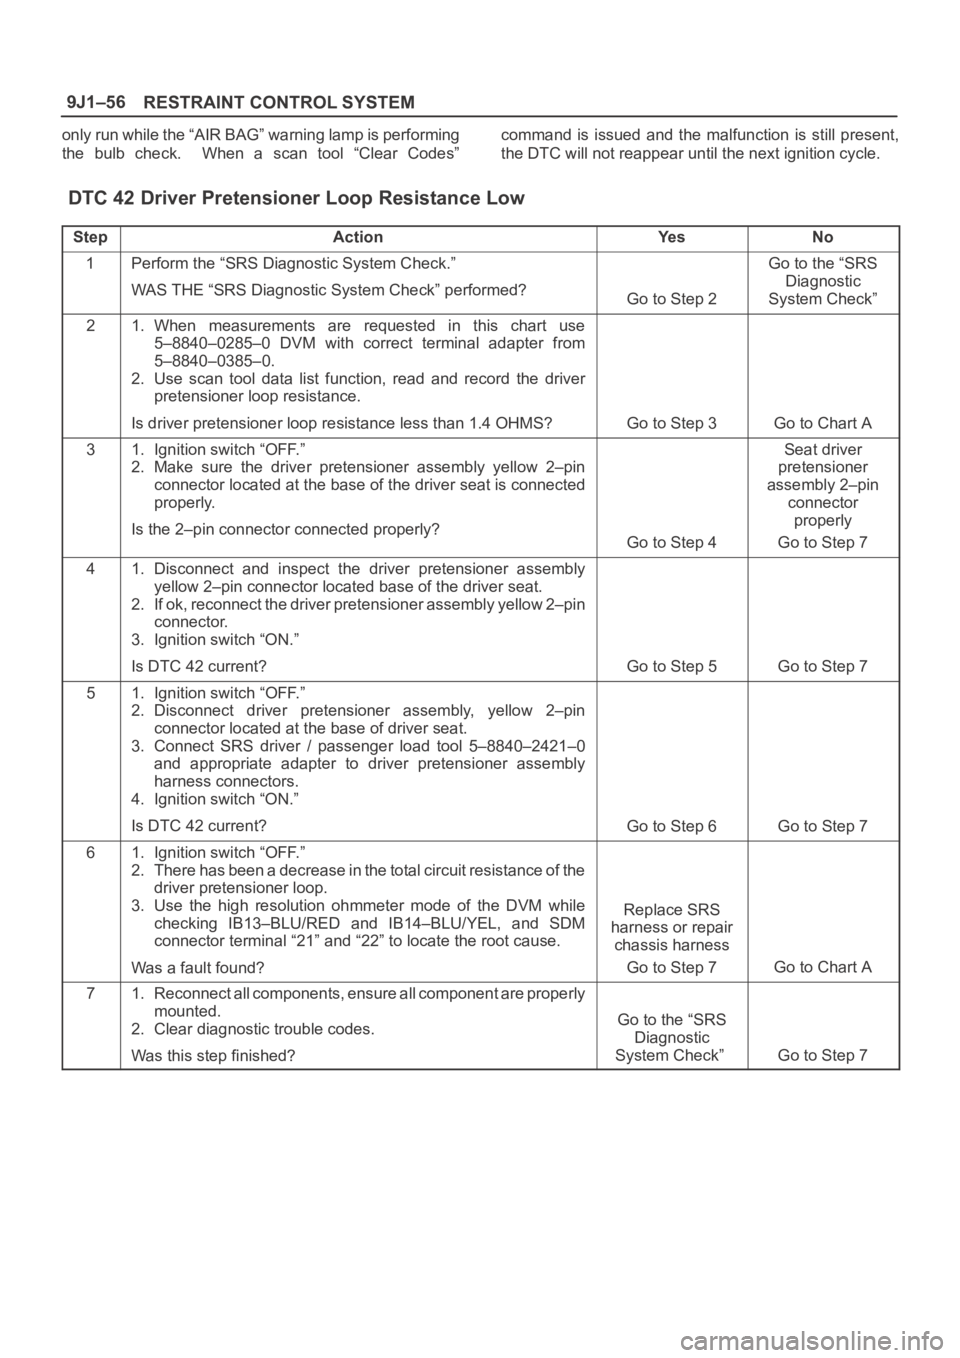
only run while the “AIR BAG” warning lamp is performing
the bulb check. When a scan tool “Clear Codes”command is issued and the malfunction is still present,
the DTC will not reappear until the next ignition cycle.
DTC 42 Driver Pretensioner Loop Resistance Low
StepActionYe sNo
1Perform the “SRS Diagnostic System Check.”
WAS THE “SRS Diagnostic System Check” performed?
Go to Step 2
Go to the “SRS
Diagnostic
System Check”
21. When measurements are requested in this chart use
5–8840–0285–0 DVM with correct terminal adapter from
5–8840–0385–0.
2. Use scan tool data list function, read and record the driver
pretensioner loop resistance.
Is driver pretensioner loop resistance less than 1.4 OHMS?
Go to Step 3Go to Chart A
31. Ignition switch “OFF.”
2. Make sure the driver pretensioner assembly yellow 2–pin
connector located at the base of the driver seat is connected
properly.
Is the 2–pin connector connected properly?
Go to Step 4
Seat driver
pretensioner
assembly 2–pin
connector
properly
Go to Step 7
41. Disconnect and inspect the driver pretensioner assembly
yellow 2–pin connector located base of the driver seat.
2. If ok, reconnect the driver pretensioner assembly yellow 2–pin
connector.
3. Ignition switch “ON.”
Is DTC 42 current?
Go to Step 5Go to Step 7
51. Ignition switch “OFF.”
2. Disconnect driver pretensioner assembly, yellow 2–pin
connector located at the base of driver seat.
3. Connect SRS driver / passenger load tool 5–8840–2421–0
and appropriate adapter to driver pretensioner assembly
harness connectors.
4. Ignition switch “ON.”
Is DTC 42 current?
Go to Step 6Go to Step 7
61. Ignition switch “OFF.”
2. There has been a decrease in the total circuit resistance of the
driver pretensioner loop.
3. Use the high resolution ohmmeter mode of the DVM while
checking IB13–BLU/RED and IB14–BLU/YEL, and SDM
connector terminal “21” and “22” to locate the root cause.
Was a fault found?
Replace SRS
harness or repair
chassis harness
Go to Step 7
Go to Chart A
71. Reconnect all components, ensure all component are properly
mounted.
2. Clear diagnostic trouble codes.
Was this step finished?
Go to the “SRS
Diagnostic
System Check”
Go to Step 7
Page 3545 of 6000
RESTRAINT CONTROL SYSTEM 9J1–58
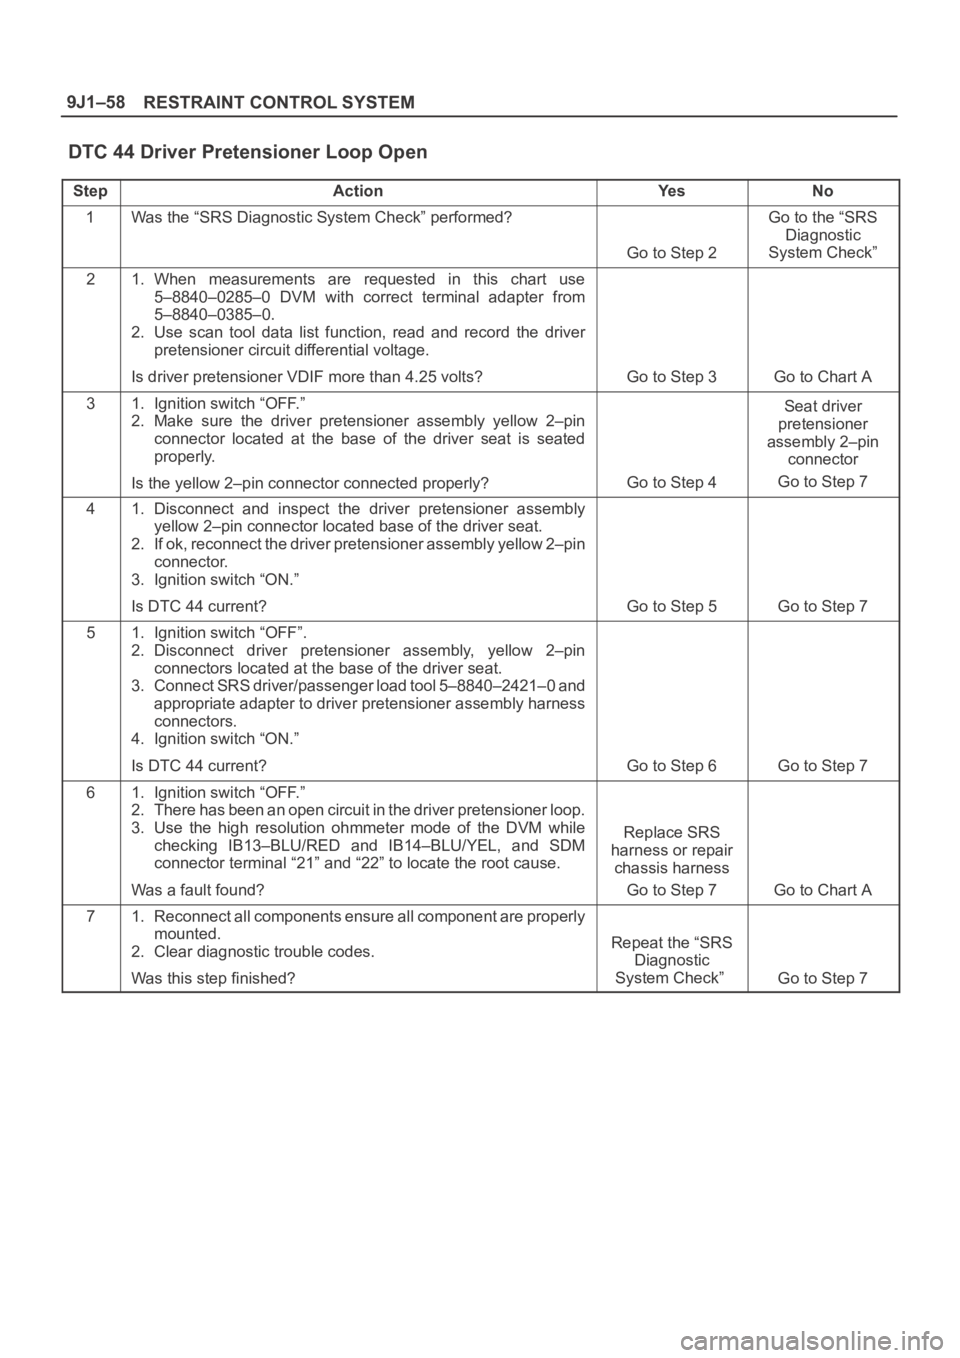
DTC 44 Driver Pretensioner Loop Open
StepActionYe sNo
1Was the “SRS Diagnostic System Check” performed?
Go to Step 2
Go to the “SRS
Diagnostic
System Check”
21. When measurements are requested in this chart use
5–8840–0285–0 DVM with correct terminal adapter from
5–8840–0385–0.
2. Use scan tool data list function, read and record the driver
pretensioner circuit differential voltage.
Is driver pretensioner VDIF more than 4.25 volts?
Go to Step 3Go to Chart A
31. Ignition switch “OFF.”
2. Make sure the driver pretensioner assembly yellow 2–pin
connector located at the base of the driver seat is seated
properly.
Is the yellow 2–pin connector connected properly?
Go to Step 4
Seat driver
pretensioner
assembly 2–pin
connector
Go to Step 7
41. Disconnect and inspect the driver pretensioner assembly
yellow 2–pin connector located base of the driver seat.
2. If ok, reconnect the driver pretensioner assembly yellow 2–pin
connector.
3. Ignition switch “ON.”
Is DTC 44 current?
Go to Step 5Go to Step 7
51. Ignition switch “OFF”.
2. Disconnect driver pretensioner assembly, yellow 2–pin
connectors located at the base of the driver seat.
3. Connect SRS driver/passenger load tool 5–8840–2421–0 and
appropriate adapter to driver pretensioner assembly harness
connectors.
4. Ignition switch “ON.”
Is DTC 44 current?
Go to Step 6Go to Step 7
61. Ignition switch “OFF.”
2. There has been an open circuit in the driver pretensioner loop.
3. Use the high resolution ohmmeter mode of the DVM while
checking IB13–BLU/RED and IB14–BLU/YEL, and SDM
connector terminal “21” and “22” to locate the root cause.
Was a fault found?
Replace SRS
harness or repair
chassis harness
Go to Step 7
Go to Chart A
71. Reconnect all components ensure all component are properly
mounted.
2. Clear diagnostic trouble codes.
Was this step finished?
Repeat the “SRS
Diagnostic
System Check”
Go to Step 7
Page 3547 of 6000

RESTRAINT CONTROL SYSTEM 9J1–60
DTC 45 Driver Pretensioner Loop Short To Ground
StepActionYe sNo
1Was the “SRS Diagnostic System Check” performed?
Go to Step 2
Go to the “SRS
Diagnostic
System Check”
21. When measurements are requested in this chart use
5–8840–0285–0 DVM with correct terminal adapter from
5–8840–0385–0.
2. Ignition switch “OFF.”
3. Connect scan tool data link connector. follow directions as
given in the scan tool operator’s manual.
4. Ignition switch “ON.”
5. Read driver belt sense LO.
Is driver belt sense LO less than 1.5 volts?
Go to Step 3Go to Chart A
31. Ignition switch “OFF.”
2. Disconnect driver pretensioner assembly yellow 2–pin
connector located at base of the driver seat, leave passenger
pretensioner assembly connected.
3. Connect SRS driver / passenger load tool 5–8840–2421–0
and appropriate adapter to driver pretensioner assembly
harness connector.
4. Ignition switch “ON.”
Is DTC 45 current?
Go to Step 4Go to Step 6
41. Ignition switch “OFF.”
2. Disconnect SDM.
3. Disconnect SRS driver / passenger load tool.
4. Measure resistance on SDM harness connector “21” to
terminal “6” (ground).
Does 5–8840–0285–0 display “OL” (infinite)?
Go to Step 5
Replace SRS
harness or repair
chassis harness
Go to Step 6
5Measure resistance on SDM harness connector from terminal
“22” to terminal “6” (ground).
Does 5–8840–0285–0 display “OL” (infinite)?
Go to Chart A
Replace SRS
harness or repair
chassis harness
Go to Step 6
61. Reconnect all components ensure all component are properly
mounted.
2. Clear diagnostic trouble codes.
Was this step finished?
Go to the “SRS
Diagnostic
System Check”
Go to Step 6