1998 OPEL FRONTERA Measurements
[x] Cancel search: MeasurementsPage 3549 of 6000

RESTRAINT CONTROL SYSTEM 9J1–62
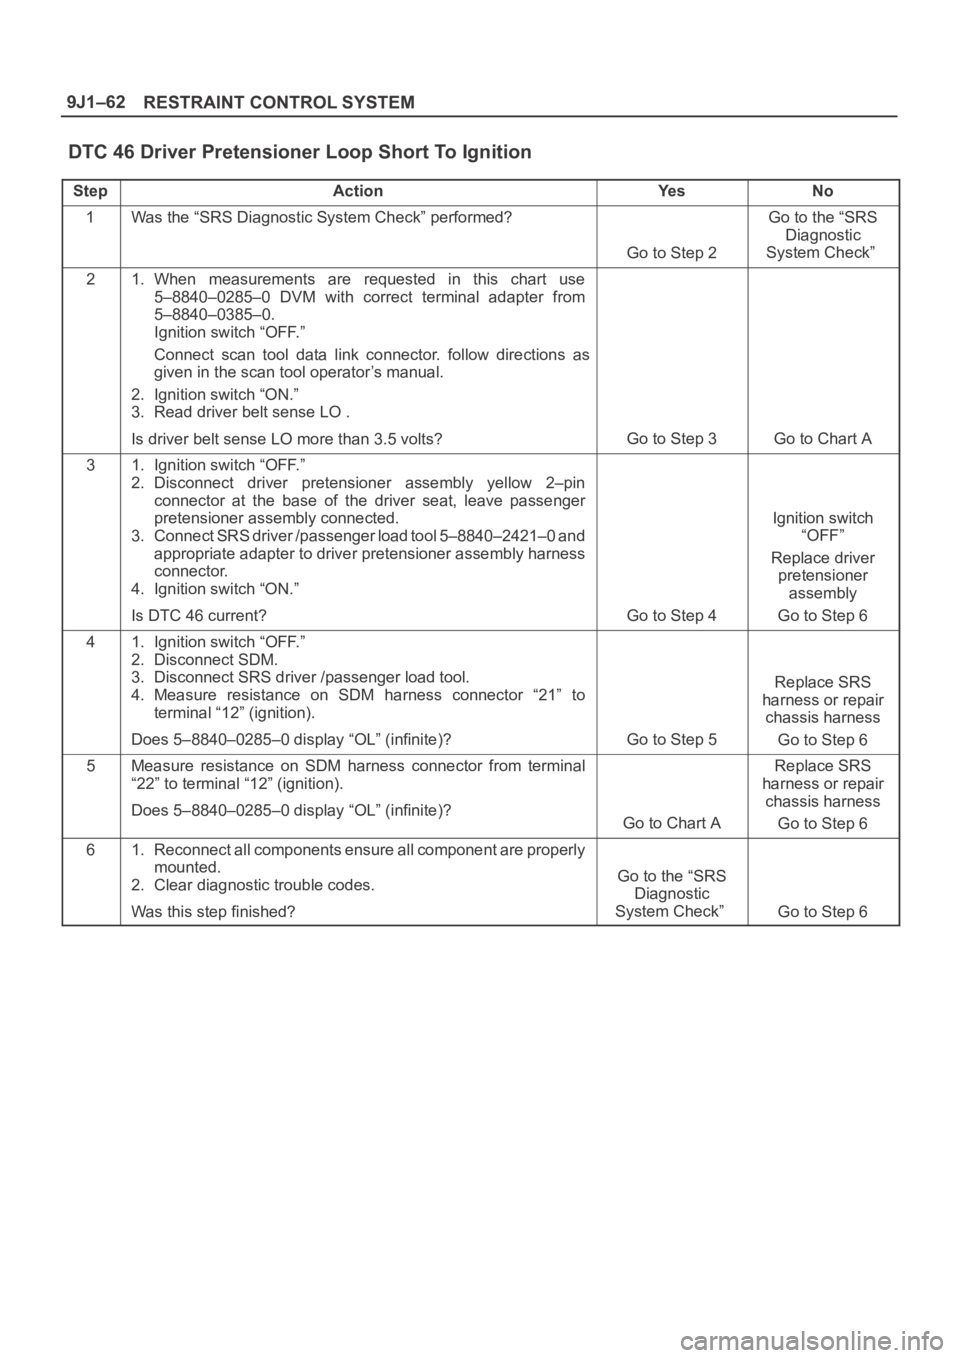
DTC 46 Driver Pretensioner Loop Short To Ignition
StepActionYe sNo
1Was the “SRS Diagnostic System Check” performed?
Go to Step 2
Go to the “SRS
Diagnostic
System Check”
21. When measurements are requested in this chart use
5–8840–0285–0 DVM with correct terminal adapter from
5–8840–0385–0.
Ignition switch “OFF.”
Connect scan tool data link connector. follow directions as
given in the scan tool operator’s manual.
2. Ignition switch “ON.”
3. Read driver belt sense LO .
Is driver belt sense LO more than 3.5 volts?
Go to Step 3Go to Chart A
31. Ignition switch “OFF.”
2. Disconnect driver pretensioner assembly yellow 2–pin
connector at the base of the driver seat, leave passenger
pretensioner assembly connected.
3. Connect SRS driver /passenger load tool 5–8840–2421–0 and
appropriate adapter to driver pretensioner assembly harness
connector.
4. Ignition switch “ON.”
Is DTC 46 current?
Go to Step 4
Ignition switch
“OFF”
Replace driver
pretensioner
assembly
Go to Step 6
41. Ignition switch “OFF.”
2. Disconnect SDM.
3. Disconnect SRS driver /passenger load tool.
4. Measure resistance on SDM harness connector “21” to
terminal “12” (ignition).
Does 5–8840–0285–0 display “OL” (infinite)?
Go to Step 5
Replace SRS
harness or repair
chassis harness
Go to Step 6
5Measure resistance on SDM harness connector from terminal
“22” to terminal “12” (ignition).
Does 5–8840–0285–0 display “OL” (infinite)?
Go to Chart A
Replace SRS
harness or repair
chassis harness
Go to Step 6
61. Reconnect all components ensure all component are properly
mounted.
2. Clear diagnostic trouble codes.
Was this step finished?
Go to the “SRS
Diagnostic
System Check”
Go to Step 6
Page 4355 of 6000

5A–5 BRAKE CONTROL SYSTEM
FR
Front Right
GEN
Generator
MV
Millivolts
RL
Rear Left
RR
Rear RightRPS
Revolution per Second
VDC
Vo l t s D C
VA C
Vo l t s A C
W/L
Warning Light
WSS
Wheel Speed Sensor
General Diagnosis
General Information
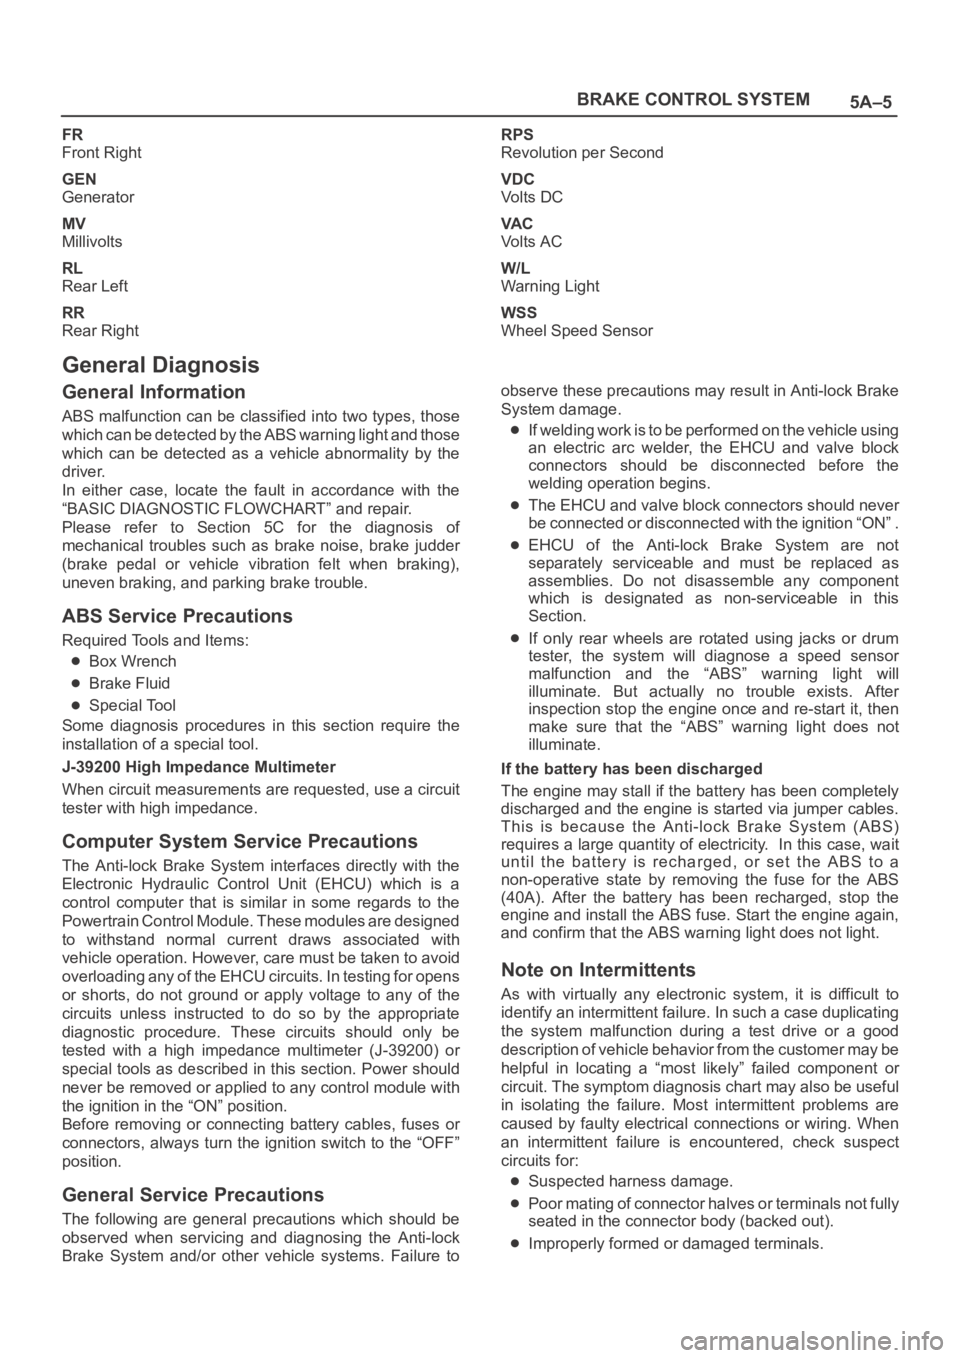
ABS malfunction can be classified into two types, those
which can be detected by the ABS warning light and those
which can be detected as a vehicle abnormality by the
driver.
In either case, locate the fault in accordance with the
“BASIC DIAGNOSTIC FLOWCHART” and repair.
Please refer to Section 5C for the diagnosis of
mechanical troubles such as brake noise, brake judder
(brake pedal or vehicle vibration felt when braking),
uneven braking, and parking brake trouble.
ABS Service Precautions
Required Tools and Items:
Box Wrench
Brake Fluid
Special Tool
Some diagnosis procedures in this section require the
installation of a special tool.
J-39200 High Impedance Multimeter
When circuit measurements are requested, use a circuit
tester with high impedance.
Computer System Service Precautions
The Anti-lock Brake System interfaces directly with the
Electronic Hydraulic Control Unit (EHCU) which is a
control computer that is similar in some regards to the
Powertrain Control Module. These modules are designed
to withstand normal current draws associated with
vehicle operation. However, care must be taken to avoid
overloading any of the EHCU circuits. In testing for opens
or shorts, do not ground or apply voltage to any of the
circuits unless instructed to do so by the appropriate
diagnostic procedure. These circuits should only be
tested with a high impedance multimeter (J-39200) or
special tools as described in this section. Power should
never be removed or applied to any control module with
the ignition in the “ON” position.
Before removing or connecting battery cables, fuses or
connectors, always turn the ignition switch to the “OFF”
position.
General Service Precautions
The following are general precautions which should be
observed when servicing and diagnosing the Anti-lock
Brake System and/or other vehicle systems. Failure toobserve these precautions may result in Anti-lock Brake
System damage.
If welding work is to be performed on the vehicle using
an electric arc welder, the EHCU and valve block
connectors should be disconnected before the
welding operation begins.
The EHCU and valve block connectors should never
be connected or disconnected with the ignition “ON” .
EHCU of the Anti-lock Brake System are not
separately serviceable and must be replaced as
assemblies. Do not disassemble any component
which is designated as non-serviceable in this
Section.
If only rear wheels are rotated using jacks or drum
tester, the system will diagnose a speed sensor
malfunction and the “ABS” warning light will
illuminate. But actually no trouble exists. After
inspection stop the engine once and re-start it, then
make sure that the “ABS” warning light does not
illuminate.
If the battery has been discharged
The engine may stall if the battery has been completely
discharged and the engine is started via jumper cables.
This is because the Anti-lock Brake System (ABS)
requires a large quantity of electricity. In this case, wait
until the battery is recharged, or set the ABS to a
non-operative state by removing the fuse for the ABS
(40A). After the battery has been recharged, stop the
engine and install the ABS fuse. Start the engine again,
and confirm that the ABS warning light does not light.
Note on Intermittents
As with virtually any electronic system, it is difficult to
identify an intermittent failure. In such a case duplicating
the system malfunction during a test drive or a good
description of vehicle behavior from the customer may be
helpful in locating a “most likely” failed component or
circuit. The symptom diagnosis chart may also be useful
in isolating the failure. Most intermittent problems are
caused by faulty electrical connections or wiring. When
an intermittent failure is encountered, check suspect
circuits for:
Suspected harness damage.
Poor mating of connector halves or terminals not fully
seated in the connector body (backed out).
Improperly formed or damaged terminals.
Page 4756 of 6000

6E–99 ENGINE DRIVEABILITY AND EMISSIONS
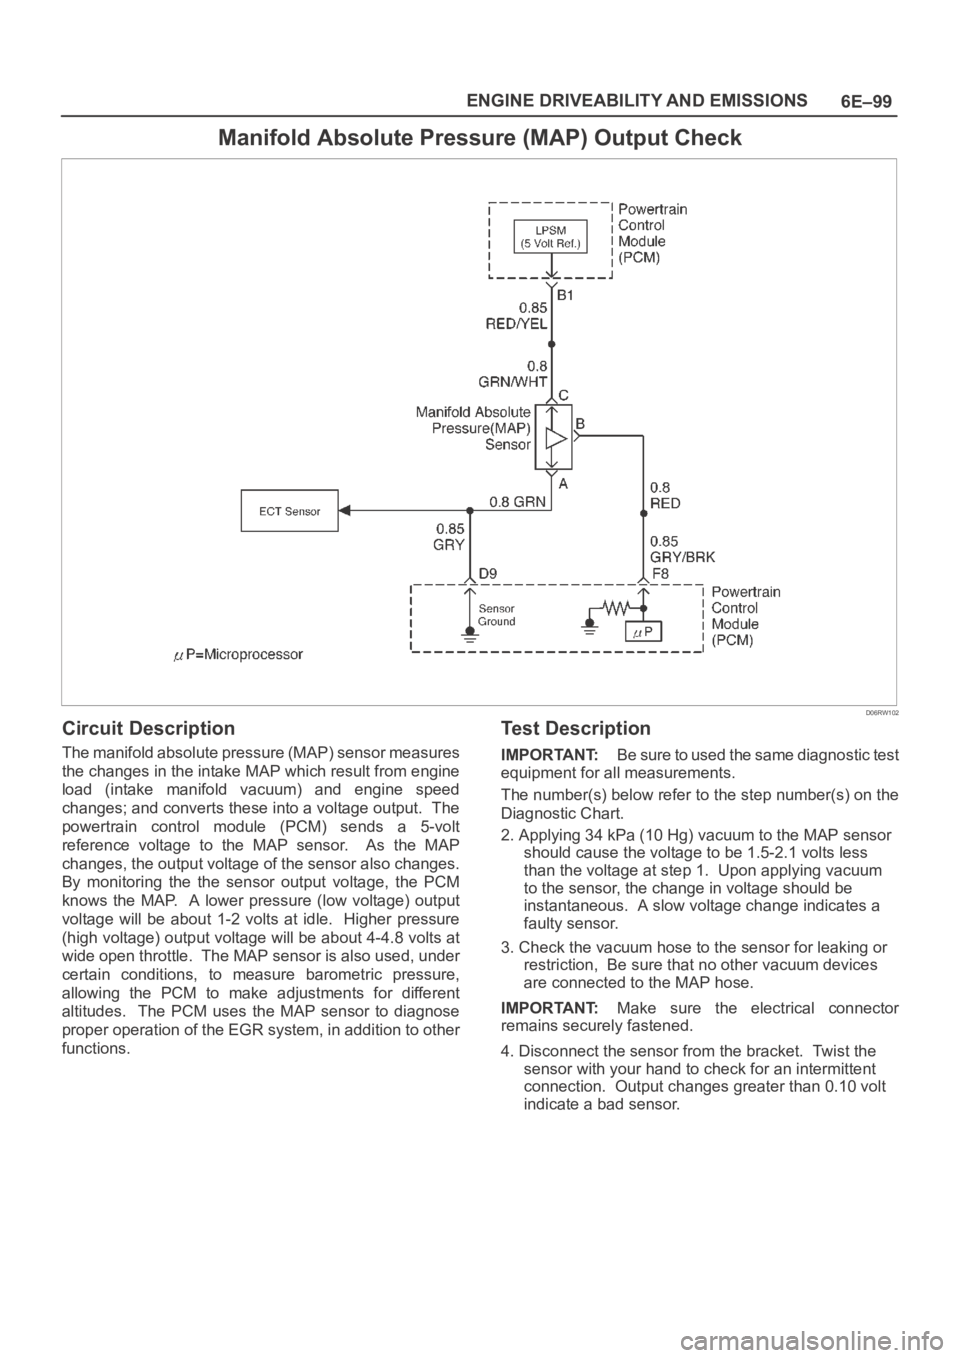
Manifold Absolute Pressure (MAP) Output Check
D06RW102
Circuit Description
The manifold absolute pressure (MAP) sensor measures
the changes in the intake MAP which result from engine
load (intake manifold vacuum) and engine speed
changes; and converts these into a voltage output. The
powertrain control module (PCM) sends a 5-volt
reference voltage to the MAP sensor. As the MAP
changes, the output voltage of the sensor also changes.
By monitoring the the sensor output voltage, the PCM
knows the MAP. A lower pressure (low voltage) output
voltage will be about 1-2 volts at idle. Higher pressure
(high voltage) output voltage will be about 4-4.8 volts at
wide open throttle. The MAP sensor is also used, under
certain conditions, to measure barometric pressure,
allowing the PCM to make adjustments for different
altitudes. The PCM uses the MAP sensor to diagnose
proper operation of the EGR system, in addition to other
functions.
Test Description
IMPORTANT:Be sure to used the same diagnostic test
equipment for all measurements.
The number(s) below refer to the step number(s) on the
Diagnostic Chart.
2. Applying 34 kPa (10 Hg) vacuum to the MAP sensor
should cause the voltage to be 1.5-2.1 volts less
than the voltage at step 1. Upon applying vacuum
to the sensor, the change in voltage should be
instantaneous. A slow voltage change indicates a
faulty sensor.
3. Check the vacuum hose to the sensor for leaking or
restriction, Be sure that no other vacuum devices
are connected to the MAP hose.
IMPORTANT:Make sure the electrical connector
remains securely fastened.
4. Disconnect the sensor from the bracket. Twist the
sensor with your hand to check for an intermittent
connection. Output changes greater than 0.10 volt
indicate a bad sensor.
Page 5845 of 6000

7A–64 AUTOMATIC TRANSMISSION (AW30-40LE)
F07RY00003
TIME LAG TEST
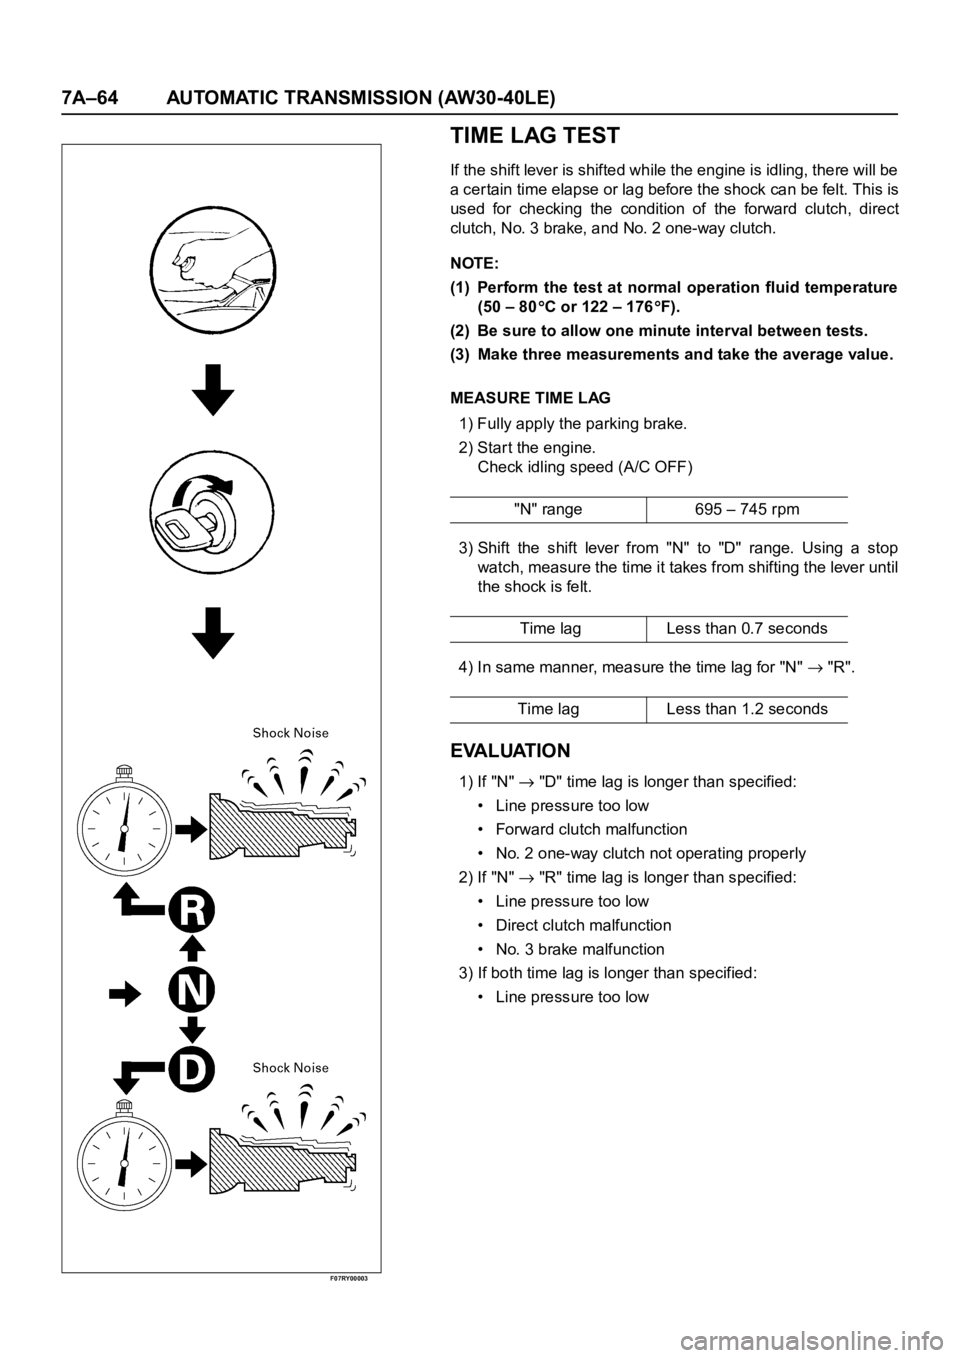
If the shift lever is shifted while the engine is idling, there will be
a cer tain time elapse or lag before the shock can be felt. This is
used for checking the condition of the forward clutch, direct
clutch, No. 3 brake, and No. 2 one-way clutch.
NOTE:
(1) Perform the test at normal operation fluid temperature
(50 – 80
C or 122 – 176F).
(2) Be sure to allow one minute interval between tests.
(3) Make three measurements and take the average value.
MEASURE TIME LAG
1) Fully apply the parking brake.
2) Start the engine.
Check idling speed (A/C OFF)
3) Shift the shift lever from "N" to "D" range. Using a stop
watch, measure the time it takes from shifting the lever until
the shock is felt.
4) In same manner, measure the time lag for "N"
"R".
EVALUATION
1) If "N" "D" time lag is longer than specified:
• Line pressure too low
• Forward clutch malfunction
• No. 2 one-way clutch not operating properly
2) If "N"
"R" time lag is longer than specified:
• Line pressure too low
• Direct clutch malfunction
• No. 3 brake malfunction
3) If both time lag is longer than specified:
• Line pressure too low"N" range 695 – 745 rpm
Time lag Less than 0.7 seconds
Time lag Less than 1.2 seconds