Page 4224 of 6000

4C–18
DRIVE SHAFT SYSTEM
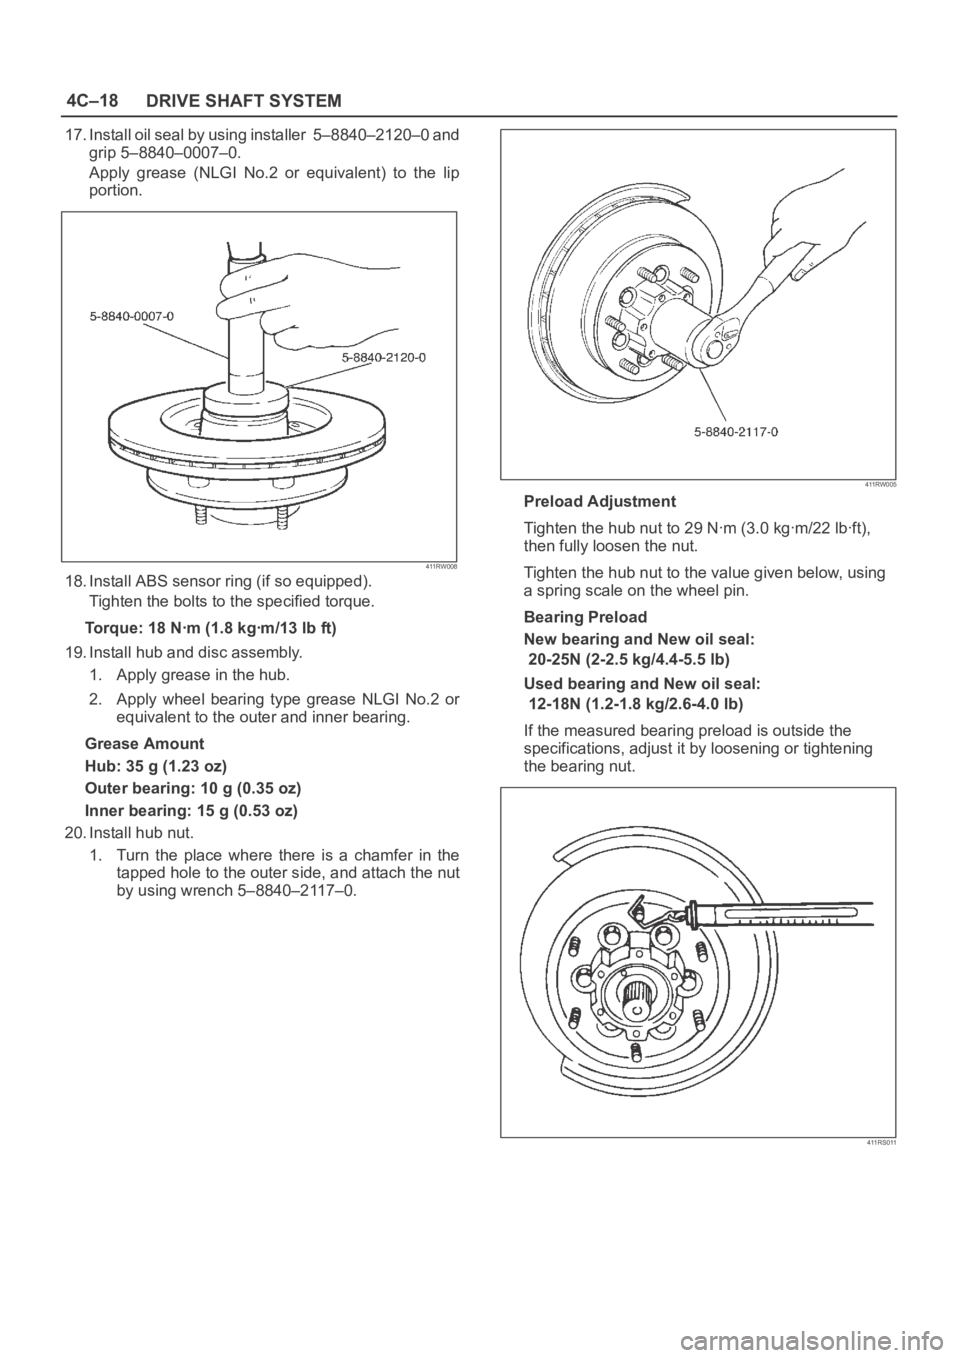
17. Install oil seal by using installer 5–8840–2120–0 and
grip 5–8840–0007–0.
Apply grease (NLGI No.2 or equivalent) to the lip
portion.
411RW008
18. Install ABS sensor ring (if so equipped).
Tighten the bolts to the specified torque.
Torque:18Nꞏm (1.8kgꞏm/13lbft)
19. Install hub and disc assembly.
1. Apply grease in the hub.
2. Apply wheel bearing type grease NLGI No.2 or
equivalent to the outer and inner bearing.
Grease Amount
Hub: 35 g (1.23 oz)
Outer bearing: 10 g (0.35 oz)
Inner bearing: 15 g (0.53 oz)
20. Install hub nut.
1. Turn the place where there is a chamfer in the
tapped hole to the outer side, and attach the nut
by using wrench 5–8840–2117–0.
411RW005
Preload Adjustment
Tighten the hub nut to 29 Nꞏm (3.0 kgꞏm/22 lbꞏft),
then fully loosen the nut.
Tighten the hub nut to the value given below, using
a spring scale on the wheel pin.
Bearing Preload
New bearing and New oil seal:
20-25N (2-2.5 kg/4.4-5.5 lb)
Used bearing and New oil seal:
12-18N (1.2-1.8 kg/2.6-4.0 lb)
If the measured bearing preload is outside the
specifications, adjust it by loosening or tightening
the bearing nut.
411RS011
Page 4225 of 6000

4C–19 DRIVE SHAFT SYSTEM
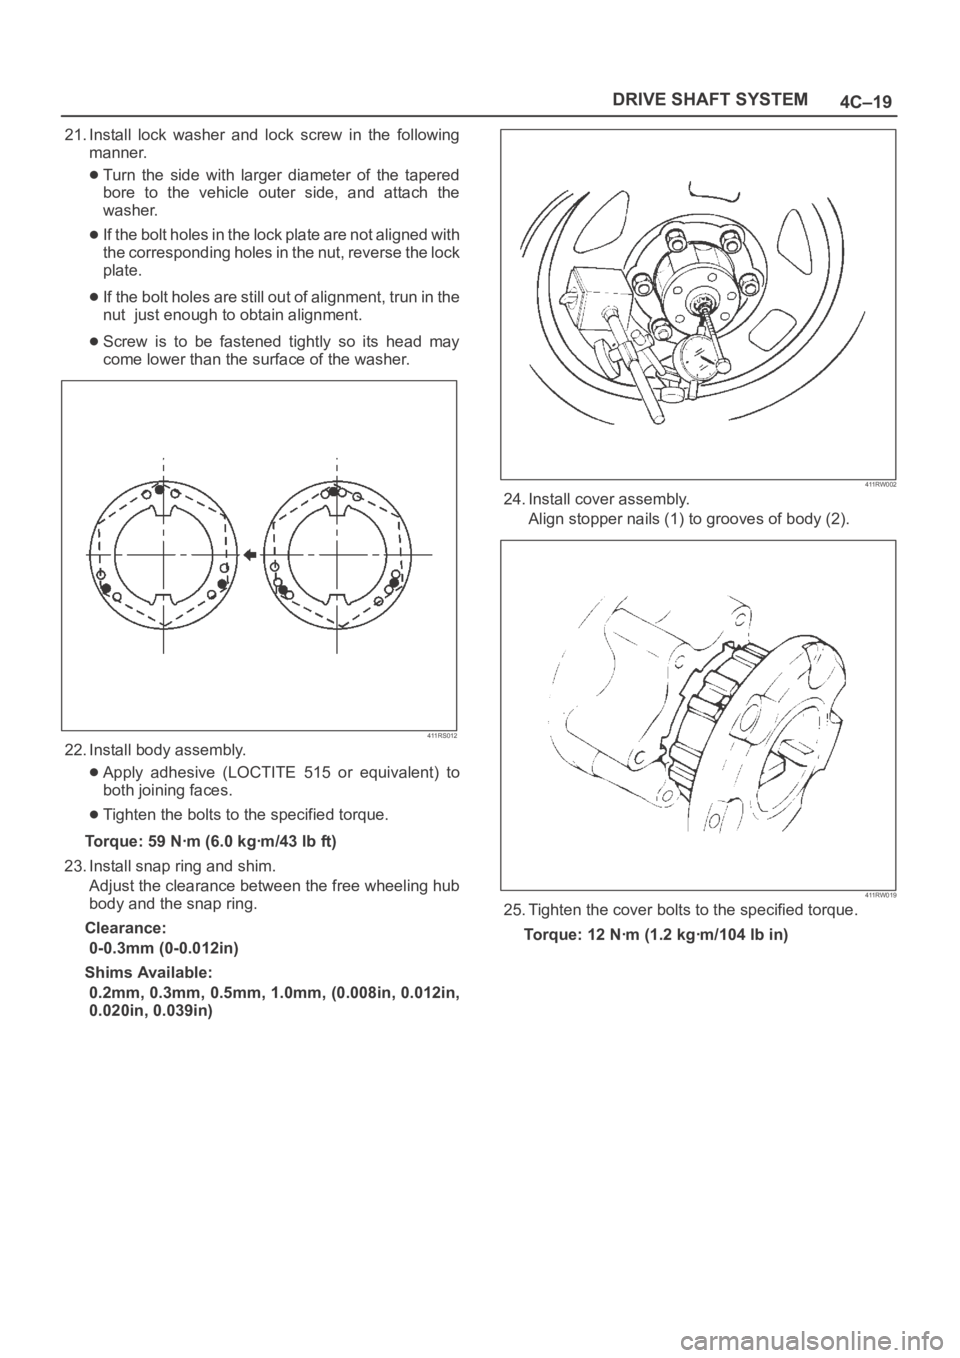
21. Install lock washer and lock screw in the following
manner.
Turn the side with larger diameter of the tapered
bore to the vehicle outer side, and attach the
washer.
If the bolt holes in the lock plate are not aligned with
the corresponding holes in the nut, reverse the lock
plate.
If the bolt holes are still out of alignment, trun in the
nut just enough to obtain alignment.
Screw is to be fastened tightly so its head may
come lower than the surface of the washer.
411RS012
22. Install body assembly.
Apply adhesive (LOCTITE 515 or equivalent) to
both joining faces.
Tighten the bolts to the specified torque.
Torque:59Nꞏm (6.0kgꞏm/43lbft)
23. Install snap ring and shim.
Adjust the clearance between the free wheeling hub
body and the snap ring.
Clearance:
0-0.3mm (0-0.012in)
Shims Available:
0.2mm, 0.3mm, 0.5mm, 1.0mm, (0.008in, 0.012in,
0.020in, 0.039in)
411RW002
24. Install cover assembly.
Align stopper nails (1) to grooves of body (2).
411RW019
25. Tighten the cover bolts to the specified torque.
Torque:12Nꞏm (1.2kgꞏm/104lbin)
Page 4228 of 6000
4C–22
DRIVE SHAFT SYSTEM
Front Drive Shaft Joint
Front Drive Shaft Joints Replace-
ment
Refer to Front Drive Axle Assembly Replacement in
this section, and refer to Front Hub and Disc in
Suspension section.
Front Hub Bearing Preload Check
Check the hub bearing preload at the wheel pin.
New bearing and New oil seal
Preload: 20 – 25 N (2.0 – 2.5 kg/4.4–5.5 lb)
New bearing and New oil seal
Preload: 12 –18 N (1.2 – 1.8 kg/2.6–4.0 lb)
411RS001
Inspection Of Shift On The Fly System
Gear Oil
412RT002
1. Open filler plug and make sure that the oil is up to the
plug port.
If the level oil is low, replenish with gear oil GL–5
grade.
2. Tighten the filler plug to specified torque.
Torque: 7.8 Nꞏm (7.9 kgꞏcm/58 lb in)
Page 4268 of 6000
TRANSFER CASE (STANDARD TYPE)
4D1–7
A/T, WO/Shift On The Fly, WO/4WD Switch, model
A07RW055
The transfer case is used to provide a means of providing
power flow to the front axle. The transfer case also
provides a means of disconnecting the front axle,
providing better fuel economy and quieter operation when
the vehicle is driven on improved roads where four wheel
drive is not required. In addition, the transfer case
provides an additional gear reduction when placed in low
range, which is useful when difficult off–road conditions
are encountered.
A floor mounted shift lever is used to select the high–low
range. When four wheel drive switch has been turned on,
the four wheel drive indicator light is designed to come on
when the front axle has been engaged.
Page 4304 of 6000
TRANSFER CASE (STANDARD TYPE)
4D1–43
Main Data and Specifications
General Specifications
Ty p eW/Shift On The Fly System model
Synchronized type gears shifting between the 2 and 4 wheel drive mode.
Constant mesh type gears shifting between “low” and “high”.
WO/Shift On The Fly System model
Constant mesh type gears shifting between the 2 and 4 wheel drive mode,
and between “low” and “high”.
Control methodW/4WD Switch model
Electric control with the button switch on the instrument panel for gear
shifting between the 2 and 4 wheel drive mode.
Remote control with the gear shift lever on the floor for gear shifting
between “low and high” .
WO/4WD Switch model
Remote control with the gear shift lever on the floor for gear shifting.
Gear ratioHigh; 1.000
Low; 2.050
Oil capacity1.45 lit. (1.53 U.S. quart)
Type of lubricantEngine oil
Refer to chart in Section 0
Torque Specifications
E07RW037
Page 4319 of 6000
4D2–12
TRANSFER CASE (TOD)
Transfer Cover Assembly
Disassembled View
261RW007
Legend
(1) Coil Assembly
(2) Snap Ring
(3) Ball Bearing(4) Speed Gear and Tone Wheel
(5) Ball Bearing
(6) Transfer Cover Assembly
(7) Front and Rear Speed Sensors
Disassembly
1. Using snap ring pliers, remove the snap ring.
261RW047
Page 4320 of 6000
4D2–13 TRANSFER CASE (TOD)
2. Strike the speed gear and tone wheel with a rod or
other appropriate tool from the outside of the transfer
cover assembly, and remove the ball bearing and
speed gear and tone wheel.
NOTE: Be careful not to damage the speed gear teeth.
266RW018
3. Remove the stopper plate on the back with a
precision screwdriver or other appropriate tool
starting from the small lock of the plate.
NOTE: Be careful not to damage the stopper plate during
the work.
261RW042
4. Using a terminal pull-out tool or an equivalent tool,
push down the lock to unlatch the terminal for the coil
assembly, and pull the terminal out.
NOTE: Be careful not to damage other terminals.
261RW032
5. Remove the fixing nuts of the coil assembly from the
outside of the transfer cover assembly. Remove the
coil assembly from the transfer cover.
261RW030
Page 4322 of 6000
4D2–15 TRANSFER CASE (TOD)
4. Apply a thin coat of grease to the seal ring of each
front and rear speed sensor, and mount the sensors
carefully.
5. Tighten the bolts to the specified torque.
Torque : 5 Nꞏm (0.5 kgꞏm/43 lb in)
NOTE: Pay attention not to mount the front (or rear)
sensor to the rear (or front) sensor position.
6. Install the ball bearing (1) for the front output shaft as
flat as shown in the figure.
261RW008
7. Mount the coil assembly and tighten the nuts to the
specified torque.
Torque : 10 Nꞏm (1.0 kgꞏm/87 lb in)
8. Connect the terminal in the central connector.
NOTE: Be careful not to damage other terminals.
9. Install speed gear and tone wheel.
10. Mount the ball bearing (2) as flat as shown in the
figure.
261RW009–1
11. Using snap ring pliers, install the snap ring to the
transfer cover assembly.NOTE: Securely install the snap ring to the groove of the
transfer cover assembly.