Page 3417 of 6000
8J–38EXTERIOR/INTERIOR TRIM
Power Door Mirror System
General Description
The circuit consists of the starter switch, door mirror
control switch, folding switch, defogger switch and door
mirrors on both sides.
The door mirror switch consists of the control switch,
folding switch and defogger switch.
When the control switch is operated with the starter
switch at either “ACC” or “ON” position, the motors
incorporated in the door mirrors on both sides rotates to
allow the horizontal and vertical adjustment of mirror
angles.
The folding switch can be used to fold the mirror and
return it to its original position.
When turning on the door mirror defogger switch with the
starter switch at “ON” position, built-in heater in the mirror
is activated to perform the defogger function.
Door Mirror Switch Assembly (Con-
trol Switch, Folding Switch and De-
fogger Switch) Removal
1. Disconnect the battery ground cable.
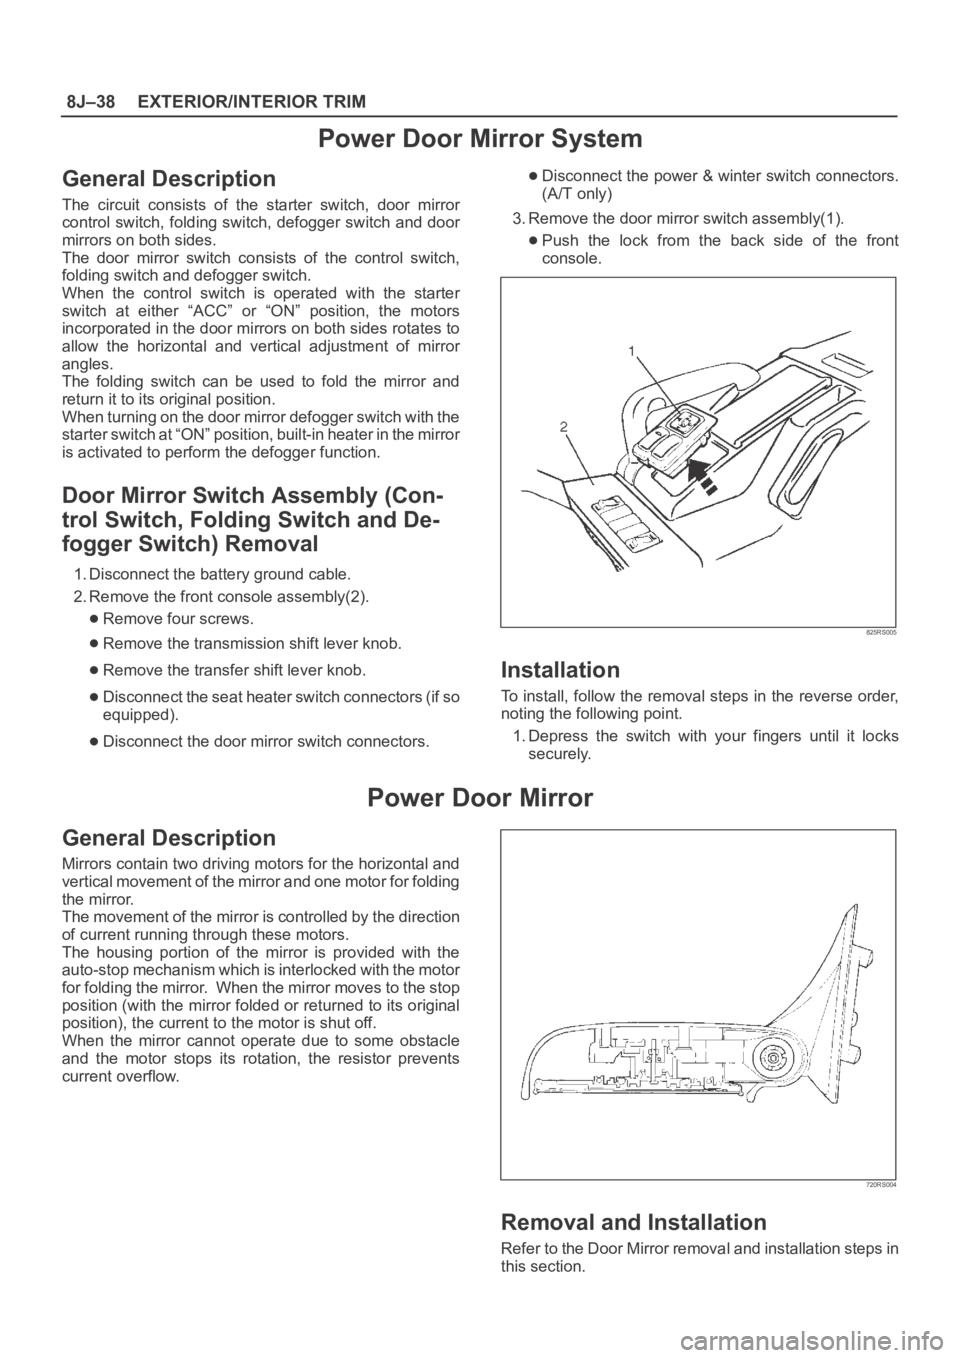
2. Remove the front console assembly(2).
Remove four screws.
Remove the transmission shift lever knob.
Remove the transfer shift lever knob.
Disconnect the seat heater switch connectors (if so
equipped).
Disconnect the door mirror switch connectors.
Disconnect the power & winter switch connectors.
(A/T only)
3. Remove the door mirror switch assembly(1).
Push the lock from the back side of the front
console.
825RS005
Installation
To install, follow the removal steps in the reverse order,
noting the following point.
1. Depress the switch with your fingers until it locks
securely.
Power Door Mirror
General Description
Mirrors contain two driving motors for the horizontal and
vertical movement of the mirror and one motor for folding
the mirror.
The movement of the mirror is controlled by the direction
of current running through these motors.
The housing portion of the mirror is provided with the
auto-stop mechanism which is interlocked with the motor
for folding the mirror. When the mirror moves to the stop
position (with the mirror folded or returned to its original
position), the current to the motor is shut off.
When the mirror cannot operate due to some obstacle
and the motor stops its rotation, the resistor prevents
current overflow.
720RS004
Removal and Installation
Refer to the Door Mirror removal and installation steps in
this section.
Page 3418 of 6000
EXTERIOR/INTERIOR TRIM8J–39
Power Window System
General Description
The circuit consists of the starter switch, (door lock &)
power window switch for each of the front windows,
p o w e r w i n d o w s w i t c h f o r r e a r w i n d o w s a n d p o w e r w i n d o w
motors.
When the starter switch is turned on, the battery voltage is
applied to each of the power window switches through the
circuit breaker and the power window relay on the circuit.
The “Down” switch of the driver’s power window switch
has a built-in function which can be operated by just
touching it.
Accordingly, the window will roll down automatically by
just setting the switch to the “AUTO” position.
When the driver’s power lock switch at the driver side is
depressed, the power source to the passenger’s power
window switches are shut off. So, even if these switches
are operated, the power window motor will not operate.
Power Window Switch Removal and
Installation
Driver Seat Side
Removal
1. Disconnect the battery ground cable.
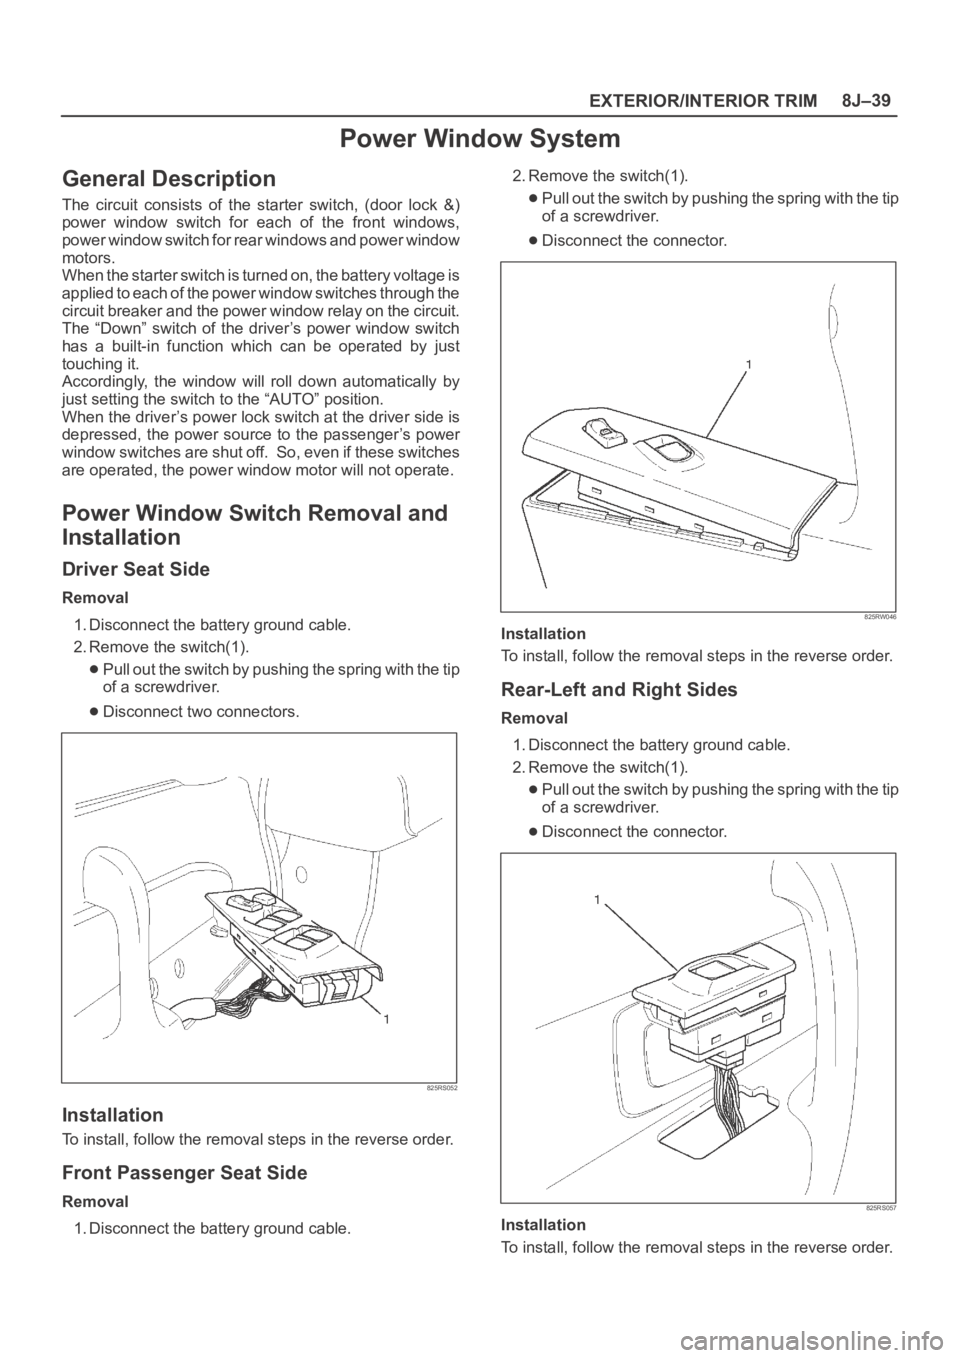
2. Remove the switch(1).
Pull out the switch by pushing the spring with the tip
of a screwdriver.
Disconnect two connectors.
825RS052
Installation
To install, follow the removal steps in the reverse order.
Front Passenger Seat Side
Removal
1. Disconnect the battery ground cable.2. Remove the switch(1).
Pull out the switch by pushing the spring with the tip
of a screwdriver.
Disconnect the connector.
825RW046
Installation
To install, follow the removal steps in the reverse order.
Rear-Left and Right Sides
Removal
1. Disconnect the battery ground cable.
2. Remove the switch(1).
Pull out the switch by pushing the spring with the tip
of a screwdriver.
Disconnect the connector.
825RS057
Installation
To install, follow the removal steps in the reverse order.
Page 3419 of 6000
8J–40EXTERIOR/INTERIOR TRIM
Power Window Motor Removal and
Installation
Driver Seat Side
Removal
1. Disconnect the battery ground cable.
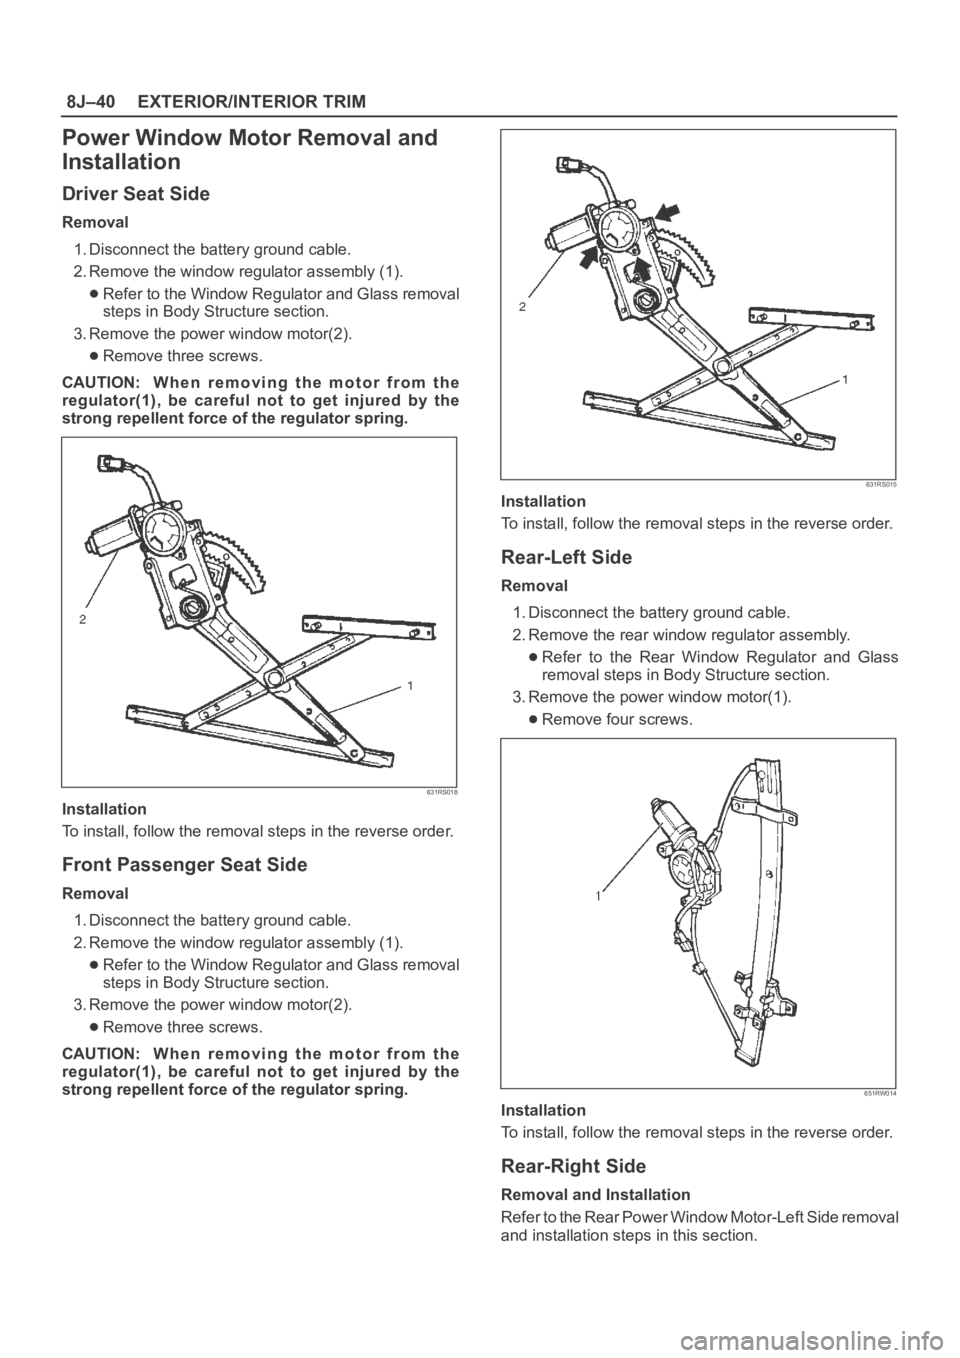
2. Remove the window regulator assembly (1).
Refer to the Window Regulator and Glass removal
steps in Body Structure section.
3. Remove the power window motor(2).
Remove three screws.
CAUTION: When removing the motor from the
regulator(1), be careful not to get injured by the
strong repellent force of the regulator spring.
631RS018
Installation
To install, follow the removal steps in the reverse order.
Front Passenger Seat Side
Removal
1. Disconnect the battery ground cable.
2. Remove the window regulator assembly (1).
Refer to the Window Regulator and Glass removal
steps in Body Structure section.
3. Remove the power window motor(2).
Remove three screws.
CAUTION: When removing the motor from the
regulator(1), be careful not to get injured by the
strong repellent force of the regulator spring.
631RS015
Installation
To install, follow the removal steps in the reverse order.
Rear-Left Side
Removal
1. Disconnect the battery ground cable.
2. Remove the rear window regulator assembly.
Refer to the Rear Window Regulator and Glass
removal steps in Body Structure section.
3. Remove the power window motor(1).
Remove four screws.
651RW014
Installation
To install, follow the removal steps in the reverse order.
Rear-Right Side
Removal and Installation
Refer to the Rear Power Window Motor-Left Side removal
and installation steps in this section.
Page 3691 of 6000
B-5
BLOWER
MOTOR2
B-5
1
I-51
3I-51
I-51I-51
MAX HI
RELAY POWER
TRANSISTORI-50
I-50
4
H-202
H-26
10
1
3
H-20
121 2L/B
0.5P/G
12
I-32
16 I-32
P-2
0.85W/G5W
5W 0.5R/W
0.3B0.5R/W 0.3R/W
TAIL RELAY(4) ILLUMINATION
CONTROLLER0.5G/R 0.85G/R
1.25B
1.25B1.25B
0.5B
9 I-32 5W 3W
BATT
FL-1
80A
MAIN4B-36
33L/R
C-19 25A
BLOWERC-20 10A
AIR CON
3L 2L/B
0.3BR
0.5BR0.3BR 2/B 0.3GR
0.3GR/L0.5L/B
2/B
B-36
20
H-27 2
B-36H-14
1
B-36HEATER & A/C RELAY
STARTER RELAY(1)
H-141
H-1310
I-328
H-269
10 C-16
10A CLOCK ROOM
BODY-RHBODY-LH
B-18
B-19
B-1
AUTO A/C CONTROL UNITAUTO A/C CONTROL UNIT
I-3217
14 35 2112 337
I-32
22
29 6I-331 H-20
14
H-16
M
192B
I-33
2I-50
D08RY00118
Page 3695 of 6000
0.5R/G
ILLUMINATION
CONTROLLER
12
I-32
157
I-32
16 I-3229
P-2
0.85W/R5W
3L 2L/B 2L/BBATT.
5W 0.5R/W
0.3B0.5R/W 0.3R/W
TAIL REAY(4) 0.5G/R 0.85R/W
1.25B
1.25B
0.5B
9 I-3236 5W 3W FL-1
80A
MAIN4
B-36
33L/RC-20 10A
AIR CON
C-19 25A
BLOWER
BLOWER
MOTOR
B-36 2
B-36H-14
1
B-36HEATER A/C RELAY
STARTER SW (ACC)
H-141
I-328
H-265
10 C-16 10A
CLOCK ROOM
C-11 10A
AUDIO
F-12 10A
TAIL-RH
BODY-LHB-19
BODY-RHB-22BH-481.25B 15
H-2614
I-50 2
AUTO A/C CONTORL UNIT AUTO A/C CONTORL UNIT
I-32
6
H-16
0.5BR 2B 2B0.3GR/W0.5L/B
0.3BR 0.3BR
19
I-33
33
22 21 3512
H-48
0.3GR/L
MAX HI
RELAY POWER
TRANSISTOR
I-51
3
H-4811
I-51
4I-50
3
I-512I-501
H-4815
I-511
B-51
B-5
2
H-484
M
17
I-33
14
D08RY00121
Page 3699 of 6000
X-2124
13X-21
X-21THERMO SW RELAY
0.5BR 0.5BR
0.5G/Y
QWS THERMO SW 0.5G/BX-21
B-19
B-18
BODY-RH
BODY-RH
I-32 I-33I-32 I-32 I-33 I-33
84
I-329I-32107111213
12
B-36 B-36
B-36 B-3634
9
H-26
5W 3W
5W
3L/R
C-16
CLOCK, ROOM
BODY ENG. FRAME10A
0.5Y/B 0.5Y/B 0.5Y/B
0.5R/G
0.5G/R 0.5G/RILLUMINATION
CONTROLLER
TAIL RELAY (4) 0.5R/W 0.3R/W0.5R/W 0.5R/W
0.5BR 0.5BR
0.5BR
HEATER
& A/C RELAY CHARGE
RELAY(1)
P-1
P-5
P-2
P-7P-10P-6
5B30B8B
8B/R
FL-1
80A MAIN
+
�ー
AUTO A/C CONTROL UNIT
I-32
H-271.25B
0.5B
20
1.25B
I-3314
I-49
4612
M
I-49 I-49 I-49
I-493
5
I-49
16
0.5L/O
0.5L/W
0.3L/R
0.3L/Y
0.3B/L
1.25B0.3B
0.5BR
C-25C-25
2 1
H-26160.5G/W 0.5LGPRESSURE SW
INTAKE
ACTUATOR
H-141
H-1310
0.85W/G 0.85W/G
5W
0.5B
0.5BR
H-167
3
H-40.5Y/B 0.5Y/B
12
H-17
1
H-24
0.5BR
3W/LFL-3
40A C/HEAT
2H-410.5G/Y
ECM(J1-23)
H-2413
5
H-41
E-23THERMO UNIT
12
I-32
3L
2L/B 2L/B
C-19 25A
BLOWER
BLOWER
MOTOR C-20 10A
A/C
I-50 2
2B 2B
0.3GR/W0.5L/B
0.3BR 0.3BR 2L/B 2B
19
I-33
33 22 34 19 18 17 12
0.3GR/LMAX HI RELAY
POWER
TRANSISTOR
I-51
3
H-26
10
I-51
4I-50
3
I-512I-501I-511
B-52
B-5
1
H-20
2
17
I-33
14 35 36 7 21
29
H-201
M
B-1
D08RY00114
Page 3701 of 6000
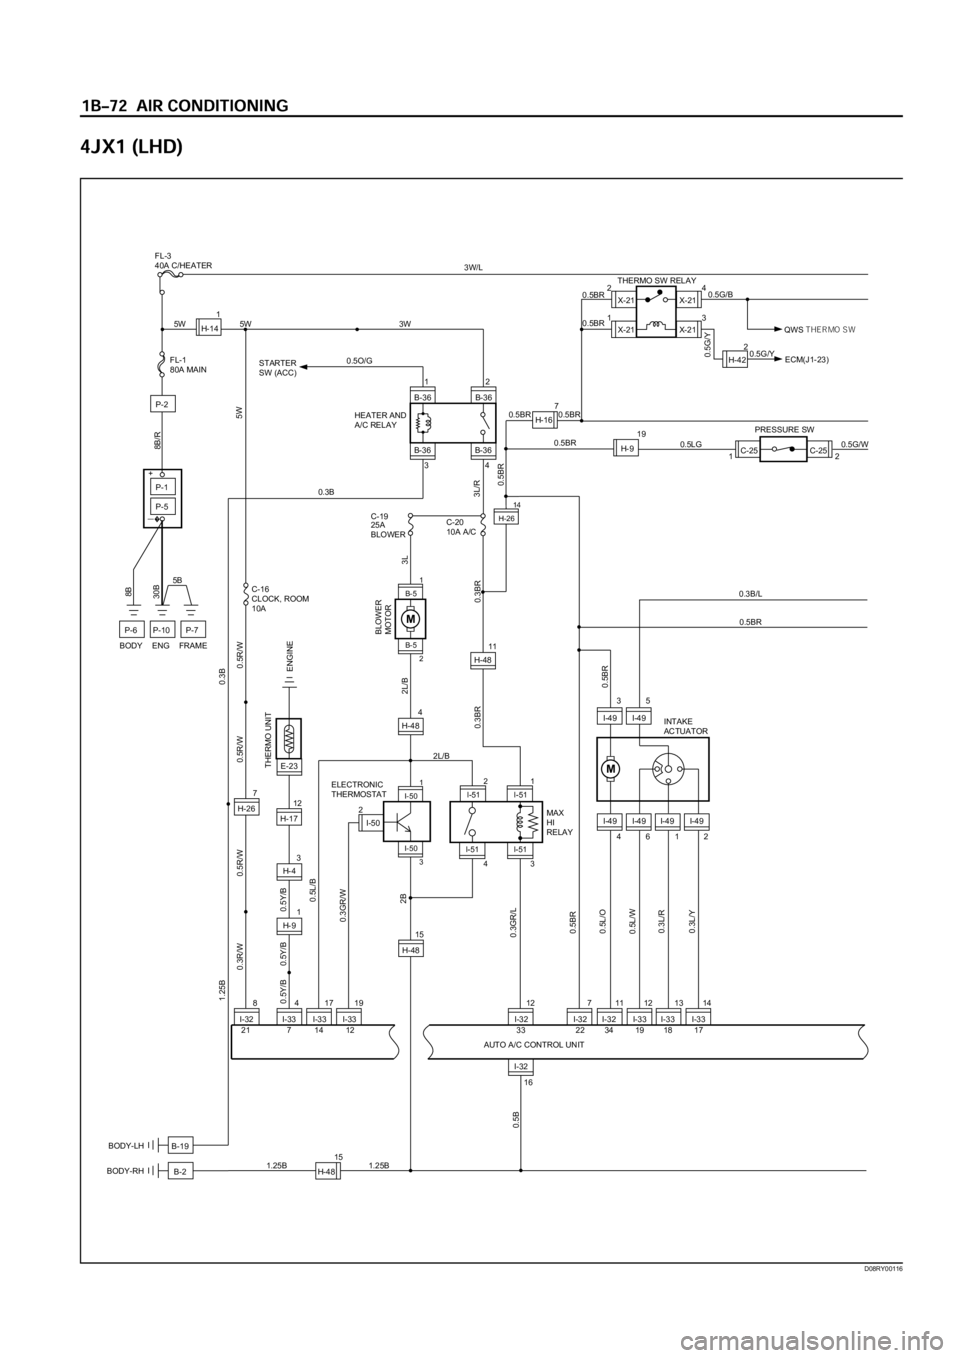
X-2124
13X-21
X-21 THERMO SW RELAY
0.5BR 0.5BR
0.5G/Y
QWS THE R MO S W 0.5G/BX-21
B-2BODY-RH
B-19 BODY-LH
I-32 I-33I-32 I-32 I-33 I-33
847111213
12
B-36 B-36
B-36 B-3634
7
H-26
5W 3W
5W
3L/R
C-16
CLOCK, ROOM
10AC-19
25A
BLOWERC-20
10A A/C
0.5Y/B 0.5Y/B 0.5Y/B0.5R/W 0.3R/W0.5R/W 0.5R/W
0.5BR
0.5BR0.5L/B
0.3GR/W
2B
0.3GR/L
0.5BR
HEATER AND
A/C RELAY STARTER
SW (ACC)
P-1
P-5
P-2
P-7P-10P-6
5B
2L/B30B8B
8B/R
FL-1
80A MAIN
+
�ー
I-32
H-481.25B
0.5B
151.25B
I-33
7 21 14 12 2233 34 19 18 1714
I-49
4612
M
I-49 I-49 I-49
I-493
5
I-49
16
0.5L/O
0.5L/W
0.3L/R
0.3L/Y
0.3B/L
1.25B0.3B
0.5BR
C-25
I-3317I-3319
H-9
3L 2L/B
0.3BR 0.3BR
0.5BR
0.5BR
C-25
2 1 19
0.5G/W 0.5LGPRESSURE SW
INTAKE
ACTUATOR
MAX
HI
RELAY ELECTRONIC
THERMOSTAT
THERMO UNIT
H-141
I-502 0.5O/G
5W
0.3B
BODY ENG FRAME
H-167
3
H-4
E-23
1
H-9
ENGINE
0.5BR
3W/LFL-3
40A C/HEATER
2H-420.5G/Y
ECM(J1-23)
12
H-17
B-51
H-2614
I-501
B-5
2
I-50
3
15
H-48
4
H-48
MBLOWER
MOTOR
I-51
2
I-511
43I-51
I-51
AUTO A/C CONTROL UNIT
I-3212
11
H-48
D08RY00116
Page 3704 of 6000
FULL AUTO display
INTAKE indication
(LED)
(switching between
fresh and interior air)
MODE indication
(LED) (Blow port)
AC display (LED)
FAN indication (LED)
FAN KNOB
AUTO SET
REC FRESH SWITCH
TEMP LEVER
(temperature control)
MODE SWITCH
(blow port selection)
AC SWITCH
IN CAR SENSOR
AMBIENT SENSOR
SUN SENSOR
DUCT SENSOR
MIX ACTUATOR
POTENTIOMETER
MODE ACTUATOR
POTENTIOMETER
AIR MIX DOOR
MODE DOOR
INTAKE ACTUATOR
RECINTAKE DOOR
FAN MOTORPOWER
TRANSISTOR
AUTOMATIC HEATER/AIR CONDITIONER CONTROL UNIT (with the built-in micro-computer)
MAX HI RELAY
PRESSURE
SWITCHAIR CONDITIONER
THERMO RELAY
COMPRESSOR
SWITCH MAGNET
CLUTCH
PCM
PRESSURE
SWITCHAIR CONDITIONER
THERMO RELAYMAGNET
CLUTCH
(4JX1engine)
MIX FRESH
F01RY00009