Page 9 of 55
SBT571
BODY END
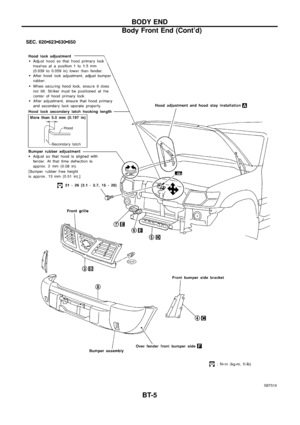
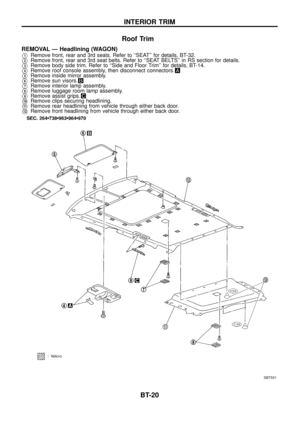
Body Rear End and Opener (Cont'd)
BT-8
Page 10 of 55
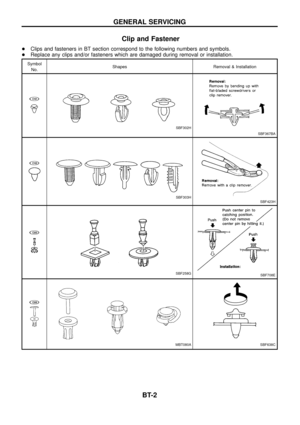
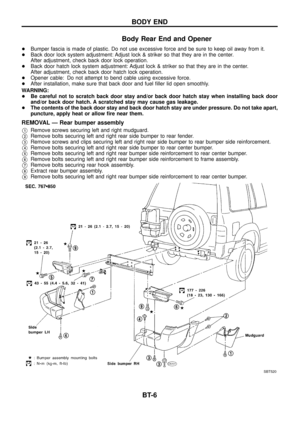
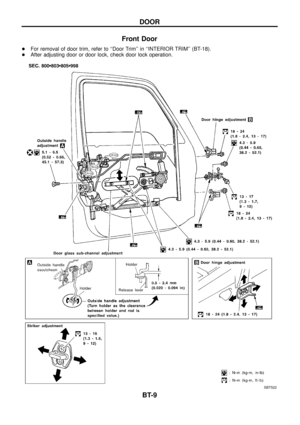
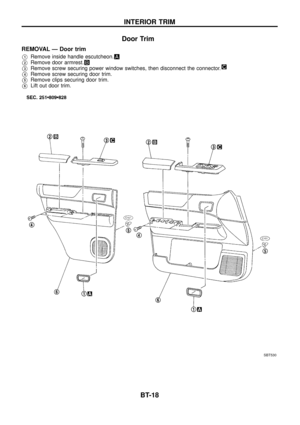
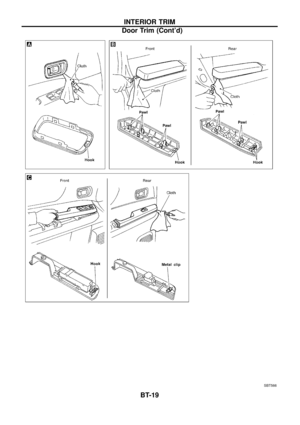
Front Door
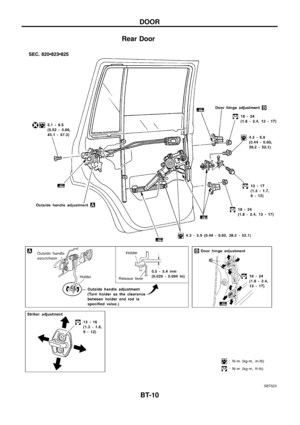
+For removal of door trim, refer to ``Door Trim'' in ``INTERIOR TRIM'' (BT-18).
+After adjusting door or door lock, check door lock operation.
SBT522
DOOR
BT-9
Page 11 of 55
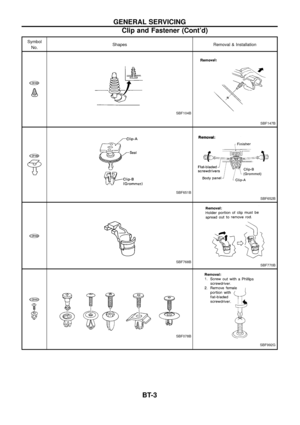
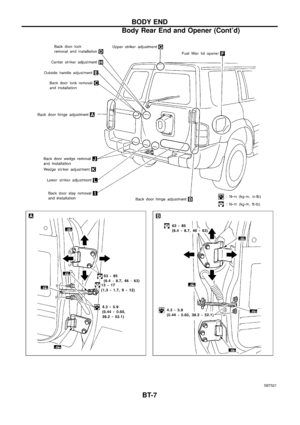
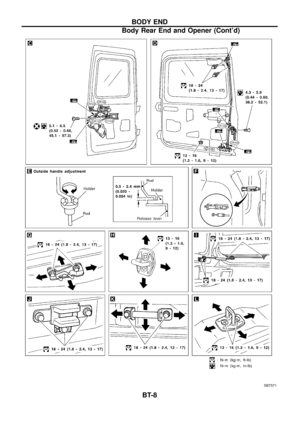
Rear Door
SBT523
DOOR
BT-10
Page 12 of 55

CAUTION:
+Disconnect both battery cables in advance.
+Disconnect air bag system line in advance.
+Never tamper with or force air bag lid open, as this may adversely affect air bag performance.
+Be careful not to scratch pad and other parts.
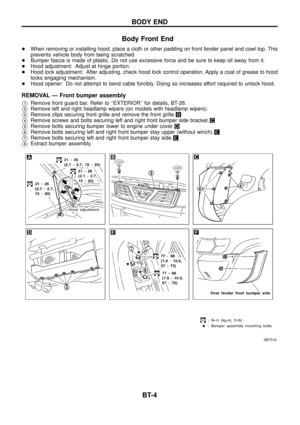
REMOVAL Ð Instrument panel assembly
Instrument panel assemblyCombination meterAudio & A/C controlConsole box
Remove air bag module (driver) and steering wheel.
Refer to ``SUPPLEMENTAL RESTRAINT SYSTEM'' in RS section for details.
Remove dash side lower ®nishers.
Refer to ``Side and Floor Trim'' in ``INTERIOR TRIM'' for
details, BT-14.
V1Steering column cover and combination switch
+Remove screws.
V2Lower instrument panel on driver side
+Remove bolts and screws.
V3Cluster lid A
+Remove screws then disconnect harness connectors.
V4Combination meter
+Remove screws then disconnect harness connectors.
V5Cluster lid C
+Pull out then disconnect harness connectors.
+Remove screws then remove in-vehicle sensor.
V6Audio
+Remove screws then disconnect harness connectors.
V7A/C control unit
+Remove screws then disconnect harness connectors.
V8Console M/T or A/T ®nisher
+Remove screws then disconnect harness connectors.
V9Console box assembly
+Remove screws then disconnect harness connectors.
V10Instrument panel stay cover
+Remove screws then disconnect harness con-
nectors.
V11Glove box assembly and lower instrument panel on
passenger side
+Remove screws.
V12Passenger air bag module
+Refer to ``SUPPLEMENTAL RESTRAINT SYS-
TEM'' in RS section.
V13Mirror control switch
+Disconnect harness connector.
Remove front pillar garnish.
Refer to ``Side and Floor Trim'' in ``INTERIOR TRIM'' for
details, BT-14.
V14Mask instrument LH/RH or sensors.
+Disconnect harness connectors (models with
sensors).
V15Instrument panel and pads
+Remove bolts and nuts then disconnect harness
connectors.
INSTRUMENT PANEL
BT-11
Page 13 of 55
SBT524
INSTRUMENT PANEL
BT-12
Page 14 of 55
SBT525
INSTRUMENT PANEL
BT-13
Page 15 of 55

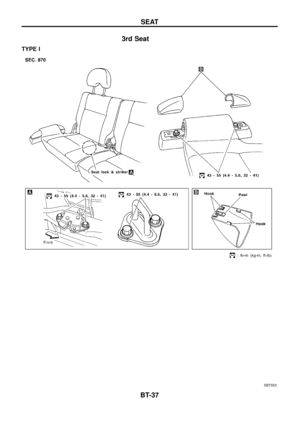
V1Remove front, rear and 3rd seats. Refer")
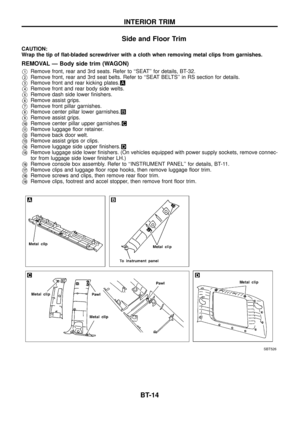
Side and Floor Trim
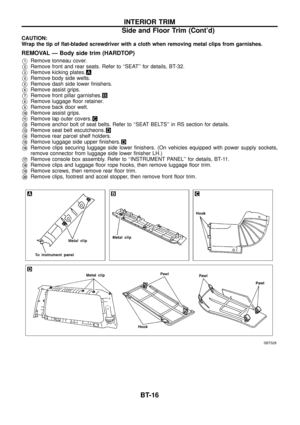
CAUTION:
Wrap the tip of ¯at-bladed screwdriver with a cloth when removing metal clips from garnishes.
REMOVAL Ð Body side trim (WAGON)
V1Remove front, rear and 3rd seats. Refer to ``SEAT'' for details, BT-32.
V2Remove front, rear and 3rd seat belts. Refer to ``SEAT BELTS'' in RS section for details.
V3Remove front and rear kicking plates.
V4Remove front and rear body side welts.
V5Remove dash side lower ®nishers.
V6Remove assist grips.
V7Remove front pillar garnishes.
V8Remove center pillar lower garnishes.
V9Remove assist grips.
V10Remove center pillar upper garnishes.
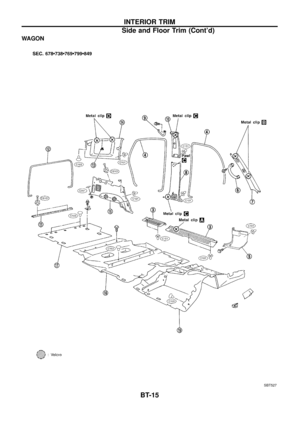
V11Remove luggage ¯oor retainer.
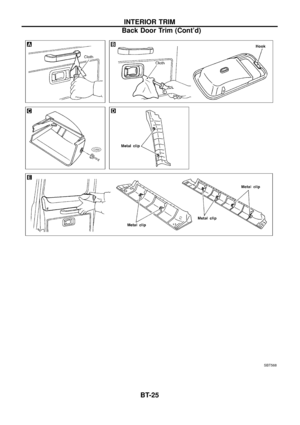
V12Remove back door welt.
V13Remove assist grips or clips.
V14Remove luggage side upper ®nishers.
V15Remove luggage side lower ®nishers. (On vehicles equipped with power supply sockets, remove connec-
tor from luggage side lower ®nisher LH.)
V16Remove console box assembly. Refer to ``INSTRUMENT PANEL'' for details, BT-11.
V17Remove clips and luggage ¯oor rope hooks, then remove luggage ¯oor trim.
V18Remove screws and clips, then remove rear ¯oor trim.
V19Remove clips, footrest and accel stopper, then remove front ¯oor trim.
SBT526
INTERIOR TRIM
BT-14
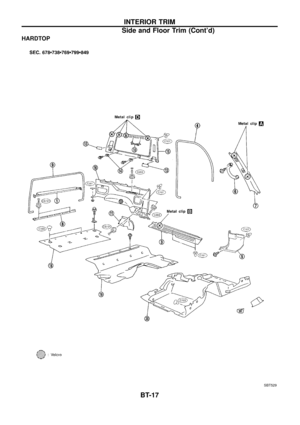
Page 16 of 55
WAGON
SBT527
INTERIOR TRIM
Side and Floor Trim (Cont'd)
BT-15


BT-8")
.
+After adjusting door or door lock, check door lock operation.
SBT522
DOOR
BT-9")


BT-15")