1998 NISSAN ALTIMA light
[x] Cancel search: lightPage 72 of 217

Replace the battery in the multi-remote con-
troller as follows:
1. Open the lid using a coin.
2. Replace the battery with a new one.
Recommended battery: Sanyo CR2025or equivalent.
3. Close the lid securely.
4. Press the
button, then thebutton
two or three times to check the multi-
remote controller operation.
Each time the
button is pressed, thehazard lights flash once.
If the battery is removed for any reason
other than replacement, perform step 4.
cAn improperly disposed battery can
hurt the environment. Always confirm
local regulations for battery disposal.
cThe multi-remote controller is water-
resistant; however, if it does get wet,
immediately wipe completely dry.
cThe operational range of the multi-
remote controller extends to approxi-
mately 49 ft (15 m) from the vehicle.
This range may vary with conditions.
FCC Notice:
Changes or modifications not expressly
approved by the manufacturer for com-
pliance could void the user's authority to
operate the equipment.
This device complies with part 15 of the
FCC Rules and RSS-210 of Industry
Canada.
APD1026
BATTERY REPLACEMENT
Pre-driving checks and adjustments3-7
ZX
Page 73 of 217

Operation is subject to the following two
conditions: (1) This device may not
cause harmful interference, and (2) this
device must accept any interference re-
ceived including interference that may
cause undesired operation of the device.
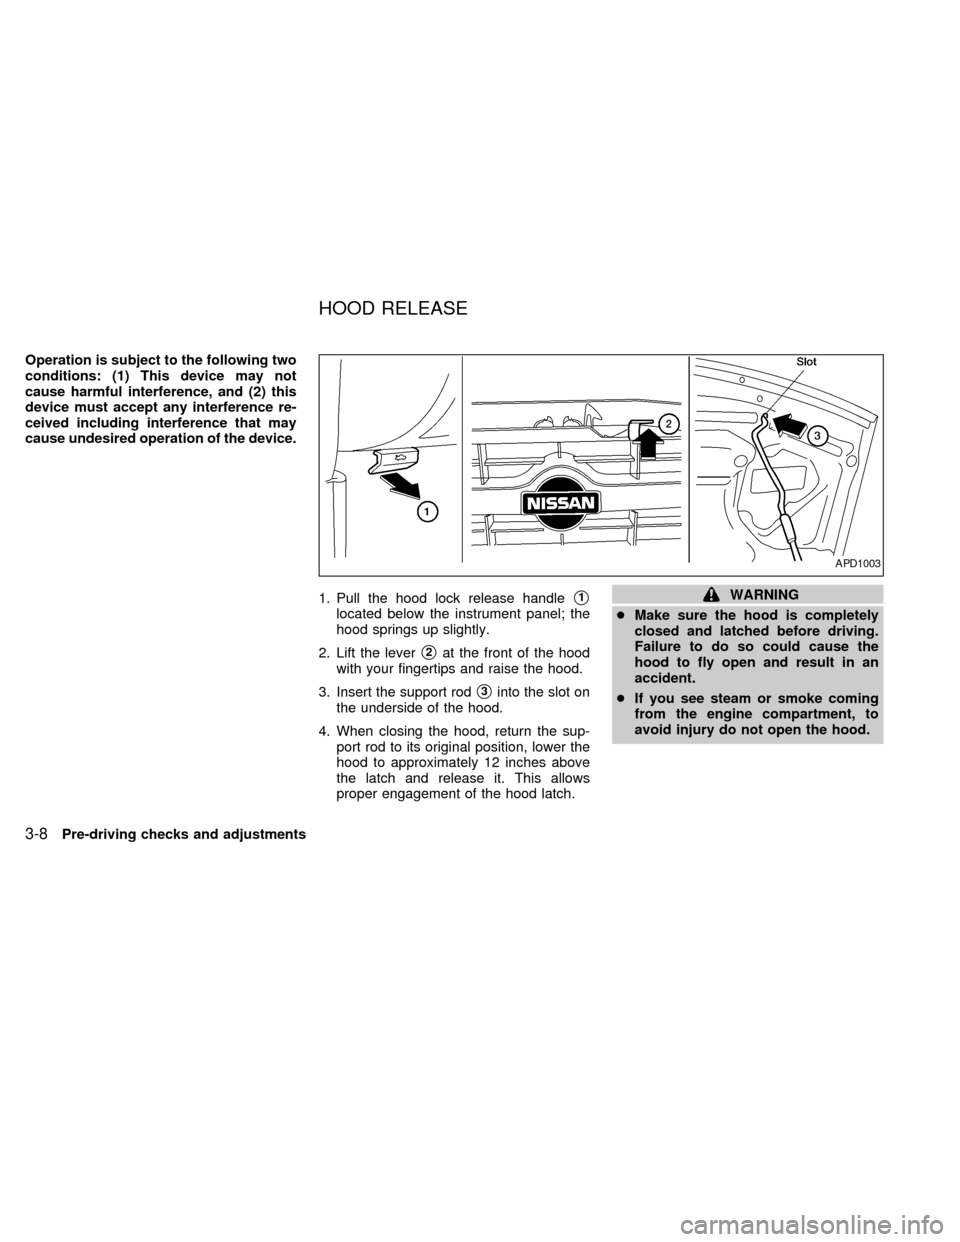
1. Pull the hood lock release handle
s1
located below the instrument panel; the
hood springs up slightly.
2. Lift the lever
s2at the front of the hood
with your fingertips and raise the hood.
3. Insert the support rod
s3into the slot on
the underside of the hood.
4. When closing the hood, return the sup-
port rod to its original position, lower the
hood to approximately 12 inches above
the latch and release it. This allows
proper engagement of the hood latch.
WARNING
cMake sure the hood is completely
closed and latched before driving.
Failure to do so could cause the
hood to fly open and result in an
accident.
cIf you see steam or smoke coming
from the engine compartment, to
avoid injury do not open the hood.
APD1003
HOOD RELEASE
3-8Pre-driving checks and adjustments
ZX
Page 74 of 217

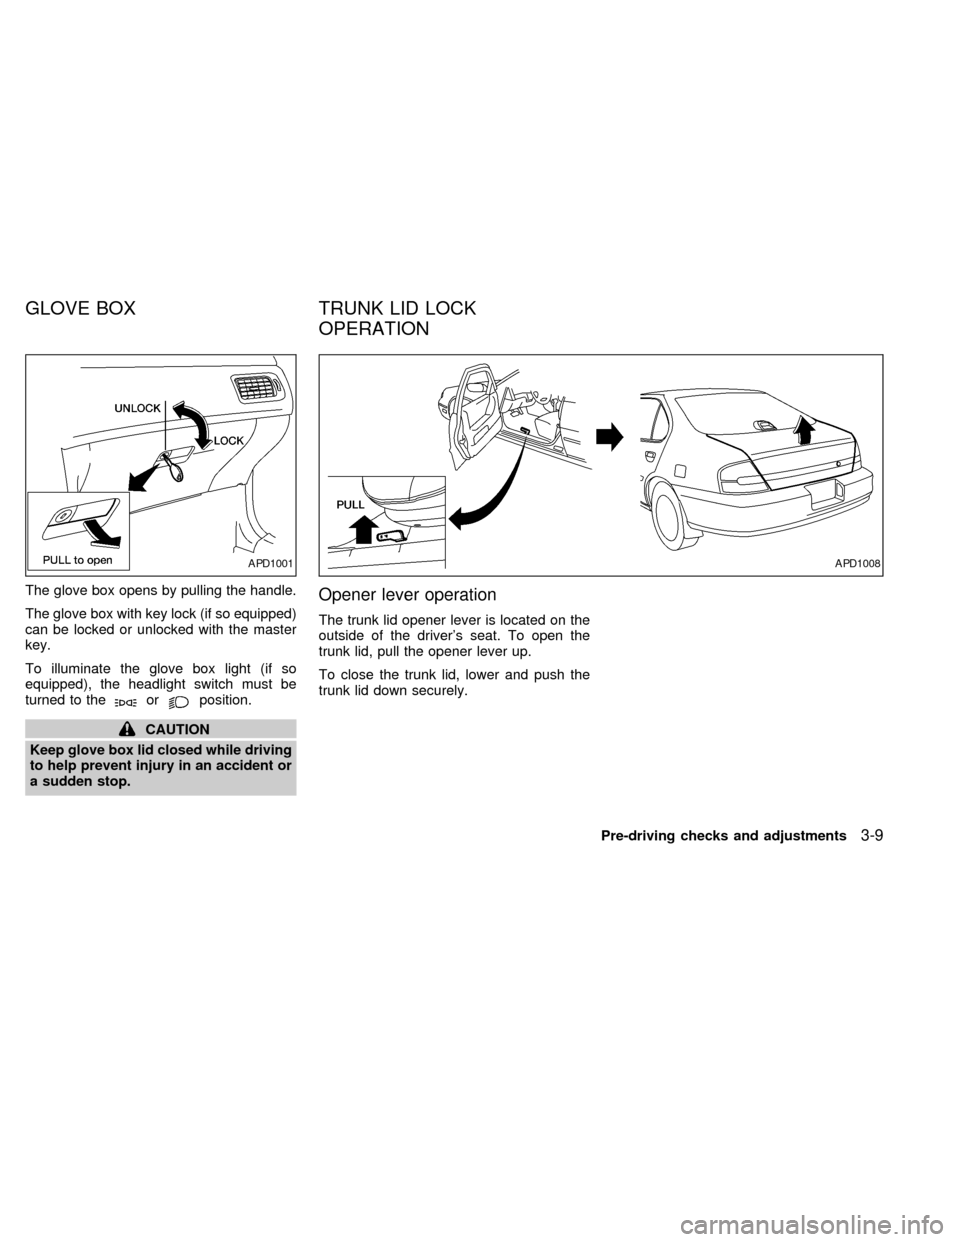
The glove box opens by pulling the handle.
The glove box with key lock (if so equipped)
can be locked or unlocked with the master
key.
To illuminate the glove box light (if so
equipped), the headlight switch must be
turned to the
orposition.
CAUTION
Keep glove box lid closed while driving
to help prevent injury in an accident or
a sudden stop.
Opener lever operation
The trunk lid opener lever is located on the
outside of the driver's seat. To open the
trunk lid, pull the opener lever up.
To close the trunk lid, lower and push the
trunk lid down securely.
APD1001APD1008
GLOVE BOX TRUNK LID LOCK
OPERATION
Pre-driving checks and adjustments3-9
ZX
Page 77 of 217

WARNING
cGasoline is extremely flammable and
highly explosive under certain con-
ditions. You could be burned or se-
riously injured if it is misused or
mishandled. Always stop the engine
and do not smoke or allow open
flames or sparks near the vehicle
when refueling.
c
Fuel may be under pressure. Turn the
cap one-half turn, and wait for any
``hissing'' sound to stop to prevent
fuel from spraying out and possible
personal injury. Then remove the cap.
cDo not attempt to top off the fuel
tank after the fuel pump nozzle shuts
off automatically. Continued refuel-
ing may cause fuel overflow, result-
ing in fuel spray and possibly fire.
cUse only a genuine NISSAN fuel filler
cap as a replacement. It has a built-in
safety valve needed for proper op-
eration of the fuel system and emis-
sion control system. An incorrect
cap can result in a serious malfunc-
tion and possible injury.
cNever pour fuel into the throttle body
to attempt to start your vehicle.
CAUTION
cIf fuel is spilled on the car body,
flush it away with water to avoid
paint damage.
cTighten until the cap clicks. Failure
to tighten the fuel cap properly may
cause the
malfunction indica-
tor light (MIL) to illuminate. If this
occurs, securely close the fuel filler
cap. After driving for a while, the
light should remain off. If the light
remains on, have the vehicle in-
spected by an authorized NISSAN
dealer.
For additional information, see the
``Malfunction indicator light (MIL)'' in
the ``Instruments and controls'' sec-
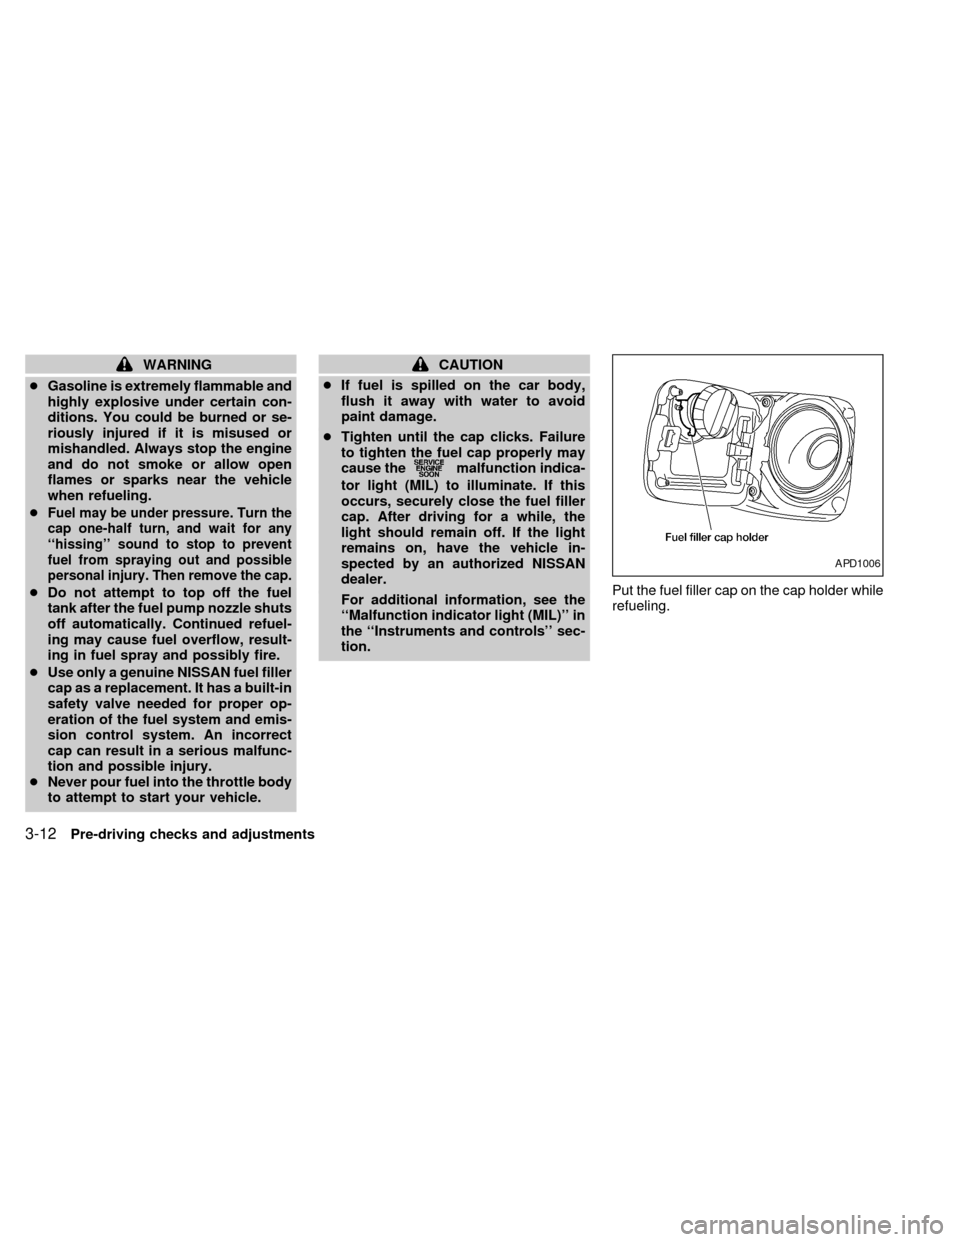
tion.Put the fuel filler cap on the cap holder while
refueling.
APD1006
3-12Pre-driving checks and adjustments
ZX
Page 78 of 217

Tilt operation
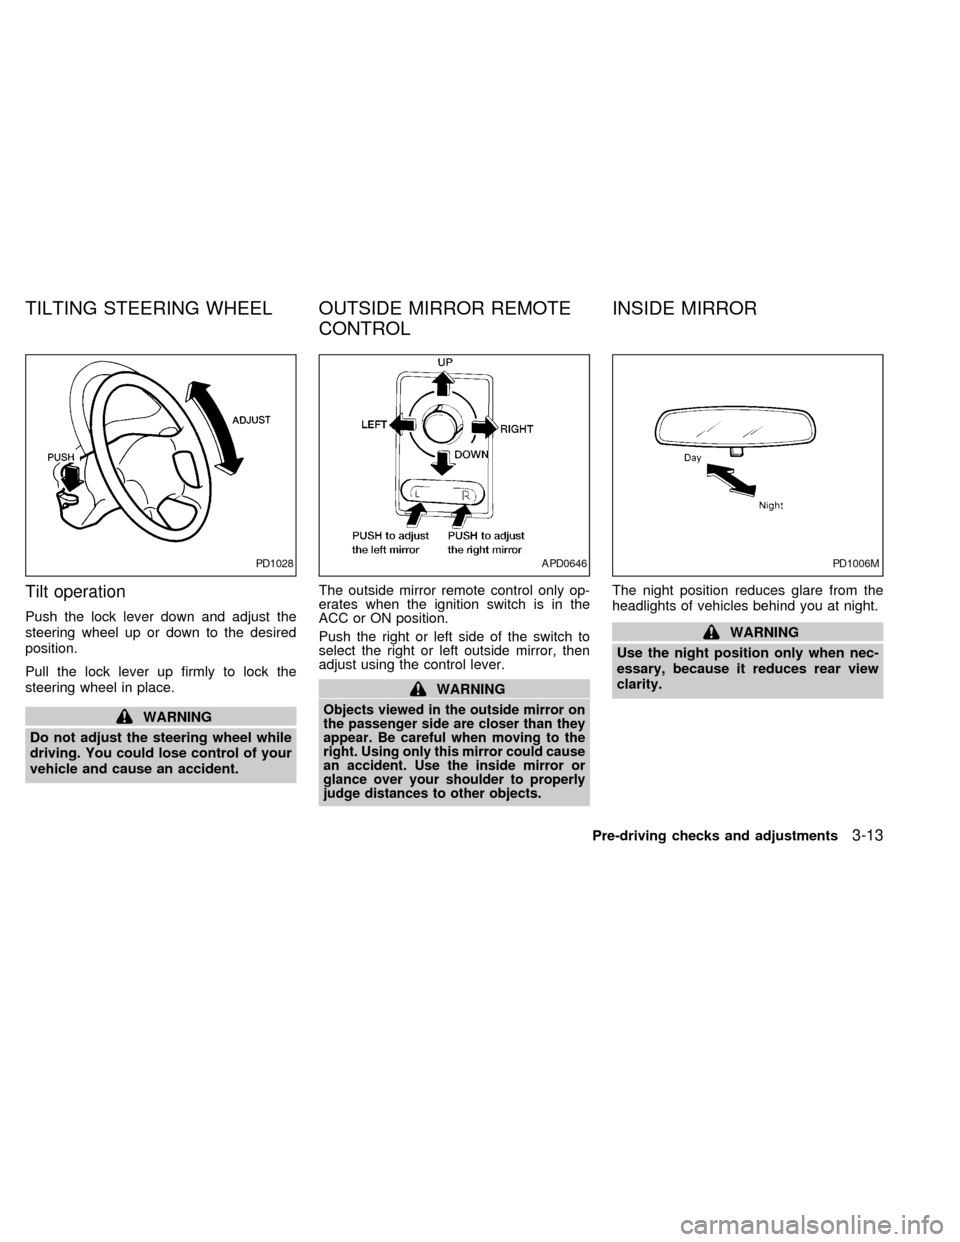
Push the lock lever down and adjust the
steering wheel up or down to the desired
position.
Pull the lock lever up firmly to lock the
steering wheel in place.
WARNING
Do not adjust the steering wheel while
driving. You could lose control of your
vehicle and cause an accident.The outside mirror remote control only op-
erates when the ignition switch is in the
ACC or ON position.
Push the right or left side of the switch to
select the right or left outside mirror, then
adjust using the control lever.
WARNING
Objects viewed in the outside mirror on
the passenger side are closer than they
appear. Be careful when moving to the
right. Using only this mirror could cause
an accident. Use the inside mirror or
glance over your shoulder to properly
judge distances to other objects.
The night position reduces glare from the
headlights of vehicles behind you at night.
WARNING
Use the night position only when nec-
essary, because it reduces rear view
clarity.
PD1028APD0646PD1006M
TILTING STEERING WHEEL OUTSIDE MIRROR REMOTE
CONTROLINSIDE MIRROR
Pre-driving checks and adjustments3-13
ZX
Page 83 of 217

Ð Air flows mainly from defroster
outlets.
Temperature control lever
This lever allows you to adjust the tempera-
ture of the outlet air.
Air recirculation button
Off position:
Outside air is drawn into the passenger
compartment and distributed through the
selected outlet.
Use the off position for normal heater or air
conditioner operation.
On position (Indicator light on):
Interior air is recirculated inside the vehicle.
Push the air recirculation button to the ON
position when driving on a dusty road, to
avoid traffic fumes, and for maximum cool-
ing when using the air conditioner.
Air conditioner button
(if so equipped)
This button is provided only on vehicles
equipped with an air conditioner.
Start the engine, move the fan control dial tothe desired (1 to 4) position and push the
A/C button to turn on the air conditioner.
The indicator light comes on when the air
conditioner is on. To stop the air condi-
tioner, push the switch again.
The air conditioner cooling function op-
erates only when the engine is running.
HEATER OPERATION
Heating
This mode is used to direct heated air to the
foot outlets. Some air also flows from the
defroster outlets.
1. Push the
(air recirculation) button
to the off position for normal heating.
2. Push the
button in.
3. Move the fan control dial to the desired
position.
4. Move the temperature control lever to the
desired position between the middle and
the HOT position.
Ventilation
This mode directs outside air to the side and
center ventilators.1. Push the
(air recirculation) button
to the off position.
2. Push the
button in.
3. Move the fan control dial to the desired
position.
4. Move the temperature control lever to the
desired position.
Defrosting or defogging
This mode is used to defrost/defog the
windows.
1. Push the
button in.
2. Move the fan control dial to the desired
position.
3. Move the temperature control lever to the
desired position between the middle and
the HOT position.
cTo quickly remove ice or fog from the
windows, turn on the fan control dial to 4
and the temperature control lever to the
full HOT position.
cWhen the
switch is pushed, the air
conditioner automatically turns on to de-
humidify the air, which helps defog the
windshield. The air recirculation mode
4-4Heater, air conditioner and audio systems
ZX
Page 84 of 217

automatically turns off.
Outside air is drawn into the passenger
compartment to improve the defogging
performance.
Bi-level heating/cooling
This mode directs air from the side, center
and foot outlets.
1. Push the
(air recirculation) button
to the off position.
2. Push the
button in.
3. Move the fan control dial to the desired
position.
4. Move the temperature control lever to the
desired position.
Heating and defogging
This mode heats the interior and defogs the
windshield.
1. Push the
button in.
2. Move the fan control dial to the desired
position.
3. Move the temperature control lever to the
desired position between the middle and
the HOT position.
Operating tips
cClear snow and ice from the wiper
blades and air inlet in front of the
windshield. This improves heater op-
eration.
cWhen the
orswitch is se-
lected, the air recirculation mode auto-
matically turns off.
Outside air is drawn into the passenger
compartment to improve the defogging
performance.
AIR CONDITIONER OPERATION
(if so equipped)
Start the engine, move the fan control dial to
the desired (1 to 4) position and push in the
A/C button to activate the air conditioner.
When the air conditioner is on, cooling and
dehumidifying functions are added to the
heater operation.
The air conditioner cooling function op-
erates only when the engine is running.
Cooling
This mode is used to cool and dehumidify
the air.
1. Push the
(air recirculation) button
to the off position.
2. Push the
button in.
3. Move the fan control dial to the desired
position.
4. Push on the air conditioner button. The
indicator light comes on.
5. Move the temperature control lever to the
desired position.
cFor quick cooling when the outside tem-
perature is high, push the air recirculation
button to the on position. Be sure to
return the air recirculation button to the
off position for normal cooling.
Dehumidified heating
This mode is used to heat and dehumidify.
1. Push the
(air recirculation) button
to the off position.
2. Push the
button in.
3. Move the fan control dial to the desired
position.
Heater, air conditioner and audio systems
4-5
ZX
Page 85 of 217

4. Push on the air conditioner button. The
indicator light comes on.
5. Move the temperature control lever to the
desired position.
Dehumidified defogging
This mode defogs the windows and dehu-
midifies the air.
1. Push the
button in.
When the
button is pushed, the air
conditioner automatically turns on to de-
humidify the air, which helps to defog the
windshield. The air recirculation mode
automatically turns off.
2. Move the fan control dial to the desired
position.
3. Move the temperature control lever to the
desired position.
Outside air is drawn into the passenger
compartment to improve the defogging per-
formance.
Operating tips
cKeep the windows and sun roof closed
while the air conditioner is in operation.
cAfter parking in the sun, drive for two orthree minutes with the windows open to
vent hot air from the passenger compart-
ment. Then, close the windows. This
allows the air conditioner to cool the
interior more quickly.
cThe air conditioner system should be
operated for about ten minutes at
least once a month. This helps pre-
vent damage to the system due to lack
of lubrication.
cIf the engine coolant temperature gauge
exceeds the H (hot) position, turn the air
conditioner off. See ``If your vehicle over-
heats'' in the ``In case of emergency''
section of this owner's manual for addi-
tional information.
AIR FLOW CHARTS
The charts on the following pages show the
switch and lever positions forMAXIMUM
and QUICKheating, cooling, or defrosting.
4-6Heater, air conditioner and audio systems
ZX