1998 NISSAN ALTIMA light
[x] Cancel search: lightPage 168 of 217

a. Keep all of the tires inflated to the correct
pressure.
b. Place the vehicle on level ground.
c. See that the vehicle is unloaded (except
for full levels of coolant, engine oil and
fuel, and spare tire, jack, and tools).
Have the driver or an equivalent weight
placed in the driver's seat.
Low beam
1. Open the hood.
2. Adjust the vertical aim by turning the
adjusting screw with a Phillips screw-
driver.
3. Adjust the horizontal aim by turning the
adjusting screw with a Phillips screw-
driver.
ADJUSTMENT AFTER
HEADLIGHT ASSEMBLY
REPLACEMENT
If the vehicle front body has been repaired
and/or the headlight assembly has been
replaced, check aiming. Use the aiming
chart shown in the illustration.
cUpper edge and left edge of high in-
tensity zone should be within the
range shown at left. Adjust headlights
accordingly.
cDotted lines in the illustration show
center of headlights.
``H'' : Horizontial center line of headlights
``W
L'': Distance between each headlight
center
ADI1039
Do-it-yourself8-23
ZX
Page 169 of 217

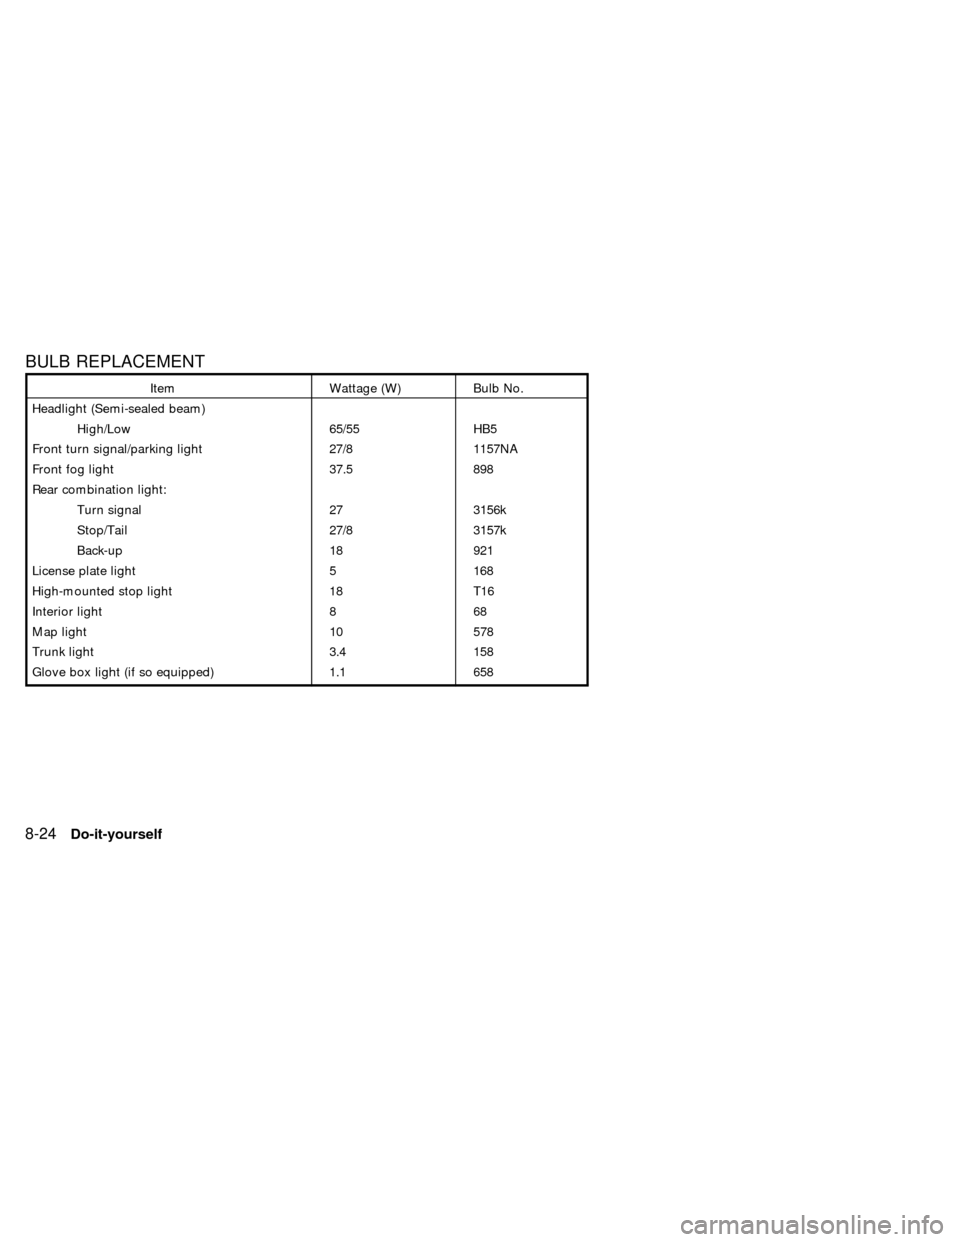
BULB REPLACEMENT
Item Wattage (W) Bulb No.
Headlight (Semi-sealed beam)
High/Low 65/55 HB5
Front turn signal/parking light 27/8 1157NA
Front fog light 37.5 898
Rear combination light:
Turn signal 27 3156k
Stop/Tail 27/8 3157k
Back-up 18 921
License plate light 5 168
High-mounted stop light 18 T16
Interior light 8 68
Map light 10 578
Trunk light 3.4 158
Glove box light (if so equipped) 1.1 658
8-24Do-it-yourself
ZX
Page 170 of 217

Replacement procedures
All other lights are either type A, B, C or D.
When replacing a bulb, first remove the lens
and/or cover.
ADI1042
ADI1049
Do-it-yourself8-25
ZX
Page 176 of 217

cImproper service for a T-type spare
tire may result in serious personal
injury. If it is necessary to repair the
T-type spare tire, contact your NIS-
SAN dealer.Changing tires and wheels
When replacing a tire, use the same size,
tread design, speed rating and load carrying
capacity as originally equipped. Recom-
mended types and sizes are shown in
``wheels/tire size'' in the ``Technical and con-
sumer information'' section of this manual.
WARNING
c
The use of tires other than those rec-
ommended or the mixed use of tires of
different brands, construction (bias,
bias-belted or radial), or tread patterns
can adversely affect the ride, braking,
handling, ground clearance, body-to-
tire clearance, tire chain clearance,
speedometer calibration, headlight
aim and bumper height. Some of these
effects may lead to accidents and
could result in serious personal injury.
cIf the wheels are changed for any rea-
son, always replace with wheels which
have the same offset dimension.
Wheels of a different offset could
cause early tire wear, possibly de-
graded vehicle handling characteris-
tics and/or interference with the brakediscs/drums. Such interference can
lead to decreased braking efficiency
and/or early brake pad/shoe wear.
cDo not install a deformed wheel or
tire even if it has been repaired. Such
wheels or tires could have structural
damage and could fail without warn-
ing.
cThe use of retread tires is not recom-
mended.
Wheel balance
Unbalanced wheels may affect vehicle han-
dling and tire life. Even with regular use,
wheels can get out of balance. Therefore,
they should be balanced as required.
Wheel balance service should be per-
formed with the wheels off the vehicle. Spin
balancing the front wheels on the vehicle
could lead to transmission damage.
Care of wheels
cWash the wheels when washing the ve-
hicle to maintain their appearance.
cClean the inner side of the wheels when
the wheel is changed or the underside of
Do-it-yourself
8-31
ZX
Page 180 of 217

Tire rotation*Ð Tires should be rotated
every 7,500 miles (12,000 km).
Wheel alignment and balanceÐIfthe
vehicle should pull to either side while driv-
ing on a straight and level road, or if you
detect uneven or abnormal tire wear, there
may be a need for a wheel alignment.
If the steering wheel or seat vibrates at
normal highway speeds, wheel balancing
may be needed.
Windshield wiper blades*Ð Check for
cracks or wear if they do not wipe properly.
Doors and hoodÐ Check that all doors
and the hood operate properly. Also ensure
all latches lock securely. Lubricate hinges,
latches, rollers and links if necessary. Make
sure the secondary latch keeps the hood
from opening when the primary latch is
released.
When driving in areas using road salt or
other corrosive materials, check lubrication
frequently.
Lights*Ð Make sure the headlights, stop
lights, tail lights, turn signal lights, and other
lights are all operating properly and installed
securely. Also check headlight aim.INSIDE THE VEHICLE
The maintenance items listed here should
be checked on a regular basis, such as
when performing periodic maintenance,
cleaning the vehicle, etc.
Additional information on the following
items with an ``*'' is found in the ``Do-it-
yourself'' section of this manual.
Warning lights and chimesÐ Make sure
all warning lights and buzzers/chimes are
operating properly.
Windshield wiper and washer*Ð Check
that the wipers and washer operate properly
and that the wipers do not streak.
Windshield defrosterÐ Check that the air
comes out of the defroster outlets properly
and in sufficient quantity when operating the
heater or air conditioner.
Steering wheelÐ Check for changes in
the steering conditions, such as excessive
freeplay, hard steering or strange noises.
SeatsÐ Check seat position controls such
as seat adjusters, seatback recliner, etc. to
ensure they operate smoothly and all latches
lock securely in every position. Check that
the head restraints move up and downsmoothly and the locks (if so equipped) hold
securely in all latched positions.
Seat beltsÐ Check that all parts of the seat
belt system (for example, buckles, anchors,
adjusters and retractors) operate properly
and smoothly, and are installed securely.
Check the belt webbing for cuts, fraying,
wear or damage.
Accelerator pedalÐ Check the pedal for
smooth operation and make sure the pedal
does not catch or require uneven effort.
Keep the floor mat away from the pedal.
Clutch pedal*Ð Make sure the pedal
operates smoothly and check that it has the
proper free travel.
BrakesÐ Check that the brakes do not pull
the vehicle to one side when applied.
Brake pedal*Ð Check the pedal for
smooth operation and make sure it has the
proper distance under it when depressed
fully. Check the brake booster function. Be
certain to keep the floor mat away from the
pedal.
Parking brake*Ð Check that the lever has
the proper travel and confirm that your
vehicle is held securely on a fairly steep hill
with only the parking brake applied.
Maintenance
9-3
ZX
Page 191 of 217

of at least 87 AKI (Anti-Knock Index) num-
ber. However, you may use unleaded gaso-
line with an octane rating as low as 85 AKI
(Anti-Knock Index) number in high altitude
areas [over 4,000 ft (1,219 m)] such as:
Colorado, Montana, New Mexico, Utah,
Wyoming, northeastern Nevada, southern
Idaho, western South Dakota, western Ne-
braska, and the part of Texas which is
directly south of New Mexico.
Using unleaded gasoline with an octane
rating lower than stated above can cause
persistent, heavy ``spark knock.''
(``Spark knock'' is a metallic rapping
noise.) If severe, this can lead to engine
damage. If you detect a persistent heavy
spark knock even when using gasoline
of the stated octane rating, or if you hear
steady spark knock while holding a
steady speed on level roads, have an
authorized dealer correct the condition.
Failure to correct the condition is misuse
of the vehicle, for which NISSAN is not
responsible.
Incorrect ignition timing may result in spark
knock, after-run or overheating, which may
cause excessive fuel consumption or en-
gine damage. If any of the above symptomsare encountered, have your vehicle
checked at an authorized NISSAN dealer or
other competent service facility.
However, now and then you may notice
light spark knock for a short time while
accelerating or driving up hills. This is
no cause for concern, because you get
the greatest fuel benefit when there is
light spark knock for a short time under
heavy engine load.
10-4Technical and consumer information
ZX
Page 200 of 217

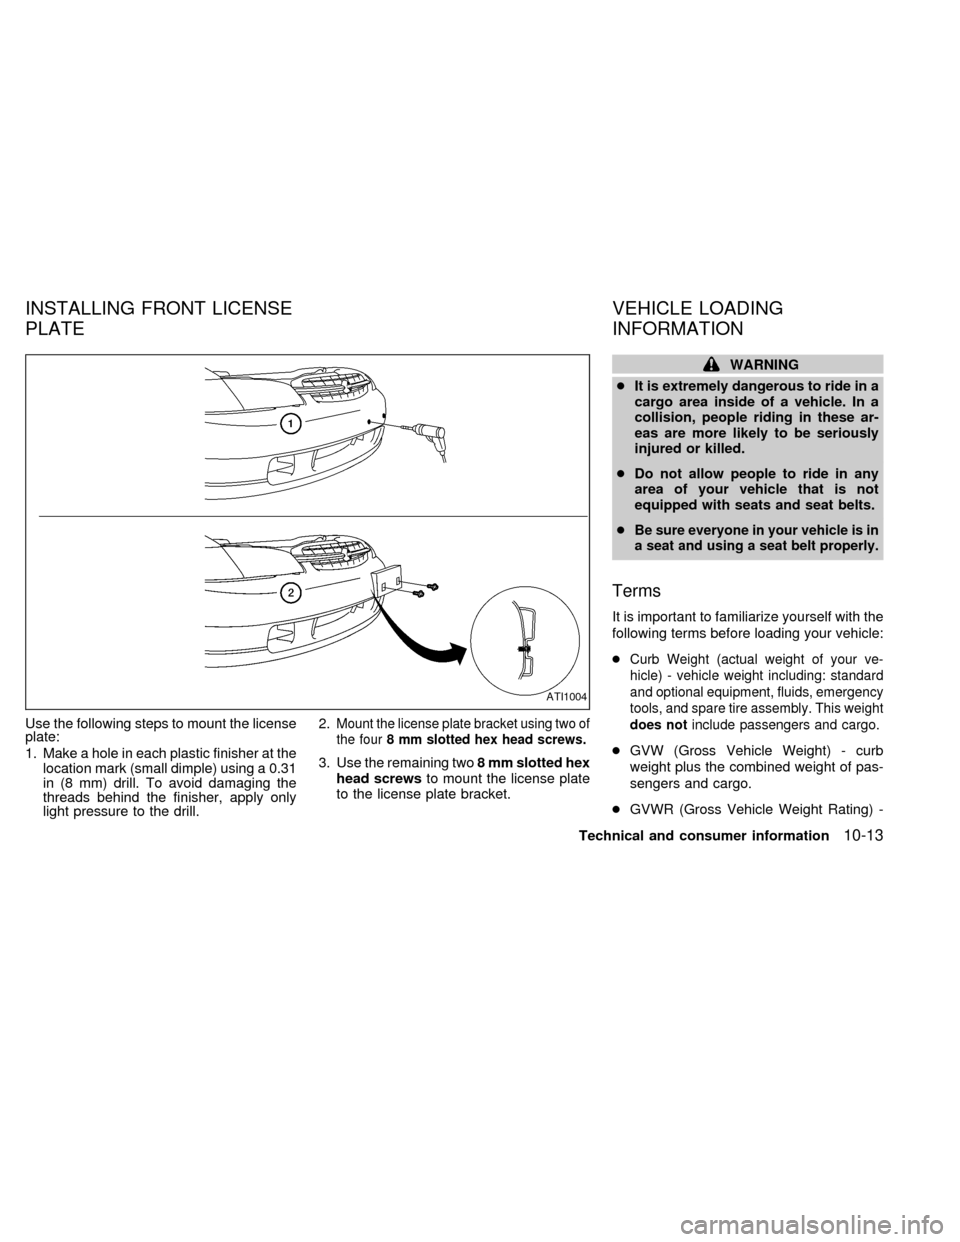
Use the following steps to mount the license
plate:
1. Make a hole in each plastic finisher at the
location mark (small dimple) using a 0.31
in (8 mm) drill. To avoid damaging the
threads behind the finisher, apply only
light pressure to the drill.2.Mount the license plate bracket using two of
the four8 mm slotted hex head screws.
3. Use the remaining two8 mm slotted hex
head screwsto mount the license plate
to the license plate bracket.
WARNING
cIt is extremely dangerous to ride in a
cargo area inside of a vehicle. In a
collision, people riding in these ar-
eas are more likely to be seriously
injured or killed.
cDo not allow people to ride in any
area of your vehicle that is not
equipped with seats and seat belts.
c
Be sure everyone in your vehicle is in
a seat and using a seat belt properly.
Terms
It is important to familiarize yourself with the
following terms before loading your vehicle:
c
Curb Weight (actual weight of your ve-
hicle) - vehicle weight including: standard
and optional equipment, fluids, emergency
tools, and spare tire assembly. This weight
does notinclude passengers and cargo.
cGVW (Gross Vehicle Weight) - curb
weight plus the combined weight of pas-
sengers and cargo.
cGVWR (Gross Vehicle Weight Rating) -
ATI1004
INSTALLING FRONT LICENSE
PLATEVEHICLE LOADING
INFORMATION
Technical and consumer information10-13
ZX
Page 203 of 217

cDo not modify the vehicle exhaust
system, brake system, etc. when the
hitch is installed.
cTo reduce the possibility of addi-
tional damage if your vehicle is
struck from the rear, where practical
remove the hitch when not in use.
Remove receiver when not in use.
cAfter the hitch is removed, seal the
bolt holes to prevent exhaust fumes,
water or dust from entering the pas-
senger compartment.
cRegularly check that all hitch mount-
ing bolts are securely mounted.
Tire pressures
cWhen towing a trailer, inflate the vehicle
tires to the recommended cold tire pres-
sure indicated on the tire placard (affixed
to the driver's door, center pillar).
cTrailer tire condition, size, load rating and
proper inflation pressure should be in
accordance with the trailer and tire
manufacturer's specifications.
Safety chains
Always use suitable chains between your
vehicle and the trailer. Safety chains should
be crossed and should be attached to the
hitch, not to the vehicle bumper or axle. Be
sure to leave enough slack in the chains to
permit turning corners.
Trailer lights
Trailer lights should comply with federal
and/ or local regulations. When wiring the
vehicle for towing, connect the stop and tail
light pickup into the vehicle electrical circuit.
Trailer brakes
If your trailer is equipped with a braking
system, make sure it conforms to Federal
and/or local regulations and that it is prop-
erly installed.
WARNING
Never connect a trailer brake system
directly to the vehicle brake system.
Pre-towing tips
cBe certain your vehicle maintains a level
position when a loaded and/or unloaded
trailer is hitched. Do not drive the vehicle ifit has an abnormal nose-up or nose- down
condition; check for improper tongue load,
overload, worn suspension or other pos-
sible causes of either condition.
cAlways secure items in the trailer to
prevent load shift while driving.
cBe certain your rear view mirrors conform
to all federal, state or local regulations. If
not, install any mirrors required for towing
before driving the vehicle.
Trailer towing tips
In order to gain skill and an understanding
of the vehicle's behavior, you should prac-
tice turning, stopping and backing up in an
area which is free from traffic. Steering
stability and braking performance will be
somewhat different than under normal driv-
ing conditions.
cAlways secure items in the trailer to
prevent load shift while driving.
cAvoid abrupt starts, acceleration or
stops.
cAvoid sharp turns or lane changes.
cAlways drive your vehicle at a moderate
speed.
10-16Technical and consumer information
ZX