Page 2266 of 2490
Instrument Panel and Console - Instrument Panel Lower Trim Panel
Removal and Installation
Removal
Installation
1.
Turn ignition switch to position 'II.'
2. Motor driver seat fully rearwards.
3. Turn ignition switch to position 'O.'
4. Slacken and remove the four underscuttle securing screws.
5. Remove and discard securing clips from screw locations.
6. Remove underscuttle from vehicle.
1. Fit new securing clips to screw locations.
2. Position and fully seat underscu ttle below fascia and fit and
tighten securing screws.
3. Return driver seat to original position.
Page 2267 of 2490
Instrument Panel and Console - Overhead Console
Removal and Installation
Removal
1. Remove battery cover and disconnect ground cable from
battery terminal. Refer to 86.15.19.
2. Open roof console sun glasses compartment.
3. Rotate fastener 1/4 turn to release console.
4. Lower console from roof and disconnect lighting module
harness multiplug and hands- free microphone harness
multiplug if telephone is fitted.
5. Release roof console from retaining clips and remove from
vehicle.
Page 2269 of 2490
Instrument Panel and Console - Rear Cup Holder
Removal and Installation
Removal
Installation
1. Remove the console glove box lid. Refer to 76.25.18.
2. Slacken and remove the ten inner lid securing screws. and
remove the inner lid.
3. Slacken and remove cupholder latch securing screw and
remove latch assembly.
4. Open cupholder, depress tang each side of latch location and
withdraw cupholder assembly. from base.
5. Slacken and remove the cupholde r trim panel securing screws.
Page 2271 of 2490

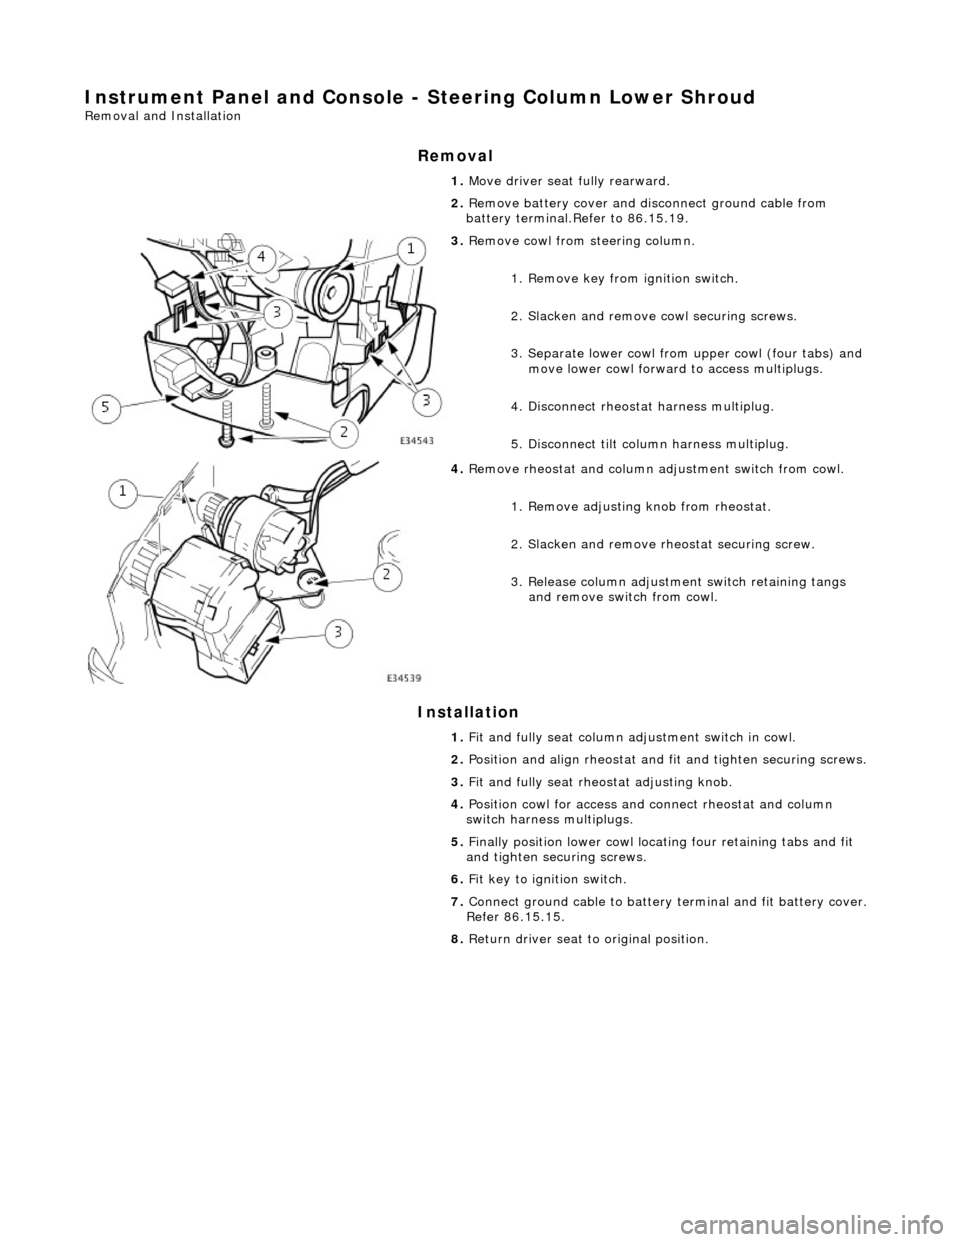
Instrument Panel and Console - Steering Column Lower Shroud
Removal and Installation
Removal
Installation
1.
Move driver seat fully rearward.
2. Remove battery cover and disconnect ground cable from
battery terminal.Refer to 86.15.19.
3. Remove cowl from steering column.
1. Remove key from ignition switch.
2. Slacken and remove cowl securing screws.
3. Separate lower cowl from upper cowl (four tabs) and move lower cowl forward to access multiplugs.
4. Disconnect rheostat harness multiplug.
5. Disconnect tilt column harness multiplug.
4. Remove rheostat and column adjustment switch from cowl.
1. Remove adjusting knob from rheostat.
2. Slacken and remove rh eostat securing screw.
3. Release column adjustment switch retaining tangs and remove switch from cowl.
1. Fit and fully seat column ad justment switch in cowl.
2. Position and align rheostat and fit and tighten securing screws.
3. Fit and fully seat rheo stat adjusting knob.
4. Position cowl for access and connect rheostat and column
switch harness multiplugs.
5. Finally position lower cowl locating four retaining tabs and fit
and tighten securing screws.
6. Fit key to ignition switch.
7. Connect ground cable to battery terminal and fit battery cover.
Refer 86.15.15.
8. Return driver seat to original position.
Page 2272 of 2490
Instrument Panel and Console - Steering Column Upper Shroud
Removal and Installation
Removal
Installation
1.
Move driver seat fully rearward.
2. Slacken and remove screws securing upper cowl to lower cowl
and separate the two cowls.
3. Move steering column to fully down position.
4. Remove upper cowl fr om steering column.
1. Position upper cowl on steering column.
2. Move column to the fully up position.
3. Fit upper cowl to lower cowl locating the four tabs, and fit and
tighten securing screws..
4. Return driver seat and column to original positions.