Page 1440 of 2490
Automatic Transmission/Transaxle - 4.0L SC V8 - AJ26 - Transmission
Fluid Filter
In-vehicle Repair
Installation
1.
Disconnect the battery ground lead.
2. Raise the vehicle for access.
3. Remove the fluid pan, refer to Operation 44.24.04.
4. Remove the fluid filter.
Pull the filter squarely to disengage the pick-up 'O' ring
and location tang - there is NO mechanical retention.
1. Installation is the reverse of the removal procedure noting
that:
2. Renew the 'O' ring.
3. Refer to Operation 44.24.02 for fluid fill procedure.
4. Check for leaks and remove spilt fluid.
Page 1441 of 2490
Automatic Transmission/Transaxle - 4.0L SC V8 - AJ26 - Transmission
Fluid Pan Gasket
In-vehicle Repair
Removal
• NOTE: This procedure will not remove re sidual fluid from the torque converter.
Installation
1. Disconnect the battery ground lead.
2. Raise the vehicle for access.
3. Drain the transmission fluid.
3. WARNING: TRANSMISSION FLUID MAY CAUSE
SEVERE BURNS, ENSURE THAT ALL SAFETY PROCEDURES
ARE OBSERVED AND THAT THE RECEPTACLE FOR WASTE
HAS SUFFICIENT CAPACITY.
Carefully remove the drain pl ug and discard the sealing
washer.
4. Remove the fluid pan.
• NOTE: The harness heatshield upper edge is retained by
a clip.
Remove the six bolts and clam ps which secure the fluid
pan to the transmission.
1. Installation is th e reverse of the re moval procedure.
Tighten the fluid pan retaining bolts to the specified torque figure.
2. Refit and tighten the drain plug to the specified torque figure.
Use a new sealing washer.
Page 1445 of 2490
4. Tighten the centre retaining bolt of the electrical connector
guide bush to 2.25 to 2.75 Nm.
5. Perform the Battery Reconnection Procedure described in
Operation 86.15.15.
6. Refer to Operation 44.24.02 for fluid fill procedure.
7. Check for leaks and remove spilt fluid.
Page 1448 of 2490
Automatic Transmission/Transaxle - 4.0L SC V8 - AJ26 - Transmission
Removal
Removal
Special Tool(s)
Engine support
303-021
Engine lifting brackets
303-536
1. Select N gear position.
2. Disconnect the battery ground lead.
3. Remove the engine covers. Re fer to Operation 12.30.06.
4. Remove the air intake tube, MAFM and air cleaner cover
assembly. Refer to Operation 19.10.30.
5. Disconnect the transmission link lead connector.
1. Release the connector fr om its mounting bracket.
2. Disconnect the multiplug.
6. Remove the EMS harness mounting bracket.
Release the bolt, bracket to cylinder head.
7. Fit engine lifting bracket 307 - 536 at the rear RH.
Page 1456 of 2490

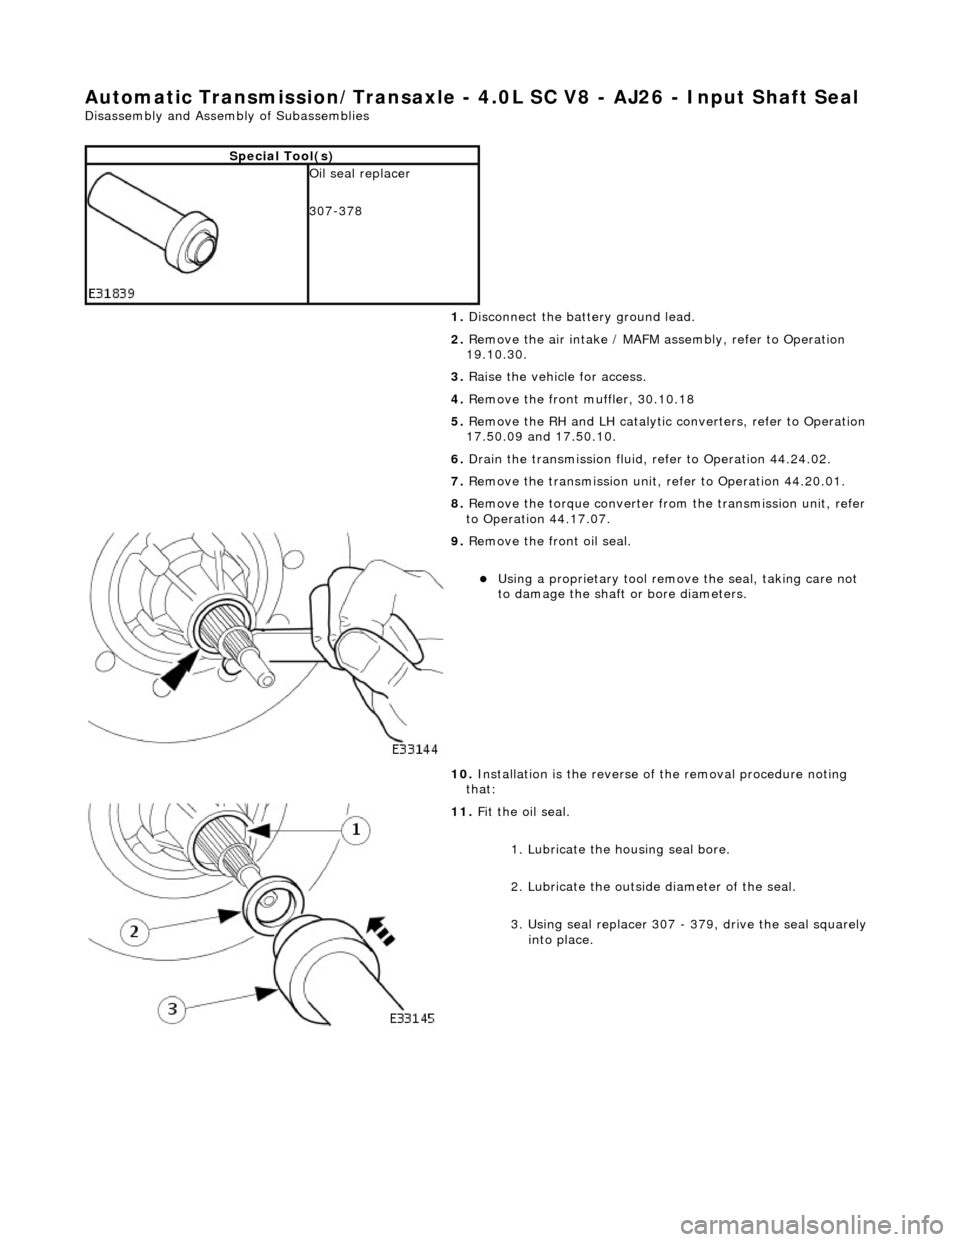
Automatic Transmission/Transaxle - 4.0L SC V8 - AJ26 - Input Shaft Seal
Disassembly and Assembly of Subassemblies
Special Tool(s)
Oil seal replacer
307-378
1. Disconnect the battery ground lead.
2. Remove the air intake / MAFM assembly, refer to Operation
19.10.30.
3. Raise the vehicle for access.
4. Remove the front muffler, 30.10.18
5. Remove the RH and LH catalytic converters, refer to Operation
17.50.09 and 17.50.10.
6. Drain the transmission fluid, refer to Operation 44.24.02.
7. Remove the transmission unit, refer to Operation 44.20.01.
8. Remove the torque converter fro m the transmission unit, refer
to Operation 44.17.07.
9. Remove the front oil seal.
Using a proprietary tool remove the seal, taking care not
to damage the shaft or bore diameters.
10. Installation is the reverse of the removal procedure noting
that:
11. Fit the oil seal.
1. Lubricate the housing seal bore.
2. Lubricate the outside diameter of the seal.
3. Using seal replacer 307 - 379, drive the seal squarely into place.
Page 1469 of 2490
Automatic Transmission/Transaxle External Controls - 4.0L NA V8 -
AJ27/3.2L NA V8 - AJ26 - External Controls
Diagnosis and Testing
Symptom Chart
Symptom Chart
Pinpoint test A: P0706
Special Tool(s)
Digital multimeter
Generic scantool
SymptomPossible SourcesAction
DTC P0706 Transmission range sensor circuit range /
performanceSelector cable maladjusted
Rotary switch fault
D to 4 switch fault
Rotary position switch fault
Harness fault
Connector pins(s) bent, loose or
corroded
*
*
*
*
*
*GO to Pinpoint Test A
*
PINPOINT TEST A : P0706
TEST CONDITIONSDETAILS/RESULTS/ACTIONS
A1: RETRIEVE DTCS
• NOTE: Battery and or ECM disconnection prior to scanning wi
ll erase all data, ensure that the correct DTC is present.
Connect the scan tool 1
Have the DTC(s) and freeze frame data been recorded?
Yes GO to A2
A2: STATUS / RELATIONSHIP CHECK
Page 1478 of 2490
Automatic Transmission/Transaxle External Controls - 4.0L NA V8 -
AJ27/3.2L NA V8 - AJ26 - Brake Shift Interlock Actuator Adjustment
General Procedures
1. Disconnect battery ground cable.
Remove the battery cover.
2. Remove the J-gate surround, Section 501-05.
3. Remove the console finisher ve neer panel, Section 501-12.
4. Remove the interlock soleno id actuating lever cover.
5. Move the shift lever to N.
Operate the gearshift interlock latch manually to release
the selector lever from P .
6. NOTE: Assistance from anot her person is required.
Adjust the gearshift interlock solenoid. 1. Slacken the solenoid fixings.
2. Hold the selector lever midway between P and R .
3. Move the solenoid rearwards, against spring pressure, to take up the free play.
4. Tighten the soleno id securing nuts.
5. Ensure that the interloc k actuating lever has no free
play with the selector lever midway between P and
Page 1479 of 2490
R .
7. Further installation is the reve rse of the removal procedure.
8. Connect the battery and fit the battery cover.
Reset the radio and the clock.