Page 1914 of 2490
Speakers - Door Speaker
Removal and Installation
Removal
Installation
1.
Disconnect battery ground cable (IMPORTANT, see SRO
86.15.19 for further information).
2. Remove door casing; refer to 76.34.01.
3. Remove speaker from door casing.
Remove four screws.
Remove speaker.
1. Installation is a reversal of the removal procedure.
2. Reconnect battery ground cable (IMPORTANT, see SRO
86.15.15 for further information).
Page 1915 of 2490
Speakers - Rear Door Speaker
Removal and Installation
Removal
Installation
1.
Disconnect battery ground cable (IMPORTANT, see SRO
86.15.19 for further information).
2. Remove door casing; refer to 76.34.04.
3. Remove speaker from door casing.
Remove four screws.
Remove speaker.
1. Installation is a reversal of the removal procedure.
2. Reconnect battery ground cable (IMPORTANT, see SRO
86.15.15 for further information).
Page 1916 of 2490
Speakers - Rear Door Tweeter Speaker
Removal and Installation
Removal
Installation
1.
Remove rear door casing fo r access; refer to 76.34.04.
2. Remove tweeter.
Disconnect connector.
Simultaneously depress retain ing clips and slide tweeter
away from location.
1. CAUTION: Misalignment of tw eeter during installation
could result in the retaining clips being broken. Position tweeter in
front of location and push into position.
Installation is a reversal of the removal procedure.
Page 1965 of 2490
Interior Lighting - Door Courtesy Lamp
Removal and Installation
Removal
Installation
1.
Remove front door casing fo r access. Refer to 76.34.01.
2. Remove the two lamp assembly securing screws.
3. Withdraw lamp assembly from door casing.
1. Position lamp assembly on door casing.
2. Install lamp securing screws.
3. Install door casing. Refer to 76.34.01.
Page 1966 of 2490
Interior Lighting - Door Courtesy Lamp Bulb
Removal and Installation
Removal
Installation
1. Using a thin plastic bl ade, carefully release lens retaining tang
from guard lamp assembly.
2. Withdraw lens from gu ard lamp assembly.
3. Remove bulb from bulb holder.
1. Install bulb in holder.
2. Position lens on guard lamp assembly.
3. Press lens firmly to fully seat securing tang in guard lamp
assembly..
Page 2014 of 2490
Multifunction Electronic Modules - Front Door Module (FDM)
Removal and Installation
Removal
Installation
1.
Disconnect battery ground cable; refer to 86.15.19.
2. Remove door casing; refer to 76.34.01.
3. Remove primary water shedder.
1. Displace primary water shedder from door.
2. Feed door harness through water shedder.
3. Remove water shedder.
4. Remove door module.
Remove screws which secu re module to door.
Reposition module to allow access to connectors.
Disconnect connector.
Remove module complete with bracket.
5. Remove mounting bracket.
Remove screws securing bracket to module.
1. Installation is reverse of removal.
2. Reconnect battery ground cable; refer to 86.15.15.
Page 2018 of 2490
Multifunction Electronic Modules - Rear Door Module (RDM)
Removal and Installation
Removal
Installation
1. Disconnect battery ground cable; refer to 86.15.19.
2. Remove door casing; refer to 76.34.04.
3. Remove primary water shedder.
1. Displace primary water shedder from door.
2. Feed door harness through water shedder.
3. Remove water shedder.
4. Remove door module.
Remove screws which secu re module to door.
Reposition module to allow access to connectors.
Disconnect connectors.
1. Installation is reverse of removal.
2. Reconnect battery ground cable; refer to 86.15.15.
Page 2019 of 2490

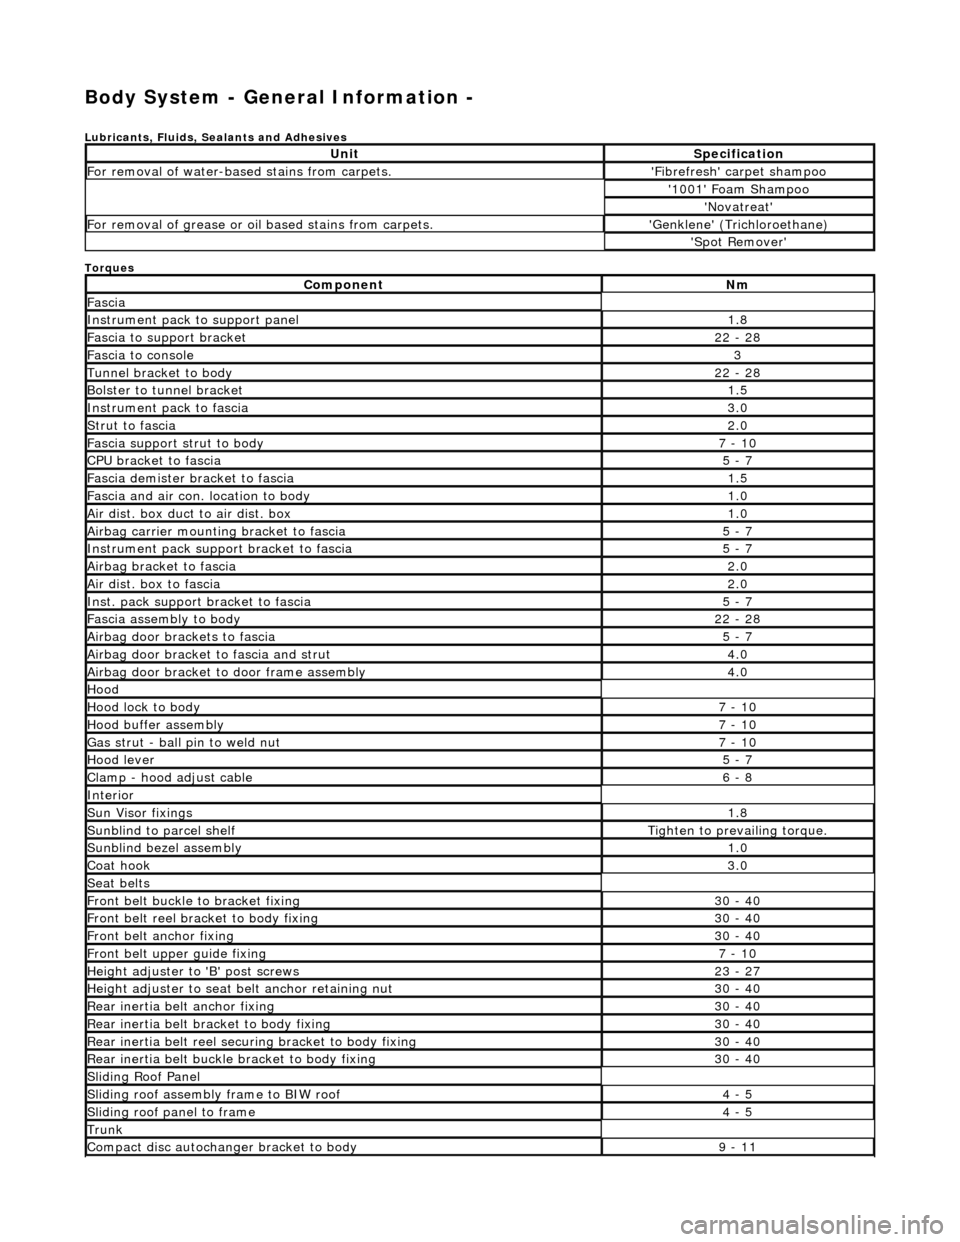
Body System - General Information -
Lubricants, Fluids, Sealants and Adhesives
Torques
UnitSpecification
For removal of water-based stains from carpets.'Fibrefresh' carpet shampoo
'1001' Foam Shampoo
'Novatreat'
For removal of grease or oil based stains from carpets.'Genklene' (Trichloroethane)
'Spot Remover'
ComponentNm
Fascia
Instrument pack to support panel1.8
Fascia to support bracket22 - 28
Fascia to console3
Tunnel bracket to body22 - 28
Bolster to tunnel bracket1.5
Instrument pack to fascia3.0
Strut to fascia2.0
Fascia support strut to body7 - 10
CPU bracket to fascia5 - 7
Fascia demister bracket to fascia1.5
Fascia and air con. location to body1.0
Air dist. box duct to air dist. box1.0
Airbag carrier mounting bracket to fascia5 - 7
Instrument pack suppo rt bracket to fascia5 - 7
Airbag bracket to fascia2.0
Air dist. box to fascia2.0
Inst. pack support bracket to fascia5 - 7
Fascia assembly to body22 - 28
Airbag door brackets to fascia5 - 7
Airbag door bracket to fascia and strut4.0
Airbag door bracket to door frame assembly4.0
Hood
Hood lock to body7 - 10
Hood buffer assembly7 - 10
Gas strut - ball pin to weld nut7 - 10
Hood lever5 - 7
Clamp - hood adjust cable6 - 8
Interior
Sun Visor fixings1.8
Sunblind to parcel shelfTighten to prevailing torque.
Sunblind bezel assembly1.0
Coat hook3.0
Seat belts
Front belt buckle to bracket fixing30 - 40
Front belt reel bracket to body fixing30 - 40
Front belt anchor fixing30 - 40
Front belt upper guide fixing7 - 10
Height adjuster to 'B' post screws23 - 27
Height adjuster to seat belt anchor retaining nut30 - 40
Rear inertia belt anchor fixing30 - 40
Rear inertia belt bracket to body fixing30 - 40
Rear inertia belt reel secu ring bracket to body fixing30 - 40
Rear inertia belt buckle bracket to body fixing30 - 40
Sliding Roof Panel
Sliding roof assembly frame to BIW roof4 - 5
Sliding roof panel to frame4 - 5
Trunk
Compact disc autochanger bracket to body9 - 11