1998 JAGUAR X308 air control
[x] Cancel search: air controlPage 1213 of 2490
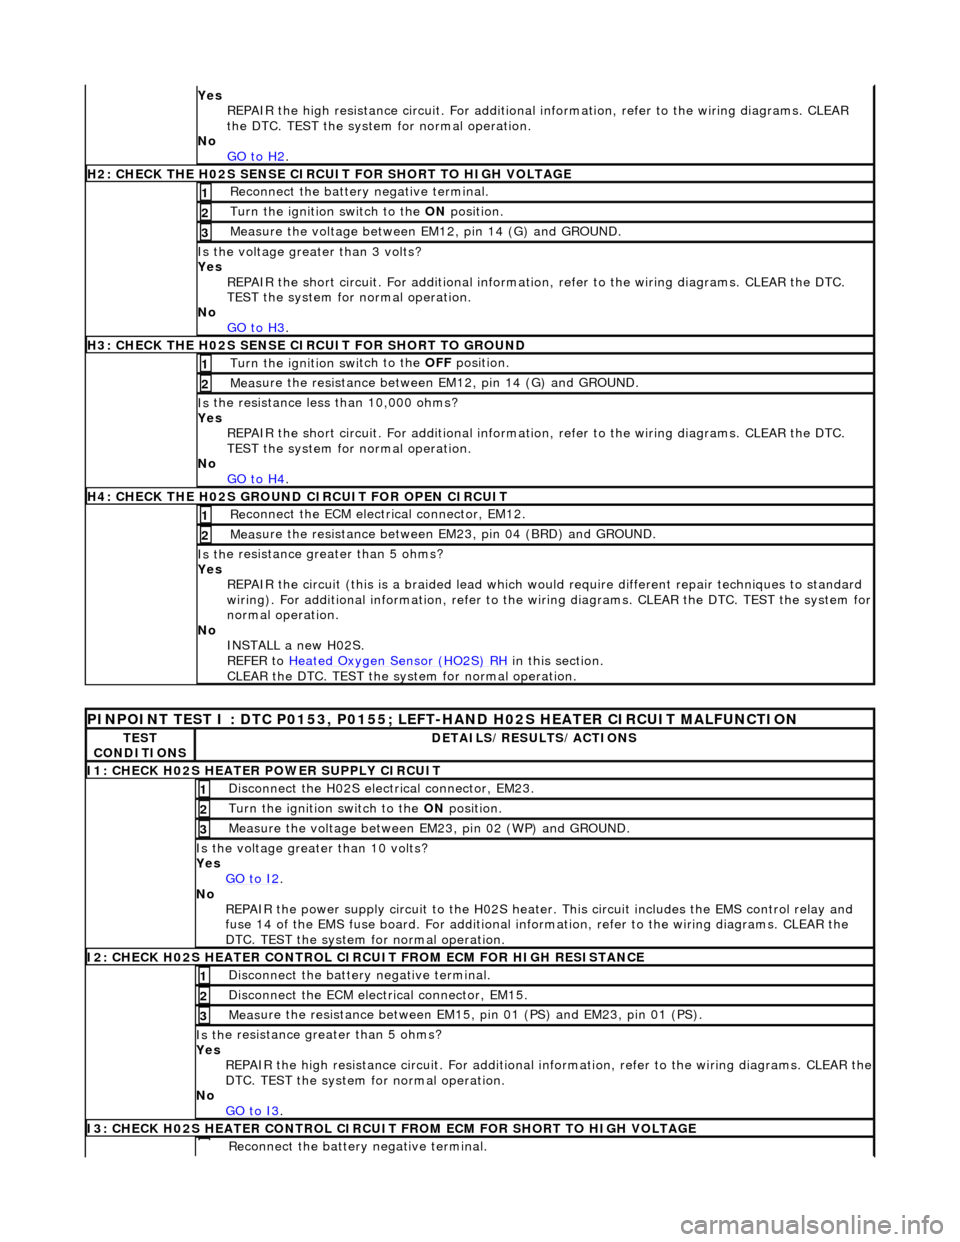
Yes
REPAIR the high resistance circui t. For additional information, refer to the wiring diagrams. CLEAR
the DTC. TEST the system for normal operation.
No GO to H2
.
H
2: CHECK THE H02S SENSE CIRCUIT FOR SHORT TO HIGH VOLTAGE
R
econnect the battery negative terminal.
1
Turn the ignition swi
tch to the ON
position.
2
M
easure the voltage between EM12, pin 14 (G) and GROUND.
3
Is th
e voltage greater than 3 volts?
Yes REPAIR the short circuit. For addi tional information, refer to the wiring diagrams. CLEAR the DTC.
TEST the system for normal operation.
No GO to H3
.
H
3: CHECK THE H02S SENSE CIRCUIT FOR SHORT TO GROUND
Turn the ignition swi
tch to the OFF
position.
1
Meas
ure the resistance between EM12, pin 14 (G) and GROUND.
2
Is
the resistance less than 10,000 ohms?
Yes REPAIR the short circuit. For addi tional information, refer to the wiring diagrams. CLEAR the DTC.
TEST the system for normal operation.
No GO to H4
.
H4:
CHECK THE H02S GROUND CIRCUIT FOR OPEN CIRCUIT
Re
connect the ECM electrical connector, EM12.
1
Meas
ure the resistance between EM23, pin 04 (BRD) and GROUND.
2
Is th
e resistance greater than 5 ohms?
Yes REPAIR the circuit (this is a braide d lead which would require different repair techniques to standard
wiring). For additional information, refer to the wiring diagrams. CL EAR the DTC. TEST the system for
normal operation.
No INSTALL a new H02S.
REFER to Heated Oxygen Sensor (HO2S) RH
in this section.
CLEAR the DTC. TEST the syst em for normal operation.
P
INPOINT TEST I : DTC P0153, P0155; LEFT-HAND H02S HEATER CIRCUIT MALFUNCTION
TE
ST
CONDITIONS
D
ETAILS/RESULTS/ACTIONS
I
1: CHECK H02S HEATER POWER SUPPLY CIRCUIT
D
isconnect the H02S electrical connector, EM23.
1
Turn the ignition swi
tch to the
ON position.
2
Meas
ure the voltage between EM23, pin 02 (WP) and GROUND.
3
Is the vol
tage greater than 10 volts?
Yes GO to I2
.
No
REPAIR the power supply circuit to the H02S heater. This circuit includes the EMS control relay and
fuse 14 of the EMS fuse board. For additional info rmation, refer to the wiring diagrams. CLEAR the
DTC. TEST the system for normal operation.
I
2: CHECK H02S HEATER CONTROL CIRC
UIT FROM ECM FOR HIGH RESISTANCE
Di
sconnect the battery negative terminal.
1
D
isconnect the ECM electrical connector, EM15.
2
Meas
ure the resistance between EM15,
pin 01 (PS) and EM23, pin 01 (PS).
3
Is th
e resistance greater than 5 ohms?
Yes REPAIR the high resistance circuit. For additional information, refer to the wiring diagrams. CLEAR the
DTC. TEST the system for normal operation.
No GO to I3
.
I
3: CHECK H02S HEATER CONTROL CIRCUIT
FROM ECM FOR SHORT TO HIGH VOLTAGE
R
econnect the battery negative terminal.
Page 1214 of 2490
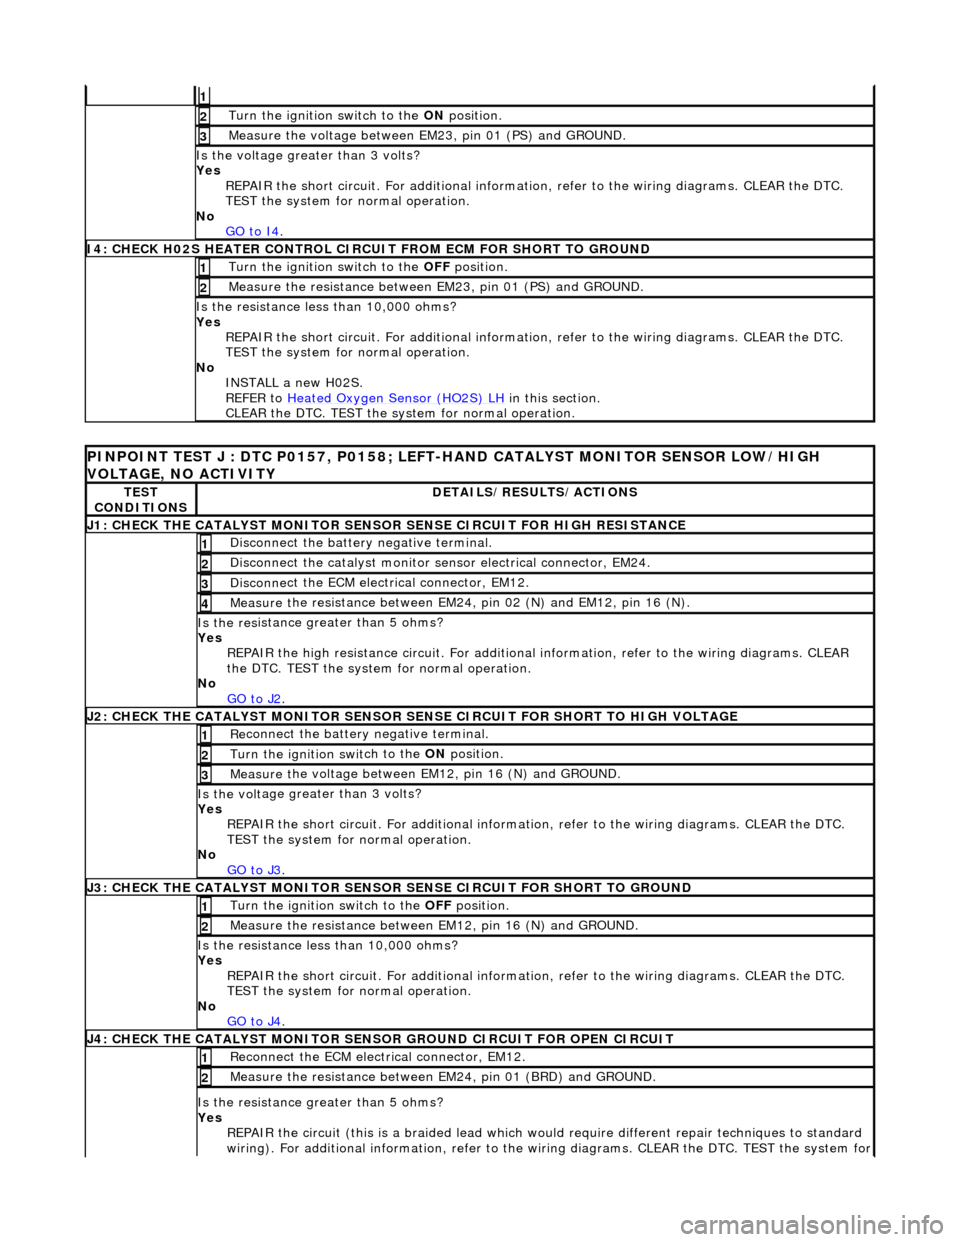
1
Turn the ignition swit
ch to the
ON position.
2
Meas ure t
he voltage between EM23, pin 01 (PS) and GROUND.
3
Is th
e volt
age greater than 3 volts?
Yes REPAIR the short circuit. For addi tional information, refer to the wiring diagrams. CLEAR the DTC.
TEST the system for normal operation.
No GO to I4
.
I4
: CHECK H02S HEATER CONTROL CIRCUIT FROM ECM FOR SHORT TO GROUND
Turn the ignition swit
ch to the
OFF position.
1
Measure t
he resistance between EM23, pin 01 (PS) and GROUND.
2
Is t
he resistance less than 10,000 ohms?
Yes REPAIR the short circuit. For addi tional information, refer to the wiring diagrams. CLEAR the DTC.
TEST the system for normal operation.
No INSTALL a new H02S.
REFER to Heated Oxygen Sensor (HO2S) LH
in this
section.
CLEAR the DTC. TEST the system for normal operation.
P INPOINT TES
T J : DTC P0157, P0158; LEFT-H
AND CATALYST MONITOR SENSOR LOW/HIGH
VOLTAGE, NO ACTIVITY
TE S
T
CONDITIONS
D E
TAILS/RESULTS/ACTIONS
J
1
: CHECK THE CATALYST MONITOR SENSOR
SENSE CIRCUIT FOR HIGH RESISTANCE
Disc
onnect the battery negative terminal.
1
Di
sc
onnect the catalyst monitor sensor electrical connector, EM24.
2
Disc
onne
ct the ECM electrical connector, EM12.
3
Meas
ure t
he resistance between EM24, pin 02 (N) and EM12, pin 16 (N).
4
Is th
e res
istance greater than 5 ohms?
Yes REPAIR the high resistance circui t. For additional information, refer to the wiring diagrams. CLEAR
the DTC. TEST the system for normal operation.
No GO to J2
.
J2
: CHECK THE CATALYST MONITOR SENSOR SENSE CIRCUIT FOR SHORT TO HIGH VOLTAGE
R
e
connect the battery negative terminal.
1
Turn the ignition swi
t
ch to the ON
position.
2
Measure t
he voltage between EM12, pin 16 (N) and GROUND.
3
Is th
e volt
age greater than 3 volts?
Yes REPAIR the short circuit. For addi tional information, refer to the wiring diagrams. CLEAR the DTC.
TEST the system for normal operation.
No GO to J3
.
J3
: CHECK THE CATALYST MONITOR SENSOR
SENSE CIRCUIT FOR SHORT TO GROUND
Turn the ignition swit
ch to the OFF
position.
1
Measure t
he resistance between EM12, pin 16 (N) and GROUND.
2
Is t
he resistance less than 10,000 ohms?
Yes REPAIR the short circuit. For addi tional information, refer to the wiring diagrams. CLEAR the DTC.
TEST the system for normal operation.
No GO to J4
.
J4
: CHECK THE CATALYST MONITOR SENSOR
GROUND CIRCUIT FOR OPEN CIRCUIT
Reconn
ect the ECM electrical connector, EM12.
1
Meas
ure t
he resistance between EM24, pin 01 (BRD) and GROUND.
2
Is th
e res
istance greater than 5 ohms?
Yes REPAIR the circuit (this is a braide d lead which would require different repair techniques to standard
wiring). For additional information, refer to the wiring diagrams. CL EAR the DTC. TEST the system for
Page 1220 of 2490
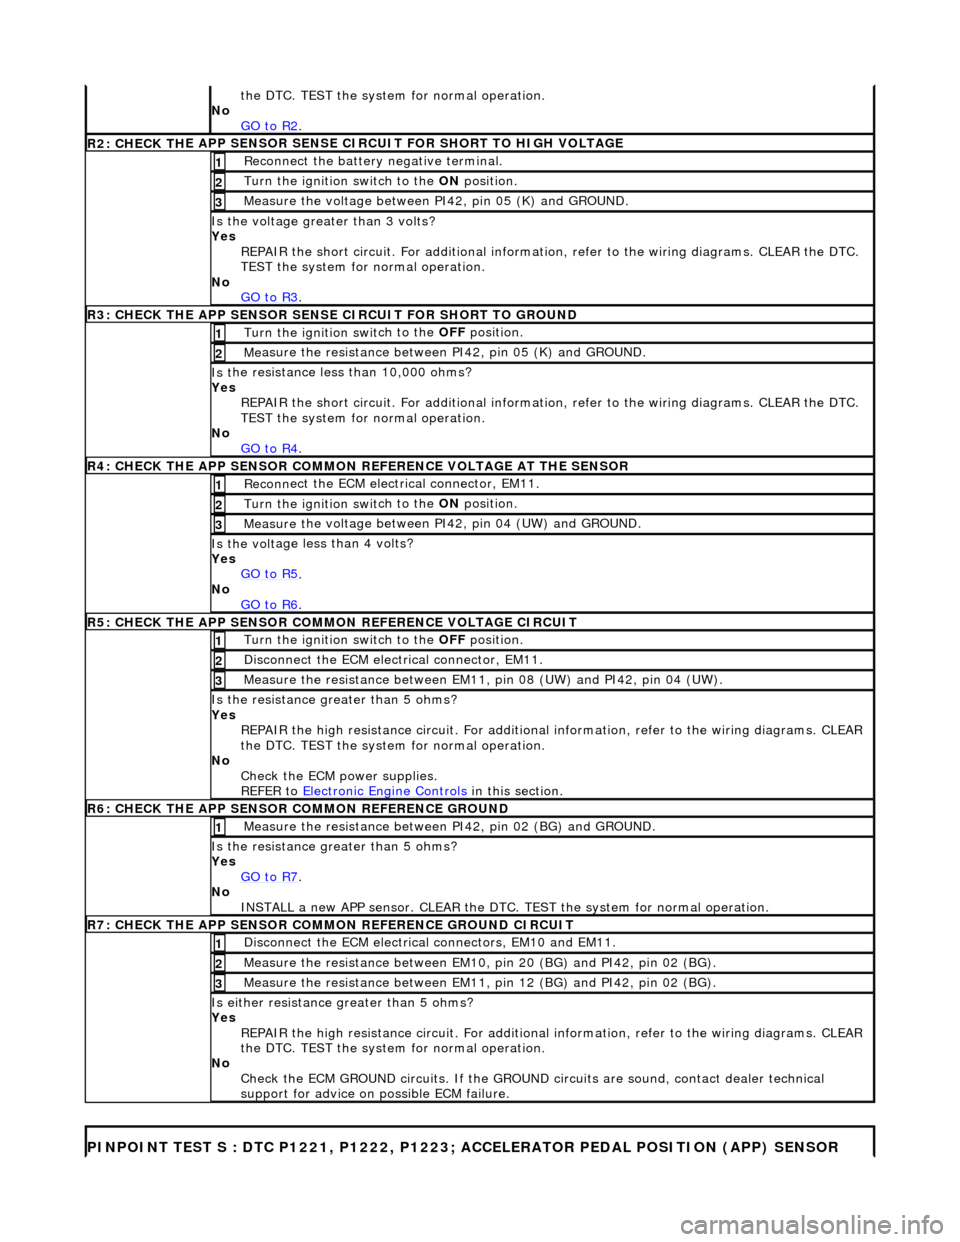
the DT
C. TEST the system for normal operation.
No GO to R2
.
R2: CHECK TH
E APP SENSOR SENSE CIRCUIT FOR SHORT TO HIGH VOLTAGE
R
e
connect the battery negative terminal.
1
Turn the ignition swi
t
ch to the ON
position.
2
Me
asure the voltage between PI42, pin 05 (K) and GROUND.
3
Is th
e volt
age greater than 3 volts?
Yes REPAIR the short circuit. For addi tional information, refer to the wiring diagrams. CLEAR the DTC.
TEST the system for normal operation.
No GO to R3
.
R3: CHECK THE APP SENSOR SENS
E CIRCUIT FOR SHORT TO GROUND
Turn the ignition swi
t
ch to the OFF
position.
1
Me
asure the resistance between PI42, pin 05 (K) and GROUND.
2
Is
t
he resistance less than 10,000 ohms?
Yes REPAIR the short circuit. For addi tional information, refer to the wiring diagrams. CLEAR the DTC.
TEST the system for normal operation.
No GO to R4
.
R4: CHECK THE APP SENSOR COM
MON
REFERENCE VOLTAGE AT THE SENSOR
Reconn
ect the ECM electrical connector, EM11.
1
Turn the ignition swi
t
ch to the ON
position.
2
Measure t
he voltage between PI42, pin 04 (UW) and GROUND.
3
Is th
e volt
age less than 4 volts?
Yes GO to R5
.
No
GO to R6
.
R5: CHECK THE APP SENSOR COM
M
ON REFERENCE VOLTAGE CIRCUIT
Turn the ignition swit
ch to the OFF
position.
1
Di
sconnect the ECM electrical connector, EM11.
2
Measure t
he resistance between EM11,
pin 08 (UW) and PI42, pin 04 (UW).
3
Is the res
istance greater than 5 ohms?
Yes REPAIR the high resistance circui t. For additional information, refer to the wiring diagrams. CLEAR
the DTC. TEST the system for normal operation.
No Check the ECM power supplies.
REFER to Electronic Engine Controls
in this
section.
R6: CHECK THE APP
SENSOR COM
MON REFERENCE GROUND
Meas
ure t
he resistance between PI42, pin 02 (BG) and GROUND.
1
Is th
e res
istance greater than 5 ohms?
Yes GO to R7
.
No
INST
ALL a new APP sensor. CLEAR the DTC.
TEST the system for normal operation.
R7: CHECK THE APP SENSOR COM
MON REFERENCE GROUND CIRCUIT
D
i
sconnect the ECM electrical connectors, EM10 and EM11.
1
Measure t
he resistance between EM10,
pin 20 (BG) and PI42, pin 02 (BG).
2
Measure t
he resistance between EM11,
pin 12 (BG) and PI42, pin 02 (BG).
3
Is either resistance greater
than 5 ohms?
Yes REPAIR the high resistance circui t. For additional information, refer to the wiring diagrams. CLEAR
the DTC. TEST the system for normal operation.
No Check the ECM GROUND circuits. If the GROUND circuits are sound, contact dealer technical
support for advice on possible ECM failure.
PINPO
INT TEST S : DTC P1221, P1222, P1223;
ACCELERATOR PEDAL POSITION (APP) SENSOR
Page 1221 of 2490
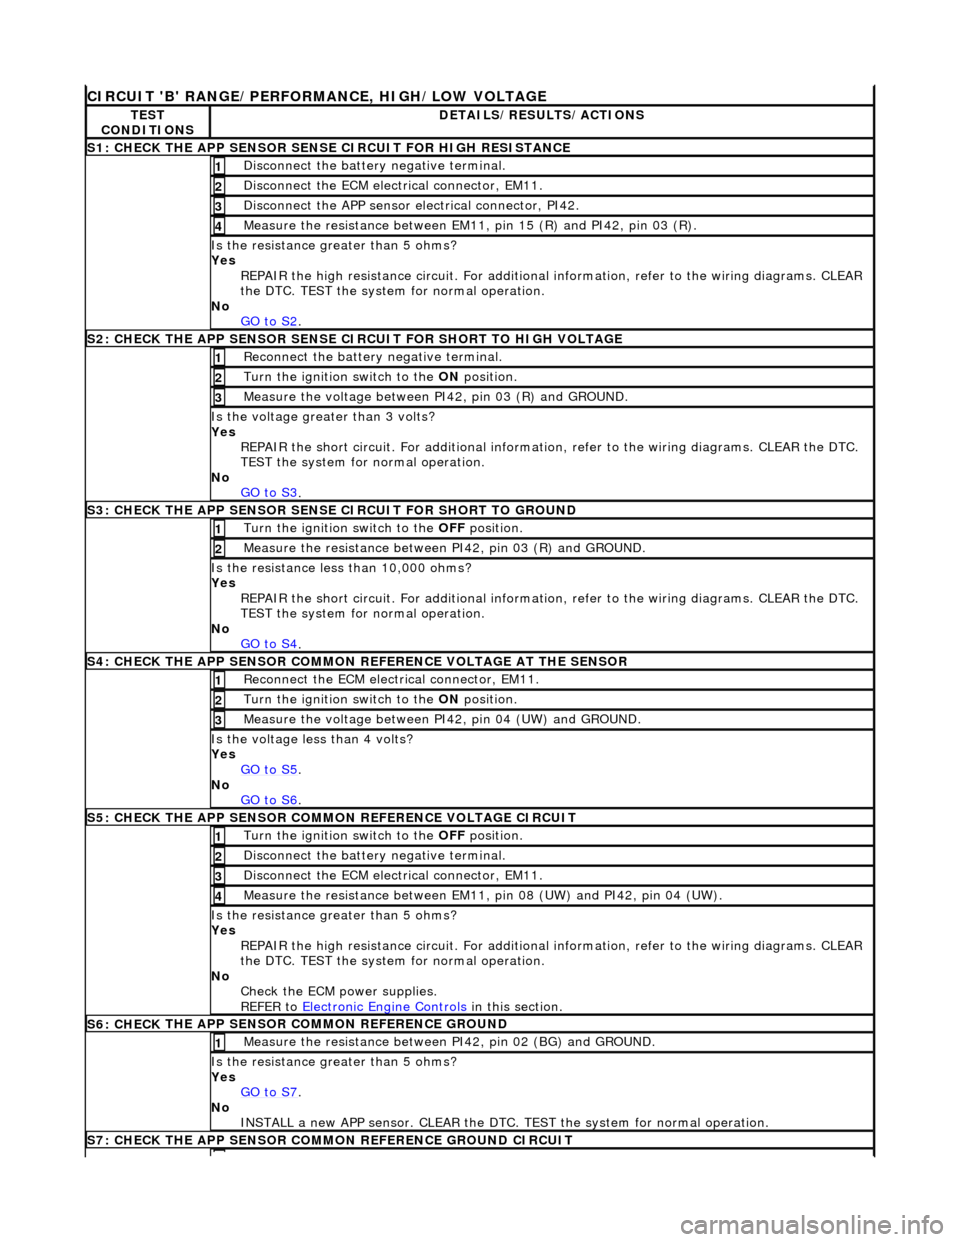
CIRCUI
T 'B' RANGE/PERFORMANCE, HIGH/LOW VOLTAGE
TE
ST
CONDITIONS
D
ETAILS/RESULTS/ACTIONS
S1: CHECK
THE APP SENSOR SENSE CIRCUIT FOR HIGH RESISTANCE
Di
sconnect the battery negative terminal.
1
D
isconnect the ECM electrical connector, EM11.
2
Di
sconnect the APP sensor electrical connector, PI42.
3
Meas
ure the resistance between EM11, pin 15 (R) and PI42, pin 03 (R).
4
Is th
e resistance greater than 5 ohms?
Yes REPAIR the high resistance circui t. For additional information, refer to the wiring diagrams. CLEAR
the DTC. TEST the system for normal operation.
No GO to S2
.
S
2: CHECK THE APP SENSOR SENSE CIRCUIT FOR SHORT TO HIGH VOLTAGE
R
econnect the battery negative terminal.
1
Turn the ignition swi
tch to the ON
position.
2
M
easure the voltage between PI42, pin 03 (R) and GROUND.
3
Is th
e voltage greater than 3 volts?
Yes REPAIR the short circuit. For addi tional information, refer to the wiring diagrams. CLEAR the DTC.
TEST the system for normal operation.
No GO to S3
.
S
3: CHECK THE APP SENSOR SENSE CIRCUIT FOR SHORT TO GROUND
Turn the ignition swi
tch to the OFF
position.
1
Meas
ure the resistance between PI42, pin 03 (R) and GROUND.
2
Is
the resistance less than 10,000 ohms?
Yes REPAIR the short circuit. For addi tional information, refer to the wiring diagrams. CLEAR the DTC.
TEST the system for normal operation.
No GO to S4
.
S4:
CHECK THE APP SENSOR COMMON REFERENCE VOLTAGE AT THE SENSOR
Re
connect the ECM electrical connector, EM11.
1
Turn the ignition swi
tch to the ON
position.
2
Meas
ure the voltage between PI42, pin 04 (UW) and GROUND.
3
Is th
e voltage less than 4 volts?
Yes GO to S5
.
No
GO to S6
.
S5: CHECK
THE APP SENSOR COMM
ON REFERENCE VOLTAGE CIRCUIT
Turn the ignition swi
tch to the OFF
position.
1
Di
sconnect the battery negative terminal.
2
D
isconnect the ECM electrical connector, EM11.
3
Meas
ure the resistance between EM11,
pin 08 (UW) and PI42, pin 04 (UW).
4
Is th
e resistance greater than 5 ohms?
Yes REPAIR the high resistance circui t. For additional information, refer to the wiring diagrams. CLEAR
the DTC. TEST the system for normal operation.
No Check the ECM power supplies.
REFER to Electronic Engine Controls
in this section.
S6: CHECK
THE APP SENSOR COMMON REFERENCE GROUND
Meas
ure the resistance between PI42, pin 02 (BG) and GROUND.
1
Is th
e resistance greater than 5 ohms?
Yes GO to S7
.
No
INSTALL a new APP sensor. CLEAR the DTC. TEST the system for normal operation.
S7: CHECK
THE APP SENSOR COMM
ON REFERENCE GROUND CIRCUIT
Page 1222 of 2490
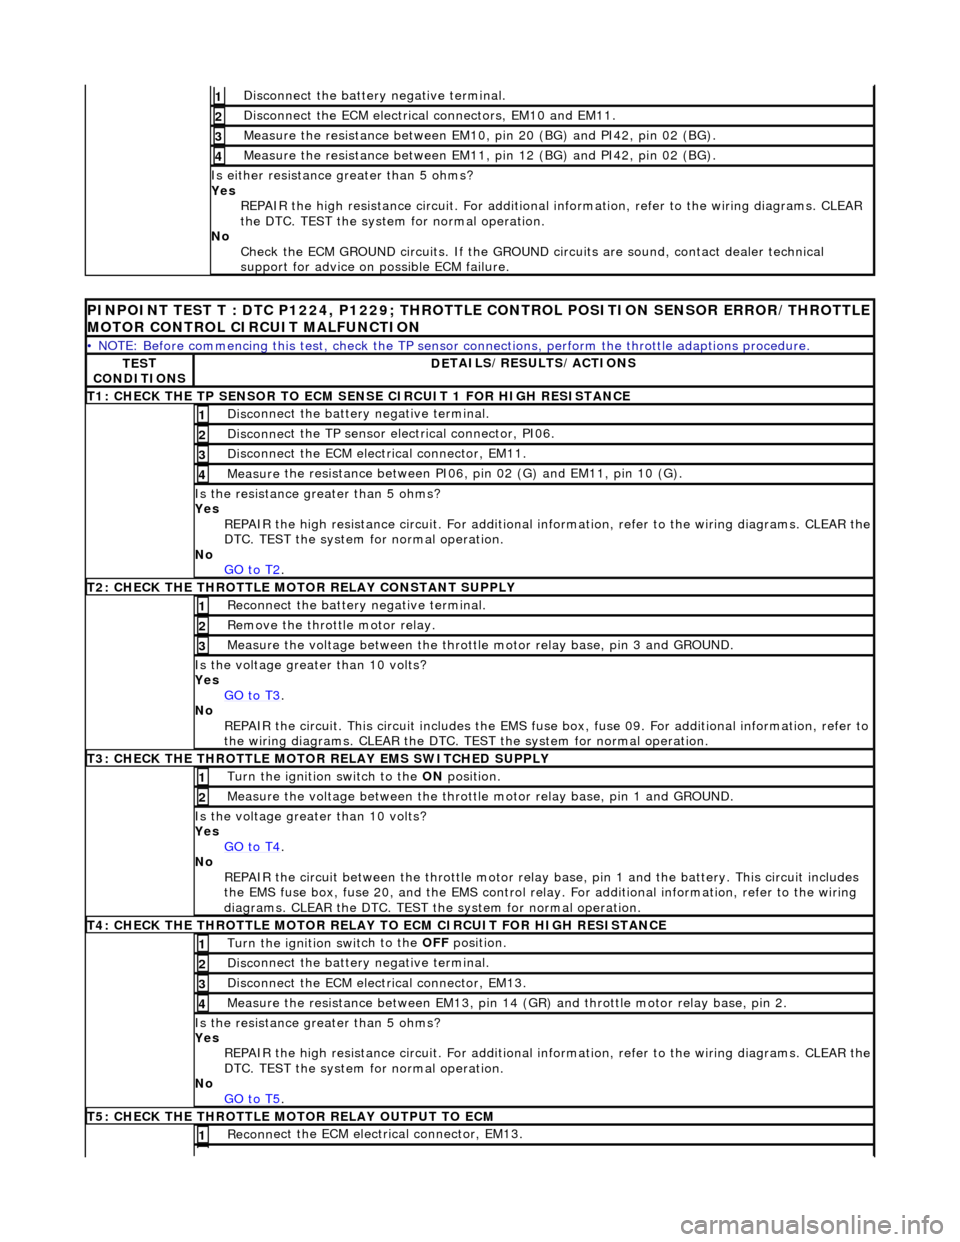
Disc
onnect the battery negative terminal.
1
D
i
sconnect the ECM electrical connectors, EM10 and EM11.
2
Meas
ure t
he resistance between EM10,
pin 20 (BG) and PI42, pin 02 (BG).
3
Measure t
he resistance between EM11,
pin 12 (BG) and PI42, pin 02 (BG).
4
Is either resistance greater
than 5 ohms?
Yes REPAIR the high resistance circui t. For additional information, refer to the wiring diagrams. CLEAR
the DTC. TEST the system for normal operation.
No Check the ECM GROUND circuits. If the GROUND circuits are sound, contact dealer technical
support for advice on possible ECM failure.
PINPOINT TES
T T : DTC P1224, P1229; THROTTLE
CONTROL POSITION SENSOR ERROR/THROTTLE
MOTOR CONTROL CIRCUIT MALFUNCTION
•
NOTE: Before commencing this test, check the TP sensor
connections, perform the throttle adaptions procedure.
TES
T
CONDITIONS
D E
TAILS/RESULTS/ACTIONS
T
1: CH
ECK THE TP SENSOR TO ECM SE
NSE CIRCUIT 1 FOR HIGH RESISTANCE
Disc
onnect the battery negative terminal.
1
Disc
onne
ct the TP sensor electrical connector, PI06.
2
D
i
sconnect the ECM electrical connector, EM11.
3
Me
asure
the resistance between PI06, pin 02 (G) and EM11, pin 10 (G).
4
Is th
e res
istance greater than 5 ohms?
Yes REPAIR the high resistance circuit. For additional information, refer to the wiring diagrams. CLEAR the
DTC. TEST the system for normal operation.
No GO to T2
.
T2
: CHECK THE THROTTLE MOTOR RELAY CONSTANT SUPPLY
R
e
connect the battery negative terminal.
1
R
e
move the thrott
le motor relay.
2
Measure t
he voltage between the throttle
motor relay base, pin 3 and GROUND.
3
Is the volt
age greater than 10 volts?
Yes GO to T3
.
No
R
EPAIR the circuit. This ci
rcuit includes the EMS fuse box, fuse 09. For addi tional information, refer to
the wiring diagrams. CLEAR the DTC. TE ST the system for normal operation.
T3
: CHECK THE THROTTLE MOTOR
RELAY EMS SWITCHED SUPPLY
Turn the ignition swit
ch to the
ON position.
1
Meas ure t
he voltage between the throttle
motor relay base, pin 1 and GROUND.
2
Is the volt
age greater than 10 volts?
Yes GO to T4
.
No
REP
AIR the circuit between the throttle motor relay
base, pin 1 and the battery. This circuit includes
the EMS fuse box, fuse 20, and the EMS control relay. For addition al information, refer to the wiring
diagrams. CLEAR the DTC. TEST th e system for normal operation.
T4
: CHECK THE THROTTLE MOTOR RELAY TO
ECM CIRCUIT FOR HIGH RESISTANCE
Turn the ignition swit
ch to the
OFF position.
1
Disc
onnect the battery negative terminal.
2
Di
sconnect the ECM electrical connector, EM13.
3
Measure t
he resistance between EM13, pin 14 (G
R) and throttle motor relay base, pin 2.
4
Is the res
istance greater than 5 ohms?
Yes REPAIR the high resistance circuit. For additional information, refer to the wiring diagrams. CLEAR the
DTC. TEST the system for normal operation.
No GO to T5
.
T5
: CHECK THE THROTTLE MOTOR RELAY OUTPUT TO ECM
Re
conn
ect the ECM electrical connector, EM13.
1
Page 1223 of 2490
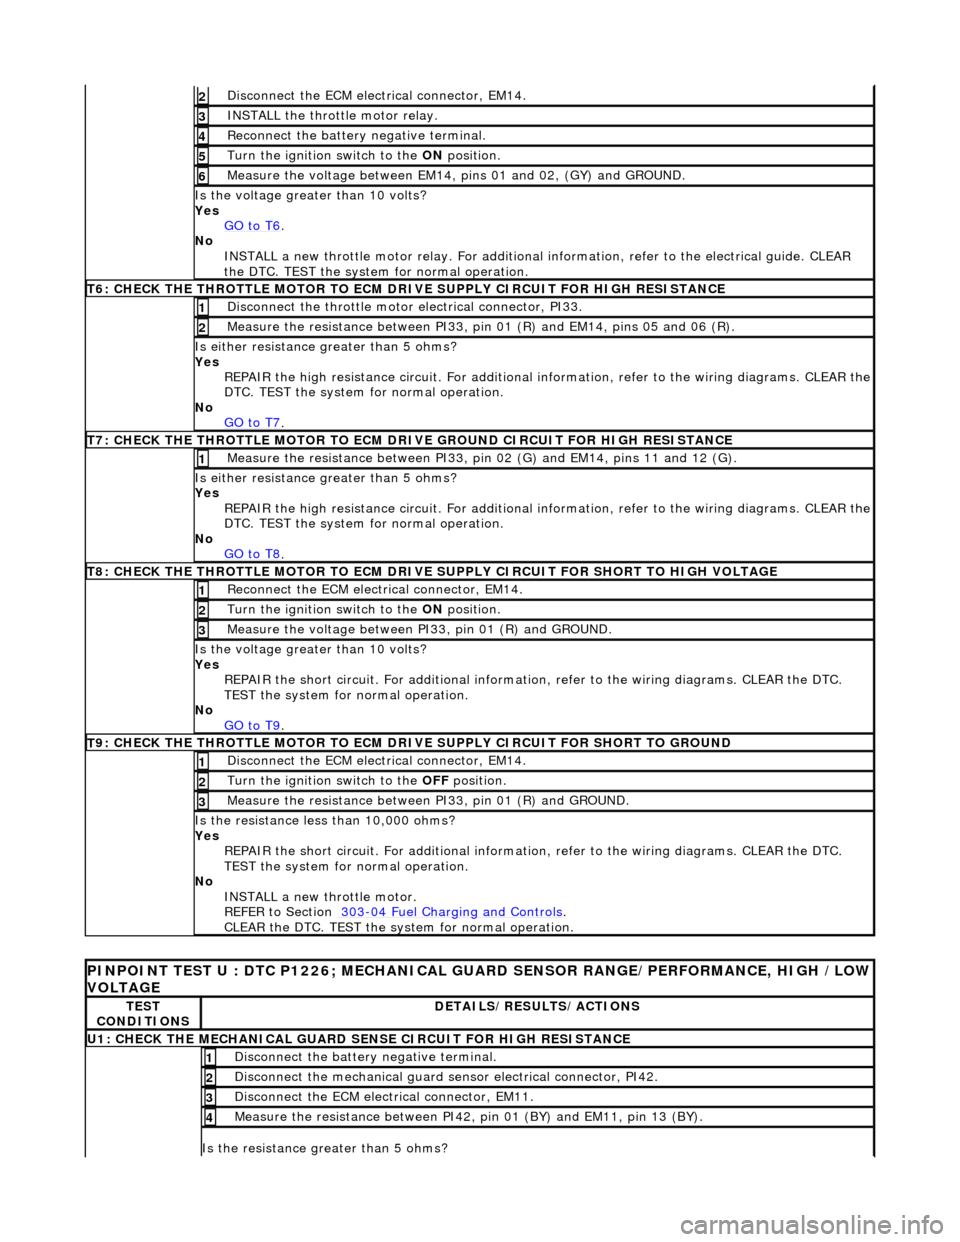
D
isconnect the ECM electrical connector, EM14.
2
IN
STALL the throttle motor relay.
3
R
econnect the battery negative terminal.
4
Turn the ignition swi
tch to the
ON position.
5
Measure the
voltage between EM14, pi
ns 01 and 02, (GY) and GROUND.
6
Is the vol
tage greater than 10 volts?
Yes GO to T6
.
No
INSTALL a new throttle motor relay. For additional information, refer to the electrical guide. CLEAR
the DTC. TEST the system for normal operation.
T
6: CHECK THE THROTTLE MOTOR TO ECM DRIVE SUPPLY CIRCUIT FOR HIGH RESISTANCE
Di
sconnect the throttle motor electrical connector, PI33.
1
Meas
ure the resistance between PI33, pi
n 01 (R) and EM14, pins 05 and 06 (R).
2
Is either resi
stance
greater than 5 ohms?
Yes REPAIR the high resistance circuit. For additional information, refer to the wiring diagrams. CLEAR the
DTC. TEST the system for normal operation.
No GO to T7
.
T
7: CHECK THE THROTTLE MOTOR TO ECM DRIVE GROUND CIRCUIT FOR HIGH RESISTANCE
Meas
ure the resistance between PI33, pin
02 (G) and EM14, pins 11 and 12 (G).
1
Is either resi
stance
greater than 5 ohms?
Yes REPAIR the high resistance circuit. For additional information, refer to the wiring diagrams. CLEAR the
DTC. TEST the system for normal operation.
No GO to T8
.
T
8: CHECK THE THROTTLE MOTOR TO ECM DRIVE SU
PPLY CIRCUIT FOR SHORT TO HIGH VOLTAGE
Re
connect the ECM electrical connector, EM14.
1
Turn the ignition swi
tch to the
ON position.
2
M
easure the voltage between PI33, pin 01 (R) and GROUND.
3
Is the vol
tage greater than 10 volts?
Yes REPAIR the short circuit. For addi tional information, refer to the wiring diagrams. CLEAR the DTC.
TEST the system for normal operation.
No GO to T9
.
T
9: CHECK THE THROTTLE MOTOR TO ECM DRIVE SUPPLY CIRCUIT FOR SHORT TO GROUND
D
isconnect the ECM electrical connector, EM14.
1
Turn the ignition swi
tch to the
OFF position.
2
Meas
ure the resistance between PI33, pin 01 (R) and GROUND.
3
Is
the resistance less than 10,000 ohms?
Yes REPAIR the short circuit. For addi tional information, refer to the wiring diagrams. CLEAR the DTC.
TEST the system for normal operation.
No INSTALL a new throttle motor.
REFER to Section 303
-0
4 Fuel Charging and Controls
.
CLEAR t
he DTC. TEST the system for normal operation.
P
INPOINT TEST U : DTC P1226; MECHANICAL
GUARD SENSOR RANGE/PERFORMANCE, HIGH /LOW
VOLTAGE
TE
ST
CONDITIONS
D
ETAILS/RESULTS/ACTIONS
U1: CHECK T
HE MECHANICAL GUARD SENSE CIRCUIT FOR HIGH RESISTANCE
Di
sconnect the battery negative terminal.
1
Di
sconnect the mechanical guard sensor electrical connector, PI42.
2
D
isconnect the ECM electrical connector, EM11.
3
Me
asure the resistance between PI42, pin 01 (BY) and EM11, pin 13 (BY).
4
Is th
e resistance greater than 5 ohms?
Page 1231 of 2490
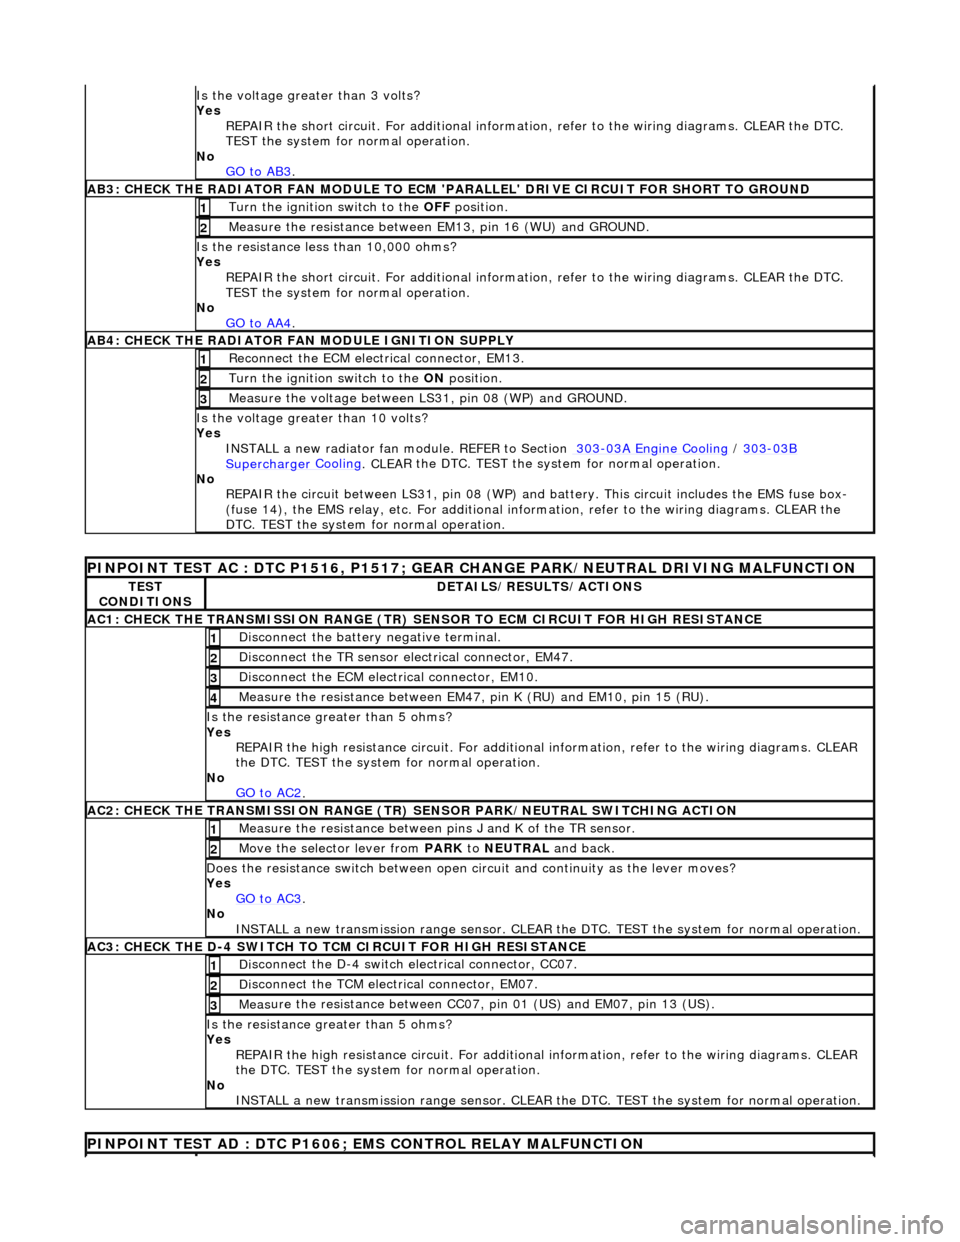
Is th
e voltage greater than 3 volts?
Yes REPAIR the short circuit. For addi tional information, refer to the wiring diagrams. CLEAR the DTC.
TEST the system for normal operation.
No GO to AB3
.
AB3
: CHECK THE RADIATOR FAN MODULE TO ECM
'PARALLEL' DRIVE CIRCUIT FOR SHORT TO GROUND
Turn the ignition swi
tch to the OFF
position.
1
Meas
ure the resistance between EM13, pin 16 (WU) and GROUND.
2
Is
the resistance less than 10,000 ohms?
Yes
REPAIR the short circuit. For addi tional information, refer to the wiring diagrams. CLEAR the DTC.
TEST the system for normal operation.
No GO to AA4
.
AB4
: CHECK THE RADIATOR FAN MODULE IGNITION SUPPLY
Re
connect the ECM electrical connector, EM13.
1
Turn the ignition swi
tch to the ON
position.
2
Measure the
voltage between LS
31, pin 08 (WP) and GROUND.
3
Is the vol
tage greater than 10 volts?
Yes INSTALL a new radiator fan module. REFER to Section 303
-0
3A Engine Cooling
/
30
3
-03
B
Supercharger
Cooling
. CLEA
R the DTC. TEST the sy
stem for normal operation.
No REPAIR the circuit between LS31, pin 08 (WP) and battery. This circuit includes the EMS fuse box-
(fuse 14), the EMS relay, etc. For additional information, refer to the wiring diagrams. CLEAR the
DTC. TEST the system for normal operation.
P
INPOINT TEST AC : DTC P1516, P1517; GEAR
CHANGE PARK/NEUTRAL DRIVING MALFUNCTION
TE
ST
CONDITIONS
D
ETAILS/RESULTS/ACTIONS
AC1: CH
ECK THE TRANSMISSION RANGE (TR) SE
NSOR TO ECM CIRCUIT FOR HIGH RESISTANCE
Di
sconnect the battery negative terminal.
1
Di
sconnect the TR sensor el
ectrical connector, EM47.
2
D
isconnect the ECM electrical connector, EM10.
3
Meas
ure the resistance between EM47, pin K (RU) and EM10, pin 15 (RU).
4
Is th
e resistance greater than 5 ohms?
Yes REPAIR the high resistance circui t. For additional information, refer to the wiring diagrams. CLEAR
the DTC. TEST the system for normal operation.
No GO to AC2
.
AC2: CH
ECK THE TRANSMISSION RANGE (TR)
SENSOR PARK/NEUTRAL SWITCHING ACTION
Meas
ure the resistance between pi
ns J and K of the TR sensor.
1
Mo
ve the selector lever from
PARK to NEUTRAL and back.
2
D
oes the resistance switch between open ci
rcuit and continuity as the lever moves?
Yes GO to AC3
.
No
INSTALL a new transmission range sensor. CLEAR th e DTC. TEST the system for normal operation.
AC3: CH
ECK THE D-4 SWITCH TO
TCM CIRCUIT FOR HIGH RESISTANCE
Di
sconnect the D-4 switch electrical connector, CC07.
1
Di
sconnect the TCM electrical connector, EM07.
2
Meas
ure the resistance between CC07,
pin 01 (US) and EM07, pin 13 (US).
3
Is th
e resistance greater than 5 ohms?
Yes REPAIR the high resistance circui t. For additional information, refer to the wiring diagrams. CLEAR
the DTC. TEST the system for normal operation.
No INSTALL a new transmission range sensor. CLEAR th e DTC. TEST the system for normal operation.
P
INPOINT TEST AD : DTC P1606;
EMS CONTROL RELAY MALFUNCTION
Page 1241 of 2490
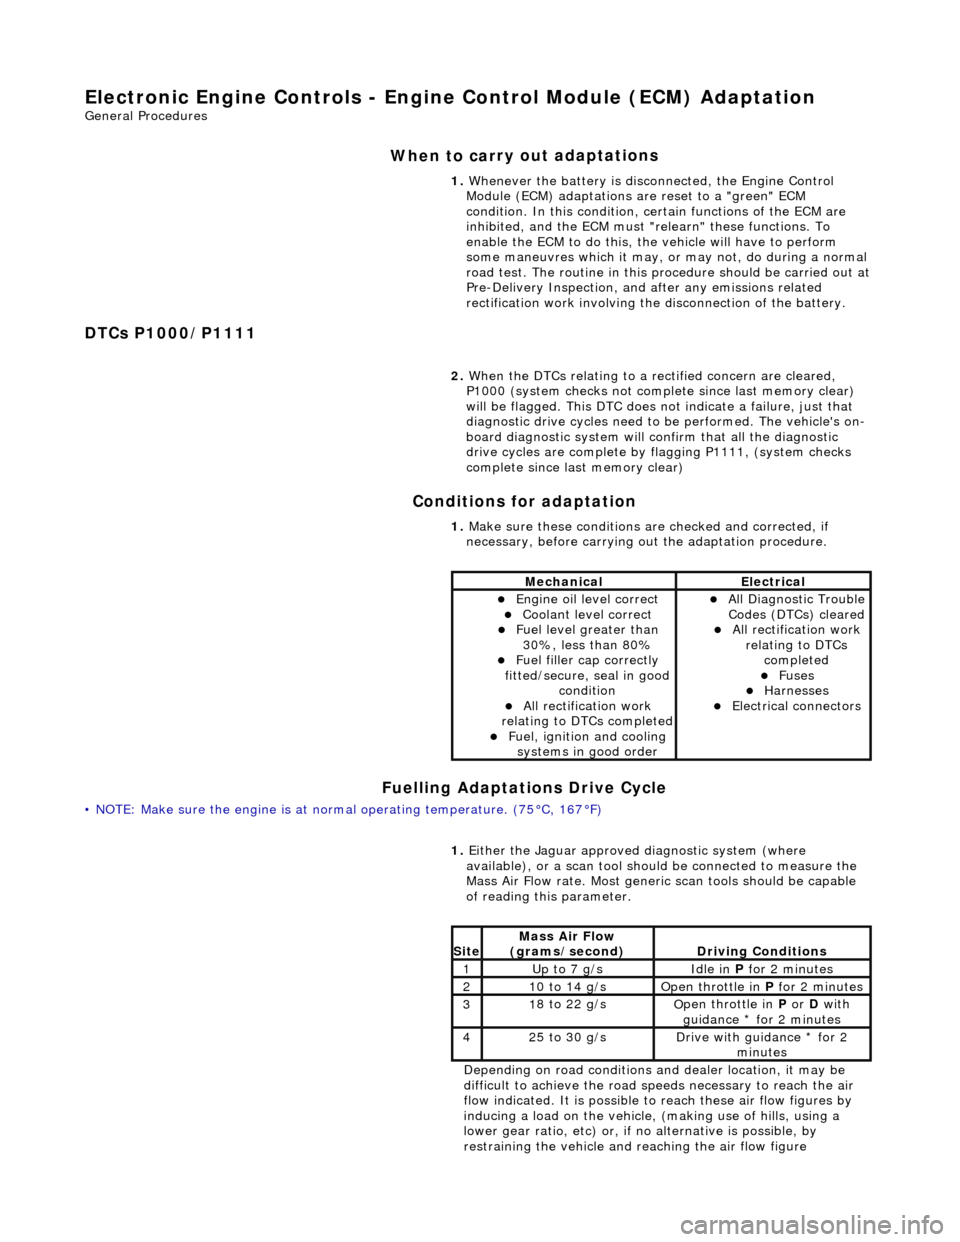
E
lectronic Engine Controls - Engine
Control Module (ECM) Adaptation
Gen
eral Procedures
When to car
ry out adaptations
DTCs P1000/P1111 Conditions for adaptation
Fuelling Adaptations Drive Cycle
•
NOTE: Make sure the engine is at normal operating
temperature. (75°C, 167°F) 1.
Whenever the battery is disconnected, the Engine Control
Module (ECM) adaptations are reset to a "green" ECM
condition. In this condition, certain functions of the ECM are
inhibited, and the ECM must "r elearn" these functions. To
enable the ECM to do this, the vehicle will have to perform
some maneuvres which it may, or may not, do during a normal
road test. The routine in this pr ocedure should be carried out at
Pre-Delivery Inspection, and after any emissions related
rectification work involving the disconnection of the battery.
2. When the DTCs relating to a rectified concern are cleared,
P1000 (system checks not complete since last memory clear)
will be flagged. This DTC does no t indicate a failure, just that
diagnostic drive cycles need to be performed. The vehicle's on-
board diagnostic system will confirm that all the diagnostic
drive cycles are complete by flagging P1111, (system checks
complete since last memory clear)
1. Make sure these conditions are checked and corrected, if
necessary, before carrying ou t the adaptation procedure.
MechanicalElectrical
Engi
ne oil level correct
Coo
lant level correct
F
uel level greater than
30%, less than 80%
F
uel filler cap correctly
fitted/secure, seal in good condition
Al
l rectification work
relating to DTCs completed
F
uel, ignition and cooling
systems in good order
Al
l Diagnostic Trouble
Codes (DTCs) cleared
Al
l rectification work
relating to DTCs completed
F
uses
Harnes
ses
E
lectrical connectors
1.
Either
the Jaguar approved diagnostic system (where
available), or a scan tool should be connected to measure the
Mass Air Flow rate. Most generi c scan tools should be capable
of reading this parameter.
Depending on road conditions and dealer location, it may be
difficult to achieve the road sp eeds necessary to reach the air
flow indicated. It is possible to reach these air flow figures by
inducing a load on the vehicle, (making use of hills, using a
lower gear ratio, etc) or, if no alternative is possible, by
restraining the vehicle and re aching the air flow figure
Si
te
Mass Air Flow
(gra
ms/second)
D
riving Conditions
1Up t
o 7 g/s
Idle
in
P for 2 minutes
21
0 to 14 g/s
O
pen throttle in
P for 2 minutes
31
8 to 22 g/s
O
pen throttle in
P or D with
guidance * for 2 minutes
42
5 to 30 g/s
D
rive with guidance * for 2
minutes