1998 ISUZU TROOPER wheel
[x] Cancel search: wheelPage 6 of 3573
PAGE BACK PAGE NEXT
THIS MALUAL INCLUDES THE FOLLOWING SECTIONS:
SECTION No. CONTRNTS
3C FRONT SUSPENSION
3D REAR SUSPENSION; COIL SPRING
3E WHEELS AND TIRES
Page 16 of 3573
GENERAL REPAIR INSTRUCTIONS
1. Park the vehicle on level ground and chock the
front or rear wheels before lifting the vehicle.
2. Use covers on the vehicle body, seats, and
floor to prevent damage and/or
contaminations.
3. Disconnect the grounding cable from the
battery before performing service operations.
This will prevent cable damage or burning due
to shortcircuiting.
4. Raise the vehicle with a jack set against the
recommended lifting points (see ÒLifting
instructionsÓ in this section).
5. Support the vehicle on chassis stands.
6. Handle brake fluid and antifreeze solution with
great care.
Spilling these liquids on painted surfaces will
damage the paint.
7. The use of the proper tool(s) and special tool(s)
where specified is essential to efficient,
reliable, and safe service operations.
8. Always use genuine ISUZU replacement parts.
9. Discard used cotter pins, gasket, plastic clips,
O-rings, oil seals, lock washers, and self-
locking nuts at disassembly.
Normal function of these parts cannot be
guaranteed if they are reused.
10. Keep the disassembled parts neatly in groups.
This will facilitate smooth and correct
reassembly.11. Keep fixing nuts and bolts separate.
Fixing nuts and bolts vary in hardness and
design according to installation positions.
12. Clean all parts before inspection or
reassembly.
13. Clean the oil ports and other openings with
compressed air to make certain that they are
free of dirt and obstructions.
14. Lubricate the rotating and sliding faces of all
moving parts with oil or grease before
installation.
15. Use the recommended liquid gasket to prevent
leakage.
16. Carefully observe all nut and bolt torque
specifications.
17. When service operation is completed, make a
final check to be sure service has been done
properly and problem has been corrected.
18. When removing or replacing parts that require
refrigerant to be discharged from the air
conditioning system, be sure to use the
following tools to recover and recycle the
Refrigerant-134a (R-134a).
For 134a:
Use the R-134a Refrigerant Recovery/Recovery/
Recycling/Recharging/System (ACR
4) or its
equivalent to prevent the discharge of
refrigerant into the air.
0AÐ2 GENERAL INFORMATION
Page 20 of 3573

VEHICLE IDENTIFICATION NUMBER (VIN)
This is the legal identification of the vehicle.
It appears on the manufacturerÕs Plate attached to the left
of the engine compartment front end. VIN number is also
stamped on the rear right side of the frame.VIN
VINISUZU MOTORS LTD.
JAC UBS 26 G Y 7 200001
Sequential Number
Plant Code
Model Year (Y: 2000)
Wheel Base (D: Short, G: Long)
Engine Type (26: 6VE1, 73: 4JX1)
Vehicle Model
World Manufacturer Identifier
ENGINE SERIAL NUMBER
The engine serial number is stamped on the left rear lower
area of the cylinder block above the starter.
4JX1
6VE1
0AÐ6 GENERAL INFORMATION
IDENTIFICATION
905RW014
905RW016
Page 22 of 3573
0AÐ8 GENERAL INFORMATION
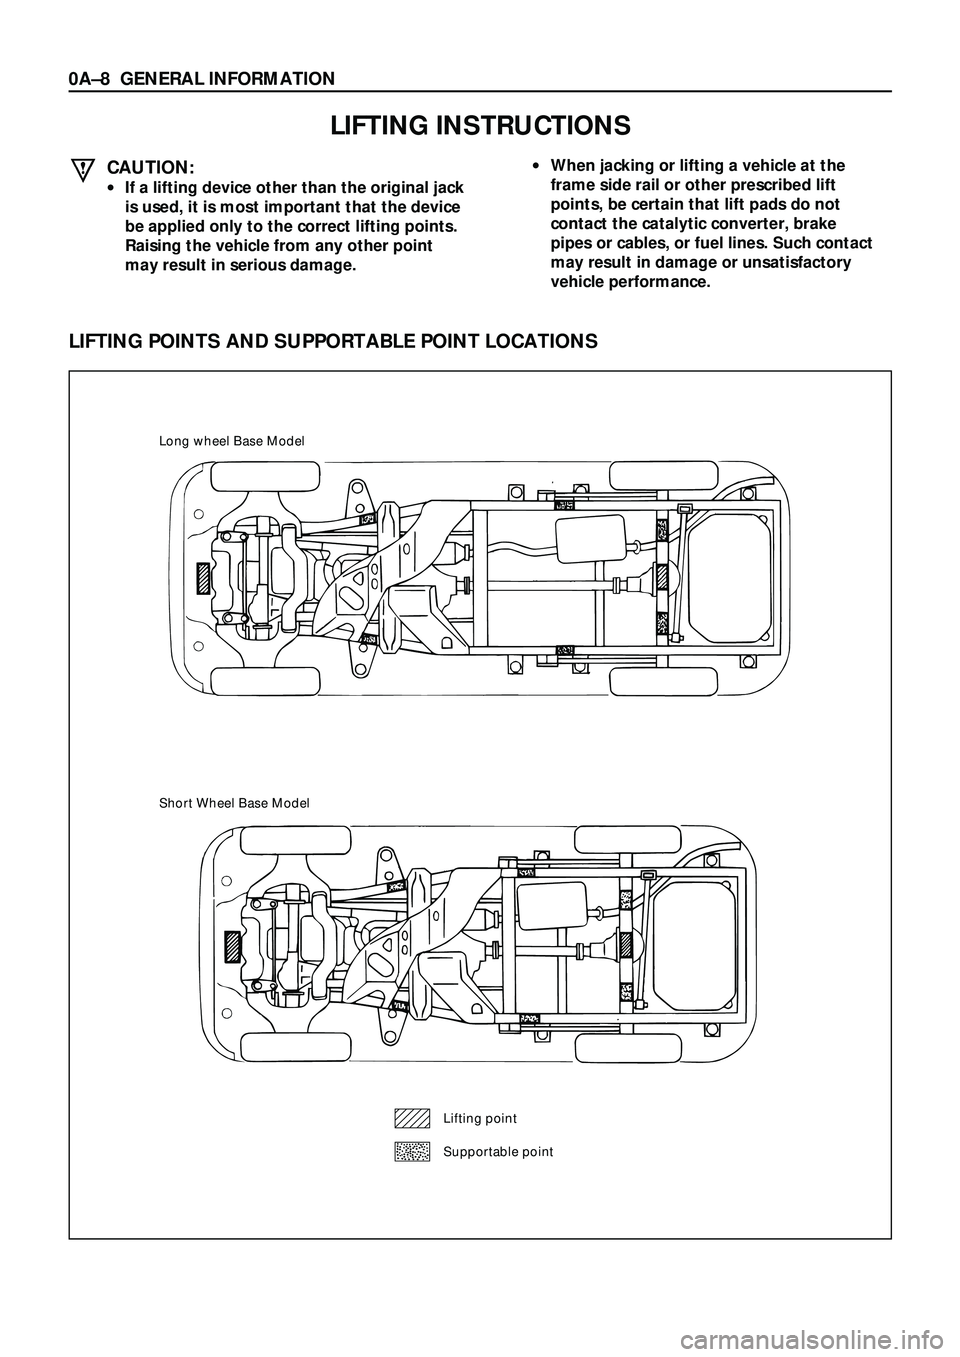
LIFTING INSTRUCTIONS
CAUTION:
·If a lifting device other than the original jack
is used, it is most important that the device
be applied only to the correct lifting points.
Raising the vehicle from any other point
may result in serious damage.
·When jacking or lifting a vehicle at the
frame side rail or other prescribed lift
points, be certain that lift pads do not
contact the catalytic converter, brake
pipes or cables, or fuel lines. Such contact
may result in damage or unsatisfactory
vehicle performance.
LIFTING POINTS AND SUPPORTABLE POINT LOCATIONS
Long wheel Base Model
Short Wheel Base Model
Lifting point
Supportable point
Page 23 of 3573
GENERAL INFORMATION 0AÐ9
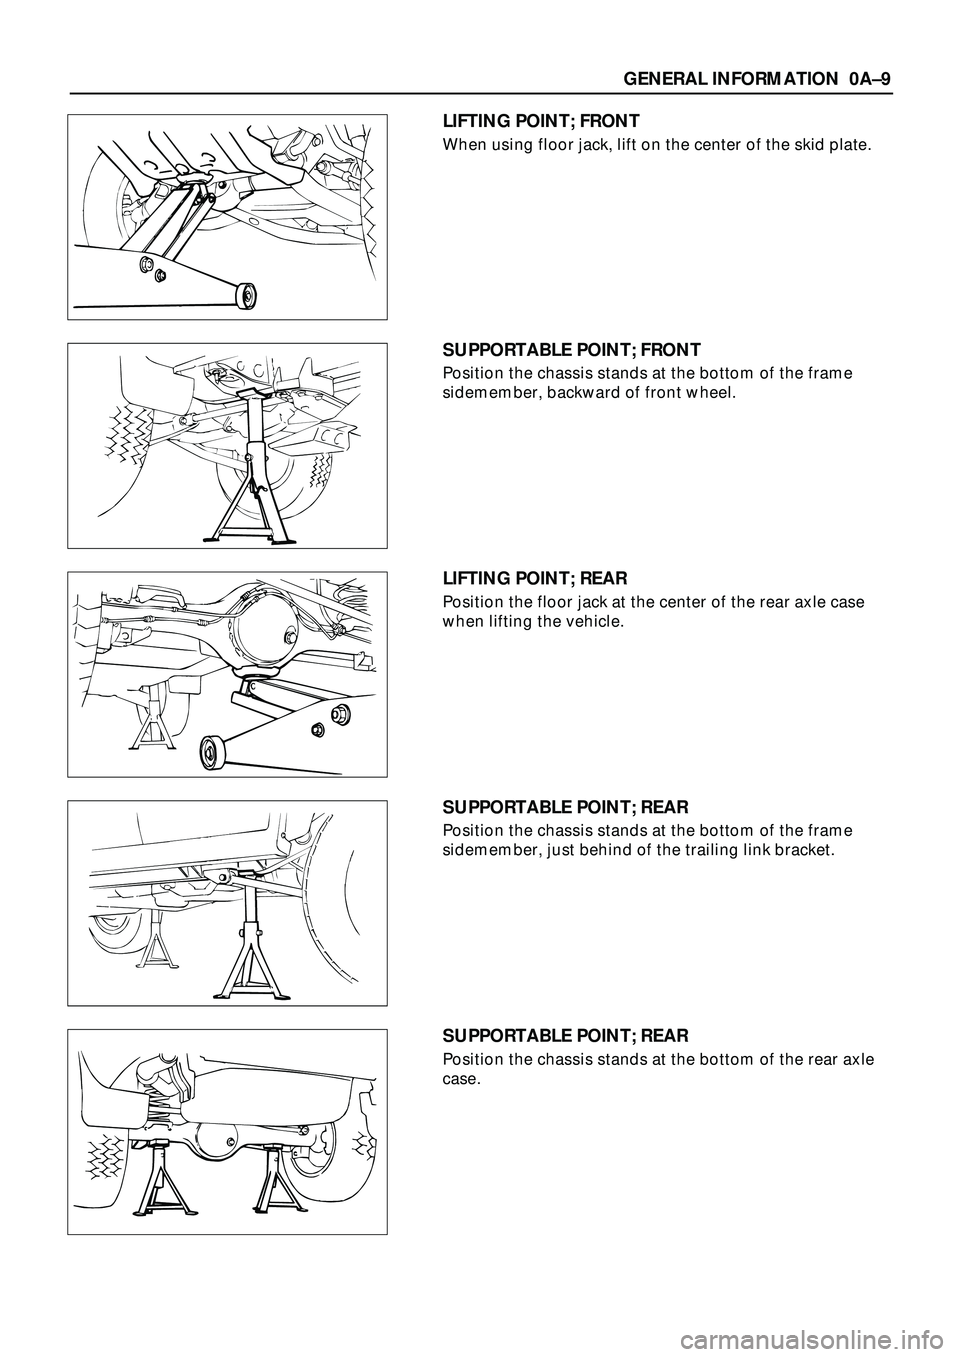
LIFTING POINT; FRONT
When using floor jack, lift on the center of the skid plate.
SUPPORTABLE POINT; FRONT
Position the chassis stands at the bottom of the frame
sidemember, backward of front wheel.
LIFTING POINT; REAR
Position the floor jack at the center of the rear axle case
when lifting the vehicle.
SUPPORTABLE POINT; REAR
Position the chassis stands at the bottom of the frame
sidemember, just behind of the trailing link bracket.
SUPPORTABLE POINT; REAR
Position the chassis stands at the bottom of the rear axle
case.
Page 26 of 3573
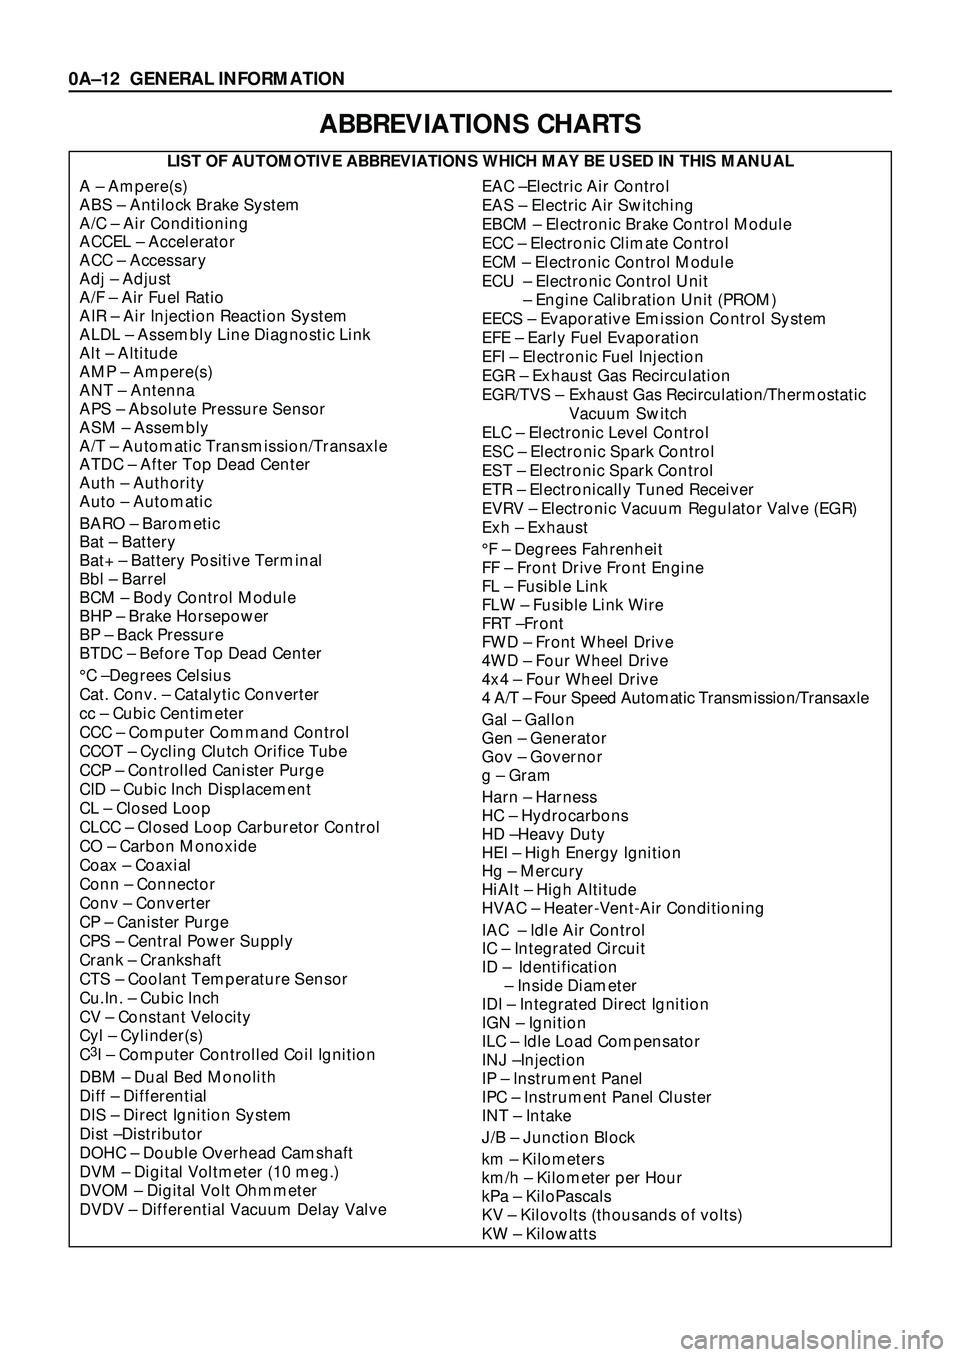
ABBREVIATIONS CHARTS
LIST OF AUTOMOTIVE ABBREVIATIONS WHICH MAY BE USED IN THIS MANUAL
A Ð Ampere(s)
ABS Ð Antilock Brake System
A/C Ð Air Conditioning
ACCEL Ð Accelerator
ACC Ð Accessary
Adj Ð Adjust
A/F Ð Air Fuel Ratio
AIR Ð Air Injection Reaction System
ALDL Ð Assembly Line Diagnostic Link
Alt Ð Altitude
AMP Ð Ampere(s)
ANT Ð Antenna
APS Ð Absolute Pressure Sensor
ASM Ð Assembly
A/T Ð Automatic Transmission/Transaxle
ATDC Ð After Top Dead Center
Auth Ð Authority
Auto Ð Automatic
BARO Ð Barometic
Bat Ð Battery
Bat+ Ð Battery Positive Terminal
Bbl Ð Barrel
BCM Ð Body Control Module
BHP Ð Brake Horsepower
BP Ð Back Pressure
BTDC Ð Before Top Dead Center
¡C ÐDegrees Celsius
Cat. Conv. Ð Catalytic Converter
cc Ð Cubic Centimeter
CCC Ð Computer Command Control
CCOT Ð Cycling Clutch Orifice Tube
CCP Ð Controlled Canister Purge
CID Ð Cubic Inch Displacement
CL Ð Closed Loop
CLCC Ð Closed Loop Carburetor Control
CO Ð Carbon Monoxide
Coax Ð Coaxial
Conn Ð Connector
Conv Ð Converter
CP Ð Canister Purge
CPS Ð Central Power Supply
Crank Ð Crankshaft
CTS Ð Coolant Temperature Sensor
Cu.In. Ð Cubic Inch
CV Ð Constant Velocity
Cyl Ð Cylinder(s)
C
3I Ð Computer Controlled Coil Ignition
DBM Ð Dual Bed Monolith
Diff Ð Differential
DIS Ð Direct Ignition System
Dist ÐDistributor
DOHC Ð Double Overhead Camshaft
DVM Ð Digital Voltmeter (10 meg.)
DVOM Ð Digital Volt Ohmmeter
DVDV Ð Differential Vacuum Delay Valve
EAC ÐElectric Air Control
EAS Ð Electric Air Switching
EBCM Ð Electronic Brake Control Module
ECC Ð Electronic Climate Control
ECM Ð Electronic Control Module
ECU Ð Electronic Control Unit
Ð Engine Calibration Unit (PROM)
EECS Ð Evaporative Emission Control System
EFE Ð Early Fuel Evaporation
EFI Ð Electronic Fuel Injection
EGR Ð Exhaust Gas Recirculation
EGR/TVS Ð Exhaust Gas Recirculation/Thermostatic
Vacuum Switch
ELC Ð Electronic Level Control
ESC Ð Electronic Spark Control
EST Ð Electronic Spark Control
ETR Ð Electronically Tuned Receiver
EVRV Ð Electronic Vacuum Regulator Valve (EGR)
Exh Ð Exhaust
¡F Ð Degrees Fahrenheit
FF Ð Front Drive Front Engine
FL Ð Fusible Link
FLW Ð Fusible Link Wire
FRT ÐFront
FWD Ð Front Wheel Drive
4WD Ð Four Wheel Drive
4x4 Ð Four Wheel Drive
4 A/T Ð Four Speed Automatic Transmission/Transaxle
Gal Ð Gallon
Gen Ð Generator
Gov Ð Governor
g Ð Gram
Harn Ð Harness
HC Ð Hydrocarbons
HD ÐHeavy Duty
HEI Ð High Energy Ignition
Hg Ð Mercury
HiAlt Ð High Altitude
HVAC Ð Heater-Vent-Air Conditioning
IAC Ð Idle Air Control
IC Ð Integrated Circuit
ID Ð Identification
Ð Inside Diameter
IDI Ð Integrated Direct Ignition
IGN Ð Ignition
ILC Ð Idle Load Compensator
INJ ÐInjection
IP Ð Instrument Panel
IPC Ð Instrument Panel Cluster
INT Ð Intake
J/B Ð Junction Block
km Ð Kilometers
km/h Ð Kilometer per Hour
kPa Ð KiloPascals
KV Ð Kilovolts (thousands of volts)
KW Ð Kilowatts
0AÐ12 GENERAL INFORMATION
Page 27 of 3573
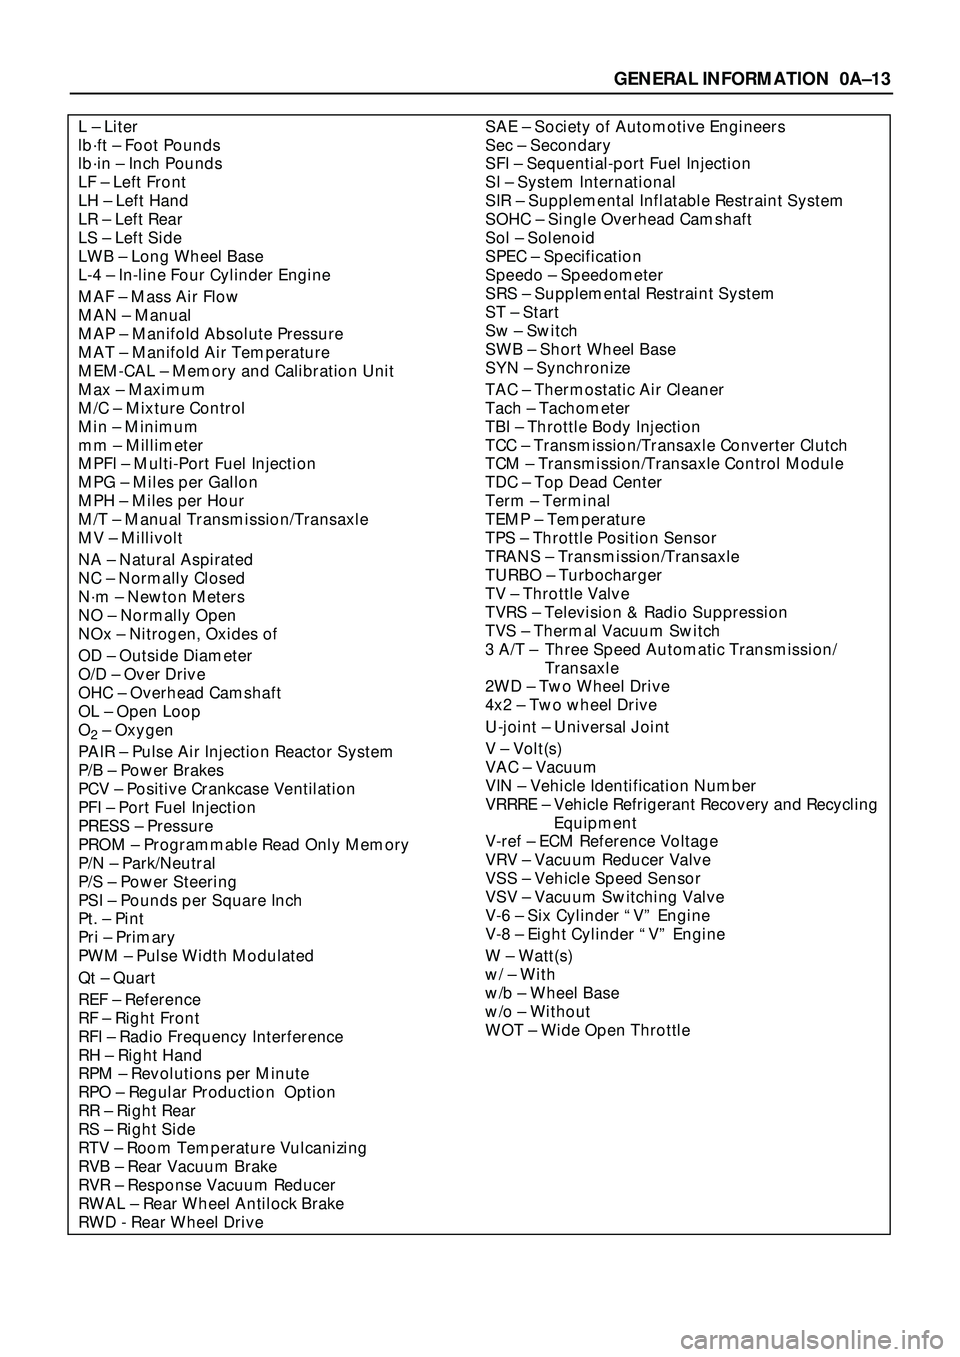
SAE Ð Society of Automotive Engineers
Sec Ð Secondary
SFI Ð Sequential-port Fuel Injection
SI Ð System International
SIR Ð Supplemental Inflatable Restraint System
SOHC Ð Single Overhead Camshaft
Sol Ð Solenoid
SPEC Ð Specification
Speedo Ð Speedometer
SRS Ð Supplemental Restraint System
ST Ð Start
Sw Ð Switch
SWB Ð Short Wheel Base
SYN Ð Synchronize
TAC Ð Thermostatic Air Cleaner
Tach Ð Tachometer
TBI Ð Throttle Body Injection
TCC Ð Transmission/Transaxle Converter Clutch
TCM Ð Transmission/Transaxle Control Module
TDC Ð Top Dead Center
Term Ð Terminal
TEMP Ð Temperature
TPS Ð Throttle Position Sensor
TRANS Ð Transmission/Transaxle
TURBO Ð Turbocharger
TV Ð Throttle Valve
TVRS Ð Television & Radio Suppression
TVS Ð Thermal Vacuum Switch
3 A/T Ð Three Speed Automatic Transmission/
Transaxle
2WD Ð Two Wheel Drive
4x2 Ð Two wheel Drive
U-joint Ð Universal Joint
V Ð Volt(s)
VAC Ð Vacuum
VIN Ð Vehicle Identification Number
VRRRE Ð Vehicle Refrigerant Recovery and Recycling
Equipment
V-ref Ð ECM Reference Voltage
VRV Ð Vacuum Reducer Valve
VSS Ð Vehicle Speed Sensor
VSV Ð Vacuum Switching Valve
V-6 Ð Six Cylinder ÒVÓ Engine
V-8 Ð Eight Cylinder ÒVÓ Engine
W Ð Watt(s)
w/ Ð With
w/b Ð Wheel Base
w/o Ð Without
WOT Ð Wide Open ThrottleL Ð Liter
lbáft Ð Foot Pounds
lbáin Ð Inch Pounds
LF Ð Left Front
LH Ð Left Hand
LR Ð Left Rear
LS Ð Left Side
LWB Ð Long Wheel Base
L-4 Ð In-line Four Cylinder Engine
MAF Ð Mass Air Flow
MAN Ð Manual
MAP Ð Manifold Absolute Pressure
MAT Ð Manifold Air Temperature
MEM-CAL Ð Memory and Calibration Unit
Max Ð Maximum
M/C Ð Mixture Control
Min Ð Minimum
mm Ð Millimeter
MPFI Ð Multi-Port Fuel Injection
MPG Ð Miles per Gallon
MPH Ð Miles per Hour
M/T Ð Manual Transmission/Transaxle
MV Ð Millivolt
NA Ð Natural Aspirated
NC Ð Normally Closed
Nám Ð Newton Meters
NO Ð Normally Open
NOx Ð Nitrogen, Oxides of
OD Ð Outside Diameter
O/D Ð Over Drive
OHC Ð Overhead Camshaft
OL Ð Open Loop
O
2Ð Oxygen
PAIR Ð Pulse Air Injection Reactor System
P/B Ð Power Brakes
PCV Ð Positive Crankcase Ventilation
PFI Ð Port Fuel Injection
PRESS Ð Pressure
PROM Ð Programmable Read Only Memory
P/N Ð Park/Neutral
P/S Ð Power Steering
PSI Ð Pounds per Square Inch
Pt. Ð Pint
Pri Ð Primary
PWM Ð Pulse Width Modulated
Qt Ð Quart
REF Ð Reference
RF Ð Right Front
RFI Ð Radio Frequency Interference
RH Ð Right Hand
RPM Ð Revolutions per Minute
RPO Ð Regular Production Option
RR Ð Right Rear
RS Ð Right Side
RTV Ð Room Temperature Vulcanizing
RVB Ð Rear Vacuum Brake
RVR Ð Response Vacuum Reducer
RWAL Ð Rear Wheel Antilock Brake
RWD - Rear Wheel Drive
GENERAL INFORMATION 0AÐ13
Page 29 of 3573
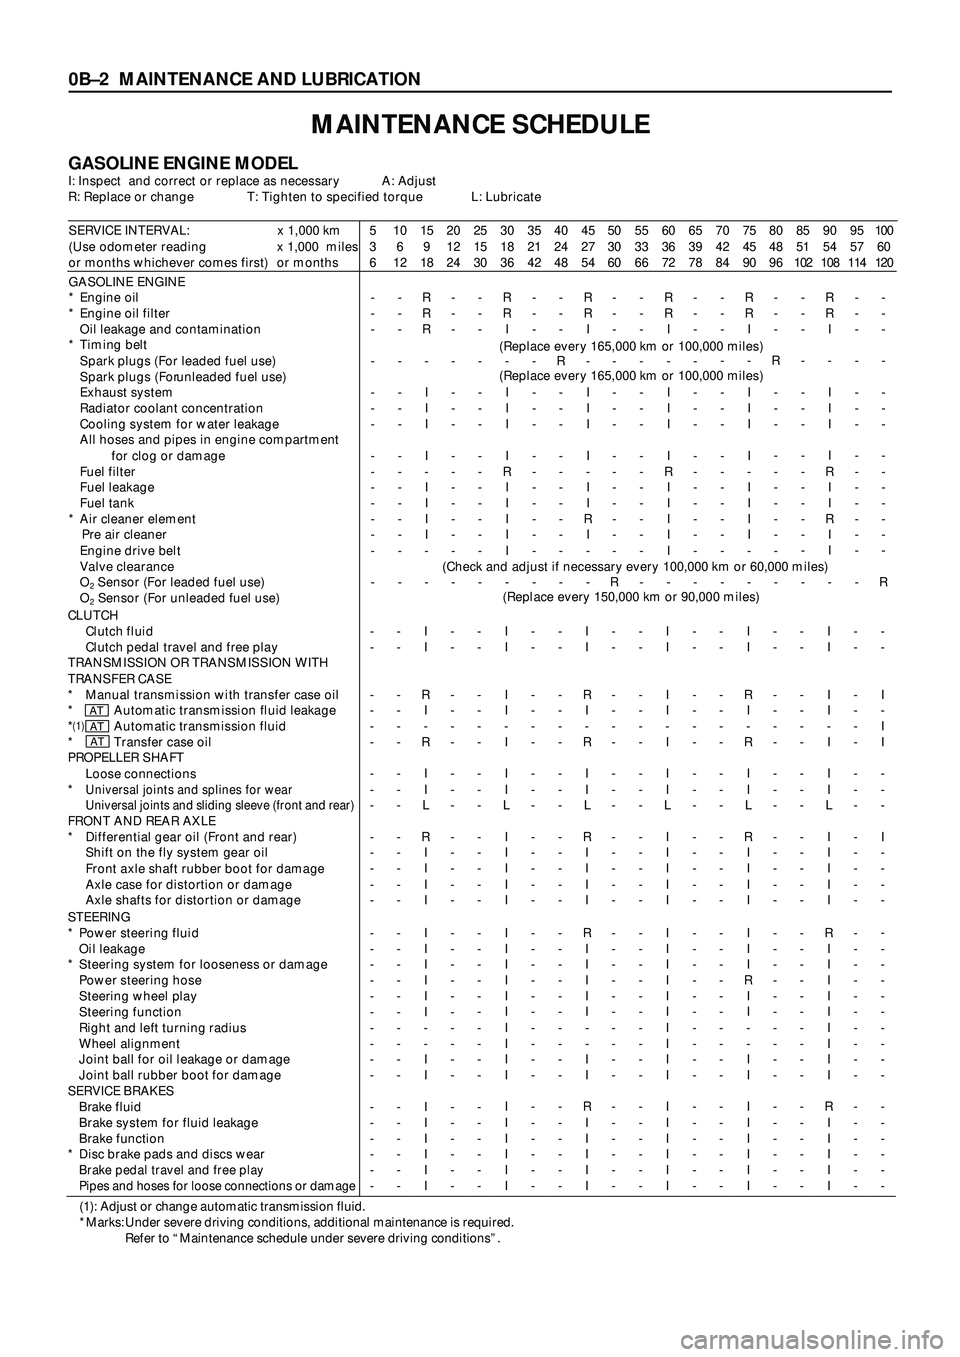
0BÐ2 MAINTENANCE AND LUBRICATION
MAINTENANCE SCHEDULE
GASOLINE ENGINE MODELI: Inspect and correct or replace as necessary A: Adjust
R: Replace or change T: Tighten to specified torque L: Lubricate
SERVICE INTERVAL: x 1,000 km
(Use odometer reading x 1,000 miles
or months whichever comes first) or months5
3
610
6
1215
9
1820
12
2425
15
3030
18
3635
21
4240
24
4845
27
5450
30
6055
33
6660
36
7265
39
7870
42
8475
45
9080
48
9685
51
10290
54
10895
57
114100
60
120
GASOLINE ENGINE
* Engine oil
* Engine oil filter
Oil leakage and contamination
* Timing belt
Spark plugs (For leaded fuel use)
Spark plugs (For unleaded fuel use)
Exhaust system
Radiator coolant concentration
Cooling system for water leakage
All hoses and pipes in engine compartment
for clog or damage
Fuel filter
Fuel leakage
Fuel tank
* Air cleaner element
Pre air cleaner
Engine drive belt
Valve clearance
O
2 Sensor (For leaded fuel use)
O
2 Sensor (For unleaded fuel use)-
-
-
-
-
-
-
-
-
-
-
-
-
-
--
-
-
-
-
-
-
-
-
-
-
-
-
-
-R
R
R
-
I
I
I
I
-
I
I
I
I
-
--
-
-
-
-
-
-
-
-
-
-
-
-
-
--
-
-
-
-
-
-
-
-
-
-
-
-
-
-R
R
I
-
I
I
I
I
R
I
I
I
I
I
--
-
-
-
-
-
-
-
-
-
-
-
-
-
--
-
-
R
-
-
-
-
-
-
-
-
-
-
-R
R
I
-
I
I
I
I
-
I
I
R
I
-
--
-
-
-
-
-
-
-
-
-
-
-
-
-
R-
-
-
-
-
-
-
-
-
-
-
-
-
-
-R
R
I
-
I
I
I
I
R
I
I
I
I
I
--
-
-
-
-
-
-
-
-
-
-
-
-
-
--
-
-
-
-
-
-
-
-
-
-
-
-
-
-R
R
I
-
I
I
I
I
-
I
I
I
I
-
--
-
-
R
-
-
-
-
-
-
-
-
-
-
--
-
-
-
-
-
-
-
-
-
-
-
-
-
-R
R
I
-
I
I
I
I
R
I
I
R
I
I
--
-
-
-
-
-
-
-
-
-
-
-
-
-
--
-
-
-
-
-
-
-
-
-
-
-
-
-
R
(Replace every 165,000 km or 100,000 miles)
(Replace every 165,000 km or 100,000 miles)
(Check and adjust if necessary every 100,000 km or 60,000 miles)
(Replace every 150,000 km or 90,000 miles)
CLUTCH
Clutch fluid
Clutch pedal travel and free play
TRANSMISSION OR TRANSMISSION WITH
TRANSFER CASE
* Manual transmission with transfer case oil
* Automatic transmission fluid leakage
*
(1)Automatic transmission fluid
* Transfer case oil
PROPELLER SHAFT
Loose connections
*
Universal joints and splines for wear
Universal joints and sliding sleeve (front and rear)
FRONT AND REAR AXLE
* Differential gear oil (Front and rear)
Shift on the fly system gear oil
Front axle shaft rubber boot for damage
Axle case for distortion or damage
Axle shafts for distortion or damage-
-
-
-
-
-
-
-
-
-
-
-
-
--
-
-
-
-
-
-
-
-
-
-
-
-
-I
I
R
I
-
R
I
I
L
R
I
I
I
I-
-
-
-
-
-
-
-
-
-
-
-
-
--
-
-
-
-
-
-
-
-
-
-
-
-
-I
I
I
I
-
I
I
I
L
I
I
I
I
I-
-
-
-
-
-
-
-
-
-
-
-
-
--
-
-
-
-
-
-
-
-
-
-
-
-
-I
I
R
I
-
R
I
I
L
R
I
I
I
I-
-
-
-
-
-
-
-
-
-
-
-
-
--
-
-
-
-
-
-
-
-
-
-
-
-
-I
I
I
I
-
I
I
I
L
I
I
I
I
I-
-
-
-
-
-
-
-
-
-
-
-
-
--
-
-
-
-
-
-
-
-
-
-
-
-
-I
I
R
I
-
R
I
I
L
R
I
I
I
I-
-
-
-
-
-
-
-
-
-
-
-
-
--
-
-
-
-
-
-
-
-
-
-
-
-
-I
I
I
I
-
I
I
I
L
I
I
I
I
I-
-
-
-
-
-
-
-
-
-
-
-
-
--
-
I
-
I
I
-
-
-
I
-
-
-
-
ATATAT
STEERING
* Power steering fluid
Oil leakage
* Steering system for looseness or damage
Power steering hose
Steering wheel play
Steering function
Right and left turning radius
Wheel alignment
Joint ball for oil leakage or damage
Joint ball rubber boot for damage
SERVICE BRAKES
Brake fluid
Brake system for fluid leakage
Brake function
* Disc brake pads and discs wear
Brake pedal travel and free play
Pipes and hoses for loose connections or damage
-
-
-
-
-
-
-
-
-
-
-
-
-
-
-
--
-
-
-
-
-
-
-
-
-
-
-
-
-
-
-I
I
I
I
I
I
-
-
I
I
I
I
I
I
I
I-
-
-
-
-
-
-
-
-
-
-
-
-
-
-
--
-
-
-
-
-
-
-
-
-
-
-
-
-
-
-I
I
I
I
I
I
I
I
I
I
I
I
I
I
I
I-
-
-
-
-
-
-
-
-
-
-
-
-
-
-
--
-
-
-
-
-
-
-
-
-
-
-
-
-
-
-R
I
I
I
I
I
-
-
I
I
R
I
I
I
I
I-
-
-
-
-
-
-
-
-
-
-
-
-
-
-
--
-
-
-
-
-
-
-
-
-
-
-
-
-
-
-I
I
I
I
I
I
I
I
I
I
I
I
I
I
I
I-
-
-
-
-
-
-
-
-
-
-
-
-
-
-
--
-
-
-
-
-
-
-
-
-
-
-
-
-
-
-I
I
I
R
I
I
-
-
I
I
I
I
I
I
I
I-
-
-
-
-
-
-
-
-
-
-
-
-
-
-
--
-
-
-
-
-
-
-
-
-
-
-
-
-
-
-R
I
I
I
I
I
I
I
I
I
R
I
I
I
I
I-
-
-
-
-
-
-
-
-
-
-
-
-
-
-
--
-
-
-
-
-
-
-
-
-
-
-
-
-
-
-
(1): Adjust or change automatic transmission fluid.
*Marks: Under severe driving conditions, additional maintenance is required.
Refer to “Maintenance schedule under severe driving conditions”.