Page 2016 of 3573
6E±123 4JX1±TC ENGINE DRIVEABILITY AND EMISSIONS
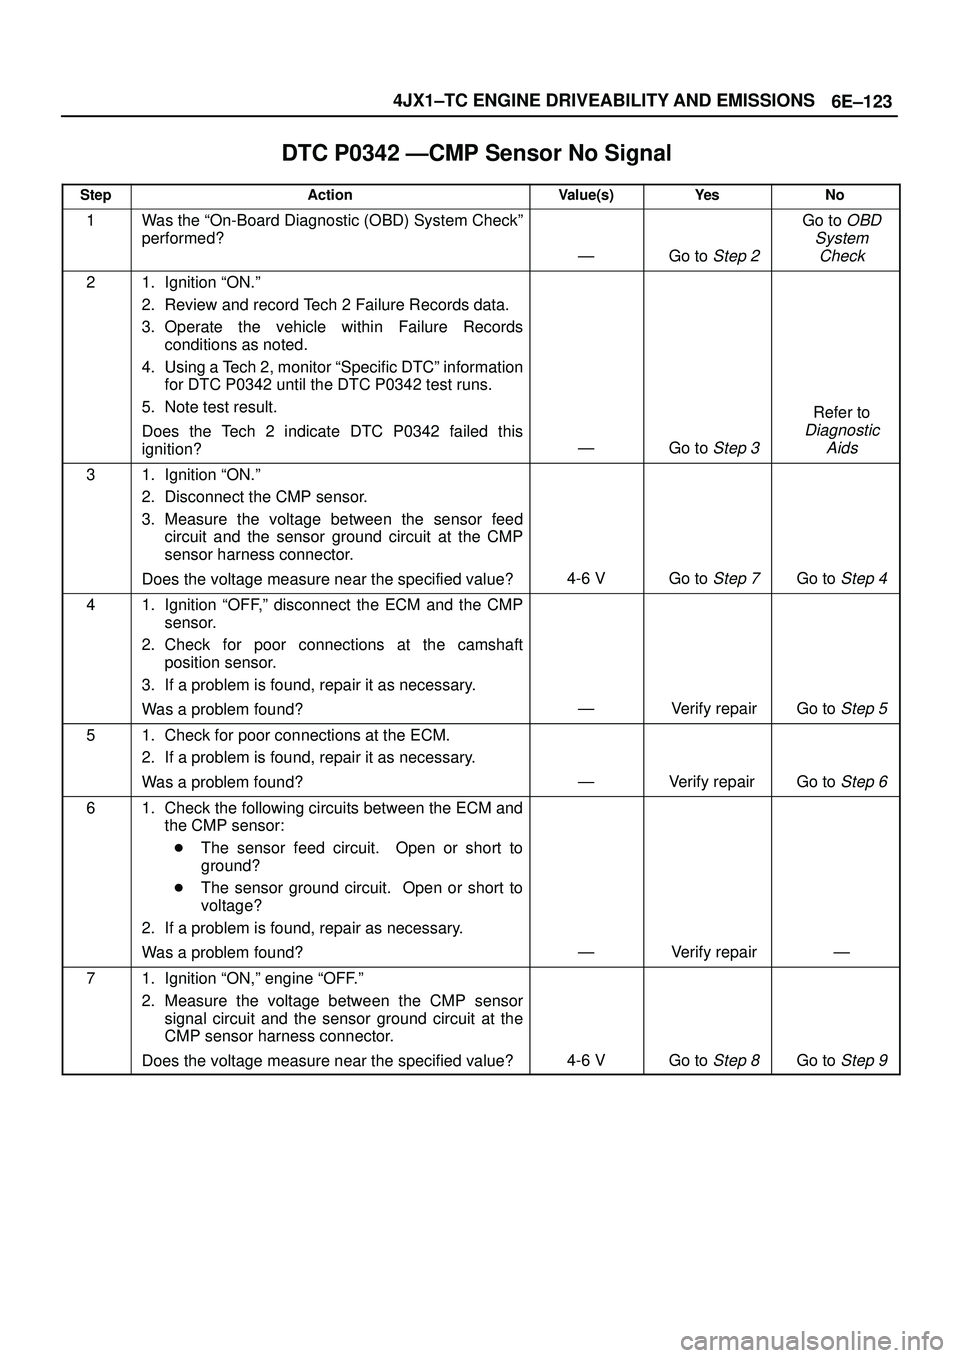
DTC P0342 ÐCMP Sensor No Signal�
StepActionValue(s)Ye sNo
1Was the ªOn-Board Diagnostic (OBD) System Checkº
performed?
ÐGo to Step 2
Go to OBD
System
Check
21. Ignition ªON.º
2. Review and record Tech 2 Failure Records data.
3. Operate the vehicle within Failure Records
conditions as noted.
4. Using a Tech 2, monitor ªSpecific DTCº information
for DTC P0342 until the DTC P0342 test runs.
5. Note test result.
Does the Tech 2 indicate DTC P0342 failed this
ignition?
ÐGo to Step 3
Refer to
Diagnostic
Aids
31. Ignition ªON.º
2. Disconnect the CMP sensor.
3. Measure the voltage between the sensor feed
circuit and the sensor ground circuit at the CMP
sensor harness connector.
Does the voltage measure near the specified value?
4-6 VGo to Step 7Go to Step 4
41. Ignition ªOFF,º disconnect the ECM and the CMP
sensor.
2. Check for poor connections at the camshaft
position sensor.
3. If a problem is found, repair it as necessary.
Was a problem found?
ÐVerify repairGo to Step 5
51. Check for poor connections at the ECM.
2. If a problem is found, repair it as necessary.
Was a problem found?
ÐVerify repair Go to Step 6
61. Check the following circuits between the ECM and
the CMP sensor:
�The sensor feed circuit. Open or short to
ground?
�The sensor ground circuit. Open or short to
voltage?
2. If a problem is found, repair as necessary.
Was a problem found?
ÐVerify repairÐ
71. Ignition ªON,º engine ªOFF.º
2. Measure the voltage between the CMP sensor
signal circuit and the sensor ground circuit at the
CMP sensor harness connector.
Does the voltage measure near the specified value?
4-6 VGo to Step 8Go to Step 9
Page 2071 of 3573
6E±178
4JX1±TC ENGINE DRIVEABILITY AND EMISSIONS
Hard Start Symptom������ ���
StepNo Ye s Value(s) Action
121. Check the battery voltage.
2. If a problem is found, repair as necessary.
Was a problem found?
ÐVerify repairGo to Step 13
131. Check for the following engine mechanical
problems (Refer to
Engine Mechanical):
�Low compression
�Leaking cylinder head gaskets
�Worn or incorrect camshaft
�Camshaft drive belt slipped or stripped
2. If a problem is found, repair as necessary.
Was a problem found?
ÐVerify repairGo to Step 14
141. Review all diagnostic procedures within this table.
2. If all procedures have been completed and no
malfunctions have been found, review/inspect the
following:
�Visual/physical inspection
�Tech±2 data
�Freeze Frame data/Failure Records buffer
�All electrical connections within a suspected
circuit and/or system.
3. If a problem is found, repair as necessary.
Was a problem found?
ÐVerify repair
Contact
Technical
Assistance
Page 2075 of 3573
6E±182
4JX1±TC ENGINE DRIVEABILITY AND EMISSIONS
Lack of Power, Sluggish or Spongy Symptom������ ���
StepNo Ye s Value(s) Action
111. Check for an engine mechanical problem. Check
for low compression, incorrect or worn camshaft,
loose timing belt, etc. Refer to
Engine Mechanical.
2. If a problem is found, repair as necessary.
Was a problem found?
ÐVerify repairGo to Step 12
121. Review all diagnostic procedures within this table.
2. If all procedures have been completed and no
malfunctions have been found, review/inspect the
following:
�Visual/physical inspection
�Tech 2 data
�Freeze Frame data/Failure Records buffer
�All electrical connections within a suspected
circuit and/or system.
3. If a problem is found, repair as necessary.
Was a problem found?
ÐVerify repair
Contact
Technical
Assistance
Page 2077 of 3573
6E±184
4JX1±TC ENGINE DRIVEABILITY AND EMISSIONS
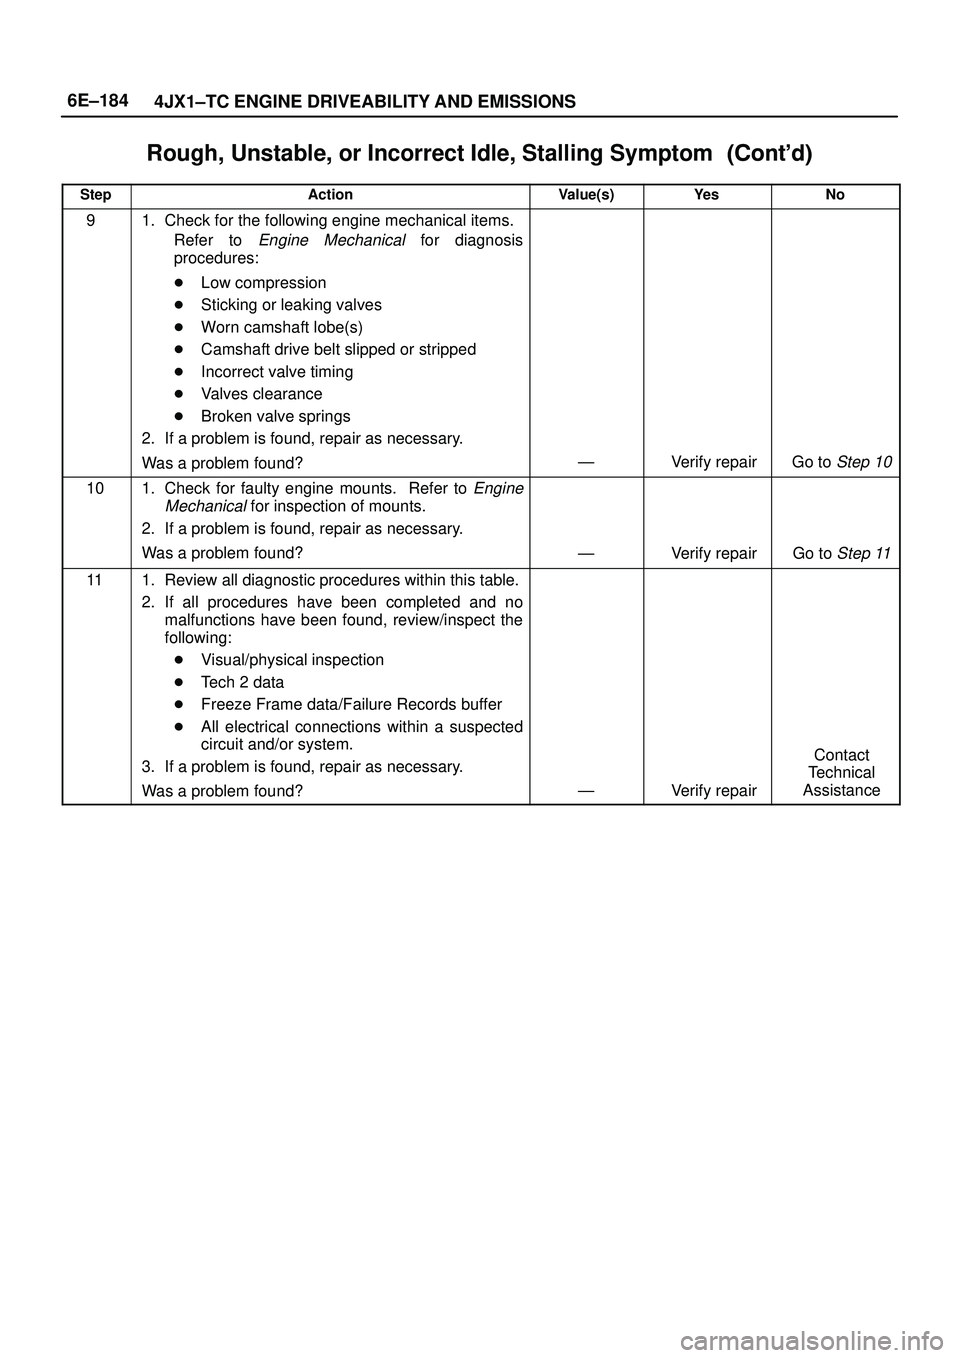
Rough, Unstable, or Incorrect Idle, Stalling Symptom������ ���
StepNo Ye s Value(s) Action
91. Check for the following engine mechanical items.
Refer to
Engine Mechanical for diagnosis
procedures:
�Low compression
�Sticking or leaking valves
�Worn camshaft lobe(s)
�Camshaft drive belt slipped or stripped
�Incorrect valve timing
�Valves clearance
�Broken valve springs
2. If a problem is found, repair as necessary.
Was a problem found?
ÐVerify repairGo to Step 10
101. Check for faulty engine mounts. Refer to Engine
Mechanical
for inspection of mounts.
2. If a problem is found, repair as necessary.
Was a problem found?
ÐVerify repairGo to Step 11
111. Review all diagnostic procedures within this table.
2. If all procedures have been completed and no
malfunctions have been found, review/inspect the
following:
�Visual/physical inspection
�Tech 2 data
�Freeze Frame data/Failure Records buffer
�All electrical connections within a suspected
circuit and/or system.
3. If a problem is found, repair as necessary.
Was a problem found?
ÐVerify repair
Contact
Technical
Assistance
Page 2083 of 3573
6E±190
4JX1±TC ENGINE DRIVEABILITY AND EMISSIONS
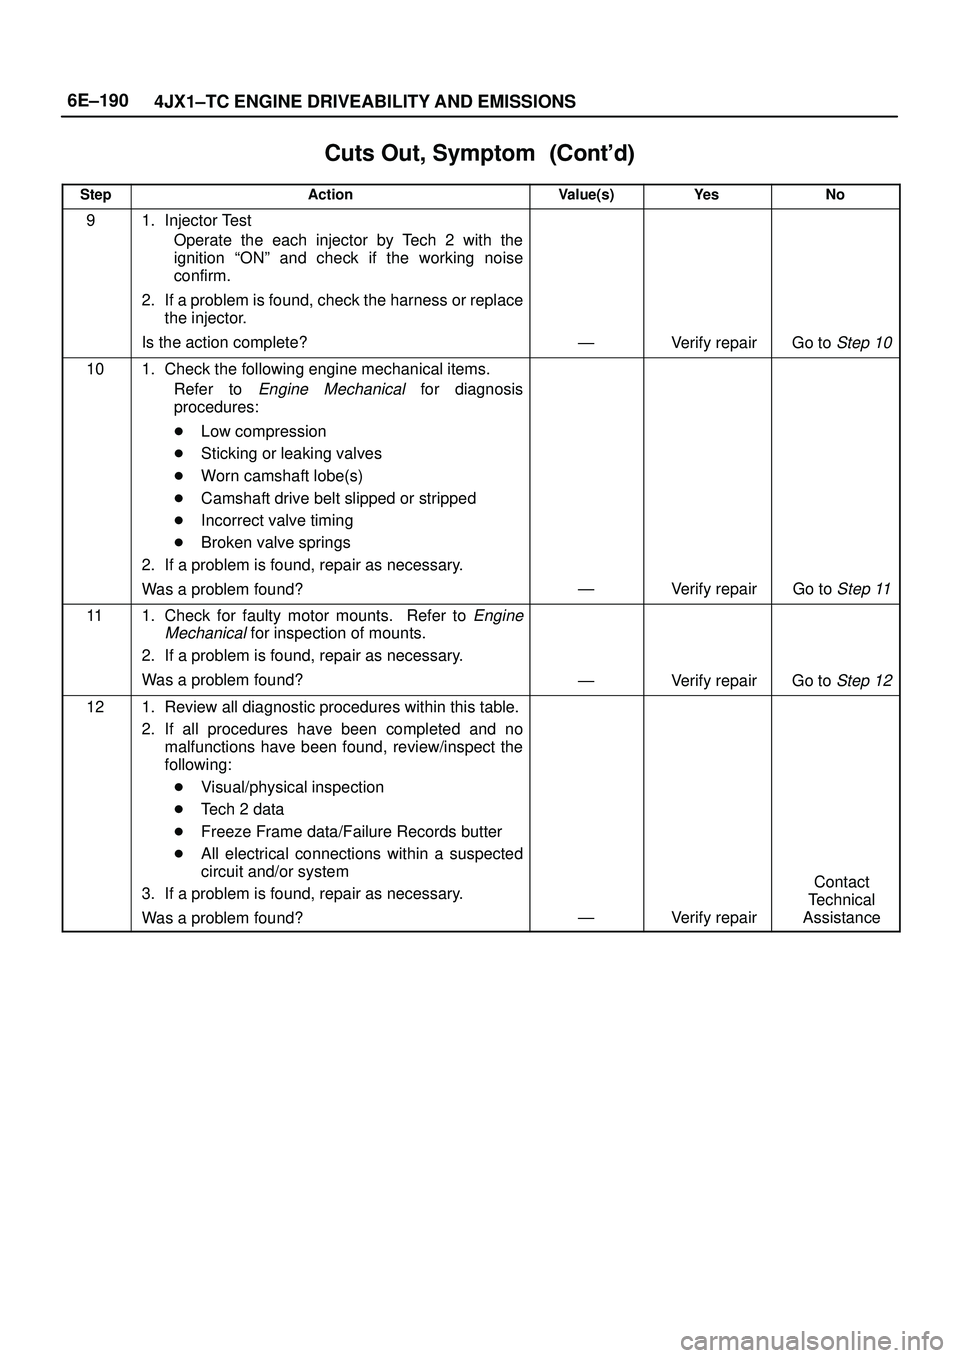
Cuts Out, Symptom������ ���
StepNo Ye s Value(s) Action
91. Injector Test
Operate the each injector by Tech 2 with the
ignition ªONº and check if the working noise
confirm.
2. If a problem is found, check the harness or replace
the injector.
Is the action complete?
ÐVerify repairGo to Step 10
101. Check the following engine mechanical items.
Refer to
Engine Mechanical for diagnosis
procedures:
�Low compression
�Sticking or leaking valves
�Worn camshaft lobe(s)
�Camshaft drive belt slipped or stripped
�Incorrect valve timing
�Broken valve springs
2. If a problem is found, repair as necessary.
Was a problem found?
ÐVerify repairGo to Step 11
111. Check for faulty motor mounts. Refer to Engine
Mechanical
for inspection of mounts.
2. If a problem is found, repair as necessary.
Was a problem found?
ÐVerify repairGo to Step 12
121. Review all diagnostic procedures within this table.
2. If all procedures have been completed and no
malfunctions have been found, review/inspect the
following:
�Visual/physical inspection
�Tech 2 data
�Freeze Frame data/Failure Records butter
�All electrical connections within a suspected
circuit and/or system
3. If a problem is found, repair as necessary.
Was a problem found?
ÐVerify repair
Contact
Technical
Assistance
Page 2087 of 3573
6E±194
4JX1±TC ENGINE DRIVEABILITY AND EMISSIONS
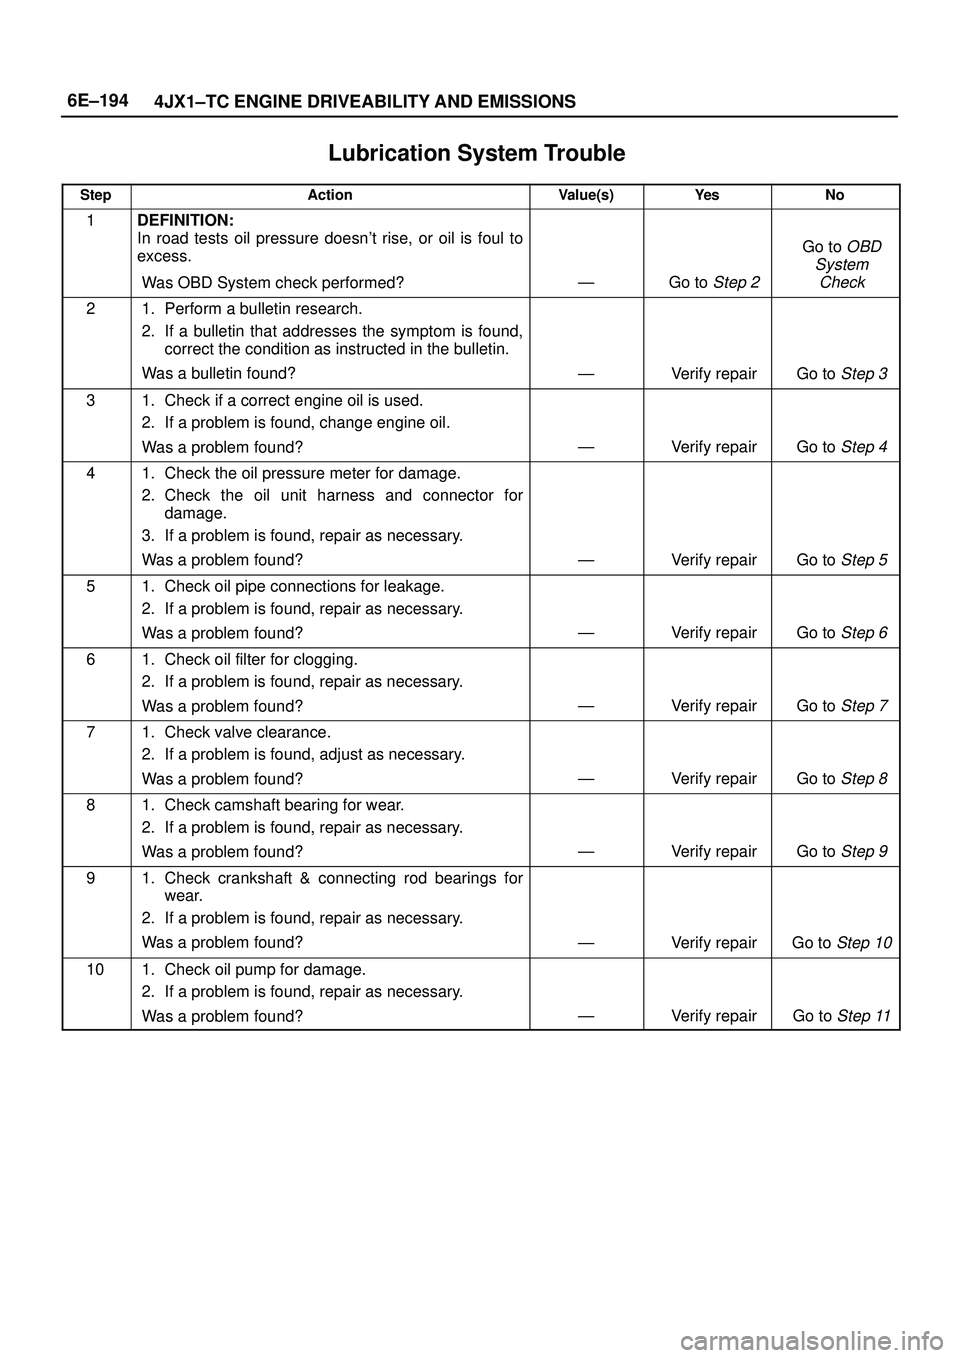
Lubrication System Trouble�
StepActionValue(s)Ye sNo
1DEFINITION:
In road tests oil pressure doesn't rise, or oil is foul to
excess.
Was OBD System check performed?
ÐGo to Step 2
Go to OBD
System
Check
21. Perform a bulletin research.
2. If a bulletin that addresses the symptom is found,
correct the condition as instructed in the bulletin.
Was a bulletin found?
ÐVerify repairGo to Step 3
31. Check if a correct engine oil is used.
2. If a problem is found, change engine oil.
Was a problem found?
ÐVerify repairGo to Step 4
41. Check the oil pressure meter for damage.
2. Check the oil unit harness and connector for
damage.
3. If a problem is found, repair as necessary.
Was a problem found?
ÐVerify repairGo to Step 5
51. Check oil pipe connections for leakage.
2. If a problem is found, repair as necessary.
Was a problem found?
ÐVerify repairGo to Step 6
61. Check oil filter for clogging.
2. If a problem is found, repair as necessary.
Was a problem found?
ÐVerify repairGo to Step 7
71. Check valve clearance.
2. If a problem is found, adjust as necessary.
Was a problem found?
ÐVerify repairGo to Step 8
81. Check camshaft bearing for wear.
2. If a problem is found, repair as necessary.
Was a problem found?
ÐVerify repairGo to Step 9
91. Check crankshaft & connecting rod bearings for
wear.
2. If a problem is found, repair as necessary.
Was a problem found?
ÐVerify repairGo to Step 10
101. Check oil pump for damage.
2. If a problem is found, repair as necessary.
Was a problem found?
ÐVerify repairGo to Step 11
Page 2091 of 3573
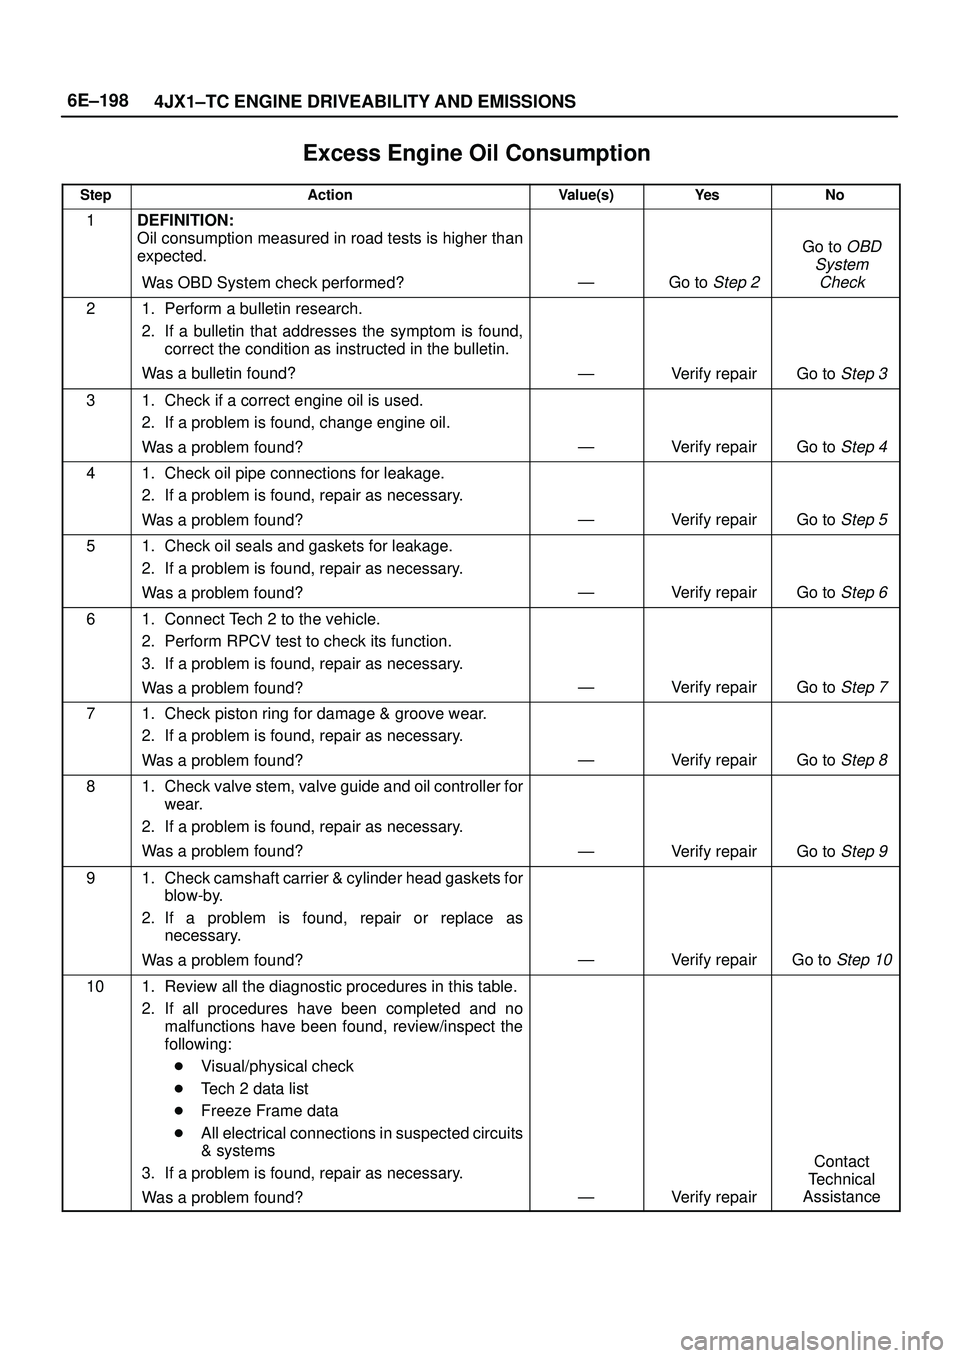
6E±198
4JX1±TC ENGINE DRIVEABILITY AND EMISSIONS
Excess Engine Oil Consumption�
StepActionValue(s)Ye sNo
1DEFINITION:
Oil consumption measured in road tests is higher than
expected.
Was OBD System check performed?
ÐGo to Step 2
Go to OBD
System
Check
21. Perform a bulletin research.
2. If a bulletin that addresses the symptom is found,
correct the condition as instructed in the bulletin.
Was a bulletin found?
ÐVerify repairGo to Step 3
31. Check if a correct engine oil is used.
2. If a problem is found, change engine oil.
Was a problem found?
ÐVerify repairGo to Step 4
41. Check oil pipe connections for leakage.
2. If a problem is found, repair as necessary.
Was a problem found?
ÐVerify repairGo to Step 5
51. Check oil seals and gaskets for leakage.
2. If a problem is found, repair as necessary.
Was a problem found?
ÐVerify repairGo to Step 6
61. Connect Tech 2 to the vehicle.
2. Perform RPCV test to check its function.
3. If a problem is found, repair as necessary.
Was a problem found?
ÐVerify repairGo to Step 7
71. Check piston ring for damage & groove wear.
2. If a problem is found, repair as necessary.
Was a problem found?
ÐVerify repairGo to Step 8
81. Check valve stem, valve guide and oil controller for
wear.
2. If a problem is found, repair as necessary.
Was a problem found?
ÐVerify repairGo to Step 9
91. Check camshaft carrier & cylinder head gaskets for
blow-by.
2. If a problem is found, repair or replace as
necessary.
Was a problem found?
ÐVerify repairGo to Step 10
101. Review all the diagnostic procedures in this table.
2. If all procedures have been completed and no
malfunctions have been found, review/inspect the
following:
�Visual/physical check
�Tech 2 data list
�Freeze Frame data
�All electrical connections in suspected circuits
& systems
3. If a problem is found, repair as necessary.
Was a problem found?
ÐVerify repair
Contact
Technical
Assistance
Page 2197 of 3573
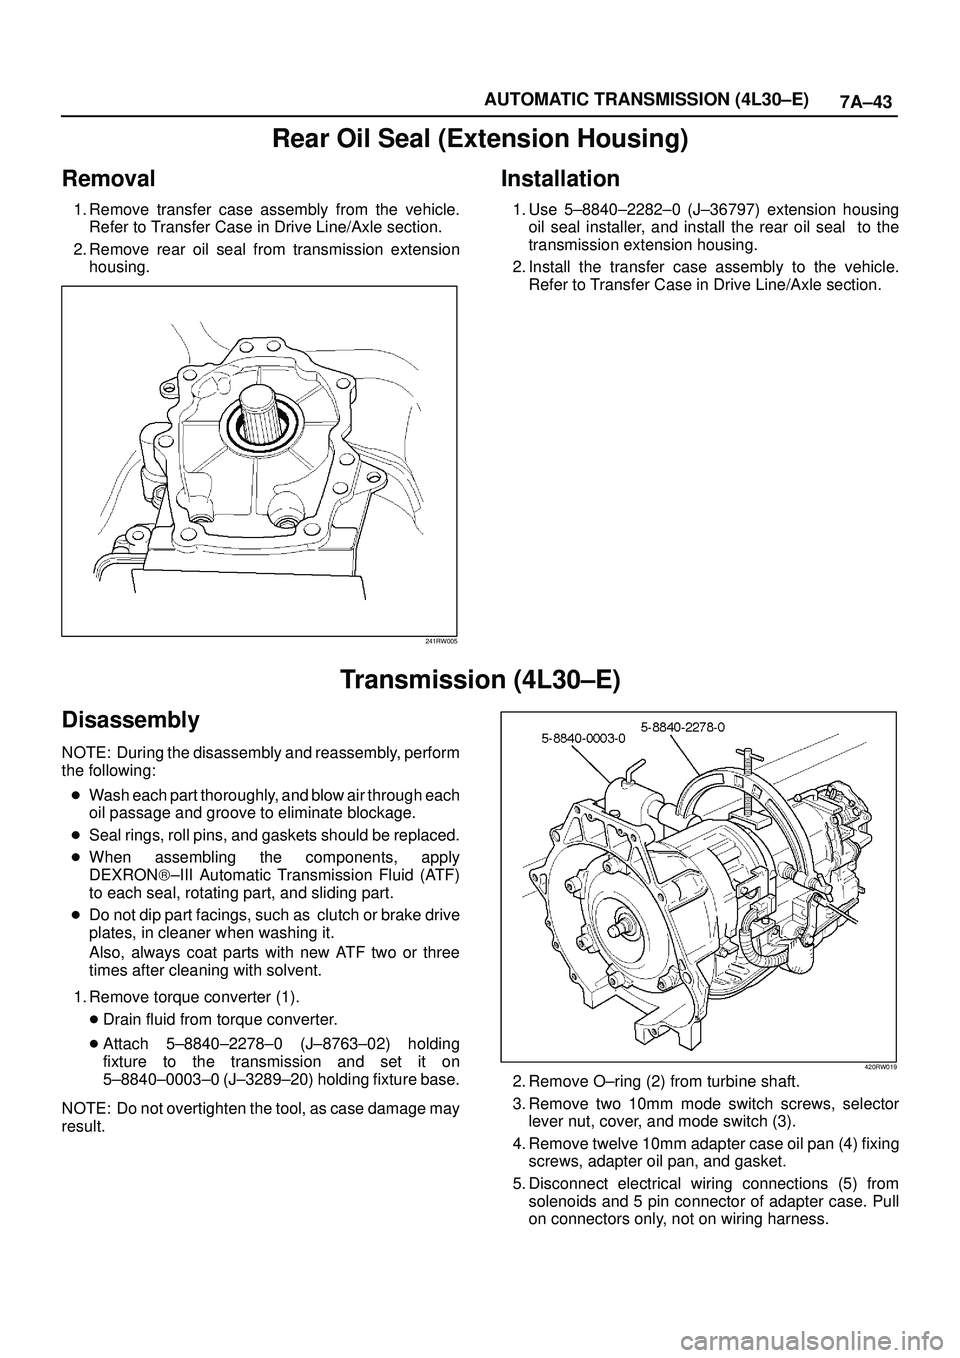
7A±43 AUTOMATIC TRANSMISSION (4L30±E)
Rear Oil Seal (Extension Housing)
Removal
1. Remove transfer case assembly from the vehicle.
Refer to Transfer Case in Drive Line/Axle section.
2. Remove rear oil seal from transmission extension
housing.
241RW005
Installation
1. Use 5±8840±2282±0 (J±36797) extension housing
oil seal installer, and install the rear oil seal to the
transmission extension housing.
2. Install the transfer case assembly to the vehicle.
Refer to Transfer Case in Drive Line/Axle section.
Transmission (4L30±E)
Disassembly
NOTE: During the disassembly and reassembly, perform
the following:
�Wash each part thoroughly, and blow air through each
oil passage and groove to eliminate blockage.
�Seal rings, roll pins, and gaskets should be replaced.
�When assembling the components, apply
DEXRON)±III Automatic Transmission Fluid (ATF)
to each seal, rotating part, and sliding part.
�Do not dip part facings, such as clutch or brake drive
plates, in cleaner when washing it.
Also, always coat parts with new ATF two or three
times after cleaning with solvent.
1. Remove torque converter (1).
�Drain fluid from torque converter.
�Attach 5±8840±2278±0 (J±8763±02) holding
fixture to the transmission and set it on
5±8840±0003±0 (J±3289±20) holding fixture base.
NOTE: Do not overtighten the tool, as case damage may
result.
420RW019
2. Remove O±ring (2) from turbine shaft.
3. Remove two 10mm mode switch screws, selector
lever nut, cover, and mode switch (3).
4. Remove twelve 10mm adapter case oil pan (4) fixing
screws, adapter oil pan, and gasket.
5. Disconnect electrical wiring connections (5) from
solenoids and 5 pin connector of adapter case. Pull
on connectors only, not on wiring harness.