6A– 90 ENGINE MECHANICAL
5. Piston Ring
1) Install the piston rings with the piston ring
expander.
The compression ring must be set with the 1N,
2N mark facing up.
2) Discerning mark is stamped as shown in the
illustration (1).
Marked 1N: 1st compression ring
Marked 2N: 2nd compression ring
3) Install piston rings in the following sequence.
1) Oil ring
(1) After installing the expander ring then assemble
the oil ring.
2) 2nd compression ring3) 1st compression ring
1) The compression ring must be set with the 1N or
2N mark facing up.
2) 1st compression ring:1N
3) 2nd compression ring: 2N
4) After installation, apply engine oil to the entire
circumference of the piston rings.
Check to see that all the rings rotate smoothly.
5) Insert the bearings into the connecting rods and
caps.
Apply new engine oil to the bearing faces.
Cap side bearings have no oil hole.
Connecting rod side bearing’s oil hole should be
aligned with oil hole on the connecting rod.
6. Piston and Connecting Rod
1) Apply engine oil to the cylinder bores, the
connecting rod bearings and the crankshaft
pins.
2) Check to see that the piston ring end gaps are
correctly positioned.
N
012RW037
2
3
1
015RW051
3
2
11
012RW058
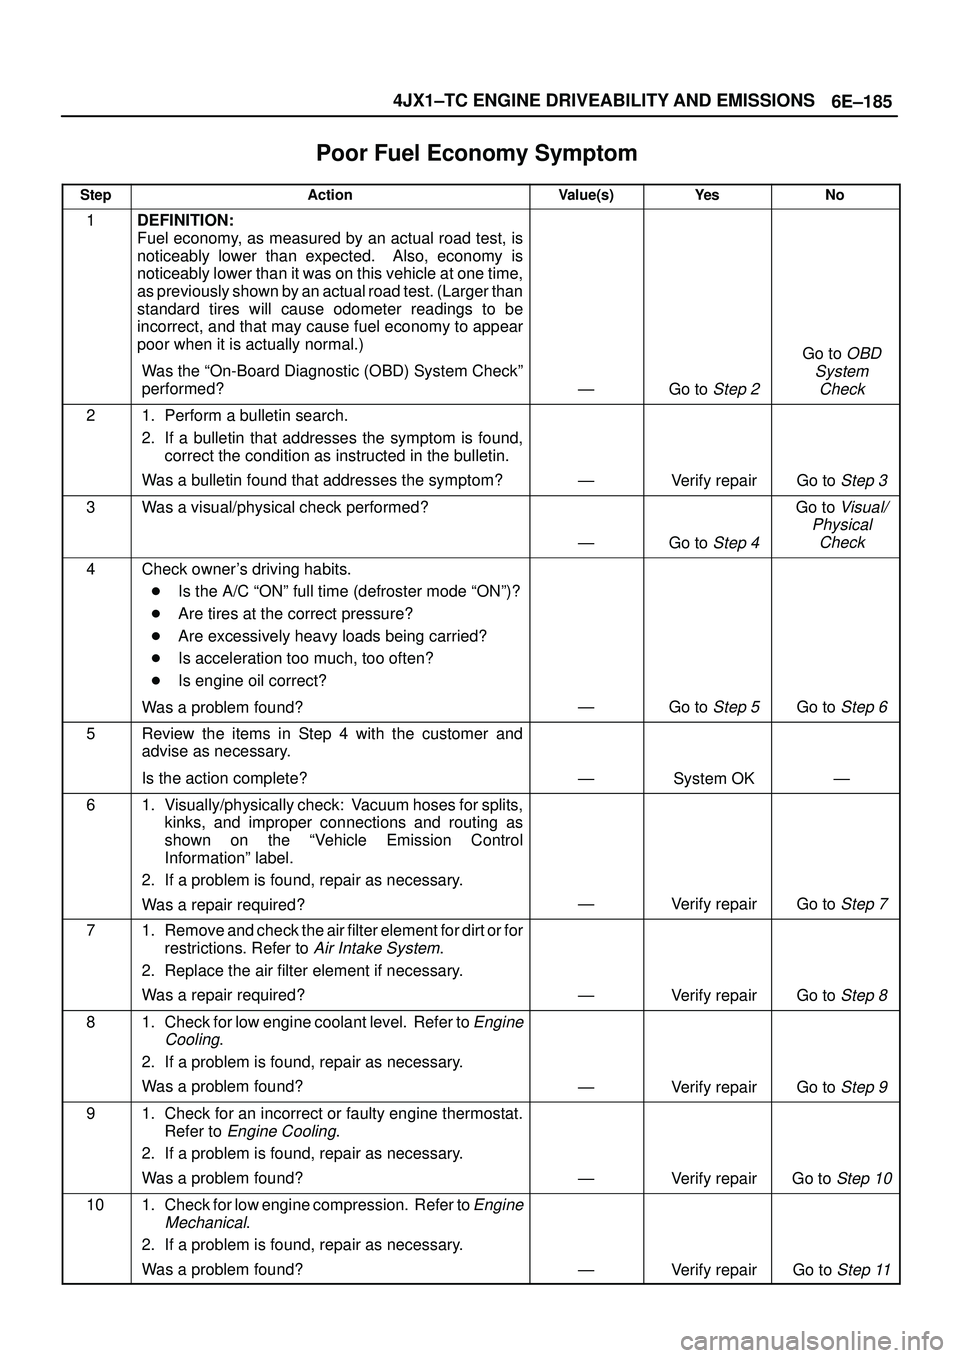
6E±185 4JX1±TC ENGINE DRIVEABILITY AND EMISSIONS
Poor Fuel Economy Symptom�
StepActionValue(s)Ye sNo
1DEFINITION:
Fuel economy, as measured by an actual road test, is
noticeably lower than expected. Also, economy is
noticeably lower than it was on this vehicle at one time,
as previously shown by an actual road test. (Larger than
standard tires will cause odometer readings to be
incorrect, and that may cause fuel economy to appear
poor when it is actually normal.)
Was the ªOn-Board Diagnostic (OBD) System Checkº
performed?
ÐGo to Step 2
Go to OBD
System
Check
21. Perform a bulletin search.
2. If a bulletin that addresses the symptom is found,
correct the condition as instructed in the bulletin.
Was a bulletin found that addresses the symptom?
ÐVerify repairGo to Step 3
3Was a visual/physical check performed?
ÐGo to Step 4
Go to Visual/
Physical
Check
4Check owner's driving habits.
�Is the A/C ªONº full time (defroster mode ªONº)?
�Are tires at the correct pressure?
�Are excessively heavy loads being carried?
�Is acceleration too much, too often?
�Is engine oil correct?
Was a problem found?
ÐGo to Step 5Go to Step 6
5Review the items in Step 4 with the customer and
advise as necessary.
Is the action complete?
ÐSystem OKÐ
61. Visually/physically check: Vacuum hoses for splits,
kinks, and improper connections and routing as
shown on the ªVehicle Emission Control
Informationº label.
2. If a problem is found, repair as necessary.
Was a repair required?
ÐVerify repairGo to Step 7
71. Remove and check the air filter element for dirt or for
restrictions. Refer to
Air Intake System.
2. Replace the air filter element if necessary.
Was a repair required?
ÐVerify repairGo to Step 8
81. Check for low engine coolant level. Refer to Engine
Cooling
.
2. If a problem is found, repair as necessary.
Was a problem found?
ÐVerify repairGo to Step 9
91. Check for an incorrect or faulty engine thermostat.
Refer to
Engine Cooling.
2. If a problem is found, repair as necessary.
Was a problem found?
ÐVerify repairGo to Step 10
101. Check for low engine compression. Refer to Engine
Mechanical
.
2. If a problem is found, repair as necessary.
Was a problem found?
ÐVerify repairGo to Step 11
 Install the piston rings with the piston ring
expander.
The compression ring must be set with the 1N,
2N mark facing up.
2) Discerning mark is stamped as s")