1998 ISUZU TROOPER Remove engine
[x] Cancel search: Remove enginePage 1801 of 3573
6A – 68 ENGINE MECHANICAL
3. Determine the thickness of the adjuster as follows.
1) Measure the thickness of the removed adjuster
with a micrometer.
2) Calculate the thickness of a new adjuster.
Calculation
TA: Thickness of new adjuster
M: Valve clearance measurement.
TO: Thickness of the removed adjuster
For intake side: TA=TO+(M–0.15) mm
For exhaust side: TA=TO+(M–0.25) mm
Select a new adjuster whose thickness is as
close to the estimated value as possible.
4. Install oil rail and tighten it temporarily.
5. Install injector assembly.
NOTE:
1) Do not forget to insert the O-ring between injector
and oil rail.
2) Install the injector to the same position as before
removal.
6. Install the injector fixing bolts and temporarily
tighten.
7. Install the injector clamp and tighten temporarily.
8. Tighten injector fixing bolts to the specified torque.
Torque: 6.5 N·m (0.7 kg·m / 5.1 lb ft)
9. Tighten injector clamp nut to the specified torque
with special method.
Torque: loosen one turn and tighten again to
specified torque.
Torque: 25 N·m (2.4 kg·m / 17.4 lb ft)
10. Tighten oil rail to the specified torque.
Torque: 20 N·m (2.0 kg·m / 14.5 lb ft)
11. Install injector harness and reconnect connector.
12. Install cylinder head cover.
Refer to”Cylinder Head” in this manual.
13. Fill with about 300cc of engine oil at the high
pressure oil pipe installation port on the oil rail using
an oil filler.
If assembled without filling the oil rail with oil, the
time for engine starting will be longer.
14. Immediately install high pressure oil pipe to tighten
with specified torque.
Torque: 80 N·m (8.1 kg·m / 57.9 lb ft)
15. Install cylinder head noise insulator cover.
Refer to “Cylinder Head” in this manual.
Page 1802 of 3573
ENGINE MECHANICAL 6A – 69
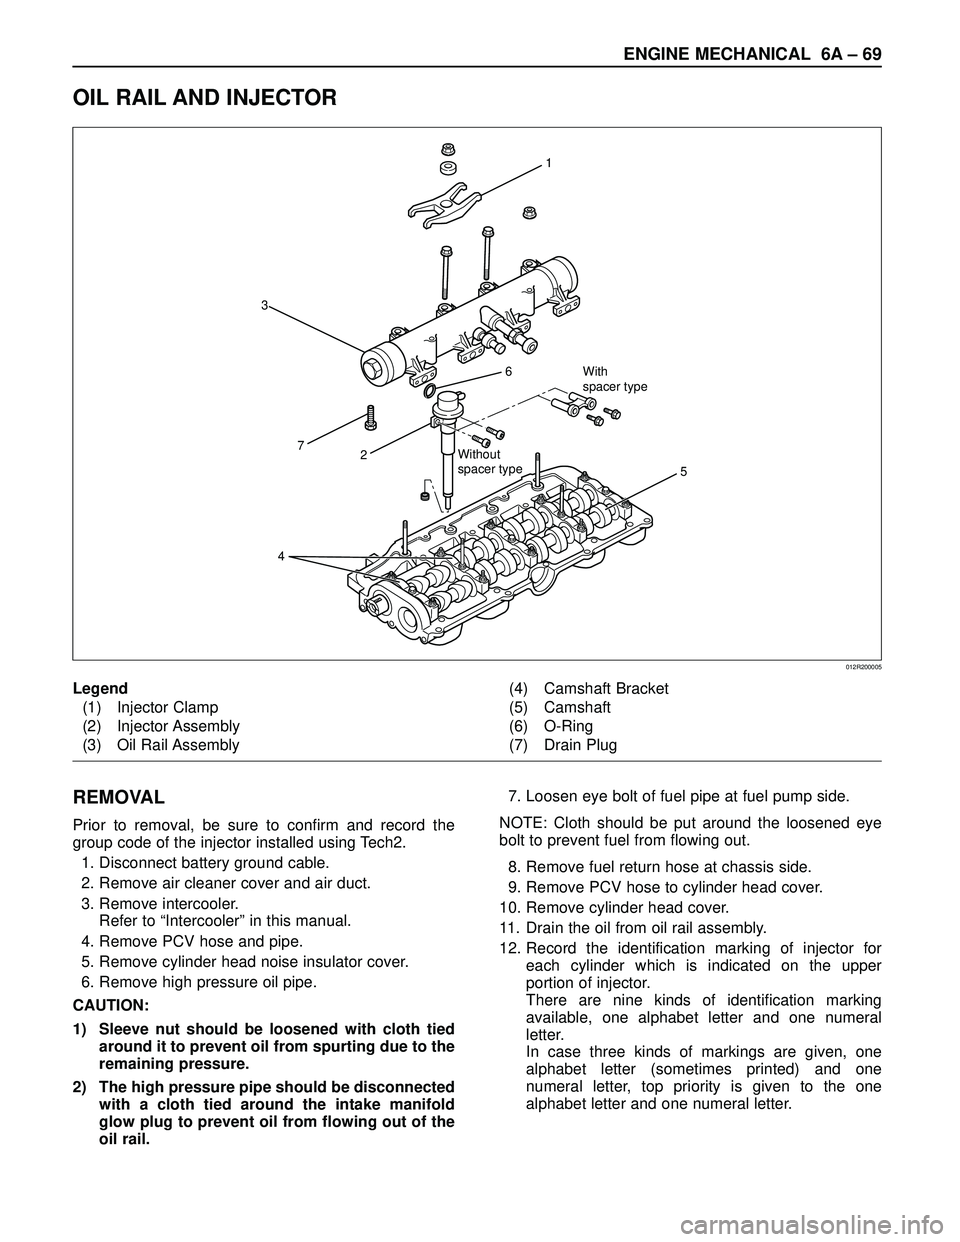
OIL RAIL AND INJECTOR
REMOVAL
Prior to removal, be sure to confirm and record the
group code of the injector installed using Tech2.
1. Disconnect battery ground cable.
2. Remove air cleaner cover and air duct.
3. Remove intercooler.
Refer to “Intercooler” in this manual.
4. Remove PCV hose and pipe.
5. Remove cylinder head noise insulator cover.
6. Remove high pressure oil pipe.
CAUTION:
1) Sleeve nut should be loosened with cloth tied
around it to prevent oil from spurting due to the
remaining pressure.
2) The high pressure pipe should be disconnected
with a cloth tied around the intake manifold
glow plug to prevent oil from flowing out of the
oil rail.7. Loosen eye bolt of fuel pipe at fuel pump side.
NOTE: Cloth should be put around the loosened eye
bolt to prevent fuel from flowing out.
8. Remove fuel return hose at chassis side.
9. Remove PCV hose to cylinder head cover.
10. Remove cylinder head cover.
11. Drain the oil from oil rail assembly.
12. Record the identification marking of injector for
each cylinder which is indicated on the upper
portion of injector.
There are nine kinds of identification marking
available, one alphabet letter and one numeral
letter.
In case three kinds of markings are given, one
alphabet letter (sometimes printed) and one
numeral letter, top priority is given to the one
alphabet letter and one numeral letter.
1
6
27
3
5
4
With
spacer type
Without
spacer type
012R200005
Legend
(1) Injector Clamp
(2) Injector Assembly
(3) Oil Rail Assembly(4) Camshaft Bracket
(5) Camshaft
(6) O-Ring
(7) Drain Plug
Page 1803 of 3573
6A – 70 ENGINE MECHANICAL
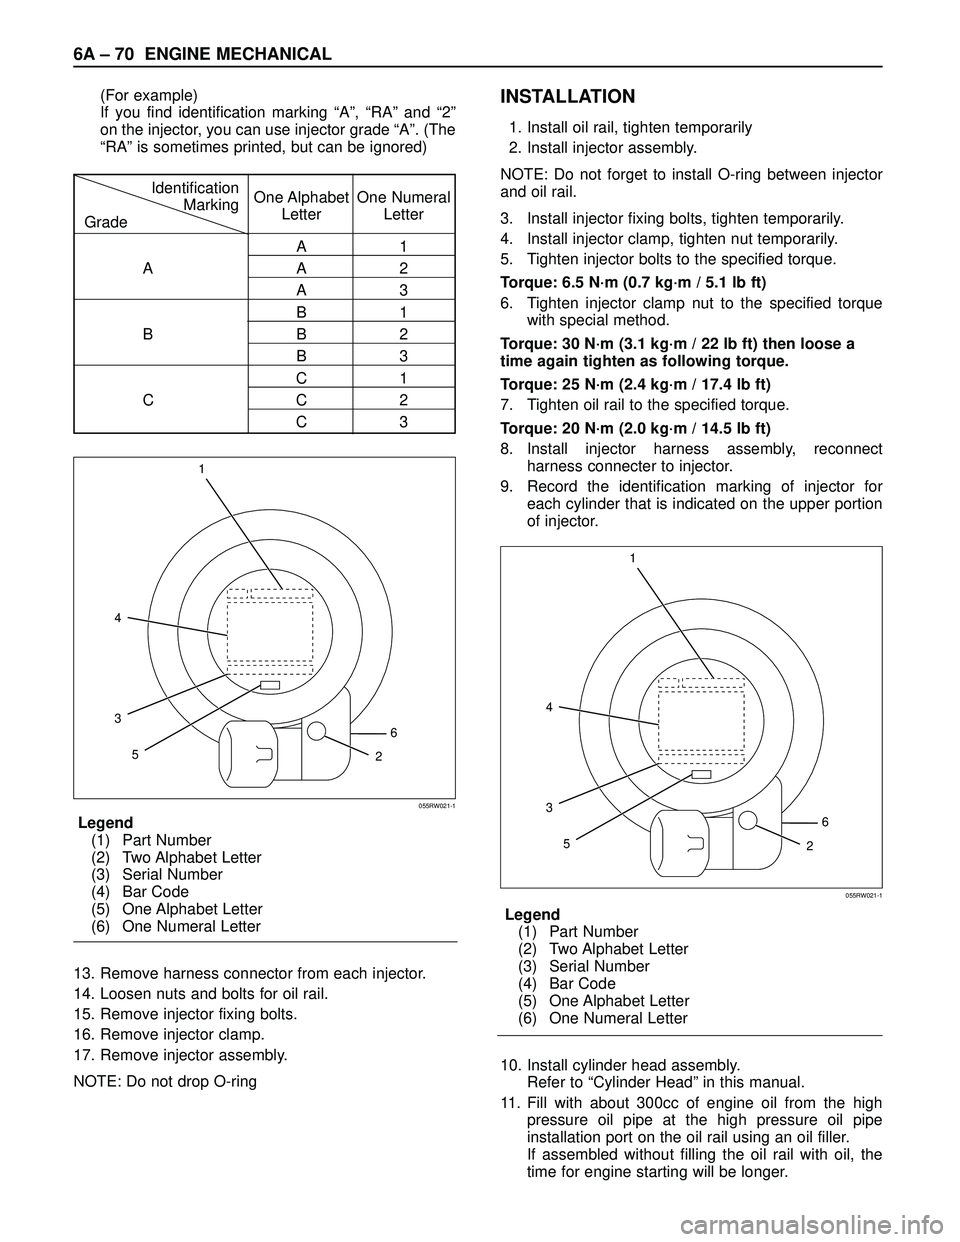
(For example)
If you find identification marking “A”, “RA” and “2”
on the injector, you can use injector grade “A”. (The
“RA” is sometimes printed, but can be ignored)
Legend
(1) Part Number
(2) Two Alphabet Letter
(3) Serial Number
(4) Bar Code
(5) One Alphabet Letter
(6) One Numeral Letter
13. Remove harness connector from each injector.
14. Loosen nuts and bolts for oil rail.
15. Remove injector fixing bolts.
16. Remove injector clamp.
17. Remove injector assembly.
NOTE: Do not drop O-ring INSTALLATION
1. Install oil rail, tighten temporarily
2. Install injector assembly.
NOTE: Do not forget to install O-ring between injector
and oil rail.
3. Install injector fixing bolts, tighten temporarily.
4. Install injector clamp, tighten nut temporarily.
5. Tighten injector bolts to the specified torque.
Torque: 6.5 N·m (0.7 kg·m / 5.1 lb ft)
6. Tighten injector clamp nut to the specified torque
with special method.
Torque: 30 N·m (3.1 kg·m / 22 lb ft) then loose a
time again tighten as following torque.
Torque: 25 N·m (2.4 kg·m / 17.4 lb ft)
7. Tighten oil rail to the specified torque.
Torque: 20 N·m (2.0 kg·m / 14.5 lb ft)
8. Install injector harness assembly, reconnect
harness connecter to injector.
9. Record the identification marking of injector for
each cylinder that is indicated on the upper portion
of injector.
Legend
(1) Part Number
(2) Two Alphabet Letter
(3) Serial Number
(4) Bar Code
(5) One Alphabet Letter
(6) One Numeral Letter
10. Install cylinder head assembly.
Refer to “Cylinder Head” in this manual.
11. Fill with about 300cc of engine oil from the high
pressure oil pipe at the high pressure oil pipe
installation port on the oil rail using an oil filler.
If assembled without filling the oil rail with oil, the
time for engine starting will be longer.
1
4
3
265
055RW021-1
1
4
3
265
055RW021-1
Identification
One Alphabet One Numeral
Marking
Letter Letter
Grade
A1
AA2
A3
B1
BB2
B3
C1
CC2
C3
Page 1805 of 3573
6A – 72 ENGINE MECHANICAL
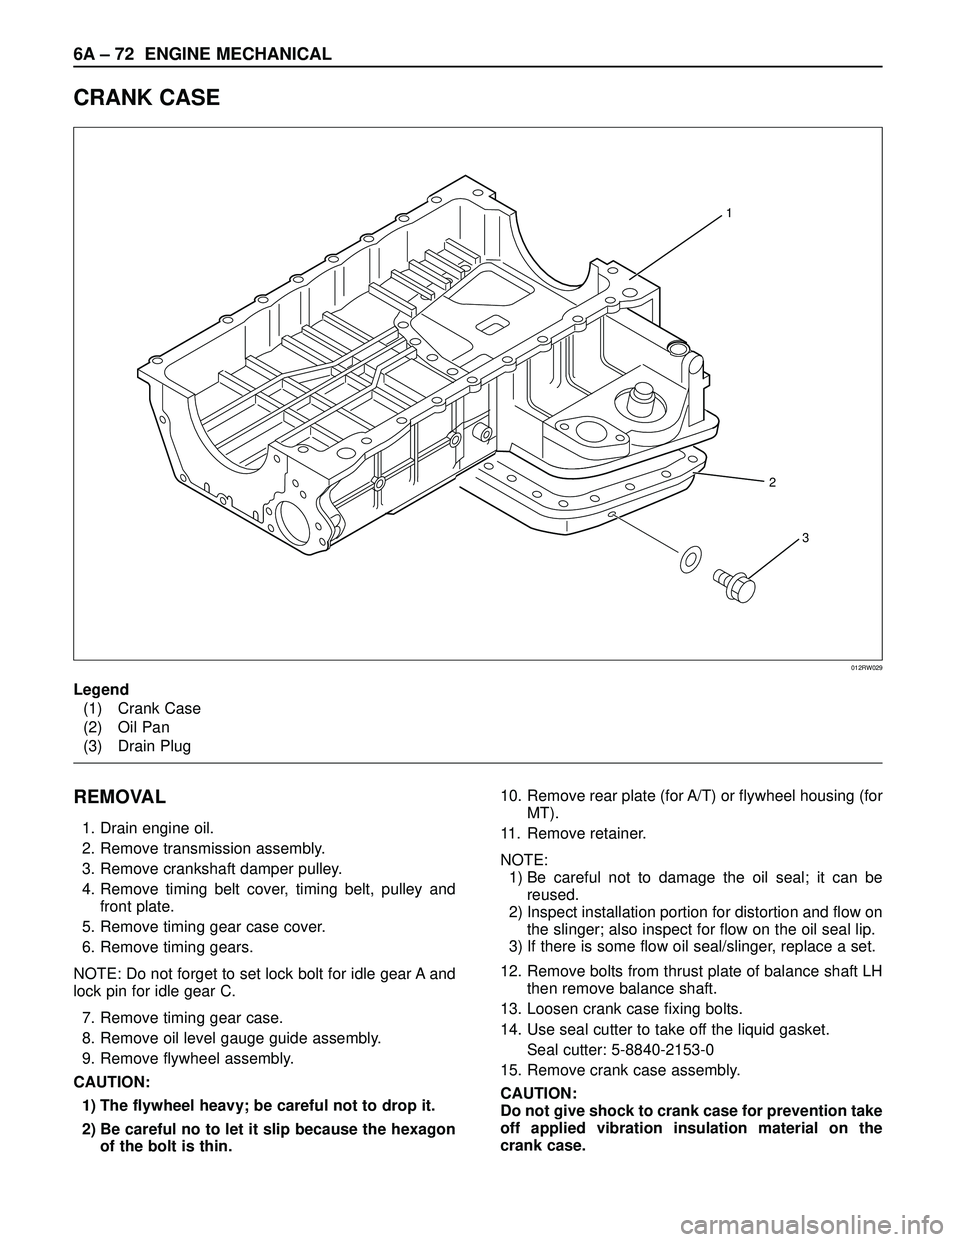
CRANK CASE
REMOVAL
1. Drain engine oil.
2. Remove transmission assembly.
3. Remove crankshaft damper pulley.
4. Remove timing belt cover, timing belt, pulley and
front plate.
5. Remove timing gear case cover.
6. Remove timing gears.
NOTE: Do not forget to set lock bolt for idle gear A and
lock pin for idle gear C.
7. Remove timing gear case.
8. Remove oil level gauge guide assembly.
9. Remove flywheel assembly.
CAUTION:
1) The flywheel heavy; be careful not to drop it.
2) Be careful no to let it slip because the hexagon
of the bolt is thin.10. Remove rear plate (for A/T) or flywheel housing (for
MT).
11. Remove retainer.
NOTE:
1) Be careful not to damage the oil seal; it can be
reused.
2) Inspect installation portion for distortion and flow on
the slinger; also inspect for flow on the oil seal lip.
3) If there is some flow oil seal/slinger, replace a set.
12. Remove bolts from thrust plate of balance shaft LH
then remove balance shaft.
13. Loosen crank case fixing bolts.
14. Use seal cutter to take off the liquid gasket.
Seal cutter: 5-8840-2153-0
15. Remove crank case assembly.
CAUTION:
Do not give shock to crank case for prevention take
off applied vibration insulation material on the
crank case.
1
2
3
012RW029
Legend
(1) Crank Case
(2) Oil Pan
(3) Drain Plug
Page 1806 of 3573
ENGINE MECHANICAL 6A – 73
INSTALLATION
1. Install relief valve (if it was removed).
Torque: 30 N·m (3.1 kg·m / 22 lb ft)
2. Insert O-ring to strainer, install strainer and tighten
to specified torque.
Torque: 20 N·m (2.0 kg·m / 14.5 lb ft)
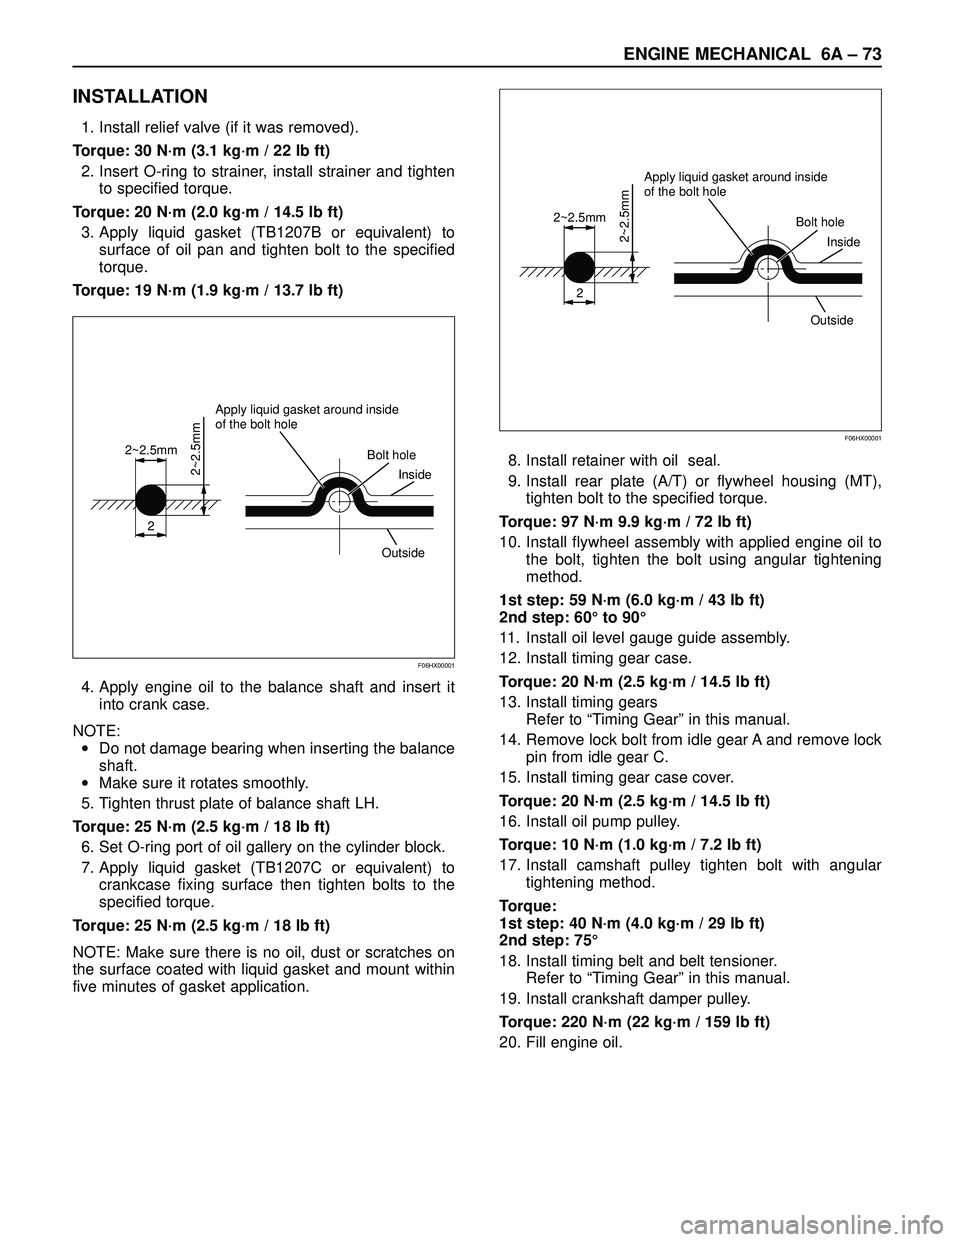
3. Apply liquid gasket (TB1207B or equivalent) to
surface of oil pan and tighten bolt to the specified
torque.
Torque: 19 N·m (1.9 kg·m / 13.7 lb ft)
4. Apply engine oil to the balance shaft and insert it
into crank case.
NOTE:
•Do not damage bearing when inserting the balance
shaft.
•Make sure it rotates smoothly.
5. Tighten thrust plate of balance shaft LH.
Torque: 25 N·m (2.5 kg·m / 18 lb ft)
6. Set O-ring port of oil gallery on the cylinder block.
7. Apply liquid gasket (TB1207C or equivalent) to
crankcase fixing surface then tighten bolts to the
specified torque.
Torque: 25 N·m (2.5 kg·m / 18 lb ft)
NOTE: Make sure there is no oil, dust or scratches on
the surface coated with liquid gasket and mount within
five minutes of gasket application.8. Install retainer with oil seal.
9. Install rear plate (A/T) or flywheel housing (MT),
tighten bolt to the specified torque.
Torque: 97 N·m 9.9 kg·m / 72 lb ft)
10. Install flywheel assembly with applied engine oil to
the bolt, tighten the bolt using angular tightening
method.
1st step: 59 N·m (6.0 kg·m / 43 lb ft)
2nd step: 60° to 90°
11. Install oil level gauge guide assembly.
12. Install timing gear case.
Torque: 20 N·m (2.5 kg·m / 14.5 lb ft)
13. Install timing gears
Refer to “Timing Gear” in this manual.
14. Remove lock bolt from idle gear A and remove lock
pin from idle gear C.
15. Install timing gear case cover.
Torque: 20 N·m (2.5 kg·m / 14.5 lb ft)
16. Install oil pump pulley.
Torque: 10 N·m (1.0 kg·m / 7.2 lb ft)
17. Install camshaft pulley tighten bolt with angular
tightening method.
Torque:
1st step: 40 N·m (4.0 kg·m / 29 lb ft)
2nd step: 75°
18. Install timing belt and belt tensioner.
Refer to “Timing Gear” in this manual.
19. Install crankshaft damper pulley.
Torque: 220 N·m (22 kg·m / 159 lb ft)
20. Fill engine oil.
2
2~2.5mm
2~2.5mm
Apply liquid gasket around inside
of the bolt hole
Bolt hole
Inside
Outside
F06HX00001
2
2~2.5mm
2~2.5mm
Apply liquid gasket around inside
of the bolt hole
Bolt hole
Inside
Outside
F06HX00001
Page 1808 of 3573
ENGINE MECHANICAL 6A – 75
DISASSEMBLY
1. Cylinder Head
1) Refer to “Cylinder head” in this manual.
2. Crankshaft Front Oil Seal
1) Use a plastic hammer and a screwdriver to tap
around the oil seal to free it from the gear case
cover.
Take care not to damage the oil seal fitting
surfaces.
3. Crankshaft Timing Gear
4. Timing Gear Case
5. Flywheel
6. Cylinder Block Rear Plate
7. Crankshaft Rear Oil Seal
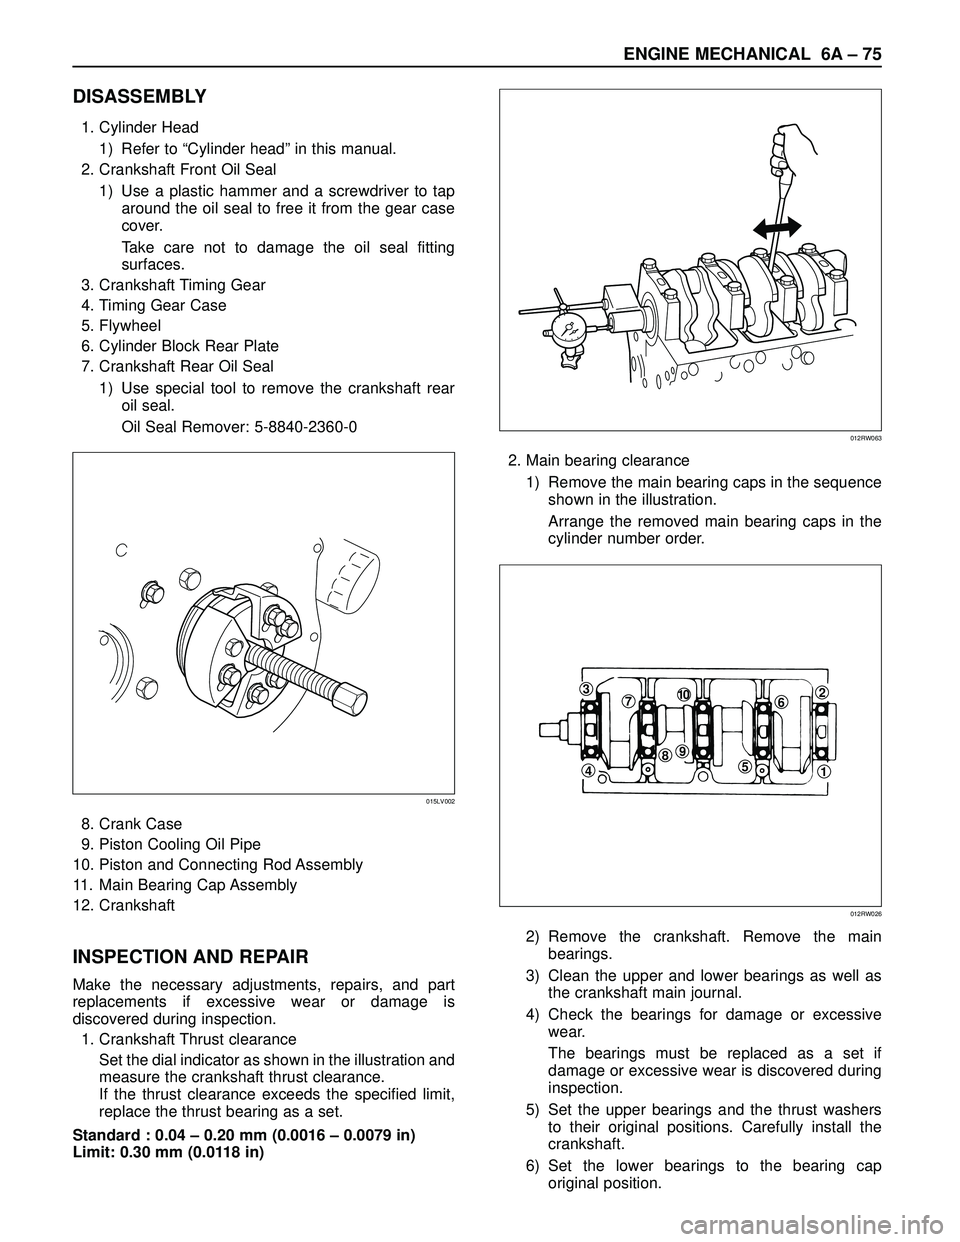
1) Use special tool to remove the crankshaft rear
oil seal.
Oil Seal Remover: 5-8840-2360-0
8. Crank Case
9. Piston Cooling Oil Pipe
10. Piston and Connecting Rod Assembly
11. Main Bearing Cap Assembly
12. Crankshaft
INSPECTION AND REPAIR
Make the necessary adjustments, repairs, and part
replacements if excessive wear or damage is
discovered during inspection.
1. Crankshaft Thrust clearance
Set the dial indicator as shown in the illustration and
measure the crankshaft thrust clearance.
If the thrust clearance exceeds the specified limit,
replace the thrust bearing as a set.
Standard : 0.04 – 0.20 mm (0.0016 – 0.0079 in)
Limit: 0.30 mm (0.0118 in)2. Main bearing clearance
1) Remove the main bearing caps in the sequence
shown in the illustration.
Arrange the removed main bearing caps in the
cylinder number order.
2) Remove the crankshaft. Remove the main
bearings.
3) Clean the upper and lower bearings as well as
the crankshaft main journal.
4) Check the bearings for damage or excessive
wear.
The bearings must be replaced as a set if
damage or excessive wear is discovered during
inspection.
5) Set the upper bearings and the thrust washers
to their original positions. Carefully install the
crankshaft.
6) Set the lower bearings to the bearing cap
original position.
015LV002
012RW063
371062
51
98
4
012RW026
Page 1809 of 3573
6A– 76 ENGINE MECHANICAL
7) Apply plastigage to the crankshaft journal unit as
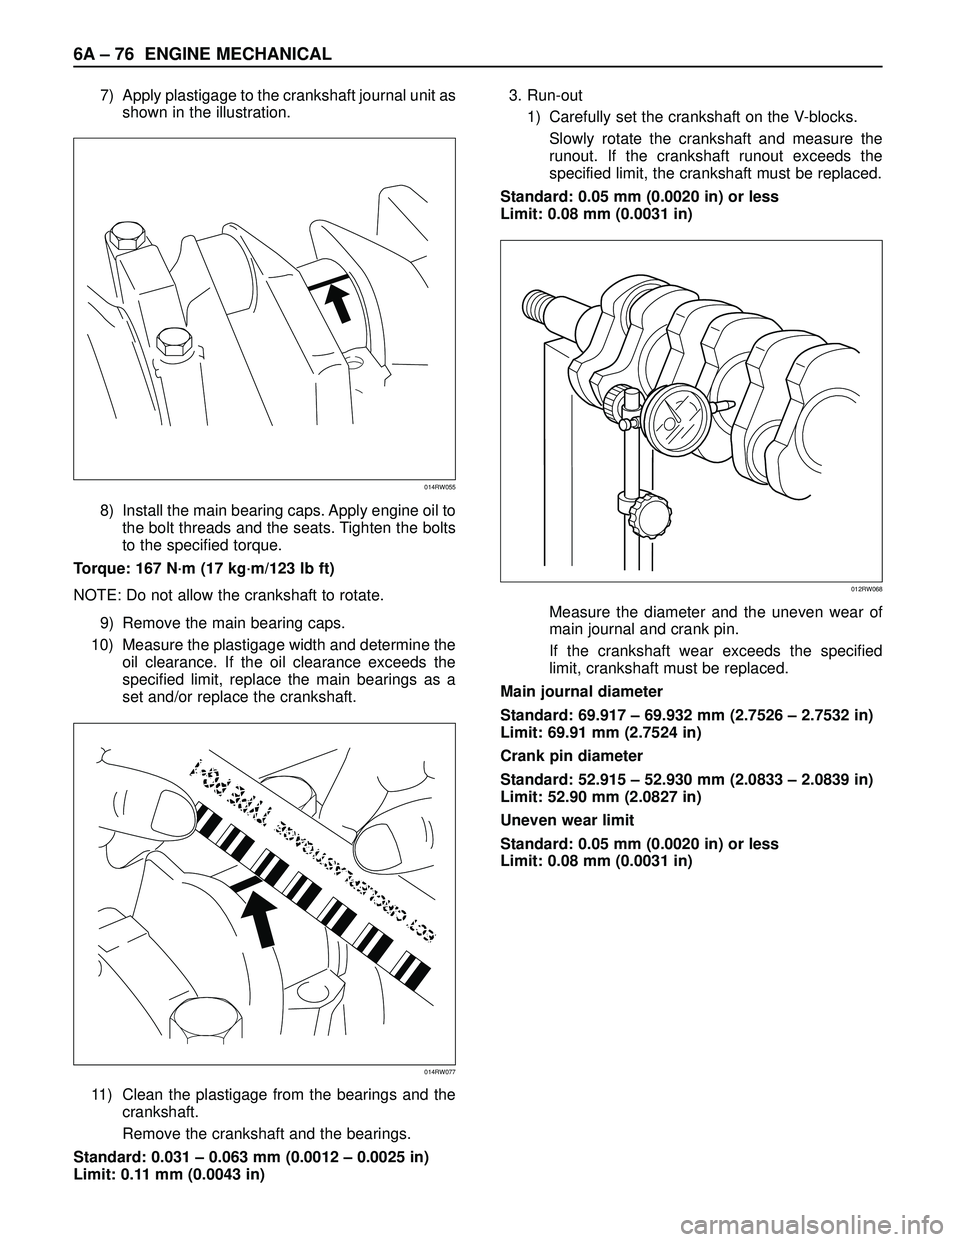
shown in the illustration.
8) Install the main bearing caps. Apply engine oil to
the bolt threads and the seats. Tighten the bolts
to the specified torque.
Torque: 167 N·m (17 kg·m/123 lb ft)
NOTE: Do not allow the crankshaft to rotate.
9) Remove the main bearing caps.
10) Measure the plastigage width and determine the
oil clearance. If the oil clearance exceeds the
specified limit, replace the main bearings as a
set and/or replace the crankshaft.
11) Clean the plastigage from the bearings and the
crankshaft.
Remove the crankshaft and the bearings.
Standard: 0.031 – 0.063 mm (0.0012 – 0.0025 in)
Limit: 0.11 mm (0.0043 in)3. Run-out
1) Carefully set the crankshaft on the V-blocks.
Slowly rotate the crankshaft and measure the
runout. If the crankshaft runout exceeds the
specified limit, the crankshaft must be replaced.
Standard: 0.05 mm (0.0020 in) or less
Limit: 0.08 mm (0.0031 in)
Measure the diameter and the uneven wear of
main journal and crank pin.
If the crankshaft wear exceeds the specified
limit, crankshaft must be replaced.
Main journal diameter
Standard: 69.917 – 69.932 mm (2.7526 – 2.7532 in)
Limit: 69.91 mm (2.7524 in)
Crank pin diameter
Standard: 52.915 – 52.930 mm (2.0833 – 2.0839 in)
Limit: 52.90 mm (2.0827 in)
Uneven wear limit
Standard: 0.05 mm (0.0020 in) or less
Limit: 0.08 mm (0.0031 in)
014RW055
014RW077
012RW068
Page 1813 of 3573
6A– 80 ENGINE MECHANICAL
3. Piston and Connecting Rod Assembly
1) Apply engine oil to the cylinder bores, the
connecting rod bearings and the crankshaft pins
and each piston ring and piston.
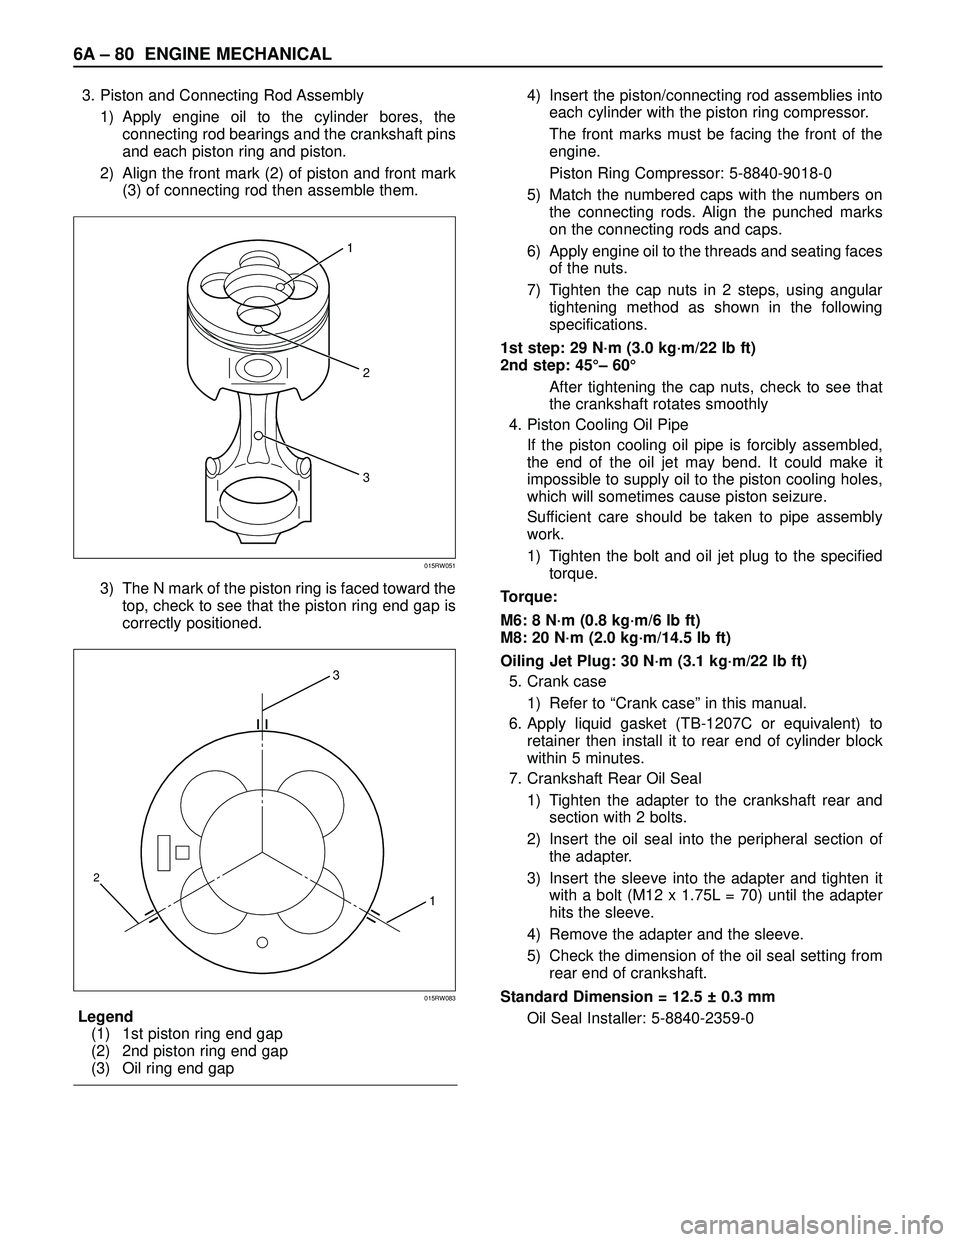
2) Align the front mark (2) of piston and front mark
(3) of connecting rod then assemble them.
3) The N mark of the piston ring is faced toward the
top, check to see that the piston ring end gap is
correctly positioned.
Legend
(1) 1st piston ring end gap
(2) 2nd piston ring end gap
(3) Oil ring end gap4) Insert the piston/connecting rod assemblies into
each cylinder with the piston ring compressor.
The front marks must be facing the front of the
engine.
Piston Ring Compressor: 5-8840-9018-0
5) Match the numbered caps with the numbers on
the connecting rods. Align the punched marks
on the connecting rods and caps.
6) Apply engine oil to the threads and seating faces
of the nuts.
7) Tighten the cap nuts in 2 steps, using angular
tightening method as shown in the following
specifications.
1st step: 29 N·m (3.0 kg·m/22 lb ft)
2nd step: 45°– 60°
After tightening the cap nuts, check to see that
the crankshaft rotates smoothly
4. Piston Cooling Oil Pipe
If the piston cooling oil pipe is forcibly assembled,
the end of the oil jet may bend. It could make it
impossible to supply oil to the piston cooling holes,
which will sometimes cause piston seizure.
Sufficient care should be taken to pipe assembly
work.
1) Tighten the bolt and oil jet plug to the specified
torque.
Torque:
M6: 8 N·m (0.8 kg·m/6 lb ft)
M8: 20 N·m (2.0 kg·m/14.5 lb ft)
Oiling Jet Plug: 30 N·m (3.1 kg·m/22 lb ft)
5. Crank case
1) Refer to “Crank case” in this manual.
6. Apply liquid gasket (TB-1207C or equivalent) to
retainer then install it to rear end of cylinder block
within 5 minutes.
7. Crankshaft Rear Oil Seal
1) Tighten the adapter to the crankshaft rear and
section with 2 bolts.
2) Insert the oil seal into the peripheral section of
the adapter.
3) Insert the sleeve into the adapter and tighten it
with a bolt (M12 x 1.75L = 70) until the adapter
hits the sleeve.
4) Remove the adapter and the sleeve.
5) Check the dimension of the oil seal setting from
rear end of crankshaft.
Standard Dimension = 12.5 ± 0.3 mm
Oil Seal Installer: 5-8840-2359-0
2
3
1
015RW051
3
1
2
015RW083