Page 1233 of 1681
Taillights (Sedanl
Bulb Replacement
Taillight:'1. Open the trunk lid, then remove the rear panel lin-
ing and side lining (see section 20).
2. Remove the bulb from the bulb socket.
O: BRAKE/TAILLIGHT BULB 132/3 CPI
@; TURN SIGNAL LIGHT BULB (32 CP)
@: REAR PARKING LIGHT EULB (3 CP)
23-176
Inn€r Taillight:'1. Open the trunk lid, then remove the bulb housing,
2. Remove the bulb from the bulb housing.
BACK.UP LIGHT BULB (32 CP}
BRAKE/TAILLIGHT BULB {32l3 CP)
O:
/n.
EULB HOUSING
Page 1234 of 1681
License PlateLights
Replacement
GloveBox Light
Test
Jl.Remove the screws and pull out the license plate
lights.
Turn the bulb socket 45o counterclockwise to re-
move it trom the housing.
l.
2.
Remove the glove box and disconnect the 2P con-
nector,
Check tor continuity between the A and B terminals
in each condition according to the table.
BULB(3.4 Wl
Terminal
c""il-------lB
PUSHED {lid closed)
RELEASED {lid open)o-/a---.ov
ciotG401t
23-177
Page 1235 of 1681
Dash Lights Brightness Control
Circuit Diagram
UNDER-HOOO FUSgRELAY 8OXUNDEN.DASHFUSE/RELAYEOXtX"f -.------^-;^*;;ilLrcrTswrc.
ffiwHT-lf-FEDGaN
, &TGEAN POSITION INOICATOROIMMING CIFCUIT.ATTGEAB POSITION CONSOLE LIGHT
. CRUISE COI,{TROL DIMMING CIRCUIT.CRUISE CONTHOT MAIN SWITCH LIGHT.GAUGE LIGHTS.HAZAFDWABN NG SWITCH LIGHT. HEATER CONTROL PANEL LIGHTS. REAR WINDOW DEFOGGER SWITCH LIGHT
23-178
Page 1236 of 1681

J
)
'1.
3.
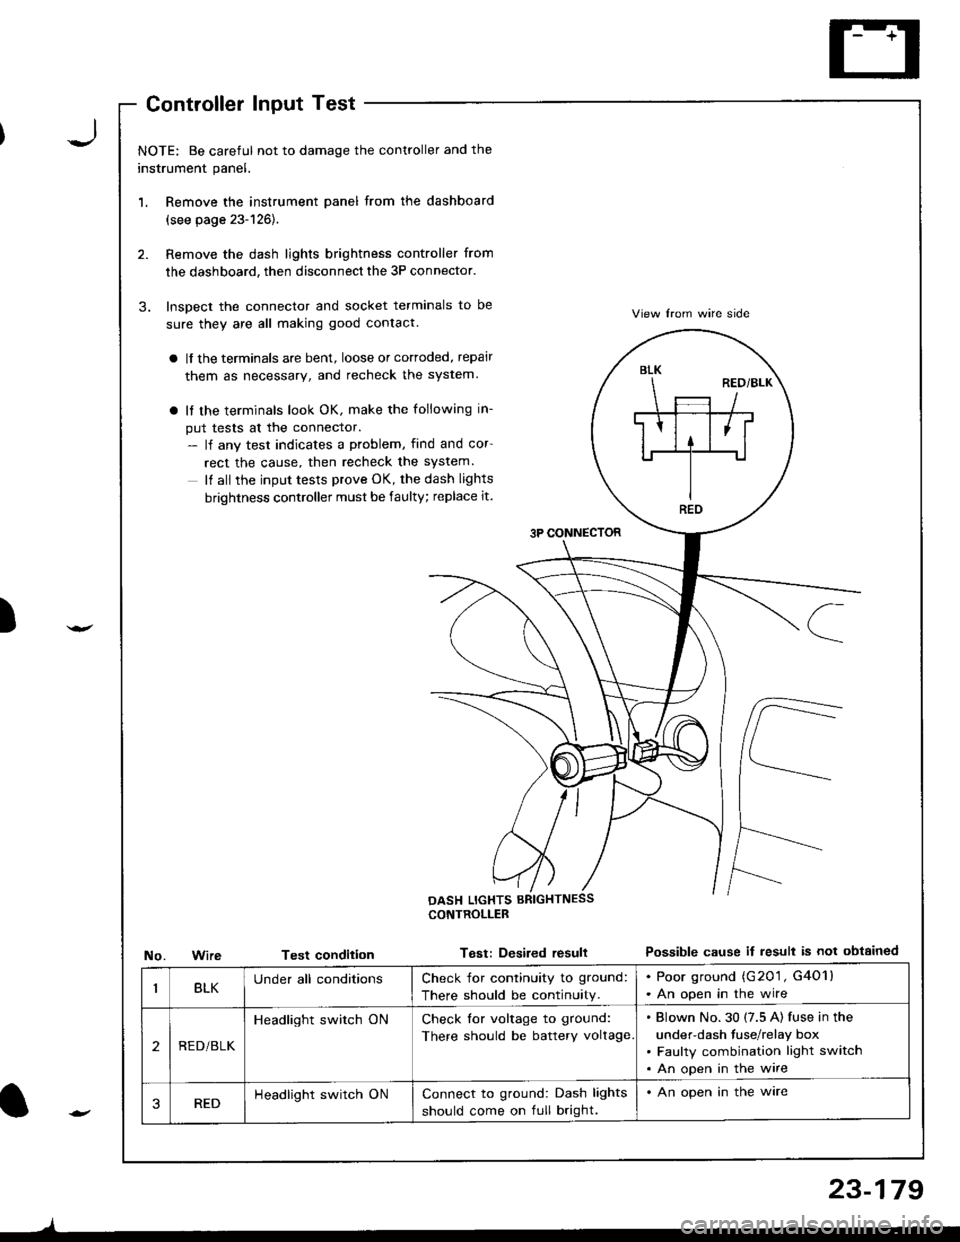
NOTE: Be careful not to damage the controller and the
instrument panel.
Remove the instrument panel from the dashboard
(see page 23-126).
Remove the dash lights brightness controller from
the dashboard, then disconnect the 3P connector.
Inspect the connector and socket terminals to be
sure they are all making good contact.
a lf the terminals are bent, loose or cortoded, repair
them as necessary, and recheck the system.
a It the terminals look OK, make the following in-
put tests at the connector.- lf any test indicates a problem, find and cor
rect the cause, then recheck the system.
It all the input tests prove OK, the dash lights
brightness controller must be faulty; replace it.
3P CONNECTOR
View lrom wire side
Possible cause if result is not obtainedNo.WireTest condition
CONTROLLEB
Test: Desired resull
BLK
REO
BLKUnder all conditionsCheck for continuity to ground:
There should be continuity.
. Poor ground (G201 , G4O1l. An open in the wire
2REDi BLK
Headlight switch ONCheck for voltage to ground:
There should be battery voltage
Blown No.30 (7.5 A) fuse in the
under-dash fuse/relay box
Faulty combination light switch
An open in the wire
3REDHeadlight switch ONConnect to ground: Dash lights
should come on full bright.
. An open in the ware
l-
)
23-179
Page 1237 of 1681
Ceiling/Trunk/Cargo Area Lights, Spotlights
Component Location Index
\* 1: Sedan'2: Hatchback
CEILING LIGHTTest/ R6placem6nt. page 23 183
SPOTLIGHTSTesV Replac€ment, page 23-182
FRONTPASSENGER'SDOORswlTcHTest, page 23-158
*2 HATCH LATCHSwlTCHTesVReplacement,page 23-186
DOOR SWTTCHTest, page 23-158
.1 TRUNK LATCHswrTcHTesVReplacement, TesVReplacementpage 23 186 page 23-185
\
23-180
l--
Page 1239 of 1681
Ceiling/Trunk/Cargo Area Lights, Spotlights
Spotlight Test/Replacement
Turn the light switch OFF.
Pry off the lens.
Remove the two screws, then pull out the housing.
Hatchback:
1
2
3
CONNECTOR
BULB
5.
Disconnect the connector from the housing.
Check for continuity between the terminals in each
switch position according to the table.
Terminal
;.ttr"
----l\BorB'CorC'
LEFTONo---o\:,,/
OFF
RIGHTONo-/-\-o
OFF
lp llLEFI II RIGH] IIlb ll
8'�O B
Page 1241 of 1681
Ceiling/Trunk/Cargo Area Lights, Spotlights
Ceiling Light Test/Replacement
Without moonroof :
1. Turn the light switch OFF.
2. Pry ofl the lens.
3. Remove the screw, then pull out the housing.
HOUSING
4. Disconnect the 3P connector from the housino.
CONNECTOR
23-1a4
5. Check for continuity between the terminals in each
switch position according to the table.
rermrnal
PositionBorB'cD
OFFo-/1--o
DOORo-/A--o
ONo-/a\--o\:,,/--{.J-
From No, i(} {7.5 A} FUSE(ln the under-hood fuse/relay box)A
({
0N z'
Dl
\>l
( owt
!.\. OFF
f,o
B'To DOOR I
Page 1243 of 1681
Ceiling/Trunk/Cargo Area Lights, Spotlight
Latch Switch Test/Replacement
Sedan:
1. Open the trunk lid. and disconnect the 2p connectorfrom the trunk latch switch.
2. There should be continuity between the A and B ter-
mtnats.
TRUNK LA
lf necessary, remove the three mounting bolts to pull
out the trunk latch switch from the trunk lid, thendisconnect the lock rod from the trunk latch switch.
Disconnect the trunk opener cable from the truoklatch switch.
OO
TRUNK LATCH SWITCH
23-146
Hatchback:
1. Open the hatch, and disconnect the 6P connector
from the hatch latch switch.
2. There should be continuity between the A and B ter-
minals.
lf necessary, remove the three mounting bolts topull out the hatch opener actuator from the latch,
then disconnect the lock rod from the hatch latch
switch and the actuator rod.
Remove the three movting bolts to pull out the
hatch latch switch.
ACTUATOR ROD
2P CONNECTOR