Page 1208 of 1681

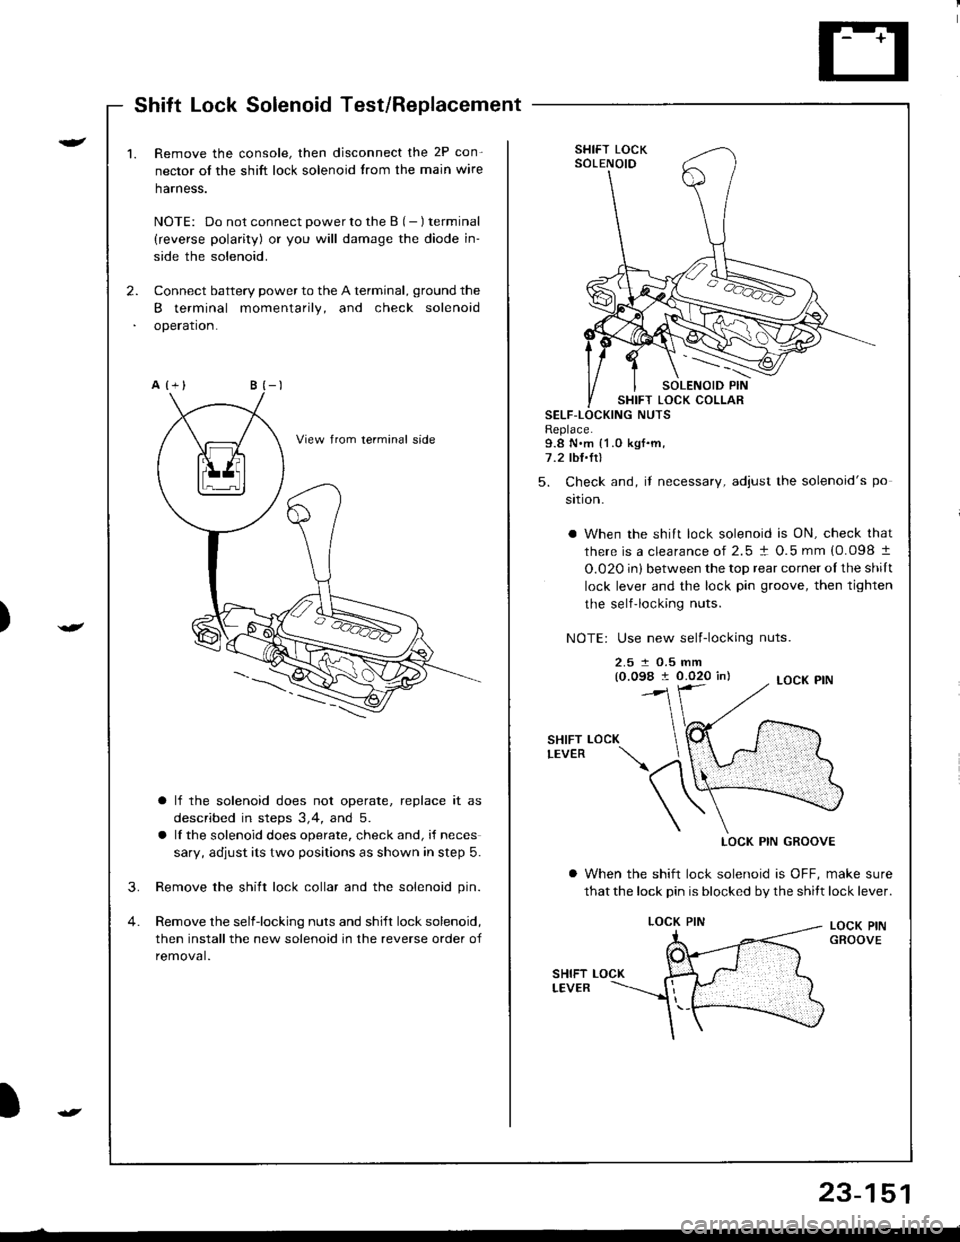
Shift Lock Solenoid Test/Beplacement
)
r-
)
2.
1.Remove the console, then disconnect the 2P con-
nector of the shift lock solenoid trom the main wire
harness.
NOTE: Do not connect power to the B (- ) terminal
(reverse polarity) or you will damage the diode in-
side the solenoid.
Connect battery power to the A terminal, ground the
B terminal momentarily, and check solenoid
operation.
a lf the solenoid does not operate, replace it as
described in steps 3,4, and 5.
a lf the solenoid does operate, check and, i{ neces
sary, adjust its two positions as shown in step 5.
3. Remove the shift lock collar and the solenoid pin.
4. Remove the selfiocking nuts and shift lock solenoid,
then installthe new solenoid in the reverse order of
removal.
SHIFT LOCKSOLENOID
SHIFT LOCK COLLARSELF-LNUTSReplace.9.8 N.m {1.0 kgf.m,7.2 lbI.Ir)
5. Check and, if necessary, adiust the solenoid's po
sition.
a When the shift lock solenoid is ON, check that
there is a clearance of 2.5 ! O.5 mm {0.098 t
O.020 in) between the top rear corner oI the shilt
lock lever and the lock pin groove, then tighten
the self-locking nuts.
NOTE: Use new self-locking nuts.
2.5 t O.5 mm(0.098 I 0.020 in)
SHIFTLEVERLOCK
LOCK PIN GROOVE
a When the shift lock solenoid is OFF, make sure
that the lock pin is blocked by the shitt lock lever.
LOCK PINGROOVE
LOCK PIN
23-151
Page 1214 of 1681
M
lgnition switch at
START iIII)
Check for voltage to ground:
There should be battery voltage.
Blown No.31 (7.5 A) fuse in the
under-dash fuse/relay box
Faulty clutch interlock switch or
starter cut relay (M/T)
Faulty neutral position switch (A/T)
An open in the wire
2D
lgnition switch ON {ll).
brake fluid reservoir
full, and parking brake
tever oown
Connect to ground: Brake
system light should come on.
. Blown brake system light. An open in the wire
Bulb Check System (brake system light)
No. Terminal Test conditionTost: Desiled resultPossiblo cause if lesult is not obtained
)
)
23-157
Page 1229 of 1681
Headlight
Headlight Replacement
1. Remove the front bumper (see section 20).
2. Remove the mounting bolts, then pull out the head-
light, and disconnect the connectors from it.
After replacement, the horizontal and venical aim-
ing must be checked using conventional methods.
Use the aiming charts on page 23-171.
Bulb Replacement
CAUTION:
a Halogen headlights can becomo very hot in use; do
not touch them or the attaching haldware imm6diately
after they have been tuh6d ott.a Do not try to replace or cl6an the headlights with tho
lights on.
1. Disconnect the 2P connector(s) from the headlight.
Turn the bulb(s) counterclockwise and remove the
bulb(s).
2P CONNECTORS
HEADLIGHT
2PCONNECTOR
2P CONNECTOR
23-172
Page 1230 of 1681
)
I
Front Parking/Front Turn
Signal Lights
Replacement
'1.Remove the screw, and pull the front parking/tront
turn signal lights out of the front bumper.
CONNECTOR
l.
FRONT TURN SIGNAL LIGHT
Disconnect the 3P and 2P connectors trom the
lights.
Turn the bulb socket 45o counterclockwise to re-
move it from the housing.
/e*----
Ar)
fl
Front Side Marker
Lights
1.Remove the screw, and pull the tront side marker
light assembly out of the tront bumper.
Disconnect the 3P and 2P connectors from the
lights.
Turn the bulb socket 45o countefclockwise to re-
move it from the housing.
FRONT SIDE MARKER LIGHT
Replacement
23-173
Page 1234 of 1681
License PlateLights
Replacement
GloveBox Light
Test
Jl.Remove the screws and pull out the license plate
lights.
Turn the bulb socket 45o counterclockwise to re-
move it trom the housing.
l.
2.
Remove the glove box and disconnect the 2P con-
nector,
Check tor continuity between the A and B terminals
in each condition according to the table.
BULB(3.4 Wl
Terminal
c""il-------lB
PUSHED {lid closed)
RELEASED {lid open)o-/a---.ov
ciotG401t
23-177
Page 1243 of 1681
Ceiling/Trunk/Cargo Area Lights, Spotlight
Latch Switch Test/Replacement
Sedan:
1. Open the trunk lid. and disconnect the 2p connectorfrom the trunk latch switch.
2. There should be continuity between the A and B ter-
mtnats.
TRUNK LA
lf necessary, remove the three mounting bolts to pull
out the trunk latch switch from the trunk lid, thendisconnect the lock rod from the trunk latch switch.
Disconnect the trunk opener cable from the truoklatch switch.
OO
TRUNK LATCH SWITCH
23-146
Hatchback:
1. Open the hatch, and disconnect the 6P connector
from the hatch latch switch.
2. There should be continuity between the A and B ter-
minals.
lf necessary, remove the three mounting bolts topull out the hatch opener actuator from the latch,
then disconnect the lock rod from the hatch latch
switch and the actuator rod.
Remove the three movting bolts to pull out the
hatch latch switch.
ACTUATOR ROD
2P CONNECTOR
Page 1246 of 1681
)
Brake Lights
Circuit Diagram
UNDER.HOOOFUSE/RELAY BOX'ry
BRAKE SWITCH(O,l I pushed)
WHT/GF
I
HONNINTEFLOCK
,#�,.^{.
LEFIBRAKELIGHT(32CP)il
:li
l_t
INNENTAIILIGHT
WHTiGRN
GRNA{HT
J
GRNMHT
23-189
l
I
Page 1248 of 1681
High Mount Brake Light Replacement (Bulb type)
Hatchback:Sedan:
1.Open the hatch.
Remove the two clips and the cover.
Remove the two nuts and the high mount brakelight, then disconnect the 2P connecror.
1.Open the trunk lid, and disconnect the 2P connector
from the high mount brake light.
Remove the two nuts, then remove the high mount
brake light from the rear shelt.
2.
3.
2.
2P CONNECTOR
Turn the socket 45o counterclockwise to remove the
bulb.
Install the high mount brake light in the reverse or-
der of removal, and clean the rear window glass be-
tore installing.
CAUTION: When installing the high mount brake
light, make sure the rubber seal fits against the reai
window evenly.
3.Install the high mount brake light in the reverse or
der of removal. Clean the rear window qlass belore
installing the light.
5.
)
23-191