1998 DODGE RAM 1500 tow
[x] Cancel search: towPage 1608 of 2627

(4) Remove air resonator box at throttle body.
(5) Unsnap cable from dashpanel routing clip.
(6) Remove cable housing from dash panel and
pull into engine compartment.
(7) Hold throttle in wide open position. While held
in this position, slide throttle cable pin (Fig. 33) from
throttle body bellcrank.
(8) Using a pick or small screwdriver, press release
tab (Fig. 34) to release plastic cable mount from
bracket.Press on tab only enough to release
cable from bracket. If tab is pressed too much,
it will be broken.Slide plastic mount (Fig. 34)
towards right side of vehicle to remove throttle cable
from throttle body bracket.
(9) Remove throttle cable from vehicle.
4.7L V-8
CAUTION: Be careful not to damage or kink cable
core wire (within cable sheathing) while servicing
accelerator pedal or throttle cable.
(1) From inside vehicle, hold up accelerator pedal.
Remove plastic cable retainer (clip) and throttle cable
core wire from upper end of pedal arm (Fig. 1). Plas-
tic cable retainer (clip) snaps into pedal arm.
(2) Remove cable core wire at pedal arm.
(3) From inside vehicle, remove cable clip holding
cable to dashpanel (Fig. 1).
(4) Remove air box at throttle body.
(5) Unsnap cable from dashpanel routing clip.
(6) Remove cable housing from dash panel and
pull into engine compartment.(7) Using finger pressure only, disconnect accelera-
tor cable connector at throttle body bellcrank pin by
pushing connector off bellcrank pin towards front of
vehicle (Fig. 35).DO NOT try to pull connector
off perpendicular to bellcrank pin. Connector
will be broken.
(8) Lift accelerator cable from top of cable cam
(Fig. 35).
(9) Press tab (Fig. 36) to release plastic cable
mount from bracket.Press on tab only enough to
release cable from bracket. If tab is pressed too
much, it will be broken.Slide plastic mount (Fig.
36) towards passenger side of vehicle to remove cable
from bracket.
(10) Remove throttle cable from vehicle.5.7L V-8
The Throttle Control Cable on the 5.7L V-8 engine
connects the accelerator pedal to the Accelerator
Pedal Position Sensor (APPS). A separate mechanical
cable is not routed to the throttle body.
CAUTION: Be careful not to damage or kink cable
core wire (within cable sheathing) while servicing
accelerator pedal, cables or APPS.
(1) From inside vehicle, hold up accelerator pedal.
Remove plastic cable retainer and throttle cable core
wire from upper end of pedal arm (Fig. 1). The plas-
tic cable retainer snaps into pedal arm.
(2) Remove cable core wire at pedal arm.
Fig. 33 THROTTLE CABLE PIN - 3.7L V-6
1 - THROTTLE CABLE PIN
2 - THROTTLE BODY BELLCRANK
3 - PUSH UP HERE
Fig. 34 THROTTLE CABLE RELEASE TAB - 3.7L V-6
1 - THROTTLE CABLE
2 - RELEASE TAB
3 - PICK OR SCREWDRIVER
4 - PLASTIC CABLE MOUNT
DRFUEL INJECTION - GAS 14 - 39
THROTTLE CONTROL CABLE (Continued)
Page 1627 of 2627

WARNING: USE EXTREME CAUTION WHEN
INSPECTING FOR HIGH-PRESSURE FUEL LEAKS.
INSPECT FOR HIGH-PRESSURE FUEL LEAKS WITH
A SHEET OF CARDBOARD. HIGH FUEL INJECTION
PRESSURE CAN CAUSE PERSONAL INJURY IF
CONTACT IS MADE WITH THE SKIN.
DIAGNOSIS AND TESTING - HIGH-PRESSURE
FUEL LINE LEAKS
High-pressure fuel line leaks can cause starting
problems and poor engine performance.
WARNING: DUE TO EXTREME FUEL PRESSURES
OF UP TO 160,000 kPa (23,206 PSI), USE EXTREME
CAUTION WHEN INSPECTING FOR HIGH-PRES-
SURE FUEL LEAKS. DO NOT GET YOUR HAND OR
A FINGER NEAR A SUSPECTED LEAK. INSPECT
FOR HIGH-PRESSURE FUEL LEAKS WITH A SHEET
OF CARDBOARD. HIGH FUEL INJECTION PRES-
SURE CAN CAUSE PERSONAL INJURY IF CON-
TACT IS MADE WITH THE SKIN.
Start the engine. Move the cardboard (Fig. 13) over
the suspected high-pressure fuel line leak, and check
for fuel spray onto the cardboard. If line is leaking,
retorque line. Replace damaged, restricted or leaking
high-pressure fuel lines with the correct replacement
line.
CAUTION: The high-pressure fuel lines must be
clamped securely in place in the holders. The lines
cannot contact each other or other components. Do
not attempt to weld high-pressure fuel lines or to
repair lines that are damaged. Only use the recom-
mended lines when replacement of high-pressure
fuel line is necessary.
REMOVAL
CAUTION: Cleanliness cannot be overemphasized
when handling or replacing diesel fuel system com-
ponents. This especially includes the fuel injectors,
high-pressure fuel lines and fuel injection pump.
Very tight tolerances are used with these parts. Dirt
contamination could cause rapid part wear and pos-
sible plugging of fuel injector nozzle tip holes. This
in turn could lead to possible engine misfire.
Always wash/clean any fuel system component
thoroughly before disassembly and then air dry.
Cap or cover any open part after disassembly.
Before assembly, examine each part for dirt, grease
or other contaminants and clean if necessary. When
installing new parts, lubricate them with clean
engine oil or clean diesel fuel only.
(1) Disconnect both negative battery cables from
both batteries. Cover and isolate ends of cables.(2) Thoroughly clean fuel lines at both ends.
(3) If removing fuel line at either #1 or #2 cylinder,
the intake manifold air heater elements must first be
removed from top of intake manifold. Refer to Intake
Air Heater Removal / Installation for procedures.
(4) If removing fuel line at #6 cylinder, a bracket
(Fig. 14) is located above fuel line connection at cyl-
inder head. Two bolts secure this bracket to rear of
cylinder head. The upper bolt hole is slotted. Loosen
(but do not remove) these 2 bracket bolts. Tilt
bracket down to gain access to #6 fuel line connec-
tion.
(5) Remove engine lift bracket (if necessary).
(6) Remove necessary insulated fuel line support
clamps (Fig. 15) and bracket bolts at intake manifold.
DO NOT remove insulators from fuel lines.
(7) Place shop towels around fuel lines at fuel rail
and injectors. If possible, do not allow fuel to drip
down side of engine.
CAUTION: WHEN LOOSENING OR TIGHTENING
HIGH-PRESSURE LINES ATTACHED TO A SEPA-
RATE FITTING (Fig. 16) , USE A BACK-UP WRENCH
ON FITTING. DO NOT ALLOW FITTING TO ROTATE.
DAMAGE TO BOTH FUEL LINE AND FITTING WILL
RESULT.
(8) Carefully remove each fuel line from engine.
Note position of each while removing.Do not bend
lines while removing.
Fig. 13 TYPICAL TEST FOR LEAKS USING
CARDBOARD
1 - HIGH-PRESSURE LINE
2 - CARDBOARD
3 - TYPICAL HIGH-PRESSURE FITTING
14 - 58 FUEL DELIVERY - DIESELDR
FUEL LINES (Continued)
Page 1701 of 2627

(4) Remove the support and lower the vehicle.
(5) Reconnect the return hose at the reservoir.
(6) Refill the power steering system,(Refer to 19 -
STEERING/PUMP - STANDARD PROCEDURE).
POWER STEERING PRESSURE
SWITCH
DESCRIPTION
A pressure sensing switch is used in the power
steering system. It is mounted on the high-pressure
steering hose (Fig. 9). This switch will be used with
both 3.7L and 5.7L engines. There is no pressure
switch used for the 4.7L or the 5.9L pump.
OPERATION
The switch is used on the 3.7L V-6 & 5.7L V-8
engines.
The power steering pressure switch provides an
input to the Powertrain Control Module (PCM). This
input is provided during periods of high steering
pump load and low engine rpm; such as during park-
ing maneuvers. The PCM increases the idle speed
through the Idle Air Control (IAC) motor. This is
done to prevent the engine from stalling under the
increased load.
When steering pump pressure exceeds 3275 kPa
690 kPa (475 psi 100 psi), the Normally Closed
(NC) switch will open and the PCM will increase the
engine idle speed. This will prevent the engine from
stalling.
When pump pressure drops to approximately 1379
kPa (200 psi), the switch circuit will re-close and
engine idle speed will return to its previous setting.
REMOVAL - 3.7L & 5.7L
The power steering pressure switch is installed in
the power steering high-pressure hose (Fig. 9).
(1) Disconnect electrical connector from power
steering pressure switch.(2) Place a small container or shop towel beneath
switch to collect any excess fluid.
(3) Remove switch. Use back-up wrench on power
steering line to prevent line bending.
INSTALLATION - 3.7L & 5.7L
This switch is used only with the 3.7L V±6 and the
5.7L V-8 engines.
(1) Install power steering switch into power steer-
ing line.
(2) Tighten to 8±11 N´m (70±100 in. lbs.) torque.
(3) Connect electrical connector to switch.
(4) Check power steering fluid and add as neces-
sary.
(5) Start engine and again check power steering
fluid. Add fluid if necessary.
Fig. 9 PRESSURE SWITCH
1 - POWER STEERING PULLEY
2 - POWER STEERING PUMP HOUSING
3 - POWER STEERING FLUID RESERVOIR
4 - RETURN HOSE
5 - HIGH PRESSURE HOSE WITH PRESSURE SWITCH
19 - 46 PUMPDR
HOSES - LINK/COIL (Continued)
Page 1706 of 2627

DIAGNOSIS AND TESTING
LOW LUBRICANT LEVEL
A low transmission lubricant level is generally the
result of a leak, inadequate lubricant fill or an incor-
rect lubricant level check. Leaks can occur at the
mating surfaces of the gear case, adaptor or exten-
sion housing, or from the front/rear seals. A sus-
pected leak could also be the result of an overfill
condition.
Leaks at the rear of the extension or adapter hous-
ing will be from the housing oil seals. Leaks at com-
ponent mating surfaces will probably be the result of
inadequate sealer, gaps in the sealer, incorrect bolt
tightening or use of a non-recommended sealer.
A leak at the front of the transmission will be from
either the front bearing retainer or retainer seal.
Lubricant may be seen dripping from the clutch
housing after extended operation. If the leak is
severe, it may also contaminate the clutch disc caus-
ing the disc to slip, grab and or chatter.
A correct lubricant level check can only be made
when the vehicle is level. Also allow the lubricant to
settle for a minute or so before checking. These rec-
ommendations will ensure an accurate check and
avoid an underfill or overfill condition. Always check
the lubricant level after any addition of fluid to avoid
an incorrect lubricant level condition.
HARD SHIFTING
Hard shifting is usually caused by a low lubricant
level, improper or contaminated lubricants. The con-
sequence of using non-recommended lubricants is
noise, excessive wear, internal bind and hard shift-
ing. Substantial lubricant leaks can result in gear,
shift rail, synchro, and bearing damage. If a leak
goes undetected for an extended period, the first indi-
cations of component damage are usually hard shift-
ing and noise.
Shift component damage or damaged clutch pres-
sure plate or disc are additional probable causes of
increased shift effort. Worn/damaged pressure plate
or disc can cause incorrect release. If clutch problem
is advanced, gear clash during shifts can result.
Worn or damaged synchro rings can cause gear clash
when shifting into any forward gear. In some new or
rebuilt transmissions, new synchro rings may tend to
stick slightly causing hard or noisy shifts. In most
cases this condition will decline as the rings wear-in.
TRANSMISSION NOISE
Most manual transmissions make some noise dur-
ing normal operation. Rotating gears generate a mild
whine that is audible, but generally only at extreme
speeds.
Severe highly audible transmission noise is gener-
ally the initial indicator of a lubricant problem.
Insufficient, improper or contaminated lubricant will
promote rapid wear of gears, synchros, shift rails,
forks and bearings. The overheating caused by a
lubricant problem, can also lead to gear and bearing
damage.
REMOVAL
(1) Disconnect battery negative cable.
(2) Shift transmission into Neutral.
(3) Remove shift boot bezel screws and slide boot
upward on shift lever extension.
(4) Remove shift lever extension from the shift
tower and lever assembly.
(5) Raise vehicle on hoist.
(6) Remove skid plate, if equipped.
(7) Drain lubricant if transmission will be disas-
sembled for service.
(8) Mark propeller shaft/shafts and companion
flange yoke/yokes for installation reference and
remove propeller shaft/shafts.
(9) Disconnect harness from clips on transmission
housing.
(10) Remove transfer case linkage if equipped.
(11) Remove transfer case mounting nuts and
remove transfer case if equipped.
(12) Remove slave cylinder mounting nut and
remove cylinder (Fig. 2).
Fig. 2 SLAVE CYLINDER
1 - MOUNTING NUTS
2 - SLAVE CYLINDER
DRMANUAL TRANSMISSION - NV3500 21 - 3
MANUAL TRANSMISSION - NV3500 (Continued)
Page 1707 of 2627

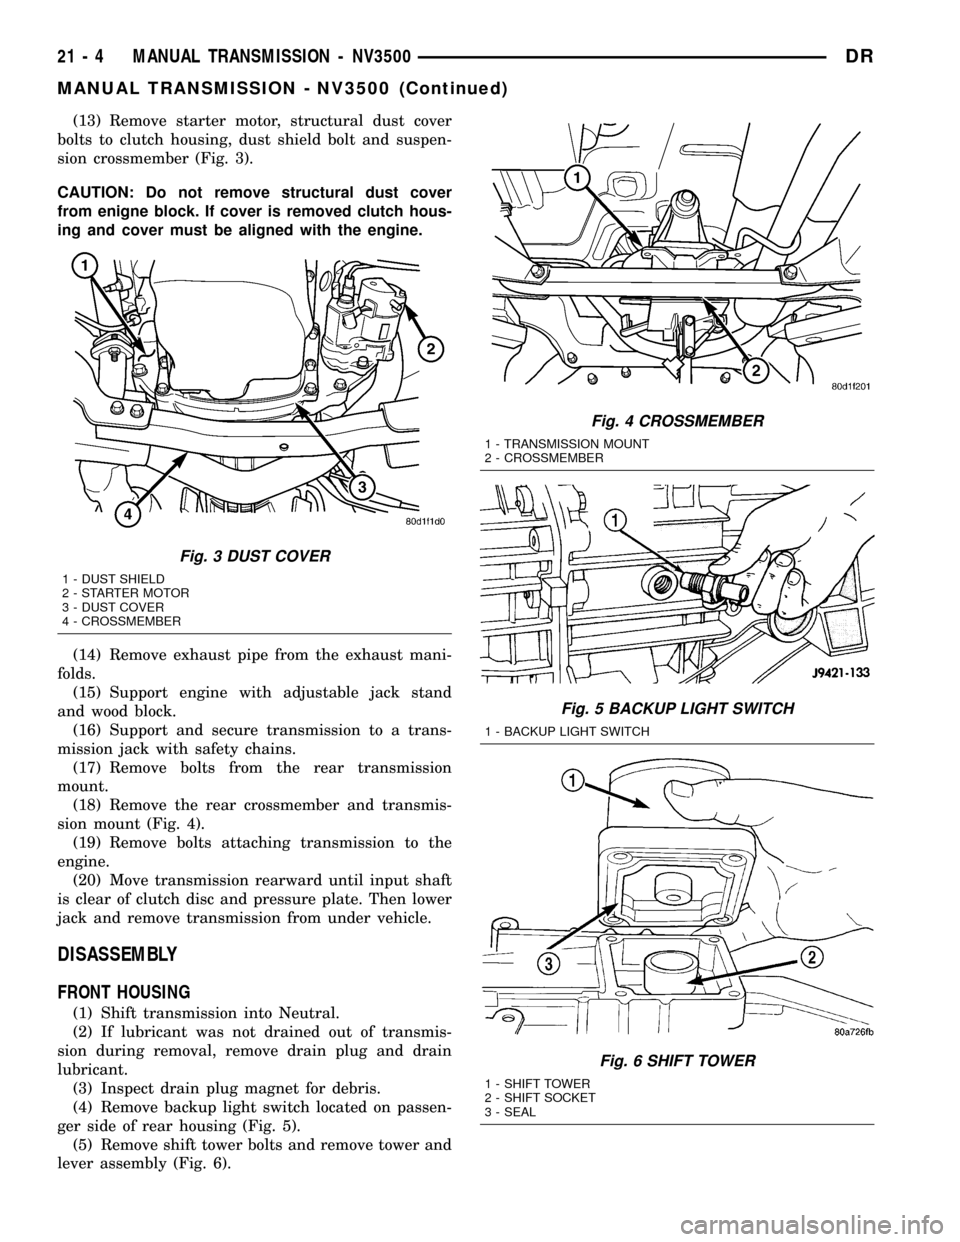
(13) Remove starter motor, structural dust cover
bolts to clutch housing, dust shield bolt and suspen-
sion crossmember (Fig. 3).
CAUTION: Do not remove structural dust cover
from enigne block. If cover is removed clutch hous-
ing and cover must be aligned with the engine.
(14) Remove exhaust pipe from the exhaust mani-
folds.
(15) Support engine with adjustable jack stand
and wood block.
(16) Support and secure transmission to a trans-
mission jack with safety chains.
(17) Remove bolts from the rear transmission
mount.
(18) Remove the rear crossmember and transmis-
sion mount (Fig. 4).
(19) Remove bolts attaching transmission to the
engine.
(20) Move transmission rearward until input shaft
is clear of clutch disc and pressure plate. Then lower
jack and remove transmission from under vehicle.
DISASSEMBLY
FRONT HOUSING
(1) Shift transmission into Neutral.
(2) If lubricant was not drained out of transmis-
sion during removal, remove drain plug and drain
lubricant.
(3) Inspect drain plug magnet for debris.
(4) Remove backup light switch located on passen-
ger side of rear housing (Fig. 5).
(5) Remove shift tower bolts and remove tower and
lever assembly (Fig. 6).
Fig. 3 DUST COVER
1 - DUST SHIELD
2 - STARTER MOTOR
3 - DUST COVER
4 - CROSSMEMBER
Fig. 4 CROSSMEMBER
1 - TRANSMISSION MOUNT
2 - CROSSMEMBER
Fig. 5 BACKUP LIGHT SWITCH
1 - BACKUP LIGHT SWITCH
Fig. 6 SHIFT TOWER
1 - SHIFT TOWER
2 - SHIFT SOCKET
3 - SEAL
21 - 4 MANUAL TRANSMISSION - NV3500DR
MANUAL TRANSMISSION - NV3500 (Continued)
Page 1710 of 2627

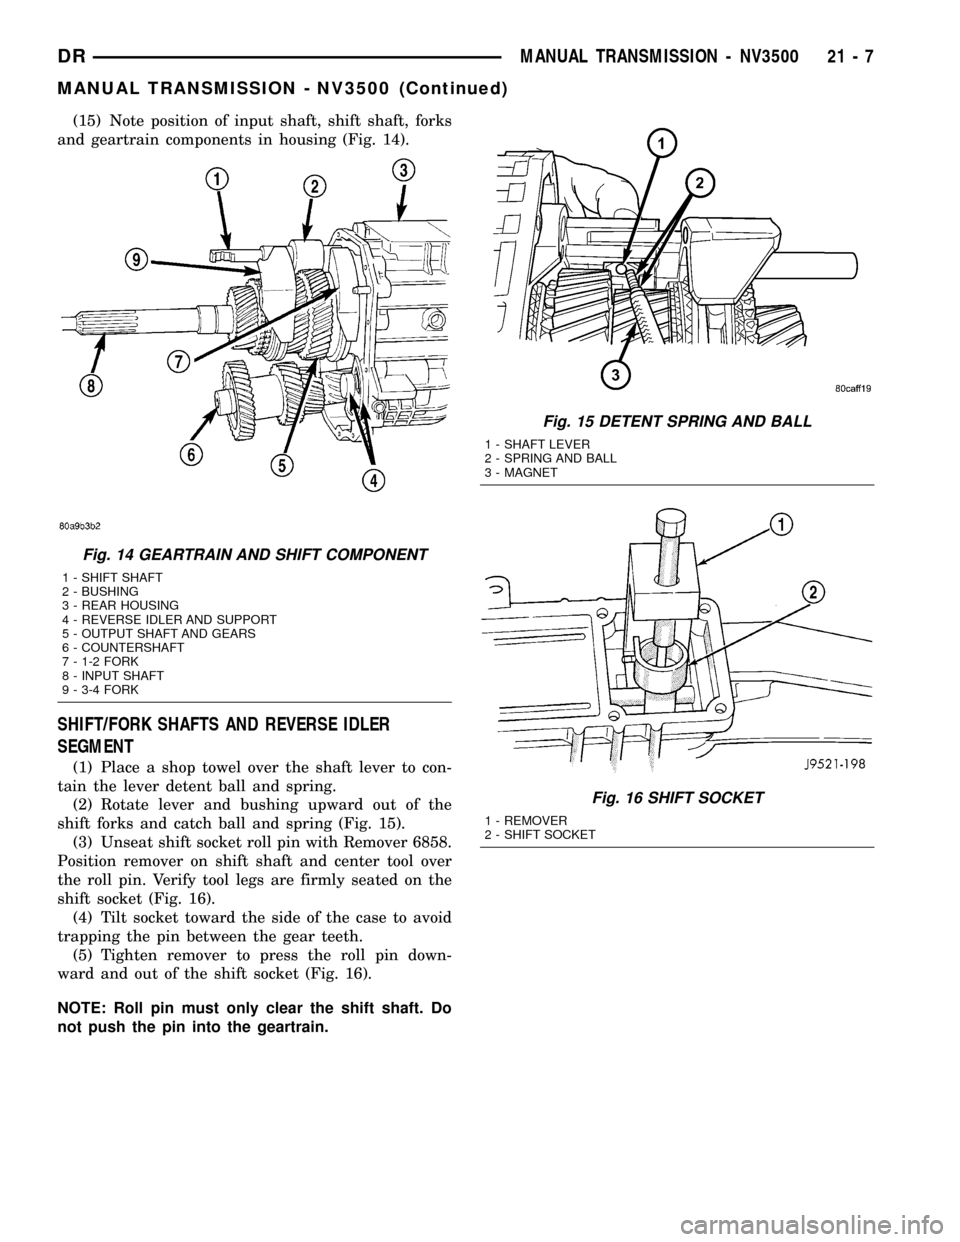
(15) Note position of input shaft, shift shaft, forks
and geartrain components in housing (Fig. 14).
SHIFT/FORK SHAFTS AND REVERSE IDLER
SEGMENT
(1) Place a shop towel over the shaft lever to con-
tain the lever detent ball and spring.
(2) Rotate lever and bushing upward out of the
shift forks and catch ball and spring (Fig. 15).
(3) Unseat shift socket roll pin with Remover 6858.
Position remover on shift shaft and center tool over
the roll pin. Verify tool legs are firmly seated on the
shift socket (Fig. 16).
(4) Tilt socket toward the side of the case to avoid
trapping the pin between the gear teeth.
(5) Tighten remover to press the roll pin down-
ward and out of the shift socket (Fig. 16).
NOTE: Roll pin must only clear the shift shaft. Do
not push the pin into the geartrain.
Fig. 14 GEARTRAIN AND SHIFT COMPONENT
1 - SHIFT SHAFT
2 - BUSHING
3 - REAR HOUSING
4 - REVERSE IDLER AND SUPPORT
5 - OUTPUT SHAFT AND GEARS
6 - COUNTERSHAFT
7 - 1-2 FORK
8 - INPUT SHAFT
9 - 3-4 FORK
Fig. 15 DETENT SPRING AND BALL
1 - SHAFT LEVER
2 - SPRING AND BALL
3 - MAGNET
Fig. 16 SHIFT SOCKET
1 - REMOVER
2 - SHIFT SOCKET
DRMANUAL TRANSMISSION - NV3500 21 - 7
MANUAL TRANSMISSION - NV3500 (Continued)
Page 1713 of 2627

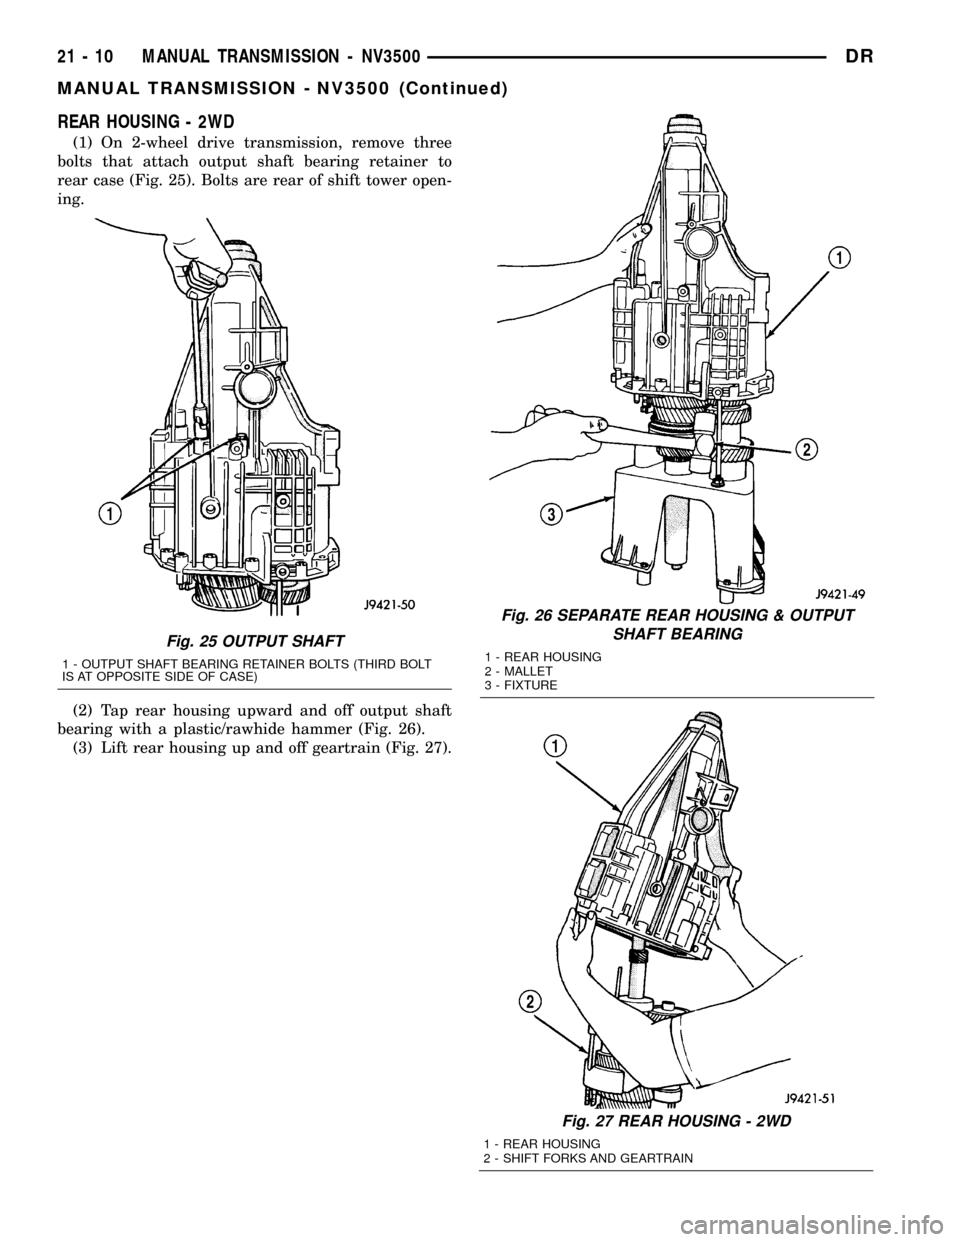
REAR HOUSING - 2WD
(1) On 2-wheel drive transmission, remove three
bolts that attach output shaft bearing retainer to
rear case (Fig. 25). Bolts are rear of shift tower open-
ing.
(2) Tap rear housing upward and off output shaft
bearing with a plastic/rawhide hammer (Fig. 26).
(3) Lift rear housing up and off geartrain (Fig. 27).
Fig. 26 SEPARATE REAR HOUSING & OUTPUT
SHAFT BEARING
1 - REAR HOUSING
2 - MALLET
3 - FIXTURE
Fig. 27 REAR HOUSING - 2WD
1 - REAR HOUSING
2 - SHIFT FORKS AND GEARTRAIN
Fig. 25 OUTPUT SHAFT
1 - OUTPUT SHAFT BEARING RETAINER BOLTS (THIRD BOLT
IS AT OPPOSITE SIDE OF CASE)
21 - 10 MANUAL TRANSMISSION - NV3500DR
MANUAL TRANSMISSION - NV3500 (Continued)
Page 1718 of 2627

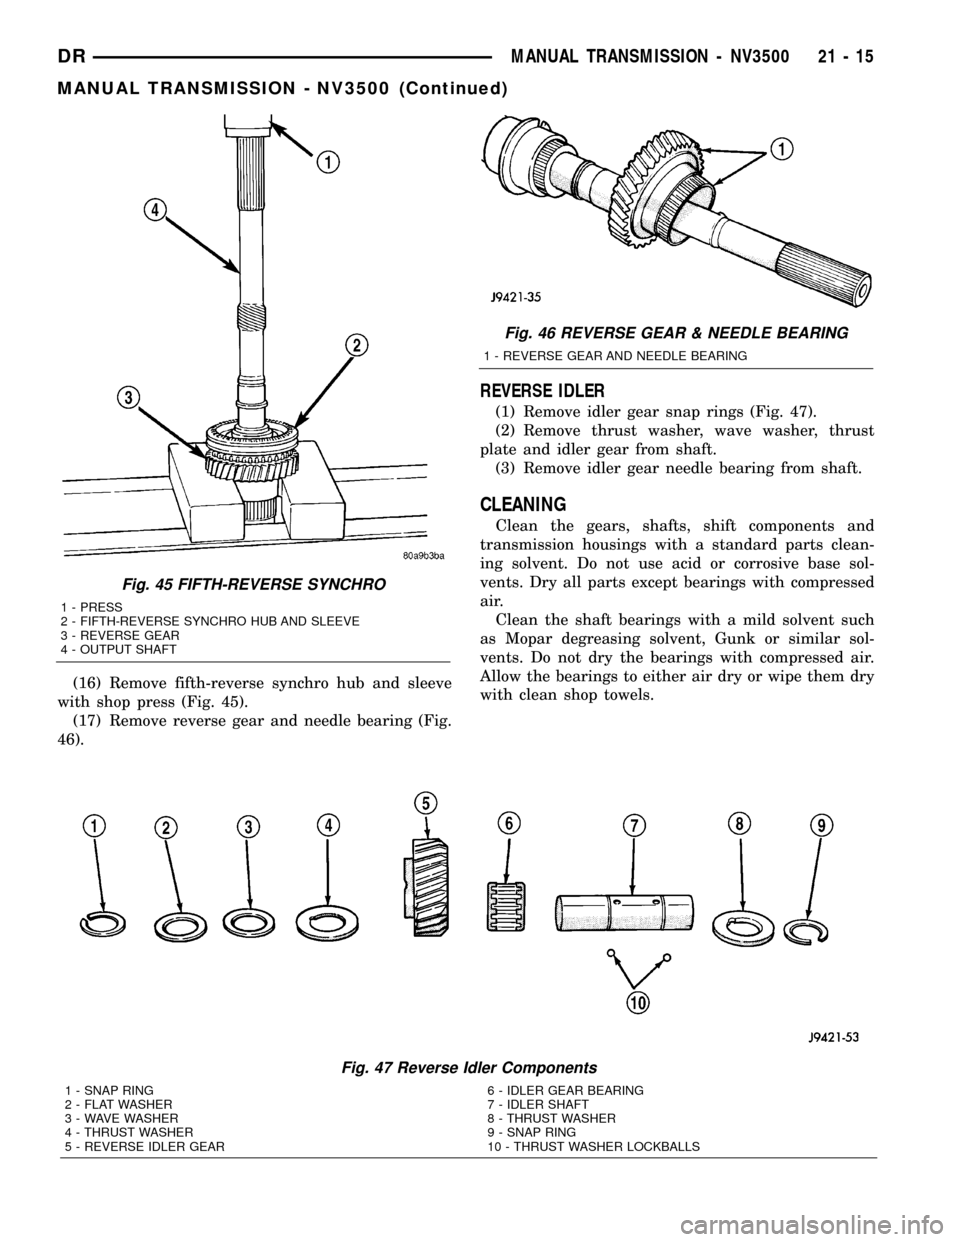
(16) Remove fifth-reverse synchro hub and sleeve
with shop press (Fig. 45).
(17) Remove reverse gear and needle bearing (Fig.
46).
REVERSE IDLER
(1) Remove idler gear snap rings (Fig. 47).
(2) Remove thrust washer, wave washer, thrust
plate and idler gear from shaft.
(3) Remove idler gear needle bearing from shaft.
CLEANING
Clean the gears, shafts, shift components and
transmission housings with a standard parts clean-
ing solvent. Do not use acid or corrosive base sol-
vents. Dry all parts except bearings with compressed
air.
Clean the shaft bearings with a mild solvent such
as Mopar degreasing solvent, Gunk or similar sol-
vents. Do not dry the bearings with compressed air.
Allow the bearings to either air dry or wipe them dry
with clean shop towels.
Fig. 45 FIFTH-REVERSE SYNCHRO
1 - PRESS
2 - FIFTH-REVERSE SYNCHRO HUB AND SLEEVE
3 - REVERSE GEAR
4 - OUTPUT SHAFT
Fig. 46 REVERSE GEAR & NEEDLE BEARING
1 - REVERSE GEAR AND NEEDLE BEARING
Fig. 47 Reverse Idler Components
1 - SNAP RING
2 - FLAT WASHER
3 - WAVE WASHER
4 - THRUST WASHER
5 - REVERSE IDLER GEAR6 - IDLER GEAR BEARING
7 - IDLER SHAFT
8 - THRUST WASHER
9 - SNAP RING
10 - THRUST WASHER LOCKBALLS
DRMANUAL TRANSMISSION - NV3500 21 - 15
MANUAL TRANSMISSION - NV3500 (Continued)