1997 NISSAN QUEST glove box
[x] Cancel search: glove boxPage 42 of 247

cause harmful interference, and (2) this
device must accept any interference re-
ceived, including interference that may
cause undesired operation of the device.The interior lights, the cargo light, the glove
box light, the stepwell lights near the sliding
door and on the front doors, and the footwell
lights near the driver's and front passen-
ger's feet illuminate when the front and
sliding doors are opened. These lights
gradually dim to off within 30 seconds or
turn off immediately when the key is turned
to ON.
Battery saver
If the vehicle doors are not fully closed and
the interior lights remain illuminated, they
eventually turn off automatically to prevent
the battery from becoming discharged.
Lights that illuminate when the front doors
and/or the sliding door are open turn off
after approximately 30 minutes. Lights that
illuminate when the back door is open turn
off after approximately 60 minutes.
If the personal reading lamp is left on when
the key is removed from the ignition, it turns
off automatically in 30 minutes.
ILLUMINATED ENTRY
SYSTEM
2-9
ZX
Page 78 of 247

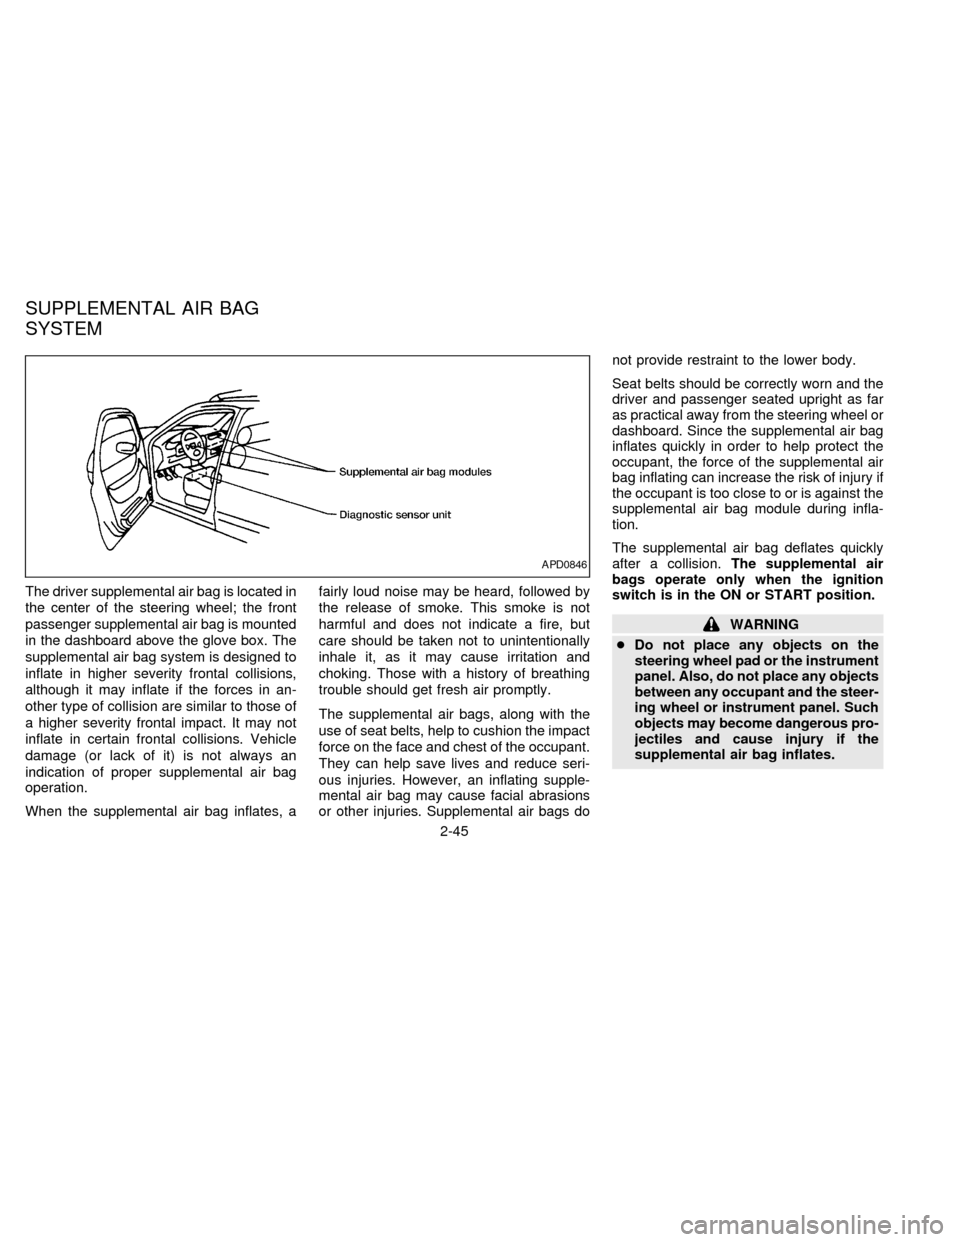
The driver supplemental air bag is located in
the center of the steering wheel; the front
passenger supplemental air bag is mounted
in the dashboard above the glove box. The
supplemental air bag system is designed to
inflate in higher severity frontal collisions,
although it may inflate if the forces in an-
other type of collision are similar to those of
a higher severity frontal impact. It may not
inflate in certain frontal collisions. Vehicle
damage (or lack of it) is not always an
indication of proper supplemental air bag
operation.
When the supplemental air bag inflates, afairly loud noise may be heard, followed by
the release of smoke. This smoke is not
harmful and does not indicate a fire, but
care should be taken not to unintentionally
inhale it, as it may cause irritation and
choking. Those with a history of breathing
trouble should get fresh air promptly.
The supplemental air bags, along with the
use of seat belts, help to cushion the impact
force on the face and chest of the occupant.
They can help save lives and reduce seri-
ous injuries. However, an inflating supple-
mental air bag may cause facial abrasions
or other injuries. Supplemental air bags donot provide restraint to the lower body.
Seat belts should be correctly worn and the
driver and passenger seated upright as far
as practical away from the steering wheel or
dashboard. Since the supplemental air bag
inflates quickly in order to help protect the
occupant, the force of the supplemental air
bag inflating can increase the risk of injury if
the occupant is too close to or is against the
supplemental air bag module during infla-
tion.
The supplemental air bag deflates quickly
after a collision.The supplemental air
bags operate only when the ignition
switch is in the ON or START position.
WARNING
cDo not place any objects on the
steering wheel pad or the instrument
panel. Also, do not place any objects
between any occupant and the steer-
ing wheel or instrument panel. Such
objects may become dangerous pro-
jectiles and cause injury if the
supplemental air bag inflates.
APD0846
SUPPLEMENTAL AIR BAG
SYSTEM
2-45
ZX
Page 203 of 247

more hours, or driven less than 1 mile (1.6
km). COLD tire pressures are shown on the
tire placard affixed to the glove box door.
WARNING
c
The vehicle capacity weight is indi-
cated on the tire placard. Do not load
your vehicle beyond this capacity.
Overloading your vehicle may result in
reduced tire life, unsafe operating con-
ditions due to premature tire failure, or
unfavorable handling characteristics
and could also lead to a serious acci-
dent. Loading beyond the specified ca-
pacity may also result in failure of
other vehicle components.
cBefore taking a long trip, or whenever
you have loaded your vehicle heavily,
use a tire pressure gauge to ensure
that the tire pressure is at the speci-
fied level.
cDo not drive your vehicle over 85
MPH (140 km/h) unless it is equipped
with high speed capability tires.
Driving faster than 85 MPH (140
km/h) may result in tire failure, loss
of control and possible injury.
Types of tires
CAUTION
When changing or replacing tires, be sure
all four tires are of the same type (i.e.,
Summer, All Season or Snow) and con-
struction. Your NISSAN dealer may be
able to help you with information about
tire type, size, speed rating and availabil-
ity. Replacement tires may have a lower
speed rating than the factory equipped
tires, and may not match the potential
maximum vehicle speed. Never exceed
the maximum speed rating of the tire.
All Season tires
NISSAN specifies All Season tires to pro-
vide good performance all year, including
snowy and icy road conditions. All Season
Tires are identified by ``ALL SEASON''
and/or ``M&S'' on the tire sidewall. Snow
tires have better snow traction than All
Season tires and may be more appropriate
in some areas.
Snow tires
If snow tires are needed, it is necessary to
select tires equivalent in size and load ratingto the original equipment tires. If you do not,
it can adversely affect the safety and han-
dling of your vehicle.
Generally, snow tires have lower speed
ratings than factory equipped tires and may
not match the potential maximum vehicle
speed. Never exceed the maximum speed
rating of the tire.
For additional traction on icy roads, studded
tires may be used. However, some states
and provinces prohibit their use. Check lo-
cal, state and provincial laws before install-
ing studded tires. Skid and traction capabili-
ties of studded snow tires on wet or dry
surfaces may be poorer than that of non-
studded snow tires.
Tire chains
Use of tire chains may be prohibited accord-
ing to location. Check the local laws before
installing tire chains. When installing tire
chains, make sure they are of proper size
for the tires on your vehicle and are installed
according to the chain manufacturer's sug-
gestions.Use only SAE Class ``S'' chains.
Other types may damage your vehicle. Use
chain tensioners when recommended by
the tire chain manufacturer to ensure a tight
7-26
ZX
Page 230 of 247

TIRE PLACARD
The cold tire pressure is shown on the tire
placard affixed to the inside of the glove
box.
AIR CONDITIONER
SPECIFICATION LABEL
The air conditioner specification label is
attached as shown.
Have your front license plate installed by
your NISSAN dealer.
ATI0561ATI0562
ATI0564
INSTALLING THE LICENSE
PLATE
9-11
ZX
Page 234 of 247

cTo reduce the possibility of addi-
tional damage if your vehicle is
struck from the rear, where practical
remove the hitch when not in use.
Remove the receiver when not in
use. After the hitch is removed, seal
the bolt holes to prevent exhaust
fumes, water or dust from entering
the passenger compartment.
cRegularly check that all hitch mount-
ing bolts are securely mounted.
Tire pressures
cWhen towing a trailer, inflate the vehicle
tires to the recommended cold tire pres-
sure indicated on the tire placard (located
on the inside of the glove box lid).
cTrailer tire condition, size, load rating and
proper inflation pressure should be in
accordance with the trailer and tire
manufacturer's specifications.
Safety chain
Always use suitable safety chains between
your vehicle and the trailer. Safety chains
should be crossed and should be attached
to the hitch, not to the vehicle bumper oraxle. Be sure to leave enough slack in the
chain to permit turning corners.
Trailer lights
Trailer lights should comply with Federal
and/or local regulations. When wiring the
vehicle for towing, connect the stop and tail
light pickup into the vehicle electrical circuit.
Class I Trailer Tow electrical wiring provides
two circuits (right and left hand) to operate
trailer stop/turn tail lamps. Each individual
stop/turn circuit will operate only one com-
bination stop/turn light bulb (#1157, 3157,
2357, or 3357) on the trailer. Never add
more than one trailer light bulb to one
circuit.
9-15
ZX
Page 235 of 247

Trailer Tow Harness and Module
(if so equipped)
The trailer tow module on your vehicle al-
lows turn/stop lamp control of a trailer being
towed by your NISSAN.The trailer tow module includes:
ctrailer tow module which draws power
from the vehicle stop lamp fuse
cone subharness containing a SAE J1239
specified connectorTo use the tow harness:
1) Remove the connector cap from the
vehicle harness, located behind the rear
bumper. Store the connector cap in ve-
hicle glove box for reinstallation.
2) Connect the tow harness to the vehicle
harness located behind the rear bumper.
3) Connect the tow harness connector
(SAE J1239) to your trailer.
4) Confirm proper vehicle and trailer
stop/turn lamp operation.
5) When towing is completed, disconnect
the tow harness from the trailer and the
vehicle. Store the tow harness in the
glove box. Reinstall the connector cap to
the vehicle harness.
If you need further assistance in wiring
a trailer to your NISSAN, contact an autho-
rized NISSAN dealer.
Always confirm proper vehicle and
trailer stop/turn lamp operation every
time the trailer light circuits are con-
nected for use.
ATI0555
9-16
ZX