1997 NISSAN QUEST open hood
[x] Cancel search: open hoodPage 17 of 247

The theft warning system provides audio
and visual alarm signals if parts of the
vehicle are disturbed.
How to activate the theft warning
system
1. Close all windows.
2. Remove the key from the ignition switch.
3. Close all doors and the hood. Lock all
doors by pressing the
button on the
multi-remote controller. At this time, the
parking lights blink and the horn chirps to
indicate all doors are locked.The system can be activated even if the
windows are open.
4. Confirm that the SECURITY indicator
light, located under the hazard warning
switch, illuminates.
cThe SECURITY light stays on for about
30 seconds and then begins to flash
once every three seconds. The system is
now activated.
The theft warning system is NOT activated if
one of the following occurs:
cA door is unlocked or opened, the hood is
opened, or the ignition key is turned to
the ACC or ON position during the 30
seconds in which the SECURITY light
stays on.
cThe SECURITY light blinks at a steady
1/2 second on - 1/2 second off rate
because a door or the hood is open and
the key is not in the ACC or ON position.
When the ignition key is turned to the
ACC or ON position, the SECURITY light
turns off.
Theft warning system operation
The theft warning system emits the follow-
ing alarm:
cThe headlights and tail lights flash and
the horn sounds intermittently. In addi-
tion, the starter motor does not operate.
cThe alarm automatically turns off after
two to three minutes. However, the alarm
reactivates if the vehicle is tampered with
again. The alarm can be shut off by
unlocking a door with the key or by
pressing the
button on the multi-
remote controller.
The alarm is activated when:
ca door is unlocked or opened without
using the key or the multi-remote control-
ler. This includes unlocking the doors
with the inside door lock switch.
cthe hood is opened.
cthe ignition is placed into the ACC, ON,
or START position without the key in the
ignition.IC0005
THEFT WARNING
(if so equipped)
1-10
ZX
Page 43 of 247

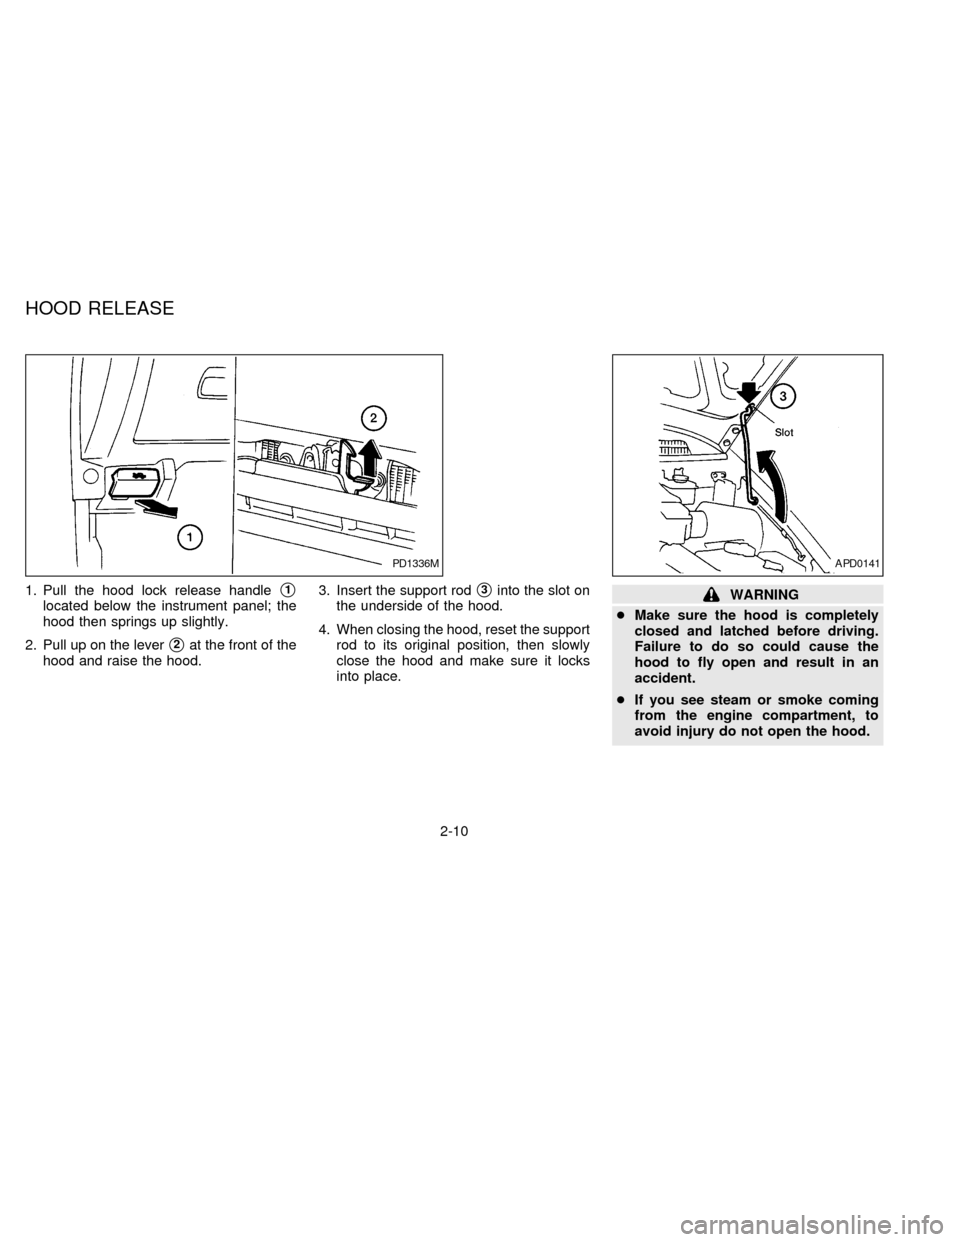
1. Pull the hood lock release handles1
located below the instrument panel; the
hood then springs up slightly.
2. Pull up on the lever
s2at the front of the
hood and raise the hood.3. Insert the support rod
s3into the slot on
the underside of the hood.
4. When closing the hood, reset the support
rod to its original position, then slowly
close the hood and make sure it locks
into place.WARNING
cMake sure the hood is completely
closed and latched before driving.
Failure to do so could cause the
hood to fly open and result in an
accident.
cIf you see steam or smoke coming
from the engine compartment, to
avoid injury do not open the hood.
PD1336MAPD0141
HOOD RELEASE
2-10
ZX
Page 167 of 247

CAUTION
cAutomatic transmission models can-
not be push started. This may cause
transmission damage.
cThree way catalyst equipped models
should not be started by pushing
since the three way catalyst may be
damaged.
cNever try to start the vehicle by tow-
ing it, when the engine starts, the
forward surge could cause the ve-
hicle to collide with the tow vehicle.If your vehicle is overheating (indicated by
an extremely high temperature gauge read-
ing), or if you feel a lack of engine power,
detect abnormal noise, etc., take the follow-
ing steps:
WARNING
cDo not continue to drive if your ve-
hicle overheats. Doing so could
cause a vehicle fire.
cTo avoid the danger of being
scalded, never remove the radiator
cap while the engine is still hot.
When the radiator cap is removed,
pressurized hot water will spurt out,
possibly causing serious injury.
cDo not open the hood if steam is
coming out.
1. Move the vehicle safely off the road,
apply the parking brake and move the
gearshift lever to the P (Park) position.
Do not stop the engine.
2. Turn off the air conditioner switch. Open
all the windows, move the temperature
control dial to warm and fan control knob
to 4.3. If engine overheating is caused by climb-
ing a long hill on a hot day, run the engine
at a fast idle (approximately 1,500 RPM)
until the temperature gauge indication
returns to normal.
4. Get out of the vehicle. Look and listen for
steam or coolant escaping from the ra-
diator before opening the hood. Wait until
no steam or coolant can be seen before
proceeding.
5. Open the hood.
WARNING
If steam or water is coming from the
engine, stand clear to prevent getting
burned.
6. Visually check drive belts for damage or
looseness. Also check to make sure the
cooling fan is running. The radiator hoses
and radiator should not leak water. If
coolant is leaking, the water pump belt is
missing or loose, or the cooling fan does
not run, stop the engine.
PUSH STARTING IF YOUR VEHICLE
OVERHEATS
5-10
ZX
Page 173 of 247

In order to maintain the appearance of your
vehicle, it is important to take proper care of
it.
In the following cases, please wash your
vehicle as soon as possible to protect the
paint surface:
cafter a rainfall to prevent possible dam-
age from acid rain.
cafter driving on coastal roads.
cwhen contaminants such as soot, bird
droppings, tree sap, metal particles or
bugs get on the paint surface.c
when dust or mud builds up on the surface.
Whenever possible, store or park your ve-
hicle inside a garage or in a covered area.
When it is necessary to park outside, park in
a shady area or protect the vehicle with a
body cover.
Be careful not to scratch the paint sur-
face
when putting on or removing a body
cover.
Washing
Wash dirt off with a wet sponge and plenty
of water. Clean the vehicle thoroughly using
a mild soap, a special vehicle soap or
general purpose dish-washing liquid mixed
with clean, lukewarm (never hot) water.
CAUTION
cDo not use strong household soap,
strong chemical detergents, gaso-
line or solvents.
cDo not wash the vehicle in direct
sunlight or while the vehicle body is
hot, as the surface may become
waterspotted.cAvoid using tight-napped or rough
cloths such as washing mitts. Care
must be taken when removing
caked-on dirt or other foreign sub-
stances so the paint surface is not
scratched or damaged.
Rinse the vehicle thoroughly with plenty of
clean water.
Inside flanges, seams and folds on the
doors, hatches and hood are particularly
vulnerable to the effects of road salt. There-
fore, these areas must be regularly cleaned.
Take care that the drain holes in the lower
edge of the door are open. Spray water
under the body and in the wheel wells to
loosen the dirt and wash away road salt.
A damp chamois can be used to dry the
vehicle to avoid water spots.
Waxing
Regular waxing protects the paint surface
and helps retain new vehicle appearance.
After waxing, polishing is recommended to
remove built-up residue and to avoid a
``weathered'' appearance.
Your NISSAN dealer can assist you in
AI1002M
CLEANING EXTERIOR AND
INTERIOR
6-2
ZX
Page 192 of 247

CAUTION
cAfter wiper blade replacement, re-
turn the wiper arm to its original
position.
cOtherwise it may be damaged when
the engine hood is opened.
cMake sure the wiper blade contacts
the glass, otherwise the arm may be
damaged from wind pressure.
Rear wiper blade replacement
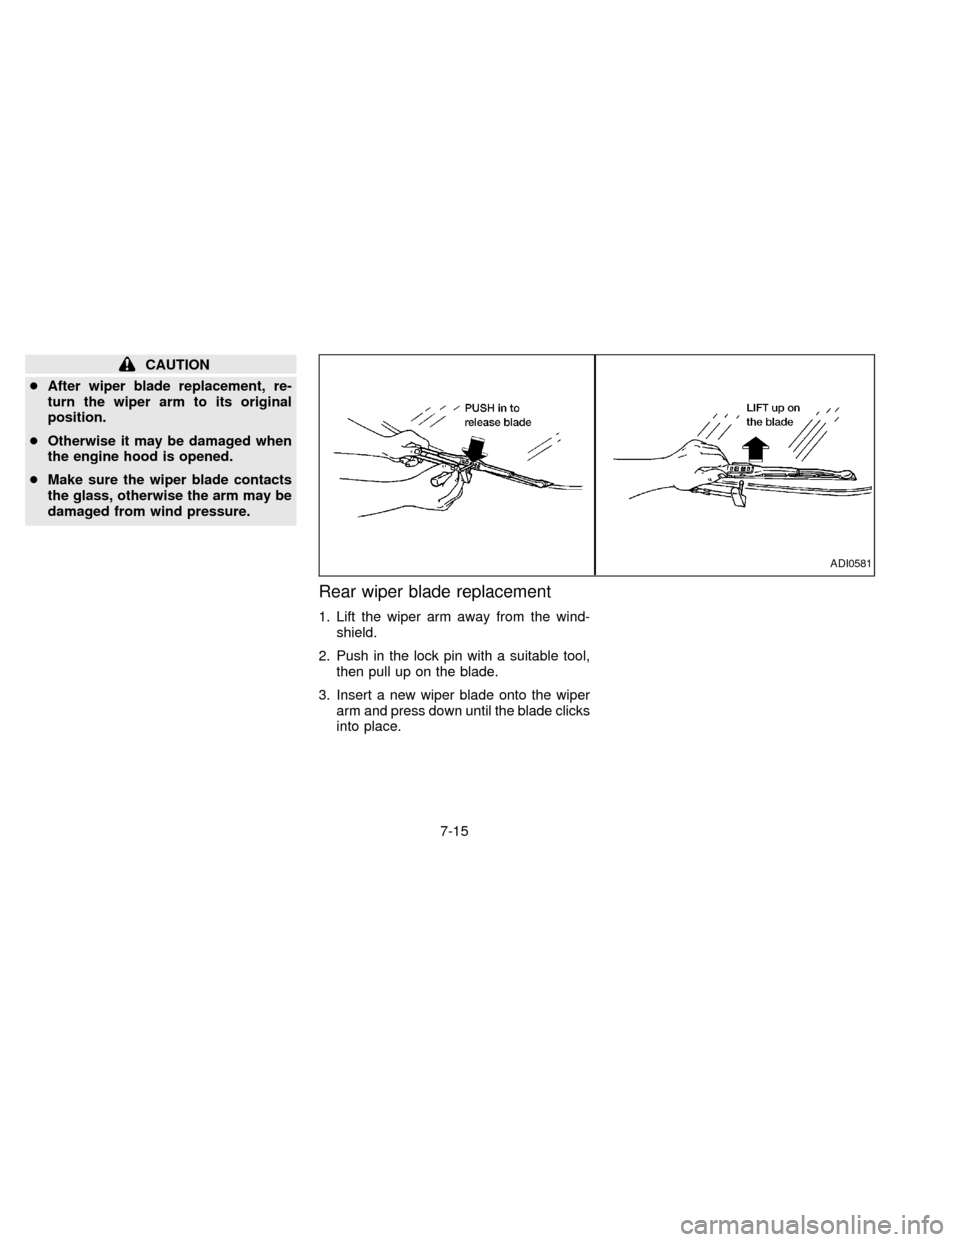
1. Lift the wiper arm away from the wind-
shield.
2. Push in the lock pin with a suitable tool,
then pull up on the blade.
3. Insert a new wiper blade onto the wiper
arm and press down until the blade clicks
into place.
ADI0581
7-15
ZX
Page 195 of 247

the right-front corner of the engine compart-
ment.
The right headlight (passenger side) fuse is
located in the left-hand fuse box, near the
radiator cap.
1. Turn the headlight switch to the OFF
position.
2. Open the engine hood.
3. Remove the appropriate fuse box cover.
4. Remove the fuse with the fuse puller
attached to the passenger compartment
fuse box cover.
5. If the fuse is open, replace it with a new
fuse.
6. If a new fuse opens again, have the
electrical system checked and repaired
by your NISSAN dealer.If the electrical equipment does not operate
and fuses are in good condition, check the
fusible links. If any of these fusible links are
melted, replace only with genuine NISSAN
parts.
If the new fusible link melts again, have the
system checked and repaired by your
NISSAN dealer.
ADI0584
FUSIBLE LINKS
7-18
ZX
Page 210 of 247

make sure no nuts are missing, and check
for any loose nuts. Tighten if necessary.
Tire rotation*Ð Tires should be rotated
every 7,500 miles (12,000 km).
Wheel alignment and balanceÐIfthe
vehicle should pull to either side while driv-
ing on a straight and level road, or if you
detect uneven or abnormal tire wear, there
may be a need for wheel alignment.
If the steering wheel or seat vibrates at
normal highway speeds, wheel balancing
may be needed.
Windshield wiper blades*Ð Check for
cracks or wear if they do not wipe properly.
Doors and engine hoodÐ Check that all
doors and the engine hood operate prop-
erly. Also ensure that all latches lock se-
curely. Lubricate hinges, latches, rollers and
links if necessary. Make sure the secondary
latch keeps the hood from opening when
the primary latch is released.
When driving in areas using road salt or
other corrosive materials, check lubrication
frequently.INSIDE THE VEHICLE
The maintenance items listed here should
be checked on a regular basis, such as
when performing periodic maintenance,
cleaning the vehicle, etc.
Lights*Ð Make sure the headlights, stop
lights, tail lights, turn signal lights, and other
lights are all operating properly and installed
securely. Also check headlight aim.
Warning lights and buzzers/chimesÐ
Make sure all warning lights and
buzzers/chimes are operating properly.
Windshield wiper and washer*Ð Check
that the wipers and washer operate properly
and that the wipers do not streak.
Windshield defrosterÐ Check that the air
comes out of the defroster outlets properly
and in sufficient quantity when operating the
heater or air conditioner.
Steering wheelÐ Check for changes in
the steering conditions, such as excessive
freeplay, hard steering or strange noises.
SeatsÐ Check seat position controls such
as seat adjusters, seatback recliner, etc. to
ensure they operate smoothly and all
latches lock securely in every position.Check that the head restraints move up and
down smoothly and the locks hold securely
in all latched positions. Check that the seat
leg latches lock securely in every anchor
position for the folding down rear seat and
detachable rear seat (if so equipped).
Seat beltsÐ Check that all parts of the seat
belt system (e.g. buckles, anchors, adjust-
ers and retractors) operate properly and
smoothly, and are installed securely. Check
the belt webbing for cuts, fraying, wear or
damage.
Accelerator pedalÐ Check the pedal for
smooth operation and make sure the pedal
does not catch or require uneven effort.
Keep the floor mats away from the pedal.
BrakesÐ Check that the brakes do not pull
the vehicle to one side when applied.
Brake pedal*Ð Check the pedal for
smooth operation and make sure it has the
proper distance under it when depressed
fully. Check the brake booster function. Be
certain to keep floor mats away from the
pedal.
Parking brake*Ð Check that the pedal is
adjusted to specification and confirm that
your vehicle is held securely on a fairly
8-3
ZX
Page 243 of 247

G
Gauge
Engine coolant temperature gauge ........ 1-4
Fuel gauge.............................................. 1-5
Odometer ................................................ 1-4
Speedometer .......................................... 1-4
Tachometer............................................. 1-4
Trip odometer ......................................... 1-4
General maintenance .................................. 8-2
H
Hazard warning flasher switch .................. 1-15
Head restraints .......................................... 2-30
Headlight control switch............................. 1-13
Headlights .................................................. 7-19
Heater
Heater and air conditioner (automatic)
(if so equipped)..................................... 3-10
Heater and air conditioner (manual)....... 3-3
Rear seat heater and air
conditioner ............................................ 3-13
Hood release ............................................. 2-10
I
Ignition switch .............................................. 4-4
Important vehicle information label............ 9-10
Increasing fuel economy............................ 4-12
Indicator lights and chimes (See warning/indicator lights and chimes) ......................... 1-6
Inertial fuel shut off switch ......................... 5-11
Inside mirror ............................................... 2-80
Instrument brightness control .................... 1-15
Integrated child safety seats...................... 2-71
Interior lights .............................................. 1-24
J
Jump starting ...................................... 5-8, 7-12
K
Key ............................................................... 2-2
Keyless entry system (See multi-remote
control system) ............................................ 2-7
L
Labels
Air conditioner specification label ......... 9-11
Emission control information label........ 9-10
Engine serial number ............................. 9-9
F.M.V.S.S. certification label ................ 9-10
Vehicle identification number ................. 9-9
Vehicle identification number (VIN)
plate ........................................................ 9-9
Warning labels (for SRS) ..................... 2-47
License plate
Installing the license plate .................... 9-11Light
Air bag warning light............................. 2-47
Brake light (See stop light) ................... 7-21
Bulb check/instrument panel .................. 1-6
Bulb replacement.................................. 7-21
Cornering light ...................................... 1-15
Headlight control switch ....................... 1-13
Headlights ............................................. 7-19
Interior lights ......................................... 1-24
Light bulbs ............................................ 7-19
Luggage compartment lights ................ 1-24
Spotlights .............................................. 1-25
Warning/indicator lights and chimes ...... 1-6
Lock
Child safety sliding door lock ................. 2-4
Door locks............................................... 2-2
Fuel filler lid lock opener lever ............. 2-15
Power door lock...................................... 2-5
Rear door lock ...................................... 2-11
Luggage compartment lights ..................... 1-24
Luggage rack ............................................. 2-14
Luggage (See vehicle loading
information ................................................. 9-12
M
Maintenance
General maintenance ............................. 8-2
Inside the vehicle.................................... 8-3
Maintenance precautions ....................... 7-2
Outside the vehicle ................................. 8-2
Periodic maintenance schedules ............ 8-5
10-3
ZX