1997 NISSAN QUEST warning lights
[x] Cancel search: warning lightsPage 8 of 247

1Instruments and controls
Meters and gauges ................................................1-3
Speedometer and odometer ..................................1-4
Tachometer ............................................................1-4
Engine coolant temperature gauge........................1-4
Fuel gauge .............................................................1-5
Warning/indicator lights and chimes ......................1-6
Theft warning (if so equipped) .............................1-10
Windshield wiper and washer switch ...................1-11
Rear window wiper and washer switches ............1-12
Rear window defogger switch ..............................1-12
Headlight control switch .......................................1-13
Daytime running light system (for Canada) .........1-13
Autolamp switch (if so equipped) .........................1-13
Turn signal switch .............................................1-14
Cornering light ......................................................1-15
Instrument brightness control ...............................1-15
Hazard warning flasher switch .............................1-15Cigarette lighter (accessory) and ashtray ............1-16
Rear power point ..................................................1-17
Coin tray ...............................................................1-17
Compact disc and audio cassette storage
compartment.........................................................1-18
Cup holder ............................................................1-18
Power window ......................................................1-19
Automatic power window switch ..........................1-20
Sunroof (if so equipped).......................................1-21
Manual rear windows ...........................................1-22
Power rear windows (if so equipped) ..................1-22
Clock.....................................................................1-23
Interior lights .........................................................1-24
Luggage compartment lights ................................1-24
Personal reading light ..........................................1-24
Spotlights ..............................................................1-25
ZX
Page 13 of 247
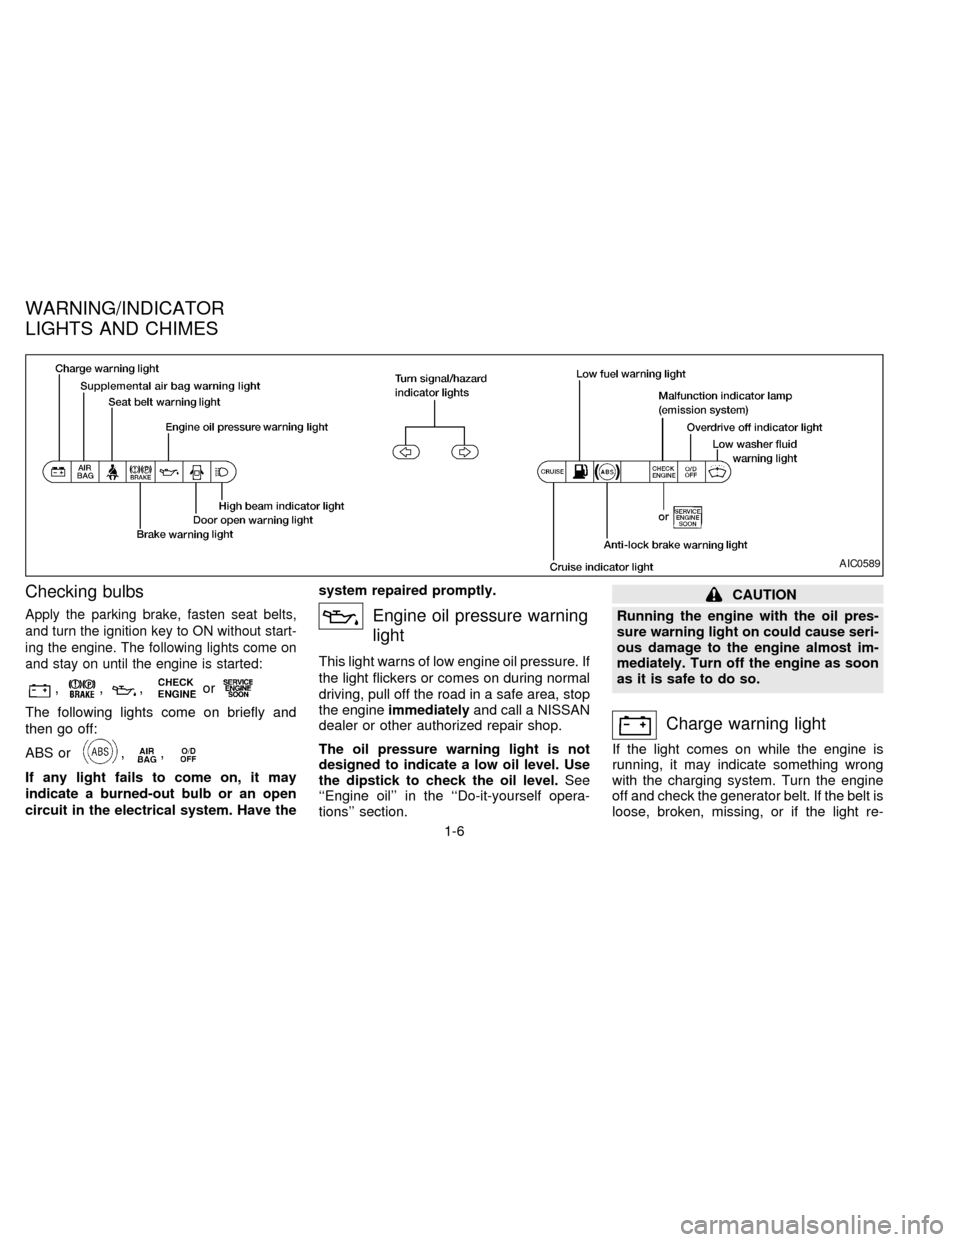
Checking bulbs
Apply the parking brake, fasten seat belts,
and turn the ignition key to ON without start-
ing the engine. The following lights come on
and stay on until the engine is started:
,,,or
The following lights come on briefly and
then go off:
ABS or
,,
If any light fails to come on, it may
indicate a burned-out bulb or an open
circuit in the electrical system. Have thesystem repaired promptly.
Engine oil pressure warning
light
This light warns of low engine oil pressure. If
the light flickers or comes on during normal
driving, pull off the road in a safe area, stop
the engineimmediatelyand call a NISSAN
dealer or other authorized repair shop.
The oil pressure warning light is not
designed to indicate a low oil level. Use
the dipstick to check the oil level.See
``Engine oil'' in the ``Do-it-yourself opera-
tions'' section.
CAUTION
Running the engine with the oil pres-
sure warning light on could cause seri-
ous damage to the engine almost im-
mediately. Turn off the engine as soon
as it is safe to do so.
Charge warning light
If the light comes on while the engine is
running, it may indicate something wrong
with the charging system. Turn the engine
off and check the generator belt. If the belt is
loose, broken, missing, or if the light re-
AIC0589
WARNING/INDICATOR
LIGHTS AND CHIMES
1-6
ZX
Page 15 of 247
the ``Do-it-yourself operations'' section.
2. If the brake fluid level is correct, have the
warning system checked by your NIS-
SAN dealer.
WARNING
cYour brake system may not be work-
ing properly if the warning light is
on. Driving could be dangerous. If
you judge it to be safe, drive care-
fully to the nearest service station
for repairs. Otherwise, have your ve-
hicle towed.
cPressing the brake pedal with the
engine stopped and/or low brake
fluid level may increase your stop-
ping distance and braking will re-
quire greater pedal effort as well as
pedal travel.
cIf the brake fluid level is below the
minimum mark on the brake fluid
reservoir, do not drive until the brake
system has been checked at a NIS-
SAN dealer.
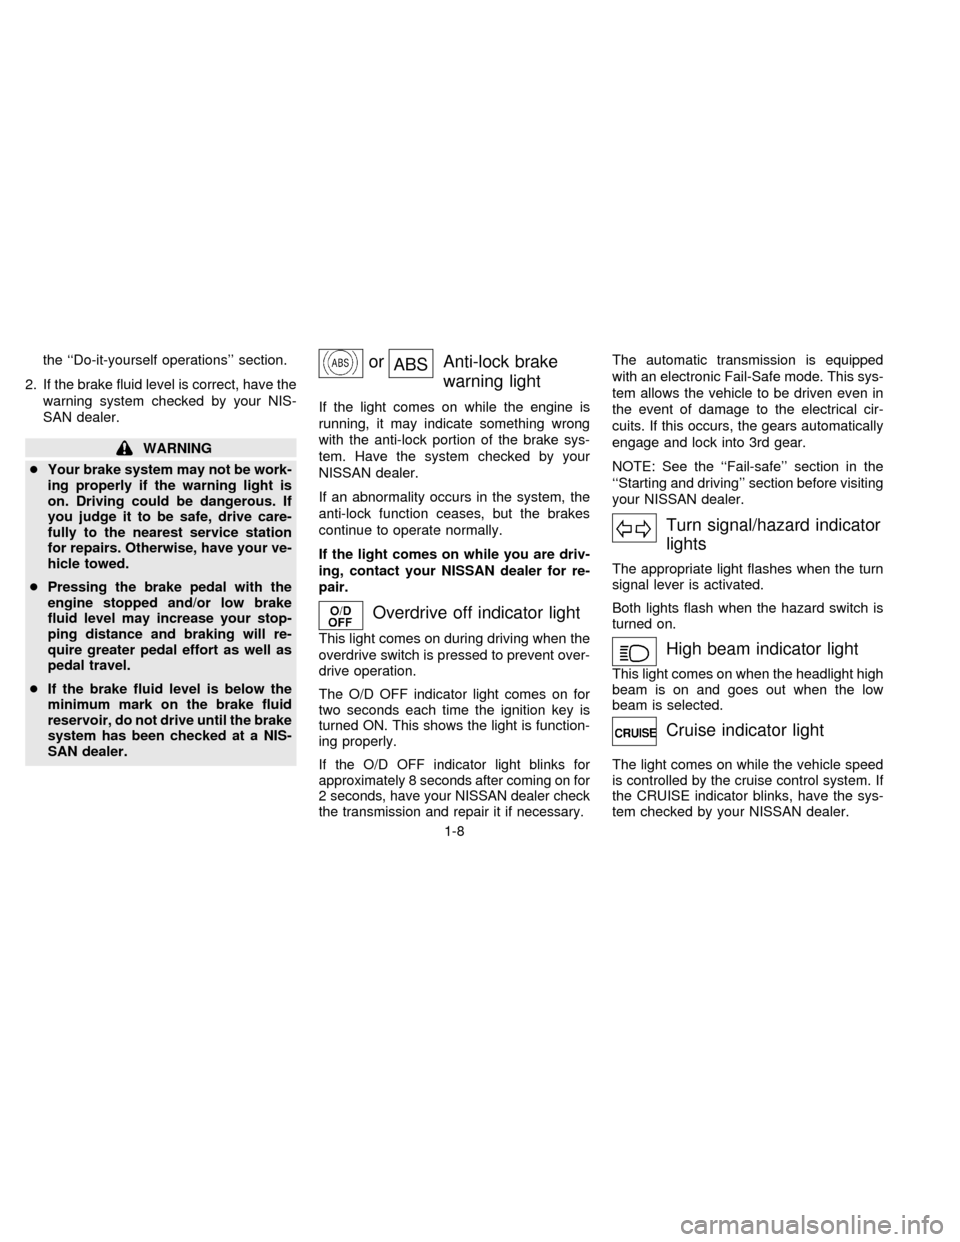
orABSAnti-lock brake
warning light
If the light comes on while the engine is
running, it may indicate something wrong
with the anti-lock portion of the brake sys-
tem. Have the system checked by your
NISSAN dealer.
If an abnormality occurs in the system, the
anti-lock function ceases, but the brakes
continue to operate normally.
If the light comes on while you are driv-
ing, contact your NISSAN dealer for re-
pair.
Overdrive off indicator light
This light comes on during driving when the
overdrive switch is pressed to prevent over-
drive operation.
The O/D OFF indicator light comes on for
two seconds each time the ignition key is
turned ON. This shows the light is function-
ing properly.
If the O/D OFF indicator light blinks for
approximately 8 seconds after coming on for
2 seconds, have your NISSAN dealer check
the transmission and repair it if necessary.
The automatic transmission is equipped
with an electronic Fail-Safe mode. This sys-
tem allows the vehicle to be driven even in
the event of damage to the electrical cir-
cuits. If this occurs, the gears automatically
engage and lock into 3rd gear.
NOTE: See the ``Fail-safe'' section in the
``Starting and driving'' section before visiting
your NISSAN dealer.
Turn signal/hazard indicator
lights
The appropriate light flashes when the turn
signal lever is activated.
Both lights flash when the hazard switch is
turned on.
High beam indicator light
This light comes on when the headlight high
beam is on and goes out when the low
beam is selected.
Cruise indicator light
The light comes on while the vehicle speed
is controlled by the cruise control system. If
the CRUISE indicator blinks, have the sys-
tem checked by your NISSAN dealer.
1-8
ZX
Page 17 of 247

The theft warning system provides audio
and visual alarm signals if parts of the
vehicle are disturbed.
How to activate the theft warning
system
1. Close all windows.
2. Remove the key from the ignition switch.
3. Close all doors and the hood. Lock all
doors by pressing the
button on the
multi-remote controller. At this time, the
parking lights blink and the horn chirps to
indicate all doors are locked.The system can be activated even if the
windows are open.
4. Confirm that the SECURITY indicator
light, located under the hazard warning
switch, illuminates.
cThe SECURITY light stays on for about
30 seconds and then begins to flash
once every three seconds. The system is
now activated.
The theft warning system is NOT activated if
one of the following occurs:
cA door is unlocked or opened, the hood is
opened, or the ignition key is turned to
the ACC or ON position during the 30
seconds in which the SECURITY light
stays on.
cThe SECURITY light blinks at a steady
1/2 second on - 1/2 second off rate
because a door or the hood is open and
the key is not in the ACC or ON position.
When the ignition key is turned to the
ACC or ON position, the SECURITY light
turns off.
Theft warning system operation
The theft warning system emits the follow-
ing alarm:
cThe headlights and tail lights flash and
the horn sounds intermittently. In addi-
tion, the starter motor does not operate.
cThe alarm automatically turns off after
two to three minutes. However, the alarm
reactivates if the vehicle is tampered with
again. The alarm can be shut off by
unlocking a door with the key or by
pressing the
button on the multi-
remote controller.
The alarm is activated when:
ca door is unlocked or opened without
using the key or the multi-remote control-
ler. This includes unlocking the doors
with the inside door lock switch.
cthe hood is opened.
cthe ignition is placed into the ACC, ON,
or START position without the key in the
ignition.IC0005
THEFT WARNING
(if so equipped)
1-10
ZX
Page 20 of 247
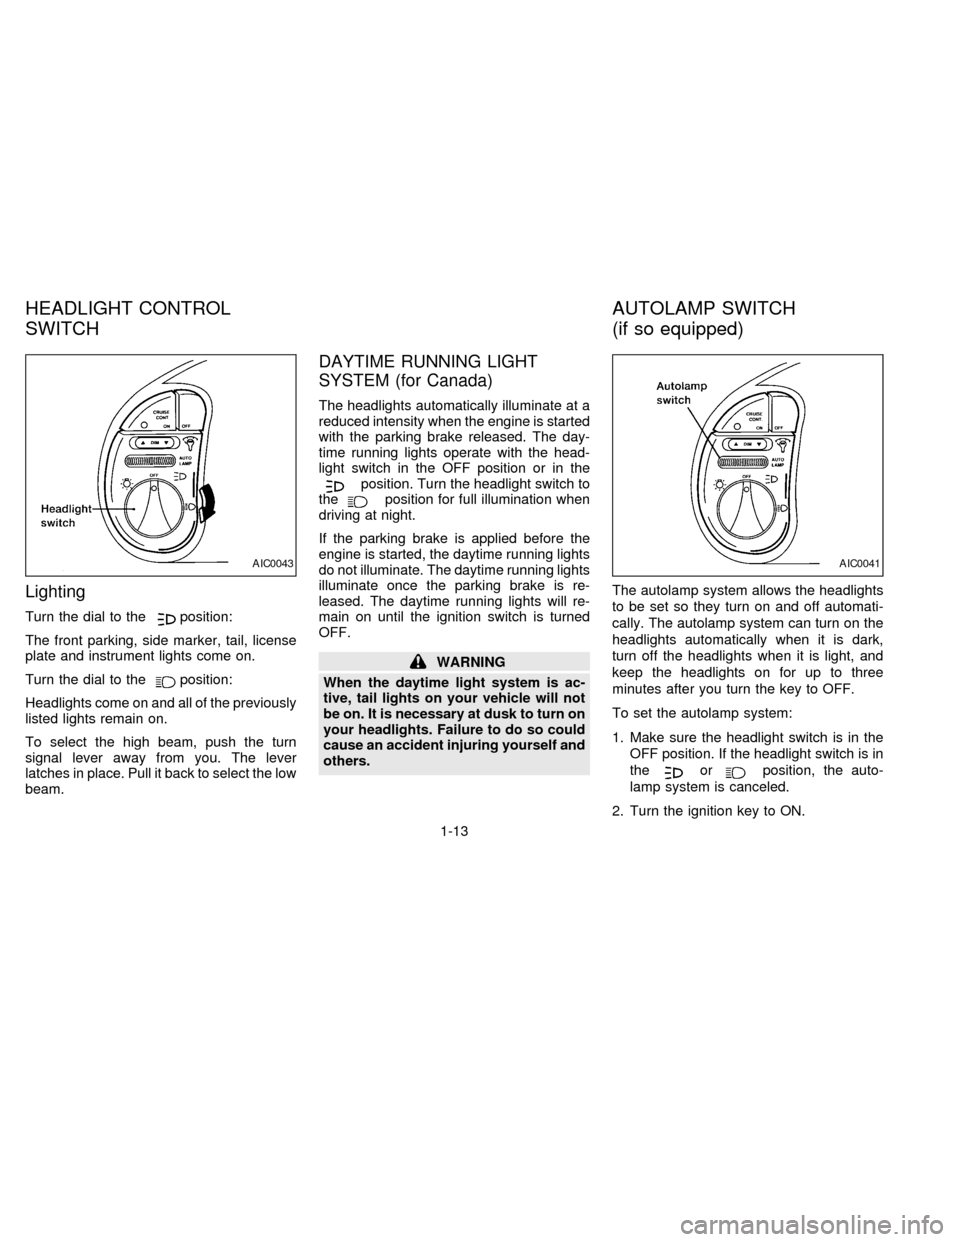
Lighting
Turn the dial to theposition:
The front parking, side marker, tail, license
plate and instrument lights come on.
Turn the dial to the
position:
Headlights come on and all of the previously
listed lights remain on.
To select the high beam, push the turn
signal lever away from you. The lever
latches in place. Pull it back to select the low
beam.
DAYTIME RUNNING LIGHT
SYSTEM (for Canada)
The headlights automatically illuminate at a
reduced intensity when the engine is started
with the parking brake released. The day-
time running lights operate with the head-
light switch in the OFF position or in the
position. Turn the headlight switch to
theposition for full illumination when
driving at night.
If the parking brake is applied before the
engine is started, the daytime running lights
do not illuminate. The daytime running lights
illuminate once the parking brake is re-
leased. The daytime running lights will re-
main on until the ignition switch is turned
OFF.
WARNING
When the daytime light system is ac-
tive, tail lights on your vehicle will not
be on. It is necessary at dusk to turn on
your headlights. Failure to do so could
cause an accident injuring yourself and
others.The autolamp system allows the headlights
to be set so they turn on and off automati-
cally. The autolamp system can turn on the
headlights automatically when it is dark,
turn off the headlights when it is light, and
keep the headlights on for up to three
minutes after you turn the key to OFF.
To set the autolamp system:
1. Make sure the headlight switch is in the
OFF position. If the headlight switch is in
the
orposition, the auto-
lamp system is canceled.
2. Turn the ignition key to ON.
AIC0043AIC0041
HEADLIGHT CONTROL
SWITCHAUTOLAMP SWITCH
(if so equipped)
1-13
ZX
Page 22 of 247
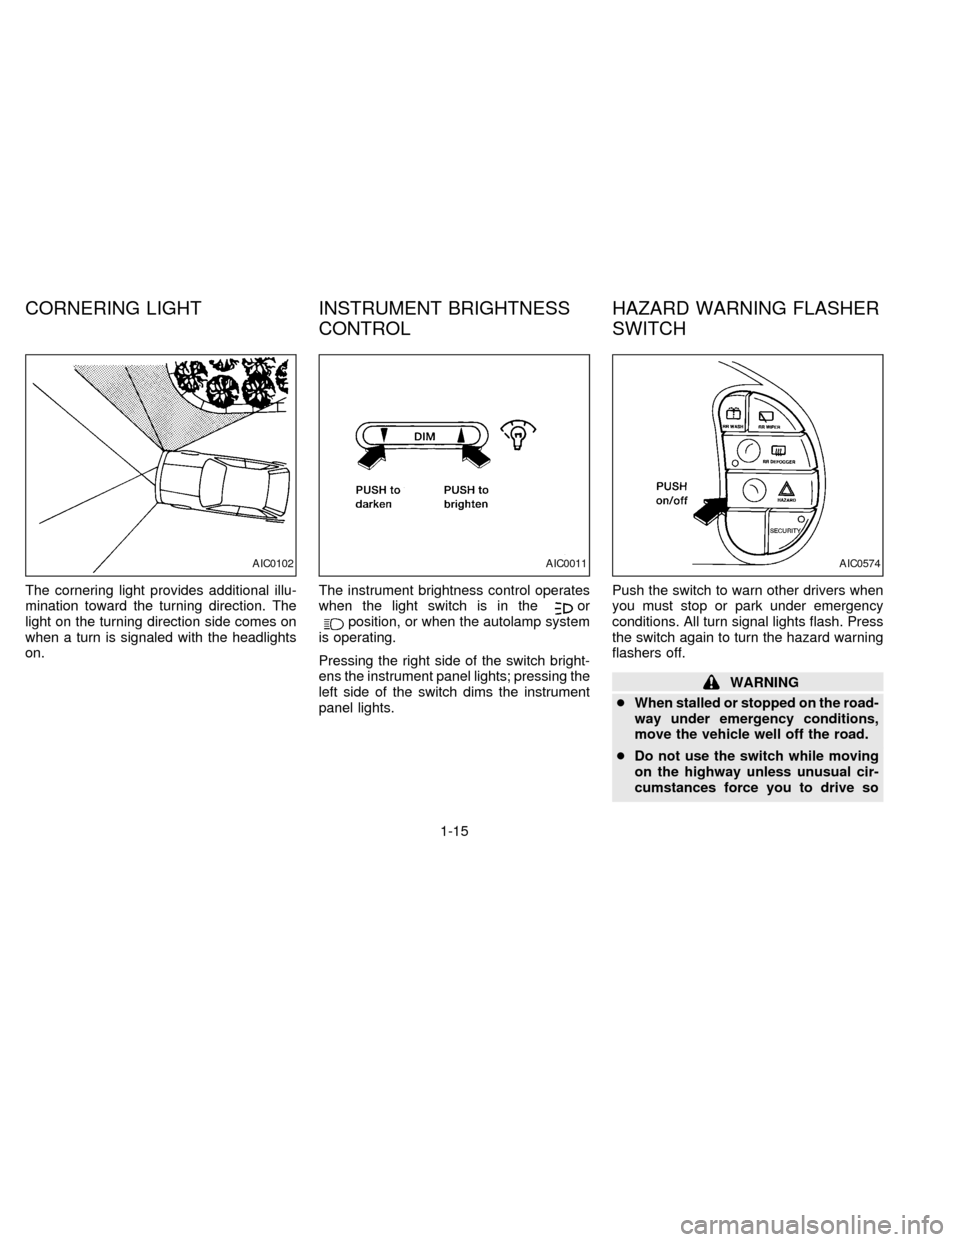
The cornering light provides additional illu-
mination toward the turning direction. The
light on the turning direction side comes on
when a turn is signaled with the headlights
on.The instrument brightness control operates
when the light switch is in theorposition, or when the autolamp system
is operating.
Pressing the right side of the switch bright-
ens the instrument panel lights; pressing the
left side of the switch dims the instrument
panel lights.Push the switch to warn other drivers when
you must stop or park under emergency
conditions. All turn signal lights flash. Press
the switch again to turn the hazard warning
flashers off.
WARNING
cWhen stalled or stopped on the road-
way under emergency conditions,
move the vehicle well off the road.
cDo not use the switch while moving
on the highway unless unusual cir-
cumstances force you to drive so
AIC0102AIC0011AIC0574
CORNERING LIGHT INSTRUMENT BRIGHTNESS
CONTROLHAZARD WARNING FLASHER
SWITCH
1-15
ZX
Page 23 of 247
slowly that your vehicle might be-
come a hazard to other traffic.
cTurn signals do not work when the
hazard warning flasher lights are on.
The flashers can be actuated with the igni-
tion switch either OFF or ON.
Some state laws may prohibit the use of
the hazard warning flasher switch while
driving.
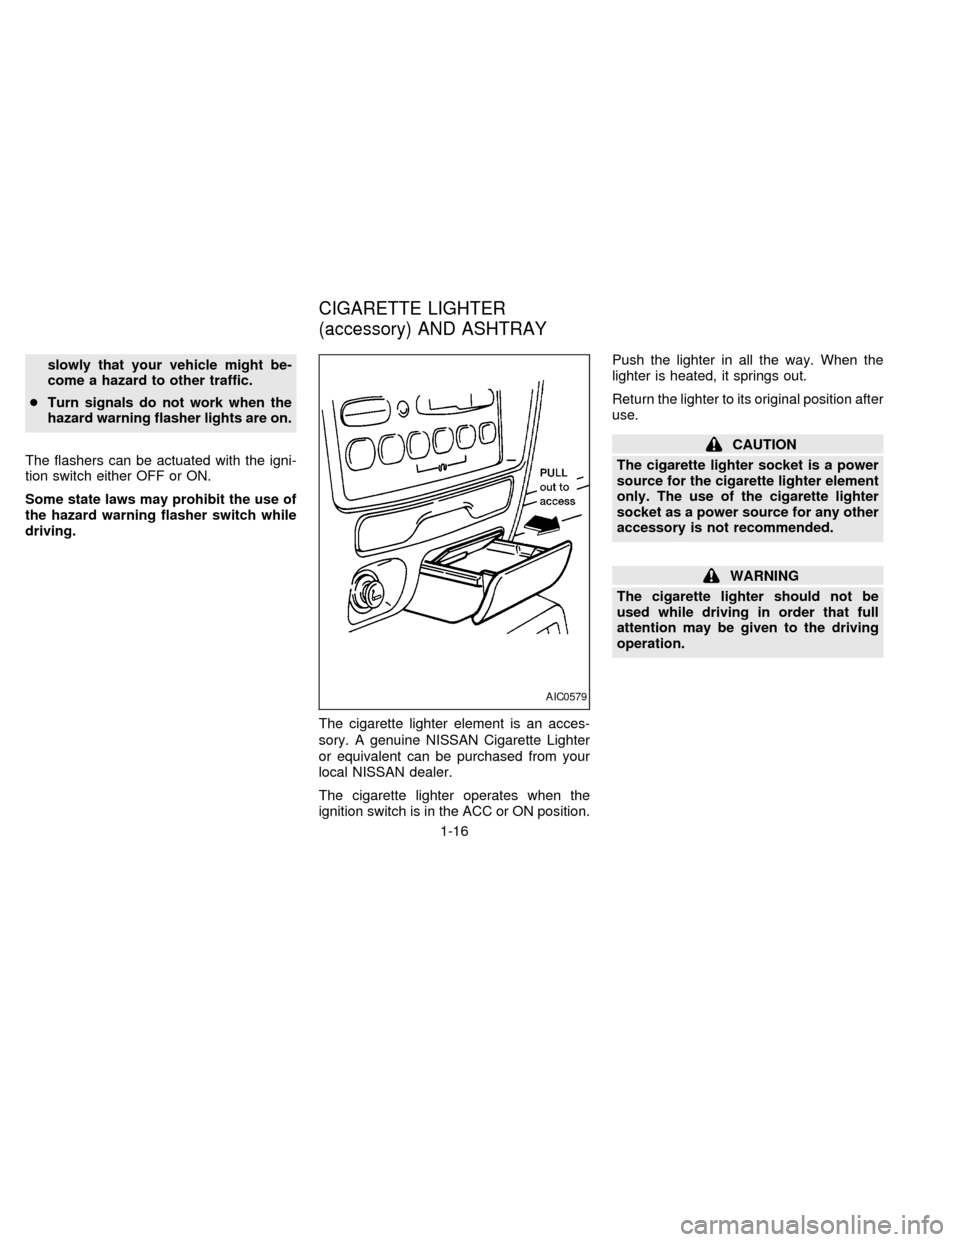
The cigarette lighter element is an acces-
sory. A genuine NISSAN Cigarette Lighter
or equivalent can be purchased from your
local NISSAN dealer.
The cigarette lighter operates when the
ignition switch is in the ACC or ON position.Push the lighter in all the way. When the
lighter is heated, it springs out.
Return the lighter to its original position after
use.
CAUTION
The cigarette lighter socket is a power
source for the cigarette lighter element
only. The use of the cigarette lighter
socket as a power source for any other
accessory is not recommended.
WARNING
The cigarette lighter should not be
used while driving in order that full
attention may be given to the driving
operation.
AIC0579
CIGARETTE LIGHTER
(accessory) AND ASHTRAY
1-16
ZX
Page 40 of 247
It is possible to lock/unlock all doors, turn
the interior lights on or off, and activate the
panic alarm by using the remote controller
from outside the vehicle.
Be sure to remove the key from the
vehicle before locking the doors and
leaving it.
The remote controller can operate at a
distance of approximately 49 ft (15 m) from
the vehicle. (The effective distance depends
on the conditions around the vehicle.)
As many as four remote controllers can be
used with one vehicle. For more information
concerning the purchase and use of addi-
tional remote controllers, contact your NIS-
SAN dealer.
CAUTION
Listed below are conditions or occur-
rences which will damage the remote
controller:
cDo not allow the remote controller to
become wet.
cDo not drop the remote controller.
cDo not strike the remote controller
sharply against another object.cDo not place the remote controller
for an extended period in an area
where temperatures exceed 140ÉF
(60ÉC).
Locking doors
1. Close all of the doors.
2. Push the
button on the multi-remote
controller.
3. All of the doors lock.
4. The parking lights flash twice and the
horn chirps to verify all the doors are
locked.
Unlocking doors
1. Push thebutton on the multi-remote
controller. Only the driver side door un-
locks.
2. The interior lights come on and stay on
for 30 seconds.
3. Push the
button on the multi-remote
controller again within five seconds. The
passenger doors and the rear door un-
lock.The interior lights can be turned off without
waiting 30 seconds by either turning the
ignition to ON or locking the doors with the
multi-remote controller.
Using the panic alarm
If you are near your vehicle and feel threat-
ened, you may activate the panic alarm to
call attention as follows:
1. Push the
button on the remote con-
troller for at least one full second.
2. The theft warning alarm (horn) sounds
and the headlights and tail lights flash for
30 seconds.
3. The panic alarm stops when:
cit has run for 30 seconds, or
cthe
or thebutton is pressed, or
c
thebutton is released and re-pushed.
MULTI-REMOTE CONTROL
SYSTEM (if so equipped)
2-7
ZX