1997 NISSAN QUEST fog light
[x] Cancel search: fog lightPage 8 of 247

1Instruments and controls
Meters and gauges ................................................1-3
Speedometer and odometer ..................................1-4
Tachometer ............................................................1-4
Engine coolant temperature gauge........................1-4
Fuel gauge .............................................................1-5
Warning/indicator lights and chimes ......................1-6
Theft warning (if so equipped) .............................1-10
Windshield wiper and washer switch ...................1-11
Rear window wiper and washer switches ............1-12
Rear window defogger switch ..............................1-12
Headlight control switch .......................................1-13
Daytime running light system (for Canada) .........1-13
Autolamp switch (if so equipped) .........................1-13
Turn signal switch .............................................1-14
Cornering light ......................................................1-15
Instrument brightness control ...............................1-15
Hazard warning flasher switch .............................1-15Cigarette lighter (accessory) and ashtray ............1-16
Rear power point ..................................................1-17
Coin tray ...............................................................1-17
Compact disc and audio cassette storage
compartment.........................................................1-18
Cup holder ............................................................1-18
Power window ......................................................1-19
Automatic power window switch ..........................1-20
Sunroof (if so equipped).......................................1-21
Manual rear windows ...........................................1-22
Power rear windows (if so equipped) ..................1-22
Clock.....................................................................1-23
Interior lights .........................................................1-24
Luggage compartment lights ................................1-24
Personal reading light ..........................................1-24
Spotlights ..............................................................1-25
ZX
Page 19 of 247

and obscure your vision, which may
lead to an accident. Warm the wind-
shield with the defroster before you
wash the windshield.
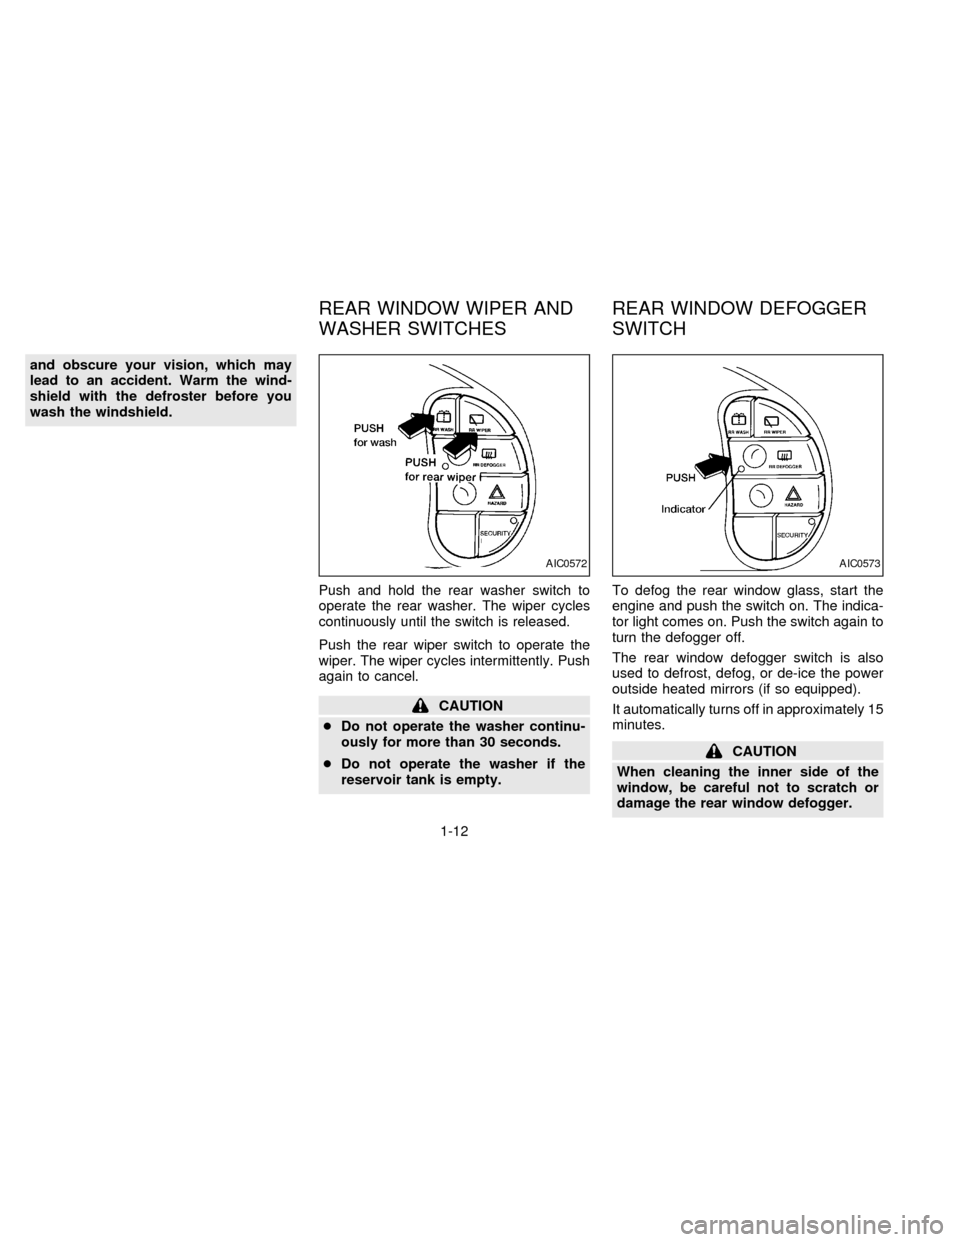
Push and hold the rear washer switch to
operate the rear washer. The wiper cycles
continuously until the switch is released.
Push the rear wiper switch to operate the
wiper. The wiper cycles intermittently. Push
again to cancel.
CAUTION
cDo not operate the washer continu-
ously for more than 30 seconds.
cDo not operate the washer if the
reservoir tank is empty.To defog the rear window glass, start the
engine and push the switch on. The indica-
tor light comes on. Push the switch again to
turn the defogger off.
The rear window defogger switch is also
used to defrost, defog, or de-ice the power
outside heated mirrors (if so equipped).
It automatically turns off in approximately 15
minutes.
CAUTION
When cleaning the inner side of the
window, be careful not to scratch or
damage the rear window defogger.
AIC0572AIC0573
REAR WINDOW WIPER AND
WASHER SWITCHESREAR WINDOW DEFOGGER
SWITCH
1-12
ZX
Page 116 of 247

WARNING
cThe air conditioner cooling function
operates only when the engine is
running.
cDo not leave children, unreliable
adults, or pets alone in your vehicle.
On hot, sunny days, temperatures in
a closed vehicle could quickly be-
come high enough to cause severe
or possibly fatal injuries to people or
animals.
cDo not use the recirculation mode
for long periods as it may cause the
interior air to become stale and the
windows to fog up.
cPositioning of the heater and air con-
ditioner controls should not be done
while driving, in order that full atten-
tion may be given to the driving
operation.
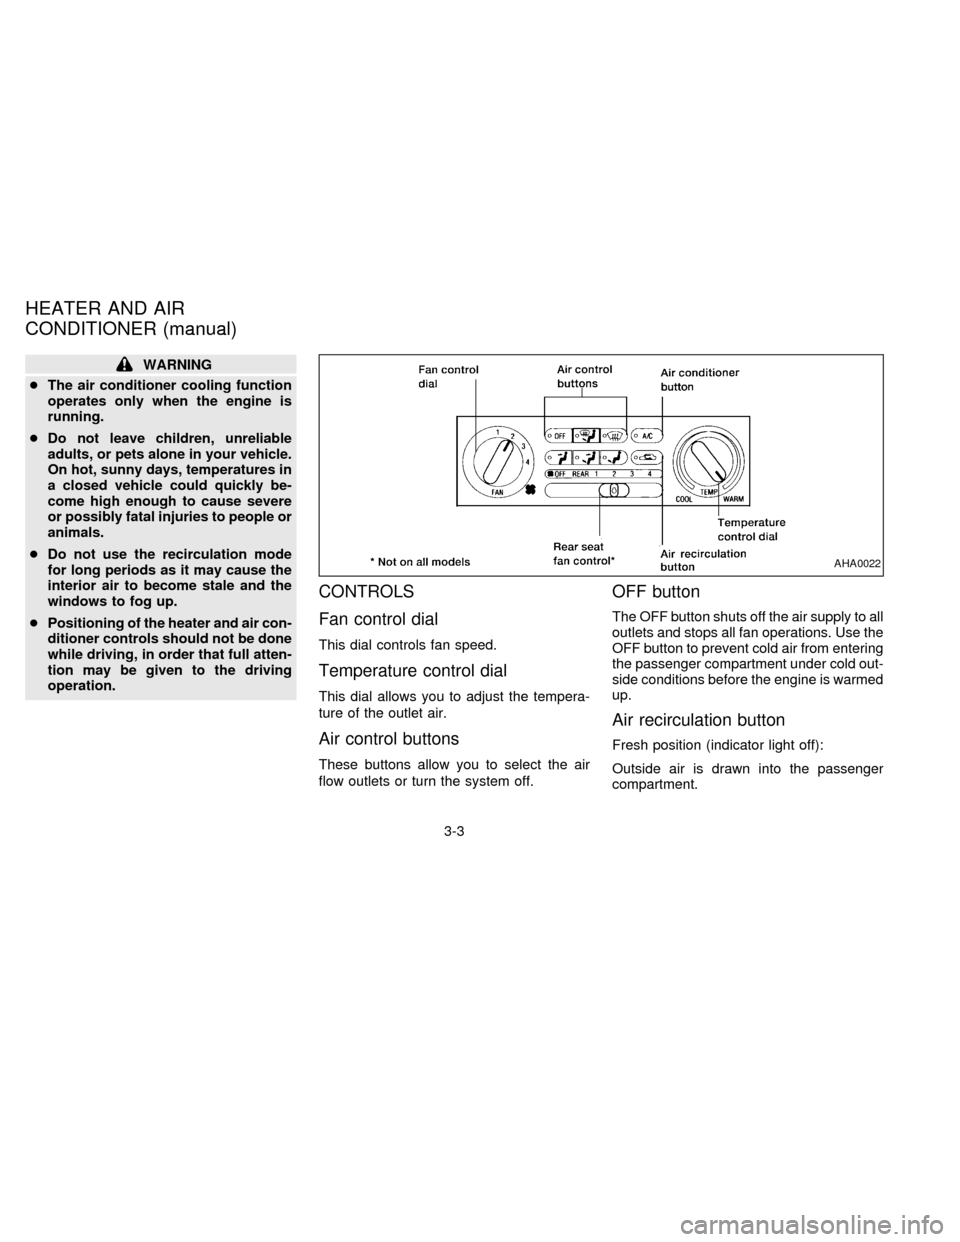
CONTROLS
Fan control dial
This dial controls fan speed.
Temperature control dial
This dial allows you to adjust the tempera-
ture of the outlet air.
Air control buttons
These buttons allow you to select the air
flow outlets or turn the system off.
OFF button
The OFF button shuts off the air supply to all
outlets and stops all fan operations. Use the
OFF button to prevent cold air from entering
the passenger compartment under cold out-
side conditions before the engine is warmed
up.
Air recirculation button
Fresh position (indicator light off):
Outside air is drawn into the passenger
compartment.
AHA0022
HEATER AND AIR
CONDITIONER (manual)
3-3
ZX
Page 117 of 247

Use this position for normal heater or air
conditioner operation.
Recirculate position (indicator light on):
Interior air is recirculated inside the vehicle.
Activate the air recirculation button when
driving on a dusty road or to help keep out
traffic fumes.
Activate the air recirculation button for im-
proved air conditioner performance under
high temperature and high humidity condi-
tions.
If the system is operating in the
or
mode, the system does not allow the
air recirculate mode to be selected.
CAUTION
Do not use the recirculation mode for
long periods as it may cause the inte-
rior air to become stale and the win-
dows to fog up.
Air conditioner button
Start the engine, move the fan control dial to
the desired (1 to 4) position, select an air
control button and push the air conditionerbutton to turn on the air conditioner. The
indicator light comes on when the air condi-
tioner is on. To stop the air conditioner,
push the button again; the indicator light
goes off.
The air conditioner cooling function op-
erates only when the engine is running.
HEATER OPERATION
Heating
This mode is used to direct most of the hot
air to the floor outlets.
The air recirculation button light shouldnot
be on for normal heating.
1. Push the
button in.
2. Turn the fan control dial to select speed.
3. Move the temperature control dial to the
desired position.
Ventilation
This mode directs air to the side and center
vents.
1. Push the
button in.
2. Turn the fan control dial to select speed.3. Move the temperature control dial to the
desired position.
NOTE: The recirculate position can be
used.
Defrosting or defogging
This mode is used to defrost/defog the
windows.
1. Push the
button in.
2. Turn the fan control dial to select speed.
3. Move the temperature control dial to the
desired position.
When the
button is pushed, the air
conditioner automatically turns on to de-
fog the windshield. The recirculated air
mode automatically turns off to reduce
window fogging.
When
is selected, the air condi-
tioner indicator light does not illuminate
unless illuminated in the previously se-
lected mode. However, the air condi-
tioner operates to dehumidify if the out-
side temperature is more than 40ÉF
(4ÉC), whether or not the A/C button has
been pressed. Manual selection and illu-
mination of the A/C button does not
3-4
ZX
Page 118 of 247

override the automatic dehumidifying
which occurs when
is selected.
Operating Tips
Clear snow and ice from the wiper
blades and air inlet in front of the wind-
shield. This improves defrosting/
defogging operation.
Bi-level heating/cooling
The bi-level mode directs air to the side and
center vents and to the floor outlets.
Bi-level is also a cooling mode when high
sun load conditions are present with cool
temperatures.
With the A/C system in operation, this mode
can be used to cool the passenger's or
driver's feet under high temperature condi-
tions.
With the A/C system in operation under high
temperature conditions, improved cooling
can be obtained by pushing the recirculation
button to the on position.
Push the air recirculation button to the off
position when heating is required.
1. Push the
button in.2. Turn the fan control dial to the desired
position.
3. Move the temperature control dial to the
desired position.
Heating and defogging
This mode heats the interior and defogs the
windshield.
1. Push the
button in.
2. Turn the fan control dial to the desired
position.
3. Move the temperature control dial to the
desired position.
When the
button is pushed, the air
recirculate mode automatically turns off.
Outside air is drawn into the passenger
compartment to improve the defogging
performance.
Operating tips
cClear snow and ice from the wiper
blades and air inlet in front of the
windshield. This improves heater op-
eration.
cTo defog the side windows more effec-
tively when in bi-level or ventilationmode, close the center vent and direct
the side vents toward the side windows.
cA slight delay may be experienced when
changing air control buttons. This is not a
problem, it is only the system motors and
solenoids switching from one outlet to
another.
AIR CONDITIONER OPERATION
Start the engine, move the fan control dial to
the desired (1 to 4) position, and select an
air control button before pushing in the air
conditioner button to activate the air condi-
tioner. When the air conditioner is on, cool-
ing and dehumidifying functions are added
to the system operation.
The air conditioner cooling function op-
erates only when the engine is running.
NOTE: When switching air flow outlets, the
A/C system remains activated unless the
A/C button is pressed again to turn it off.
The indicator light on the A/C button re-
mains illuminated unless the button is
pressed to turn it off, or the OFF air control
button is pressed.
Cooling
This mode is used to cool and dehumidify.
3-5
ZX
Page 119 of 247

1. Push thebutton in.
2. Turn the fan control dial to select speed.
3. Push the air conditioner button. The indi-
cator light comes on.
4. Move the temperature control dial to the
desired position.
cFor quick cooling when the outside tem-
perature is high, push the air recirculation
button on. Be sure to return the air recir-
culation button to the off position for
normal cooling.
cOpening the windows helps to vent heat
buildup when parked in the sun.
Dehumidified heating
This mode is used to heat and dehumidify.
1. Push the air recirculation button to the off
position.
2. Push the
button in.
3. Turn the fan control dial to select speed.
4. Push on the air conditioner button. The
indicator light comes on.
5. Move the temperature control dial to the
desired position.
Dehumidified defogging
This mode is used to defog the windows
and dehumidify.
1. Push the
button in.
2. Turn the fan control dial to the desired
speed.
3. Move the temperature control dial to the
desired position.
When the
button is pushed, the air
conditioner automatically turns on to de-
fog the windshield, (however, the light
does not illuminate unless illuminated in
the previously selected mode) and the
recirculated air mode automatically turns
off.
Operating tips
cKeep windows and sun roof closed while
the air conditioner is in operation.
cAfter parking in the sun, drive for two or
three minutes with the windows open to
vent hot air from the passenger compart-
ment. Then, close the windows. This
allows the air conditioner to cool the
interior more quickly.
cThe air conditioning system should beoperated for about ten minutes at
least once a month. This helps pre-
vent damage to the system due to lack
of lubrication.
cIf the coolant temperature gauge ex-
ceeds the H (hot) position, turn the air
conditioner off. See ``If your vehicle over-
heats'' in the ``In case of emergency''
section for additional information.
3-6
ZX
Page 124 of 247

AUTOMATIC OPERATION
Push the AUTOMATIC button and select
the desired temperature. The selected tem-
perature and AUTO show in the display
window. The EATC heats or cools to
achieve the set temperature.
When in AUTOMATIC and weather condi-
tions require heat, air is sent to the floor.
However, a feature is included in the EATC
to prevent blowing cold air to the floor if the
engine coolant is not warm enough to allow
heating. In three or four minutes the fan
speed gradually increases and airflow
changes to the floor.
If unique conditions exist, such as window
fogging, the five override buttons allow spe-
cific airflow selection. The thumbwheel al-
lows you to adjust the fan speed to suit your
needs.
Temperature selection
TheTEMPbutton on the left
side of the control panel is for temperature
selection. The
side lowers the set
temperature, and theside raises the
set temperature. Press and hold either side
of the button to rapidly change the tempera-
ture setting in one degree increments toeither 65ÉF (18ÉC) or 85ÉF (29ÉC). If you
want continuous maximum cooling, push
the
side of the TEMP button until
60ÉF (16ÉC) shows in the display window.
The EATC cools at maximum and disre-
gards the 60ÉF (16ÉC) setting until a warmer
temperature is selected. If you want con-
tinuous maximum heating, push the
side of the TEMP button until 90ÉF
(32ÉC) shows in the display window. The
EATC provides maximum heat regardless
of the 90ÉF (32ÉC) setting until a cooler
temperature is selected.
Fan speed and thumbwheel
Your EATC automatically adjusts the fan
speed to the existing conditions. To control
the fan speed yourself, use the thumbwheel
located at the extreme right side of the
EATC control panel. Using the thumbwheel
cancels the automatic fan speed control,
and causes a
to appear in the display
window. Rotate the thumbwheel up for HI
speeds and down for LO speeds.
To return to auto fan control, press the
AUTOMATIC button.
AIR CONTROL BUTTONS
Your EATC has five buttons which allow youto make special selections. The buttons are
grouped in the middle of the EATC panel
and allow you to determine airflow location.
Pressing any of the air control buttons
changes airflow location only, and does not
affect the ability of the system to control
temperature or fan speed. Return to fully
automatic operation by pushing the AUTO-
MATIC button.
Push this button for airflow to the floor and
windshield at the same time. Thein-
dicator light comes on, and the display
window shows the set temperature.
Press this button to obtain maximum airflow
to the windshield. Adjust the temperature
setting as required for defrosting. The
indicator light comes on, and the
display window shows the set temperature.
When the outside temperature is about
50ÉF (10ÉC) or above, the air is dehumidi-
fied to prevent window fogging.
Push this button to select airflow through
the instrument panel registers. The
indicator light comes on, and the
display window shows the set temperature.
3-11
ZX
Page 242 of 247

Audio controls (steering wheel) ............ 3-23
Heater and air conditioner controls
(automatic) ............................................ 3-10
Heater and air conditioner controls
(manual).................................................. 3-3
Rear seat heater and air conditioner
controls ................................................. 3-13
Coolant
Capacities and recommended fuel/
lubricants ................................................ 9-2
Changing engine coolant........................ 7-5
Checking engine coolant level ............... 7-4
Engine coolant temperature gauge ........ 1-4
Cornering light ........................................... 1-15
Corrosion protection .................................... 6-4
Cruise control............................................. 4-10
Cup holder ................................................. 1-18
D
Daytime running light system
(Canada only) ............................................ 1-13
Defogger switch
Rear window defogger switch .............. 1-12
Dimensions and weights.............................. 9-8
Door ajar warning light ................................ 1-7
Door locks .................................................... 2-2
Drive belts .................................................. 7-12
Driving
Cold weather driving............................. 4-16
Driving with automatic transmission ....... 4-5Precautions when starting and
driving ..................................................... 4-2
E
Economy - fuel........................................... 4-12
Emission control information label............. 9-10
Emission control system warranty ............. 9-19
Engine
Before starting the engine ...................... 4-5
Capacities and recommended fuel/
lubricants ................................................ 9-2
Changing engine coolant........................ 7-5
Changing engine oil................................ 7-6
Changing engine oil filter........................ 7-7
Checking engine coolant level ............... 7-4
Checking engine oil level ....................... 7-5
Engine compartment check
locations.................................................. 7-3
Engine coolant temperature gauge ........ 1-4
Engine cooling system ........................... 7-4
Engine oil ................................................ 7-5
Engine oil and oil filter
recommendation ..................................... 9-4
Engine oil pressure warning light ........... 1-6
Engine oil viscosity ................................. 9-5
Engine serial number ............................. 9-9
Starting the engine ................................. 4-8
Exhaust gas (Carbon monoxide) ................. 4-2F
Five passenger seating ............................. 2-18
Five passenger seating with cargo
room ........................................................... 2-18
Flashers (See hazard warning flasher
switch) ........................................................ 1-15
Flat tire ......................................................... 5-2
Flexible seating .......................................... 2-32
Floor mat positioning ........................ 2-17, 2-20
Floor mat positioning aid ........................... 2-20
Fluid
Automatic transmission fluid (ATF) ........ 7-8
Brake fluid ..................................... 7-10, 9-2
Capacities and recommended fuel/
lubricants ................................................ 9-2
Engine coolant ........................................ 7-4
Engine oil ................................................ 7-5
Power steering fluid ........................ 7-9, 9-2
Window washer fluid ............................ 7-10
F.M.V.S.S. certification label ..................... 9-10
Fuel
Capacities and recommended fuel/
lubricants ................................................ 9-2
Fuel economy ....................................... 4-12
Fuel filler lid and cap ............................ 2-15
Fuel filler lid lock opener lever ............. 2-15
Fuel gauge.............................................. 1-5
Fuel octane rating................................... 9-3
Fuel recommendation ............................. 9-2
Fuses ......................................................... 7-17
Fusible links ............................................... 7-18
10-2
ZX