1997 NISSAN ALTIMA key battery
[x] Cancel search: key batteryPage 27 of 203
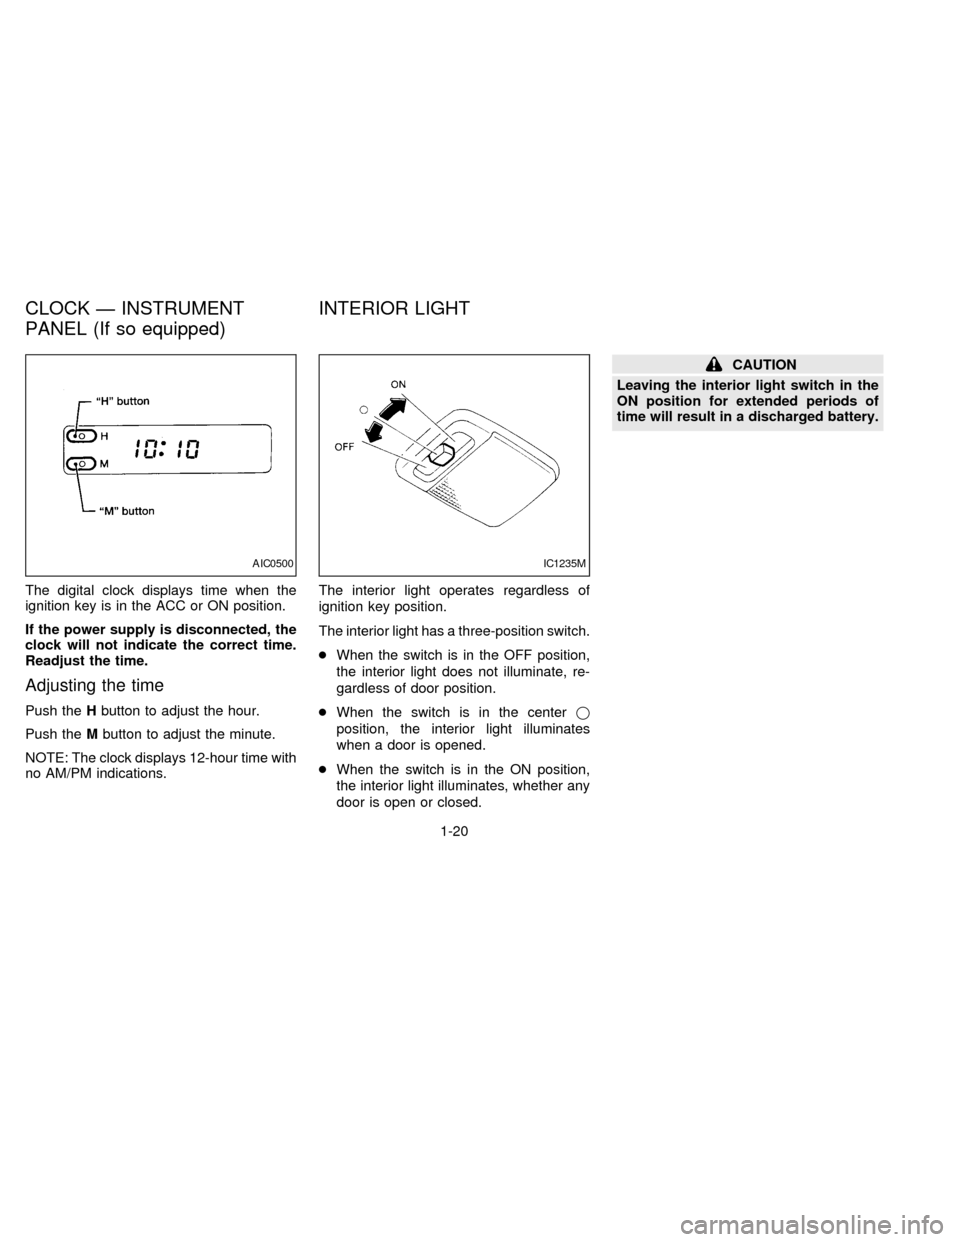
The digital clock displays time when the
ignition key is in the ACC or ON position.
If the power supply is disconnected, the
clock will not indicate the correct time.
Readjust the time.
Adjusting the time
Push theHbutton to adjust the hour.
Push theMbutton to adjust the minute.
NOTE: The clock displays 12-hour time with
no AM/PM indications.The interior light operates regardless of
ignition key position.
The interior light has a three-position switch.
cWhen the switch is in the OFF position,
the interior light does not illuminate, re-
gardless of door position.
cWhen the switch is in the centerj
position, the interior light illuminates
when a door is opened.
cWhen the switch is in the ON position,
the interior light illuminates, whether any
door is open or closed.
CAUTION
Leaving the interior light switch in the
ON position for extended periods of
time will result in a discharged battery.
AIC0500IC1235M
CLOCK Ð INSTRUMENT
PANEL (If so equipped)INTERIOR LIGHT
1-20
ZX
Page 30 of 203

2Pre-driving checks and adjustments
Key .........................................................................2-2
Door locks ..............................................................2-2
Manual door lock ....................................................2-2
Power door lock .....................................................2-3
Child safety rear door lock .....................................2-4
Multi-remote control system (if so equipped).........2-4
Battery replacement ...............................................2-6
Hood release ..........................................................2-8
Glove box ...............................................................2-8
Trunk lid lock operation ..........................................2-9
Opener cancel lever for trunk lid..........................2-10
Fuel filler lid lock operation ..................................2-10
Fuel filler cap ........................................................2-11
Front seats ...........................................................2-12
Seat adjustment ...................................................2-12
Head restraints .....................................................2-14
Rear seat ..............................................................2-15
Supplemental restraint system (air bag
system) .................................................................2-16Supplemental air bag system...............................2-19
Warning labels......................................................2-21
Supplemental air bag warning light......................2-21
Seat belts .............................................................2-23
Precautions on seat belt usage ...........................2-23
Child safety...........................................................2-25
3-point type with retractor ....................................2-26
2-point type without retractor (center position
of rear seat) ..........................................................2-28
Seat belt extenders ..............................................2-30
Seat belt maintenance .........................................2-30
Child restraints for infants and small children......2-30
Top strap child restraint .......................................2-34
Tilting steering wheel ...........................................2-37
Outside mirror remote control ..............................2-37
Outside mirrors .....................................................2-37
Inside mirror .........................................................2-38
Vanity mirror .........................................................2-38
ZX
Page 35 of 203

The interior light can be turned off without
waiting 30 seconds by inserting the key into
the ignition or locking the doors with the
multi-remote controller or pushing the
interior light button to OFF.
Using the panic alarm
If you are near your vehicle and feel threat-
ened, you may activate the alarm to call
attention as follows:
1. Push the
button on the remote con-
troller forlonger than 1.5 seconds.
2. The theft warning alarm and headlights
will stay on for 30 seconds.
3. The panic alarm stops when:
cit has run for 30 seconds, or
cthe
or thebutton is pressed, or
cthe
button is pushed for longer than
1.5 seconds on the multi-remote control-
ler.
Replace the battery in the multi-remote con-
troller as follows:
1. Open the lid using a coin.
2. Replace the battery with a new one.
Insert the battery as illustrated above.Recommended battery: Sanyo CR2025
or equivalent.
3. Close the lid securely.
4. Press the
button, then thebutton
two or three times to check the multi-
remote controller operation.
APD0535
BATTERY REPLACEMENT
2-6
ZX
Page 82 of 203

than 2 seconds. For example, in the
diagram ch2 is to be memorized. The
radio mutes when the select button is
pushed.
3. The indicator, ch2, then comes on in the
display and the sound resumes. Memo-
rizing is now complete.
4. Other select buttons can be set in the
same manner.
If the battery cable is disconnected, or if the
fuse opens, the radio memory is cancelled.
In that case, reset the desired stations.
Adjusting tone quality and speaker
balance
To adjust BASS, TREB (treble), FADER,
and BAL (balance) the control knobs must
be released from their stowed positions.
Pushing the knobs once moves them to the
released position.
In the released position, the knobs control
tone quality. Turn the control knobs to adjust
BASS and TREB to the most pleasing level.
From the released position, the knobs must
be pulled out in order to control FADER and
BAL. FADER adjusts the sound level be-tween the front and rear speakers, and BAL
adjusts the sound level between the right
and left speakers.
Once sound quality is set to the desired
levels, return the control knobs to the
stowed position by pushing them in com-
pletely and releasing.
CASSETTE TAPE OPERATION
Turn the ignition key to ACC or ON, then
carefully insert a cassette tape into the tape
door.
The cassette tape automatically pulls into
the player. The word TAPE and an arrow
AHA0522
3-14
ZX
Page 87 of 203
continues in the SEEK mode at the lowest
broadcasting station. If using the
button, once the lowest broadcasting
station is reached, the radio continues in the
SEEK mode at the highest broadcasting
station. Pushing the button again continues
the SEEK function.
SCAN tuning
Push the SEEK/SCAN tuning button
orfor more than 1.5 seconds. SCAN tun-
ing begins from low to high frequencies or
high to low frequencies, depending on
which button is pressed. SCAN tuning stops
at each broadcasting station for five sec-
onds. Pushing the button again during this
five second period stops SCAN tuning and
the radio remains tuned to that station.
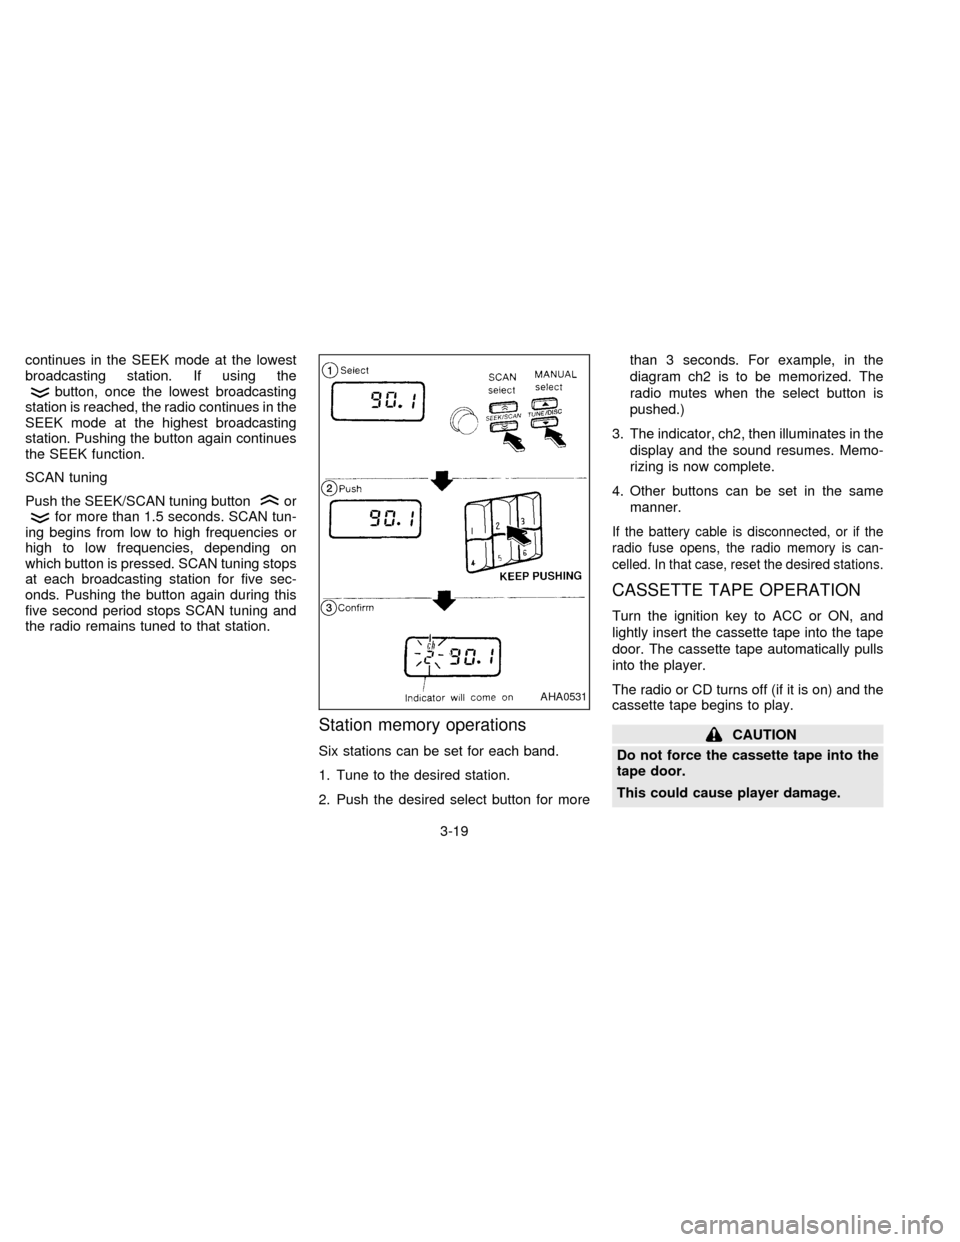
Station memory operations
Six stations can be set for each band.
1. Tune to the desired station.
2. Push the desired select button for morethan 3 seconds. For example, in the
diagram ch2 is to be memorized. The
radio mutes when the select button is
pushed.)
3. The indicator, ch2, then illuminates in the
display and the sound resumes. Memo-
rizing is now complete.
4. Other buttons can be set in the same
manner.
If the battery cable is disconnected, or if the
radio fuse opens, the radio memory is can-
celled. In that case, reset the desired stations.
CASSETTE TAPE OPERATION
Turn the ignition key to ACC or ON, and
lightly insert the cassette tape into the tape
door. The cassette tape automatically pulls
into the player.
The radio or CD turns off (if it is on) and the
cassette tape begins to play.
CAUTION
Do not force the cassette tape into the
tape door.
This could cause player damage.
AHA0531
3-19
ZX
Page 98 of 203
The automatic transmission in your vehicle
is electronically controlled by the A/T control
unit to produce maximum power and
smooth operation.
The recommended operating procedures for
this transmission are shown on the following
pages. Follow these procedures for maximum
vehicle performance and driving enjoyment.
Starting the vehicle
cAfter starting the engine, fully depress
the foot brake pedal before shifting the
shift lever to the D, R, 2 or 1 position. Be
sure the vehicle is fully stopped before
attempting to shift the shift lever.
cKeep the foot brake pedal depressed and
shift into a driving gear.
c
Release the foot brake, then gradually
start the vehicle in motion.
The automatic transmission is designed
so the foot brake pedal MUST be de-
pressed before shifting from P to any drive
position while the ignition switch is ON.
The shift lever cannot be moved out of P
and into any of the other gear positions if
the ignition key is turned to LOCK or if
the key is removed.When the battery charge is low, the shift
lever can be moved if the ignition switch
is in the ACC position.
WARNING
cDo not depress the accelerator pedal
while shifting from P or N to R, D, 2
or 1. Always depress the brake pedal
until shifting is completed. Failure to
do so could cause you to lose con-
trol and have an accident.
cCold engine idle speed is high, so
use caution when shifting into a for-
ward or reverse gear before the en-
gine has warmed up.
cNever shift to P or R while the ve-
hicle is moving. This could cause an
accident.
cOn slippery roads, do not downshift.
This may cause a loss of control.
CAUTION
When stopping the vehicle on an uphill
grade, do not hold the vehicle by de-
pressing the accelerator pedal. The foot
brake should be used for this purpose.
DRIVING WITH AUTOMATIC
TRANSMISSION
(if so equipped)
4-6
ZX
Page 110 of 203
If the light comes on during the self-test or
while you are driving, you should take your
car to your NISSAN dealer for repair at your
earliest convenience.
WARNING
The anti-lock brake system is a sophis-
ticated device, but it cannot prevent
accidents resulting from careless or
dangerous driving techniques. It can
help maintain vehicle control during
braking on slippery surfaces, but re-
member that the stopping distance on
slippery surfaces will be longer than on
normal surfaces, even with the anti-
lock system. Stopping distances may
also be longer on rough, gravel or
snow covered roads, or if you are using
tire chains. Always maintain a safe dis-
tance from the vehicle in front of you.
Ultimately, the responsibility for safety
of self and others rests in the hands of
the driver.
Tire type and condition of tires may
also affect braking effectiveness.
cWhen replacing tires, install the
specified size of tire on all 4 wheels.cWhen installing a spare tire, make
sure it is the proper size and type as
specified on the tire placard. For tire
placard location information, refer to
ªTire placardº in the Owner's Manual
index.
Refer to ``Wheels and Tires'' in the
``Do-it-yourself operations'' section of
this manual.
Freeing a frozen door lock
To prevent a door lock from freezing, apply
de-icer or glycerin through the key hole. If
the lock becomes frozen, heat the key be-
fore inserting it into the key hole.
Anti-freeze
In the winter when it is anticipated that the
temperature will drop below 32ÉF (0ÉC),
check the anti-freeze (ethylene glycol base)
to assure proper winter protection. For de-
tails, see ``Engine cooling system'' in the
``Do-it-yourself operations'' section.
Battery
If the battery is not fully charged during
extremely cold weather conditions, the bat-
tery fluid may freeze and damage the bat-
tery. To maintain maximum efficiency, the
battery should be checked regularly. For
details, see ``Battery'' in the ``Do-it-yourself
operations'' section.
Draining of coolant water
If the vehicle is to be left outside without
anti-freeze, drain the cooling system by
opening the drain valves located under the
radiator and on the engine block. Refill
COLD WEATHER DRIVING
4-18
ZX
Page 120 of 203
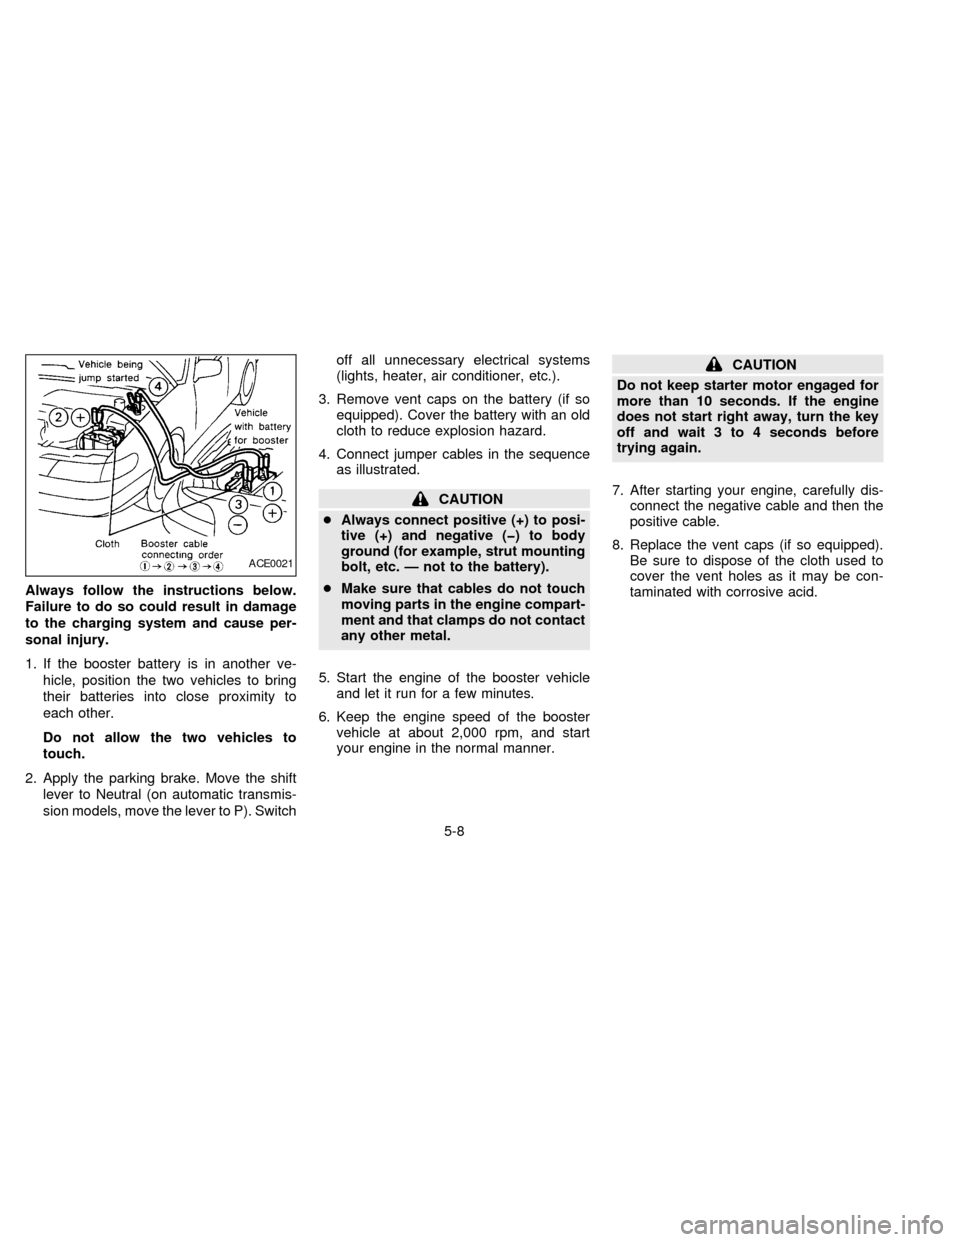
Always follow the instructions below.
Failure to do so could result in damage
to the charging system and cause per-
sonal injury.
1. If the booster battery is in another ve-
hicle, position the two vehicles to bring
their batteries into close proximity to
each other.
Do not allow the two vehicles to
touch.
2. Apply the parking brake. Move the shift
lever to Neutral (on automatic transmis-
sion models, move the lever to P). Switchoff all unnecessary electrical systems
(lights, heater, air conditioner, etc.).
3. Remove vent caps on the battery (if so
equipped). Cover the battery with an old
cloth to reduce explosion hazard.
4. Connect jumper cables in the sequence
as illustrated.
CAUTION
cAlways connect positive (+) to posi-
tive (+) and negative (þ) to body
ground (for example, strut mounting
bolt, etc. Ð not to the battery).
cMake sure that cables do not touch
moving parts in the engine compart-
ment and that clamps do not contact
any other metal.
5. Start the engine of the booster vehicle
and let it run for a few minutes.
6. Keep the engine speed of the booster
vehicle at about 2,000 rpm, and start
your engine in the normal manner.
CAUTION
Do not keep starter motor engaged for
more than 10 seconds. If the engine
does not start right away, turn the key
off and wait 3 to 4 seconds before
trying again.
7. After starting your engine, carefully dis-
connect the negative cable and then the
positive cable.
8. Replace the vent caps (if so equipped).
Be sure to dispose of the cloth used to
cover the vent holes as it may be con-
taminated with corrosive acid.
ACE0021
5-8
ZX