1997 NISSAN ALTIMA ECO mode
[x] Cancel search: ECO modePage 1 of 203
Foreword
Welcome to the growing family of new NISSAN owners. This vehicle is delivered to you with confidence. It was produced using the latest
techniques and strict quality control.
This manual was prepared to help you understand the operation and maintenance of your vehicle so that you may enjoy many miles of
driving pleasure. Please read through this manual before operating your vehicle.
A separate Warranty Information and Maintenance Log Booklet explains details about the warranties covering your vehicle and vehicle
maintenance schedules.
Your NISSAN dealer knows your vehicle best. When you require any service or have any questions, he will be glad to assist you with the
extensive resources available to him.
WARNING
IMPORTANT SAFETY INFORMATION
REMINDERS FOR SAFETY!
Follow these five important rules to help ensure a safe and
complete trip for you and your passengers!
cNEVER drive under the influence of alcohol or drugs.
cALWAYS observe posted speed limits and never drive too
fast for conditions.
cALWAYS use your seat belts and appropriate child restraint
systems.
cALWAYS provide information about the proper use of
vehicle safety features to all occupants of the vehicle.
cALWAYS review this Owner's Manual for important safety
information.
1996 NISSAN NORTH AMERICA, INC.
TORRANCE, CALIFORNIA
All rights reserved. No part of this Owner's Manual may be reproduced
or stored in a retrieval system, or transmitted in any form, or by any
means, electronic, mechanical, photocopying, recording or otherwise,
without the prior written permission of Nissan North America, Inc.
NOTES ON THE INFORMATION CONTAINED IN
THIS OWNER'S MANUAL
This owner's manual contains descriptions and operating in-
structions for all systems, features and optional equipment that
might appear in any model of this vehicle built for any destina-
tion in North America, including the continental United States,
Canada and Hawaii. Therefore, you may very well find informa-
tion in this manual that does not apply to your vehicle.
MODIFICATION OF YOUR VEHICLE
This vehicle should not be modified. Modification could affect
its performance, safety or durability, and may even violate
governmental regulations. In addition, damage or perfor-
mance problems resulting from modifications may not be
covered under NISSAN warranties.
All information, specifications and illustrations in this manual are
those in effect at the time of printing. NISSAN reserves the right to
change specifications or design without notice and without obligation.
The inside pages of this manual contain
a minimum of 50% recycled fibers,
including 10% post-consumer fibers.
Page 2 of 203

Welcome To The World Of NISSAN
Your new Nissan is the result of our dedication to
produce the finest in safe, reliable and economi-
cal transportation. Your vehicle is the product of
a successful worldwide company that manufac-
tures cars and trucks in over 17 countries and
distributes them in 170 nations.
Nissan vehicles are designed and manufactured
by Nissan Motor Co., Ltd. which was founded in
Tokyo, Japan in 1933, and Nissan affiliates world
wide, collectively growing to become the fifth
largest automaker in the world. In addition to cars
and trucks, Nissan also makes textile machinery,
forklift trucks, marine engines, boats and other
products.
Nissan has made a substantial and growing
investment in North America, starting with the
opening of Nissan Motor Corporation U.S.A. in
1960 and continuing with the production of some
cars and trucks at one of the world's mostmodern manufacturing facilities, Nissan Motor
Manufacturing Corporation U.S.A. in Smyrna,
Tennessee, vehicle styling at Nissan Design
International in San Diego, California, and engi-
neering at Nissan Research and Development in
Farmington Hills, Michigan.
Nissan Motor Corporation U.S.A. and its dealers
indirectly employ about 60,000 Americans.
Nissan is also a substantial contributor to the
Canadian economy. Nissan Canada Inc., its sup-
pliers and over 170 dealers employ approxi-
mately 4,500 people. These include company
employees and the staffs of Nissan dealers all
across Canada. In addition, many Canadians
work for companies that supply Nissan and Nis-
san dealers with materials and services ranging
from the operation of port facilities and transpor-
tation services, to the supply of lubricants, parts
and accessories.Nissan pioneered the use of electronics and
computers in automobiles, and has led the indus-
try in improving both performance and fuel effi-
ciency through new engine designs and the use
of synthetic materials to reduce vehicle weight.
The company has also developed ways to build
quality into its vehicles at each stage of the
production process, both through extensive use
of automation and Ð most importantly Ð
through an awareness thatpeopleare the cen-
tral element in quality control.
From the time the parts arrived from our suppli-
ers until you took delivery of your new Nissan,
dozens of checks were made to ensure that only
the best job was being done in producing and
delivering your vehicle. Nissan also takes great
care to ensure that when you take your Nissan to
your dealer for maintenance, the service techni-
cian will perform his work according to the quality
standards that have been established by Nissan.
Safety has also been built into your Nissan. As
you know, seat belts are an integral part of the
safety systems that will help protect you and your
passengers in the event of a sudden stop or an
accident. We urge you to use the belts every time
you drive the vehicle.
The Nissan story of growth and achievement
reflects our major goal: to provide you, our
customer, with a vehicle that is built with quality
and craftsmanship Ð a product that we can be
proud to build and you can be proud to own.
AFW0001
The inside pages of this manual contain
a minimum of 50% recycled fibers,
including 10% post-consumer fibers.
ZX
Page 71 of 203
cDo not use the recirculation mode for
long periods as it may cause the inte-
rior air to become stale and the win-
dows to fog up.
cPositioning of the heating or air con-
ditioning controls should not be
done while driving, in order that full
attention may be given to the driving
operation.
CONTROLS
Fan control dial
This dial turns the fan on and off, and
controls fan speed.
Air flow control buttons
These buttons allow you to select the air
flow outlets.
Ð Air flows from center and side
ventilators.
Ð Air flows from center and side
ventilators and foot outlets.
Ð Air flows mainly from foot outlets.
Ð Air flows from defroster outlets
and foot outlets.
Ð Air flows mainly from defroster
outlets.
Temperature control lever
This lever allows you to adjust the tempera-
ture of the outlet air.
Air recirculation button
Off position:
Outside air is drawn into the passenger
compartment and distributed through the
selected outlet.
Use the off position for normal heater or air
conditioner operation.
On position (Indicator light on):
Interior air is recirculated inside the vehicle.
Push the air recirculation button to the ON
position when driving on a dusty road, to
avoid traffic fumes, and for maximum cool-
ing when using the air conditioner.
Air conditioner button
(If so equipped)
This button is provided only on vehicles
equipped with an air conditioner.
Start the engine, move the fan control dial tothe desired (1 to 4) position and push the
A/C button to turn on the air conditioner.
The indicator light comes on when the air
conditioner is on. To stop the air condi-
tioner, push the switch again.
The air conditioner cooling function op-
erates only when the engine is running.
HEATER OPERATION
Heating
This mode is used to direct heated air from
the foot outlets. Some air also flows from
the defroster outlets.
1. Push the air recirculation button to the off
position for normal heating.
2. Push the
button in.
3. Move the fan control dial to the desired
position.
4. Move the temperature control lever to the
desired position between the middle and
the HOT position.
Ventilation
This mode directs outside air to the side and
center ventilators.
3-3
ZX
Page 76 of 203
WARNING
cThe air conditioner cooling function
operates only when the engine is
running.
cDo not leave children, unreliable
adults, or pets alone in your vehicle.
On hot sunny days, temperatures in
a closed vehicle could quickly be-
come high enough to cause severe
or possibly fatal injuries to people or
animals.cDo not use the recirculation mode
for long periods as it may cause the
interior air to become stale and the
windows to fog up.
cPositioning of the heating or air con-
ditioning controls should not be
done while driving, in order that full
attention may be given to the driving
operation.
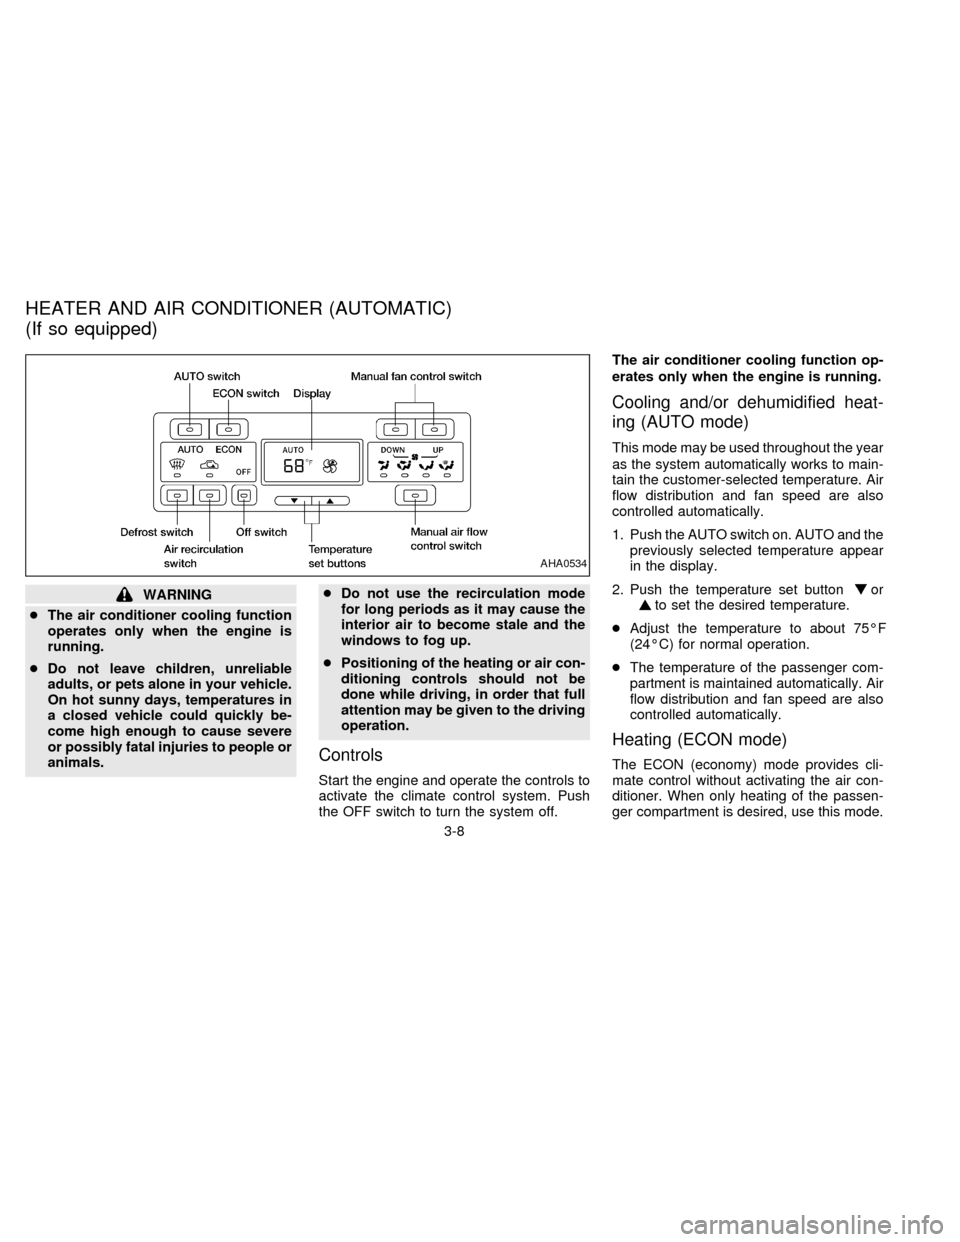
Controls
Start the engine and operate the controls to
activate the climate control system. Push
the OFF switch to turn the system off.The air conditioner cooling function op-
erates only when the engine is running.
Cooling and/or dehumidified heat-
ing (AUTO mode)
This mode may be used throughout the year
as the system automatically works to main-
tain the customer-selected temperature. Air
flow distribution and fan speed are also
controlled automatically.
1. Push the AUTO switch on. AUTO and the
previously selected temperature appear
in the display.
2. Push the temperature set button
orto set the desired temperature.
cAdjust the temperature to about 75ÉF
(24ÉC) for normal operation.
cThe temperature of the passenger com-
partment is maintained automatically. Air
flow distribution and fan speed are also
controlled automatically.
Heating (ECON mode)
The ECON (economy) mode provides cli-
mate control without activating the air con-
ditioner. When only heating of the passen-
ger compartment is desired, use this mode.
AHA0534
HEATER AND AIR CONDITIONER (AUTOMATIC)
(If so equipped)
3-8
ZX
Page 77 of 203

1. Push the ECON switch on. ECON ap-
pears in the display.
2. Push the temperature set button
or
to set the desired temperature.
cThe temperature of the passenger com-
partment is maintained as selected by
the temperature set button. Air flow dis-
tribution and fan speed are also con-
trolled automatically in an effort to reach
the desired termperature.
cDo not select a temperature setting lower
than the outside air temperature. Due to
the absence of air conditioner operation,
the selected interior temperature may not
be reached.
cECON mode is not recommended if the
windows are fogging up. If the windows
begin to fog up while using the ECON
mode, use the procedures outlined in
``Dehumidified defogging''.
Dehumidified defogging
1. Push theswitch on. The indicator
light comes on.
2. Push the temperature set button
orto set the desired temperature.cTo quickly remove ice or fog from the
outside of the windows, push the manual
fan control switch and set to the maxi-
mum position
.
cAs soon as possible after the windshield
is clean, push the AUTO switch to return
to the auto mode.
cWhen the
switch is pushed, the air
conditioner automatically turns on at out-
side temperatures above 35ÉF (2ÉC) to
defog the windshield, and the air recircu-
lation mode automatically turns off.
Outside air is drawn into the passenger
compartment to improve the defogging
performance.
Manual fan speed control
Push the fan control switches to manually
control the fan speed. Each fan speed is
indicated by the shading of a fan blade on
the display. For example,
indicates
that the fan is operating at low speed and
indicates that the fan is operating at
medium-high speed.
cPush the AUTO switch to return to auto-
matic control of the fan speed.
Air recirculation switch
Push the air recirculation switch to recircu-
late interior air inside the vehicle. The indi-
cator light comes on.
Push it again to draw outside air into the
passenger compartment. The indicator
goes out.
cThe air recirculation mode cannot be
activated when the
mode has
been selected.
Manual air flow control
Pushing the manual air flow control switch
selects the air outlet.
Ð Air flows from center and side
ventilators.
Ð Air flows from center and side
ventilators and foot outlets.
Ð Air flows mainly from foot outlets.
Ð Air flows from defroster outlets
and foot outlets.
Ð Air flows mainly from defroster
outlets.
3-9
ZX
Page 81 of 203
Clock Priority Mode
In this mode the clock is shown in the
display. If any radio or cassette tape func-
tions are activated, the radio (or cassette
tape) display illuminates for ten seconds
then returns to the clock mode.
NOTE:
After clock adjustment, the radio is in the
clock priority mode.
Radio/Cassette Tape Priority Mode
In this mode, the radio station illuminates in
the display during radio operation. During
cassette tape operation, TAPE illuminates
in the display.
Selecting the desired band
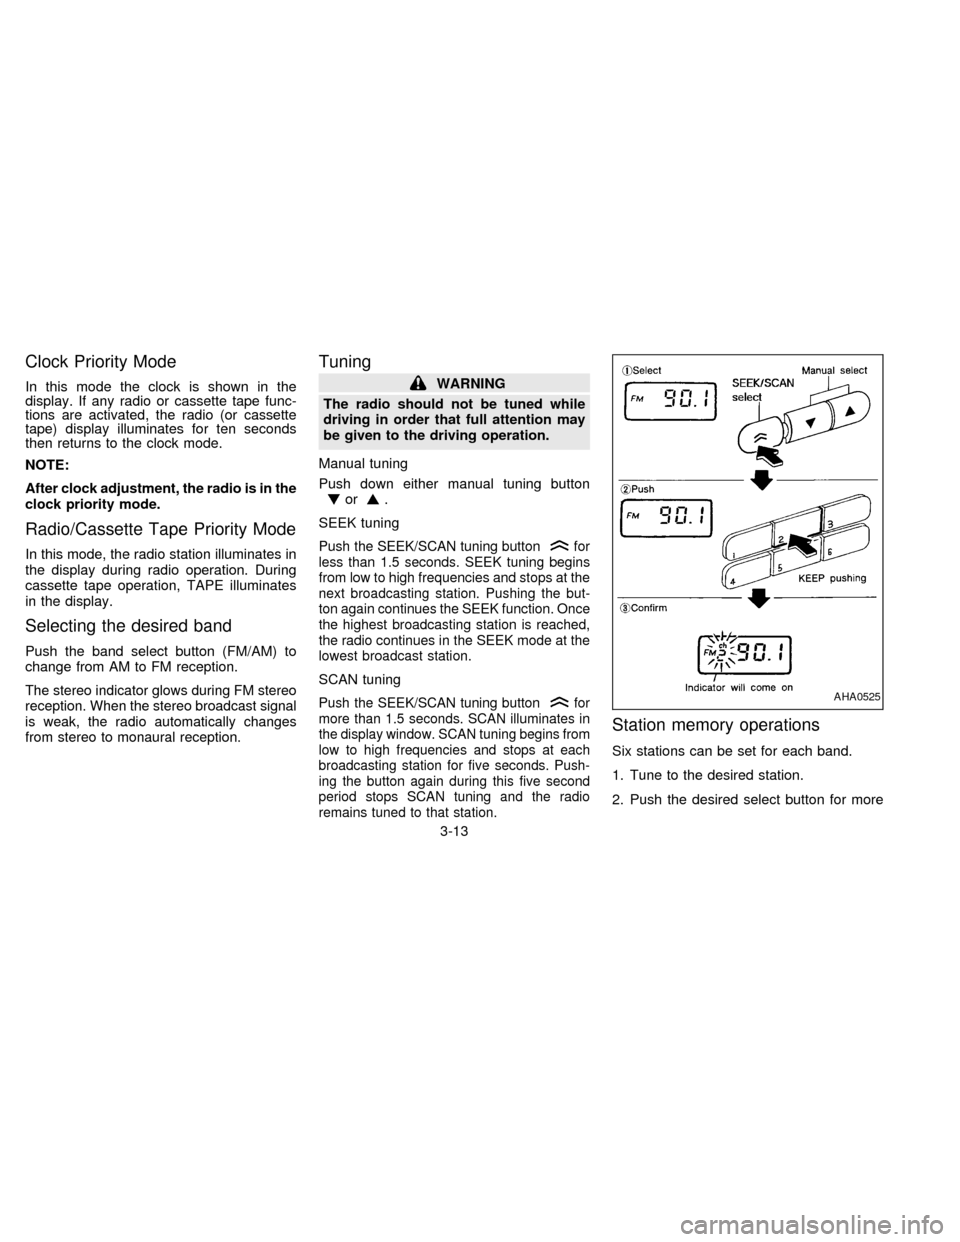
Push the band select button (FM/AM) to
change from AM to FM reception.
The stereo indicator glows during FM stereo
reception. When the stereo broadcast signal
is weak, the radio automatically changes
from stereo to monaural reception.
Tuning
WARNING
The radio should not be tuned while
driving in order that full attention may
be given to the driving operation.
Manual tuning
Push down either manual tuning button
or.
SEEK tuning
Push the SEEK/SCAN tuning buttonfor
less than 1.5 seconds. SEEK tuning begins
from low to high frequencies and stops at the
next broadcasting station. Pushing the but-
ton again continues the SEEK function. Once
the highest broadcasting station is reached,
the radio continues in the SEEK mode at the
lowest broadcast station.
SCAN tuning
Push the SEEK/SCAN tuning buttonfor
more than 1.5 seconds. SCAN illuminates in
the display window. SCAN tuning begins from
low to high frequencies and stops at each
broadcasting station for five seconds. Push-
ing the button again during this five second
period stops SCAN tuning and the radio
remains tuned to that station.
Station memory operations
Six stations can be set for each band.
1. Tune to the desired station.
2. Push the desired select button for more
AHA0525
3-13
ZX
Page 84 of 203

Dolby NR (noise reduction)
Push theDOLBY NR button for
Dolby NR encoded tapes to reduce high
frequency tape noise. The indicator light
comes on.
Dolby NR is manufactured under license
from Dolby Laboratories Licensing Corpora-
tion. DOLBY NR and the double-D symbol
are trademarks of Dolby Laboratories Li-
censing Corporation.
If in the clock priority mode when the
button is pressed,and
TAPE illuminate in the display window for
about ten seconds. The clock mode then
returns to the display window.
Metal or chrome tape usage
The cassette player is automatically set to
high performance play when playing a metal
or chrome cassette tape.
Ejecting the cassette tape
Push the EJECT button. The cassette tape
automatically comes out.
3-16
ZX
Page 87 of 203
continues in the SEEK mode at the lowest
broadcasting station. If using the
button, once the lowest broadcasting
station is reached, the radio continues in the
SEEK mode at the highest broadcasting
station. Pushing the button again continues
the SEEK function.
SCAN tuning
Push the SEEK/SCAN tuning button
orfor more than 1.5 seconds. SCAN tun-
ing begins from low to high frequencies or
high to low frequencies, depending on
which button is pressed. SCAN tuning stops
at each broadcasting station for five sec-
onds. Pushing the button again during this
five second period stops SCAN tuning and
the radio remains tuned to that station.
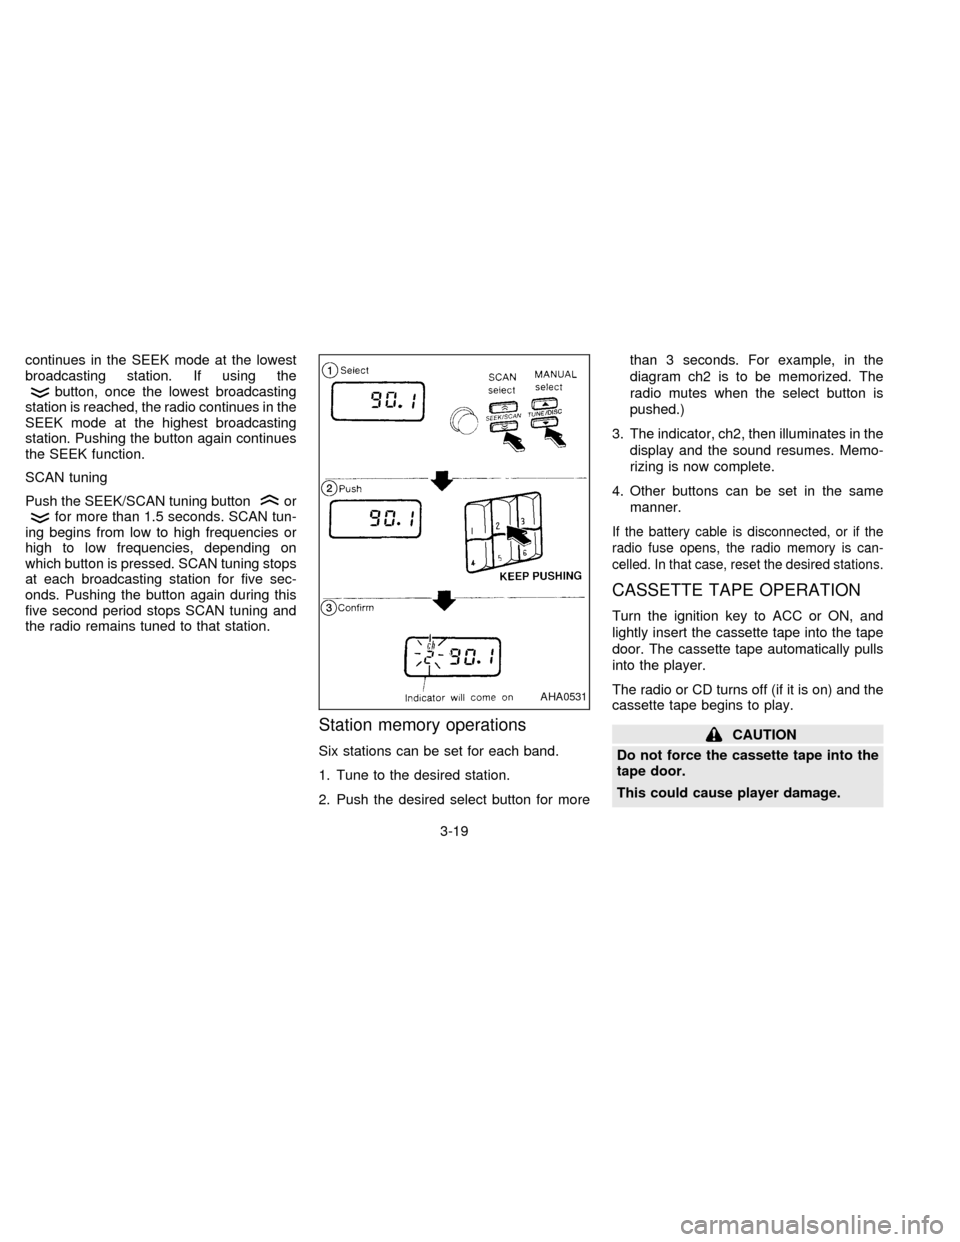
Station memory operations
Six stations can be set for each band.
1. Tune to the desired station.
2. Push the desired select button for morethan 3 seconds. For example, in the
diagram ch2 is to be memorized. The
radio mutes when the select button is
pushed.)
3. The indicator, ch2, then illuminates in the
display and the sound resumes. Memo-
rizing is now complete.
4. Other buttons can be set in the same
manner.
If the battery cable is disconnected, or if the
radio fuse opens, the radio memory is can-
celled. In that case, reset the desired stations.
CASSETTE TAPE OPERATION
Turn the ignition key to ACC or ON, and
lightly insert the cassette tape into the tape
door. The cassette tape automatically pulls
into the player.
The radio or CD turns off (if it is on) and the
cassette tape begins to play.
CAUTION
Do not force the cassette tape into the
tape door.
This could cause player damage.
AHA0531
3-19
ZX