1997 NISSAN ALTIMA heating
[x] Cancel search: heatingPage 71 of 203
cDo not use the recirculation mode for
long periods as it may cause the inte-
rior air to become stale and the win-
dows to fog up.
cPositioning of the heating or air con-
ditioning controls should not be
done while driving, in order that full
attention may be given to the driving
operation.
CONTROLS
Fan control dial
This dial turns the fan on and off, and
controls fan speed.
Air flow control buttons
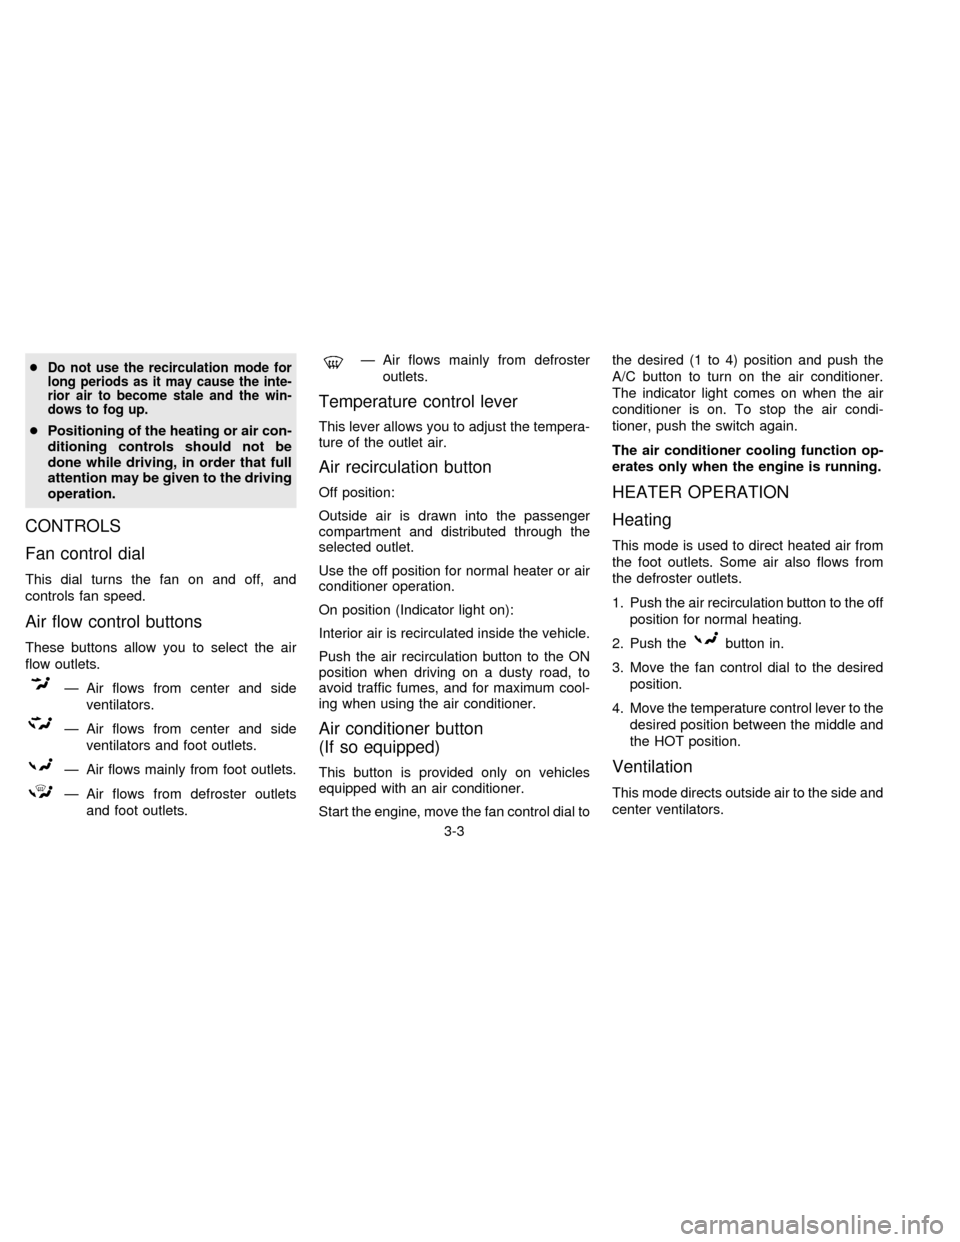
These buttons allow you to select the air
flow outlets.
Ð Air flows from center and side
ventilators.
Ð Air flows from center and side
ventilators and foot outlets.
Ð Air flows mainly from foot outlets.
Ð Air flows from defroster outlets
and foot outlets.
Ð Air flows mainly from defroster
outlets.
Temperature control lever
This lever allows you to adjust the tempera-
ture of the outlet air.
Air recirculation button
Off position:
Outside air is drawn into the passenger
compartment and distributed through the
selected outlet.
Use the off position for normal heater or air
conditioner operation.
On position (Indicator light on):
Interior air is recirculated inside the vehicle.
Push the air recirculation button to the ON
position when driving on a dusty road, to
avoid traffic fumes, and for maximum cool-
ing when using the air conditioner.
Air conditioner button
(If so equipped)
This button is provided only on vehicles
equipped with an air conditioner.
Start the engine, move the fan control dial tothe desired (1 to 4) position and push the
A/C button to turn on the air conditioner.
The indicator light comes on when the air
conditioner is on. To stop the air condi-
tioner, push the switch again.
The air conditioner cooling function op-
erates only when the engine is running.
HEATER OPERATION
Heating
This mode is used to direct heated air from
the foot outlets. Some air also flows from
the defroster outlets.
1. Push the air recirculation button to the off
position for normal heating.
2. Push the
button in.
3. Move the fan control dial to the desired
position.
4. Move the temperature control lever to the
desired position between the middle and
the HOT position.
Ventilation
This mode directs outside air to the side and
center ventilators.
3-3
ZX
Page 72 of 203

1. Push the air recirculation button to the off
position.
2. Push the
button in.
3. Move the fan control dial to the desired
position.
4. Move the temperature control lever to the
desired position.
Defrosting or defogging
This mode is used to defrost/defog the
windows.
1. Push the
button in.
2. Move the fan control dial to the desired
position.
3. Move the temperature control lever to the
desired position between the middle and
the HOT position.
cTo quickly remove ice or fog from the
windows, turn on the fan control dial to 4
and the temperature control lever to the
full HOT position.
cWhen the
switch is pushed, the air
conditioner automatically turns on to de-
fog the windshield, and the air recircula-
tion mode automatically turns off.Outside air is drawn into the passenger
compartment to improve the defogging
performance.
Bi-level heating/cooling
This mode directs air from the side, center
and foot outlets.
1. Push the air recirculation button to the off
position.
2. Push the
button in.
3. Move the fan control dial to the desired
position.
4. Move the temperature control lever to the
desired position.
Heating and defogging
This mode heats the interior and defogs the
windshield.
1. Push the
button in.
2. Move the fan control dial to the desired
position.
3. Move the temperature control lever to the
desired position between the middle and
the HOT position.
Operating tips
cClear snow and ice from the wiper
blades and air inlet in front of the
windshield. This improves heater op-
eration.
cWhen the
orswitch is se-
lected, the air recirculation mode auto-
matically turns off.
Outside air is drawn into the passenger
compartment to improve the defogging
performance.
AIR CONDITIONER OPERATION
(If so equipped)
Start the engine, move the fan control dial to
the desired (1 to 4) position and push in the
A/C button to activate the air conditioner.
When the air conditioner is on, cooling and
dehumidifying functions are added to the
heater operation.
The air conditioner cooling function op-
erates only when the engine is running.
3-4
ZX
Page 73 of 203

Cooling
This mode is used to cool and dehumidify.
1. Push the air recirculation button to the off
position.
2. Push the
button in.
3. Move the fan control dial to the desired
position.
4. Push on the air conditioner button. The
indicator light comes on.
5. Move the temperature control lever to the
desired position.
cFor quick cooling when the outside tem-
perature is high, push the air recirculation
button to the on position. Be sure to
return the air recirculation button to the
off position for normal cooling.
Dehumidified heating
This mode is used to heat and dehumidify.
1. Push the air recirculation button to the off
position.
2. Push the
button in.
3. Move the fan control dial to the desired
position.4. Push on the air conditioner button. The
indicator light comes on.
5. Move the temperature control lever to the
desired position.
Dehumidified defogging
This mode defogs the windows and dehu-
midifies.
1. Push the
button in.
2. Move the fan control dial to the desired
position.
3. Push the air conditioner button. The indi-
cator light comes on.
4. Move the temperature control lever to the
desired position.
When the
button is pushed, the air
conditioner automatically turns on to de-
fog the windshield, and the air recircula-
tion mode automatically turns off.
Outside air is drawn into the passenger
compartment to improve the defogging per-
formance.
Operating tips
cKeep the windows and sun roof closed
while the air conditioner is in operation.cAfter parking in the sun, drive for two or
three minutes with the windows open to
vent hot air from the passenger compart-
ment. Then, close the windows. This
allows the air conditioner to cool the
interior more quickly.
cThe air conditioner system should be
operated for about ten minutes at
least once a month. This helps pre-
vent damage to the system due to lack
of lubrication.
cIf the coolant temperature gauge ex-
ceeds the H (hot) position, turn the air
conditioner off. See ``If your vehicle over-
heats'' in the ``In case of emergency''
section for additional information.
AIR FLOW CHARTS
The charts on the following pages show the
switch and lever positions forMAXIMUM
and QUICKheating, cooling, or defrosting.
3-5
ZX
Page 76 of 203
WARNING
cThe air conditioner cooling function
operates only when the engine is
running.
cDo not leave children, unreliable
adults, or pets alone in your vehicle.
On hot sunny days, temperatures in
a closed vehicle could quickly be-
come high enough to cause severe
or possibly fatal injuries to people or
animals.cDo not use the recirculation mode
for long periods as it may cause the
interior air to become stale and the
windows to fog up.
cPositioning of the heating or air con-
ditioning controls should not be
done while driving, in order that full
attention may be given to the driving
operation.
Controls
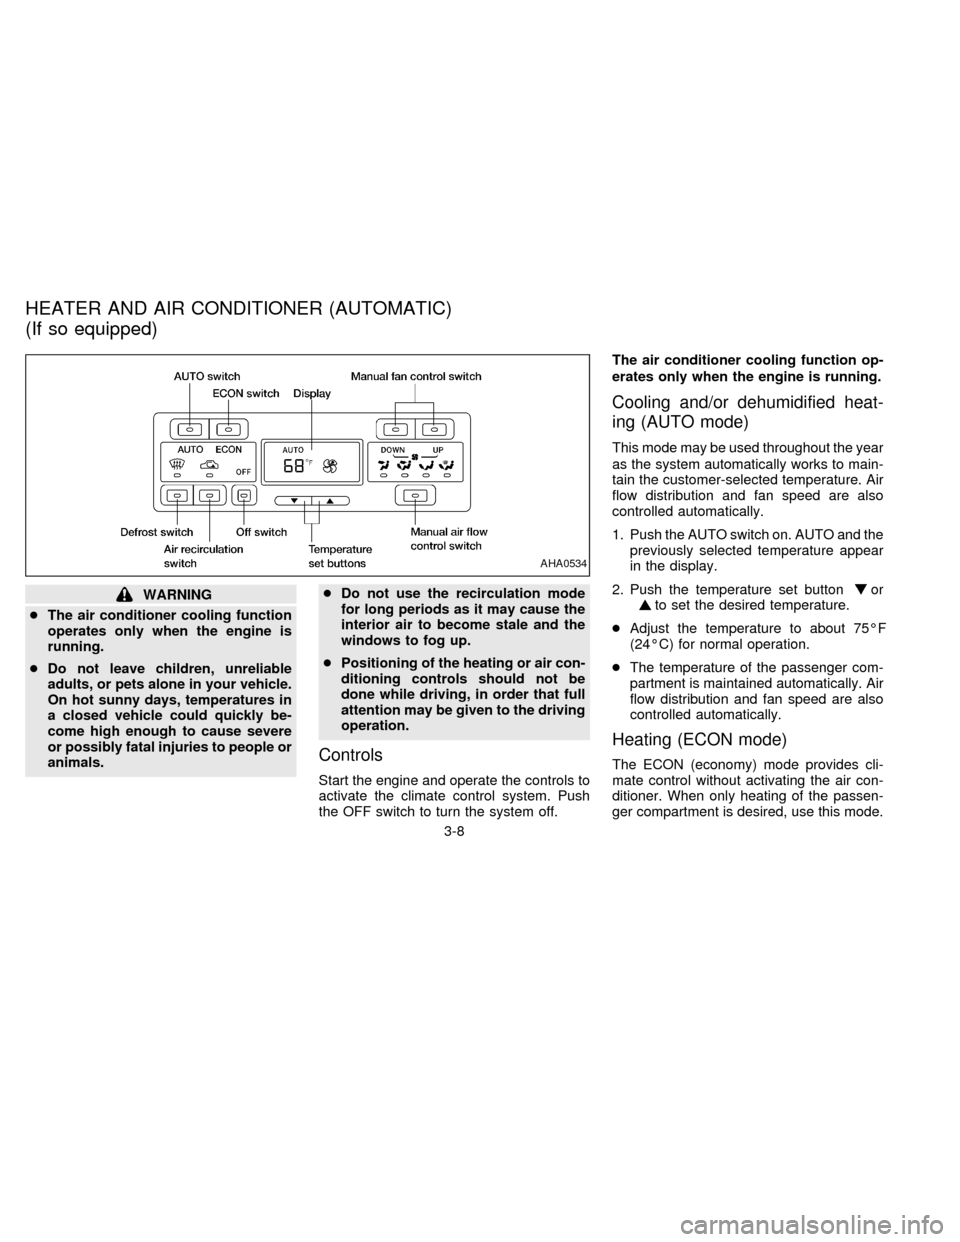
Start the engine and operate the controls to
activate the climate control system. Push
the OFF switch to turn the system off.The air conditioner cooling function op-
erates only when the engine is running.
Cooling and/or dehumidified heat-
ing (AUTO mode)
This mode may be used throughout the year
as the system automatically works to main-
tain the customer-selected temperature. Air
flow distribution and fan speed are also
controlled automatically.
1. Push the AUTO switch on. AUTO and the
previously selected temperature appear
in the display.
2. Push the temperature set button
orto set the desired temperature.
cAdjust the temperature to about 75ÉF
(24ÉC) for normal operation.
cThe temperature of the passenger com-
partment is maintained automatically. Air
flow distribution and fan speed are also
controlled automatically.
Heating (ECON mode)
The ECON (economy) mode provides cli-
mate control without activating the air con-
ditioner. When only heating of the passen-
ger compartment is desired, use this mode.
AHA0534
HEATER AND AIR CONDITIONER (AUTOMATIC)
(If so equipped)
3-8
ZX
Page 109 of 203
while driving. This overheats the brakes,
increases wear on the brake linings and
pads, and reduces gas mileage.
To help save the brakes and to prevent the
brakes from overheating, reduce speed and
downshift to a lower gear before going down
a slope or long grade. Overheated brakes
may reduce braking performance and could
result in loss of vehicle control.
WARNING
While driving on a slippery surface, be
careful when braking, accelerating or
downshifting. Abrupt braking or accel-
erating could cause the wheels to skid
and result in an accident.The anti-lock brake system installed in
some models controls the brakes at each
wheel so the wheels do not lock when
braking abruptly or when braking on slip-
pery surfaces. The system detects the rota-
tion speed at each wheel and varies the
brake fluid pressure to prevent each wheel
from locking and sliding. By preventing
wheel lockup, the system helps the driver
maintain steering control and helps to mini-
mize swerving and spinning on slippery
surfaces.
Using the System
Depress the brake pedal and hold it down.
WARNING
Do not pump the brake pedal. Doing so
may result in increased stopping dis-
tances.
Normal operation
The anti-lock brake system does not oper-
ate at speeds below 3 to 6 MPH (5 to 10
km/h) to completely stop the vehicle. (The
speeds vary according to road conditions.)
When the anti-lock system senses that one
or more wheels are close to locking up, theactuator (under the hood) rapidly applies
and releases hydraulic pressure (like pump-
ing the brakes very quickly). While the ac-
tuator is working, you may feel a pulsation in
the brake pedal and hear a noise or vibra-
tion from the actuator under the hood. This
is normal and indicates that the anti-lock
system is working properly. However, the
pulsation may indicate that road conditions
are hazardous and extra care is required
while driving.
Self-test feature
The anti-lock brake system is sophisticated,
with electronic sensors, electric pumps, and
hydraulic solenoids controlled by a com-
puter. The computer has a built-in diagnos-
tic feature that tests the system each time
you start the engine and move the vehicle at
a low speed in forward or reverse. When the
self-test occurs, you may hear a ``clunk''
noise and/or feel a pulsation in the brake
pedal. This is normal and is not an indica-
tion of any malfunction. If the computer
senses any malfunction, it switches the anti-
lock brake system OFF and turns on the
ABS brake warning light in the dashboard.
The brake system then operates normally,
but without anti-lock assistance.
ANTI-LOCK BRAKE SYSTEM
(ABS) (If so equipped)
4-17
ZX
Page 121 of 203
CAUTION
cAutomatic transmission models can-
not be push started. This may cause
transmission damage.
cThree way catalyst equipped models
should not be started by pushing
since the three way catalyst may be
damaged.
cNever try to start the vehicle by tow-
ing it; when the engine starts, the
forward surge could cause the ve-
hicle to collide with the tow vehicle.If your vehicle is overheating (indicated by
an extremely high temperature gauge read-
ing), or if you feel a lack of engine power,
detect abnormal noise, etc., take the follow-
ing steps:
WARNING
cDo not continue to drive if your ve-
hicle overheats. Doing so could
cause a vehicle fire.
cTo avoid the danger of being
scalded, never remove the radiator
cap while the engine is still hot.
When the radiator cap is removed,
pressurized hot water will spurt out,
possibly causing serious injury.
cDo not open the hood if steam is
coming out.
1. Move the vehicle safely off the road,
apply the parking brake and move the
shift lever to Neutral (automatic transmis-
sion to P).
Do not stop the engine.
2. Turn off the air conditioner. Open all the
windows, move the heater or air condi-
tioner temperature control to maximum
hot and fan control to high speed.3. If engine overheating is caused by climb-
ing a long hill on a hot day, run the engine
at a fast idle (approximately 1,500 rpm)
until the temperature gauge indication
returns to normal.
4. Get out of the vehicle. Look and listen for
steam or coolant escaping from the ra-
diator before opening the hood. Wait until
no steam or coolant can be seen before
proceeding.
5. Open the engine hood.
WARNING
If steam or water is coming from the
engine, stand clear to prevent getting
burned.
6. Visually check drive belts for damage or
looseness. Also check if the cooling fan
is running. The radiator hoses and radia-
tor should not leak water. If coolant is
leaking, the water pump belt is missing or
loose, or the cooling fan does not run,
stop the engine.
PUSH STARTING IF YOUR VEHICLE
OVERHEATS
5-9
ZX
Page 135 of 203
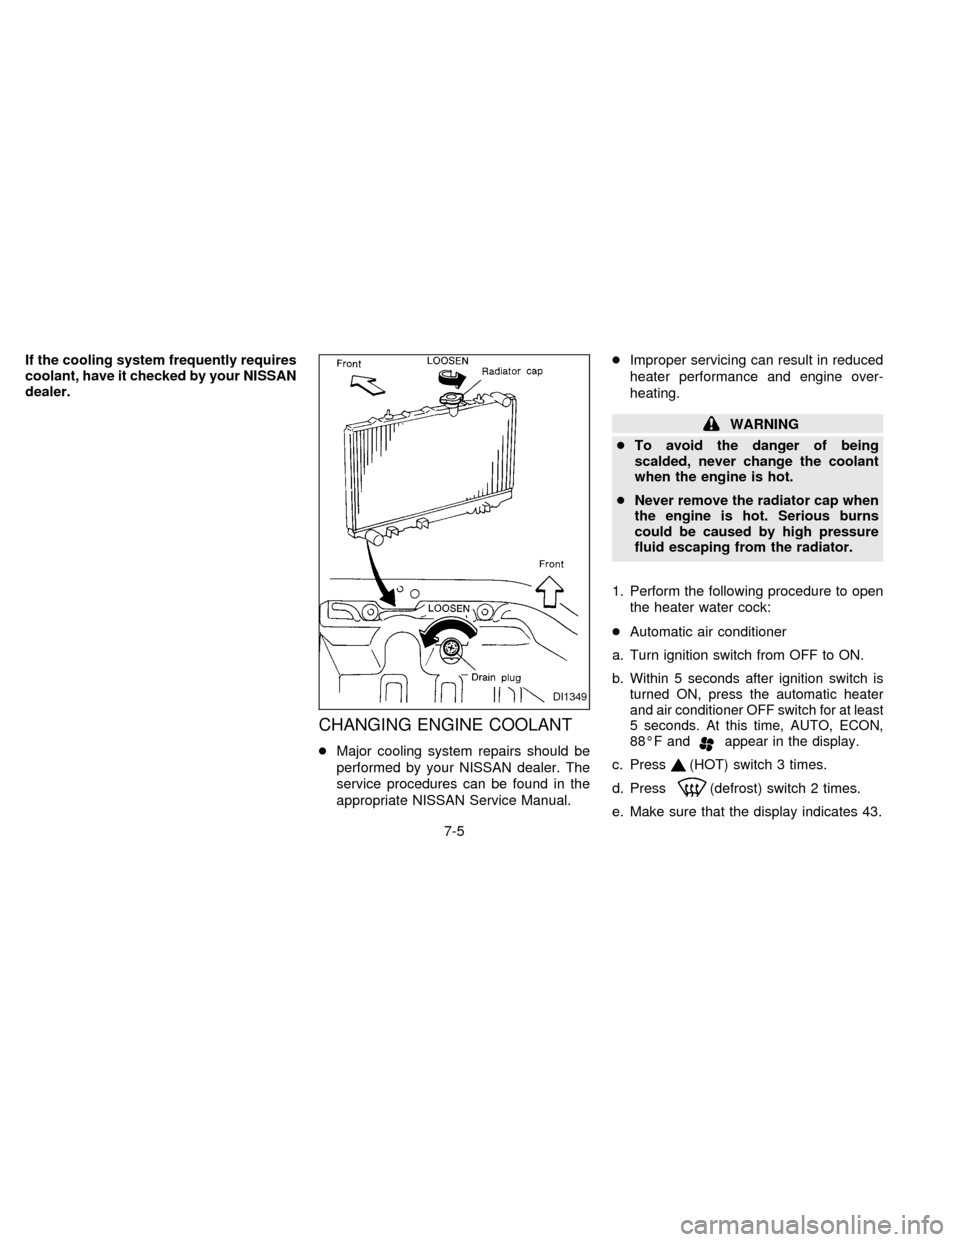
If the cooling system frequently requires
coolant, have it checked by your NISSAN
dealer.
CHANGING ENGINE COOLANT
cMajor cooling system repairs should be
performed by your NISSAN dealer. The
service procedures can be found in the
appropriate NISSAN Service Manual.cImproper servicing can result in reduced
heater performance and engine over-
heating.
WARNING
cTo avoid the danger of being
scalded, never change the coolant
when the engine is hot.
cNever remove the radiator cap when
the engine is hot. Serious burns
could be caused by high pressure
fluid escaping from the radiator.
1. Perform the following procedure to open
the heater water cock:
cAutomatic air conditioner
a. Turn ignition switch from OFF to ON.
b.
Within 5 seconds after ignition switch is
turned ON, press the automatic heater
and air conditioner OFF switch for at least
5 seconds. At this time, AUTO, ECON,
88ÉF and
appear in the display.
c. Press(HOT) switch 3 times.
d. Press
(defrost) switch 2 times.
e. Make sure that the display indicates 43.
DI1349
7-5
ZX
Page 136 of 203

f. Wait 10 seconds before turning ignition
switch OFF.
cManual air conditioning
a. Turn the ignition switch ON and set the
temperature control lever to the maxi-
mum hot position. Wait 10 seconds, then
turn the switch OFF.
2. Open the radiator drain plug. Open the
drain plug on the engine water pipe.
3. Open the radiator cap to drain the cool-
ant.
4. Flush the cooling system by running
fresh water through the radiator.
5. Close the radiator drain plug and the
drain plug on the engine water pipe se-
curely.
6. See the ``Technical and consumer infor-
mation'' section for cooling system ca-
pacity. Fill the radiator slowly with the
proper mixture of coolant and water. Fill
the reservoir tank up to the MAX level.
7. Open and close the air release plug to
release air. Then fill the radiator again
and install the radiator cap.8. Start the engine and warm it up until it
reaches normal operating temperature.
Then race the engine 2 or 3 times under
no load. Watch the coolant temperature
gauge for signs of overheating.
9. Stop the engine. After it completely cools
down, refill the radiator up to the filler
opening. Fill the reservoir tank up to the
MAX level.
10. Open and close the air release plug to
release air. Then fill the radiator again
and install the radiator cap.11. Check the radiator drain plug and the
drain plug on the engine water pipe for
any sign of leakage, tighten if neces-
sary.
DI1351DI1299
7-6
ZX