1997 NISSAN ALTIMA Headlights
[x] Cancel search: HeadlightsPage 16 of 203

The theft warning system provides visual
and audio alarm signals if parts of the
vehicle are disturbed.
How to activate the theft warning
system
1. Close all windows.
2. Remove the key from the ignition switch.
3. Close and lock all doors, hood and trunk
lid. Lock all doors by pressing the
button on the multi-remote controller. At
this time, the hazard indicators flash
twice to indicate all doors are locked.The system can be activated even if the
windows are open.
4.
Confirm that the SECURITY indicator light
comes on. The SECURITY light glows for
about 30 seconds and then begins to flash
once every three seconds. The system is
now activated. If, during this 30-second
time period, the door is unlocked by the
key or the multi-remote controller, or the
ignition key is turned to ACC or ON, the
system will not activate.
If the key is turned slowly when locking
the door, the system may not activate.
Furthermore, if the key is turned exces-
sively to the unlock position, the system
may be deactivated when the key is re-
moved. If the indicator light fails to glow
for 30 seconds, unlock the door once
and lock it again.
Even when the driver and/or passengers
are in the vehicle, the system will acti-
vate with all doors, hood and trunk lid
locked and ignition key off. Turn the
ignition key to ACC or ON to turn the
system off.
Theft warning system operation
The theft warning system emits the follow-
ing alarm:
cThe headlights blink and the horn sounds
intermittently. In addition, the starter mo-
tor does not operate.
cThe alarm automatically turns off after 2
to 3 minutes. However, the alarm reacti-
vates if the vehicle is tampered with
again. The alarm can be shut off by
unlocking a door or trunk lid with the key,
or by pressing the
button on the
multi-remote controller.
The alarm is activated by:
copening the door or trunk lid without
using the key (even if the door is un-
locked by releasing the door inside lock
switch) or opening the trunk lid by oper-
ating the opener lever.
copening the hood.
cpushing in or pulling out the key cylinder
on the door or trunk lid.
How to stop the alarm
The alarm stops only by unlocking a door or
the trunk lid with the key, or by pressing
IC0005
THEFT WARNING
(If so equipped)
1-9
ZX
Page 19 of 203

Lighting
Turn the switch to theposition: The
front clearance, side marker, tail, license
plate and instrument panel lights come on.
Turn the switch to the
position:The headlights come on and all the other
lights remain on.
To select the high beam function, push the
lever forward. The high beam lights come
on and the indicator light illuminates. Pull it
back to select the low beam.
AIC0505
HEADLIGHT AND TURN
SIGNAL SWITCH
1-12
ZX
Page 20 of 203

DAYTIME RUNNING LIGHT SYS-
TEM (for Canada)
The headlights automatically illuminate at a
reduced intensity when the engine is started
with the parking brake released. The day-
time running lights operate with the head-
light switch in the ``OFF'' position or in the
``
'' position. Turn the headlight switch
to the ``
'' position for full illumination
when driving at night.
If the parking brake is applied before the
engine is started, the daytime running lights
do not illuminate. The daytime running lights
illuminate once the parking brake is re-
leased. The daytime running lights will re-
main on until the ignition switch is turned off.
WARNING
When the daytime running light system
is active, tail lights on your vehicle are
not on. It is necessary at dusk to turn
on your headlights. Failure to do so
could cause an accident injuring your-
self and others.
Passing signal
Pulling and releasing the lever flashes the
headlight high beams on and off.
Turn signal
Move the lever up or down to signal the
turning direction. When the turn is com-
pleted, the turn signals cancel automati-
cally.
Lane change signal
To signal a lane change, move the lever up
or down to the point where the indicator light
begins to flash, but the lever does not latch.
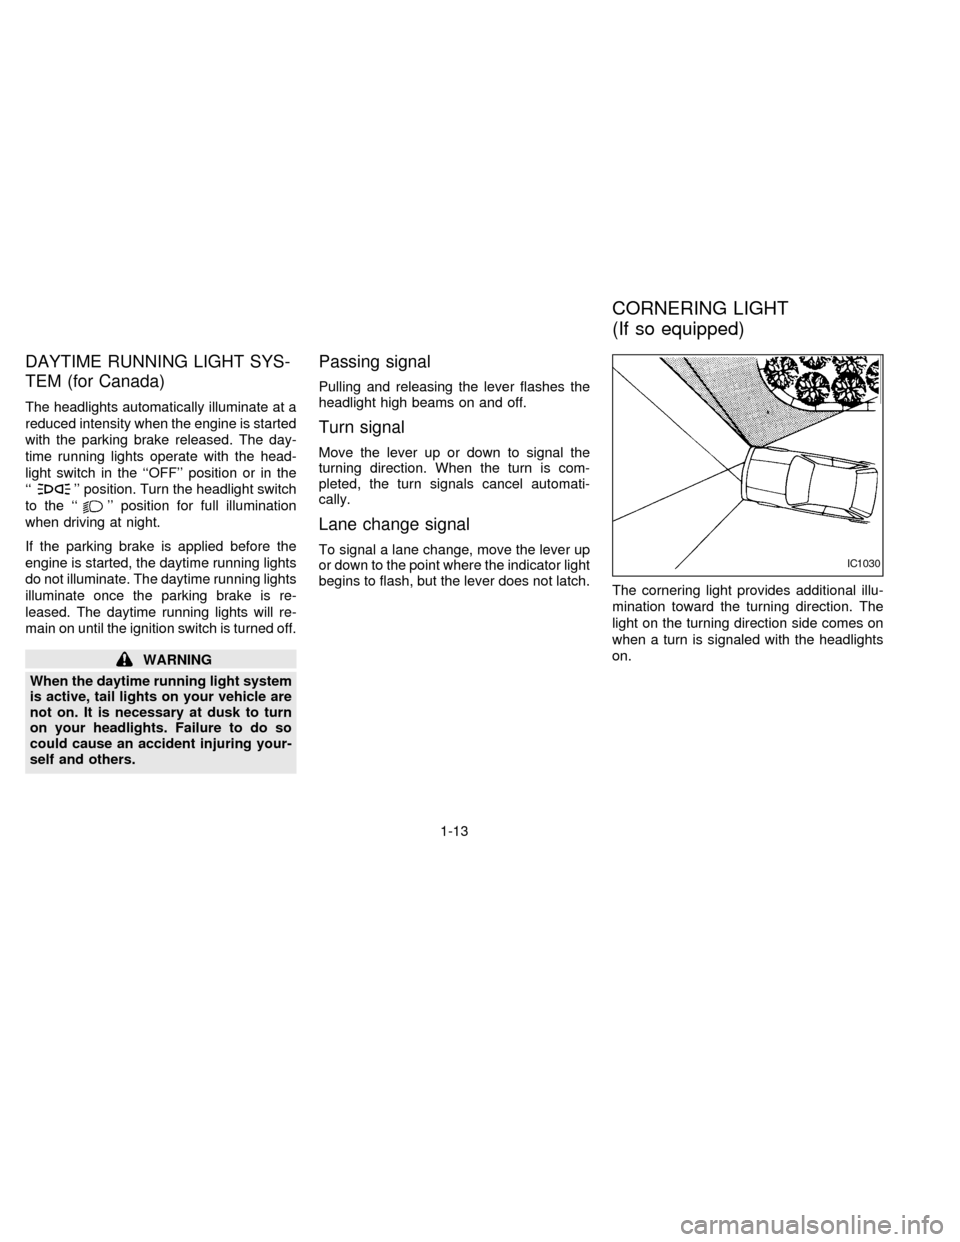
The cornering light provides additional illu-
mination toward the turning direction. The
light on the turning direction side comes on
when a turn is signaled with the headlights
on.IC1030
CORNERING LIGHT
(If so equipped)
1-13
ZX
Page 35 of 203

The interior light can be turned off without
waiting 30 seconds by inserting the key into
the ignition or locking the doors with the
multi-remote controller or pushing the
interior light button to OFF.
Using the panic alarm
If you are near your vehicle and feel threat-
ened, you may activate the alarm to call
attention as follows:
1. Push the
button on the remote con-
troller forlonger than 1.5 seconds.
2. The theft warning alarm and headlights
will stay on for 30 seconds.
3. The panic alarm stops when:
cit has run for 30 seconds, or
cthe
or thebutton is pressed, or
cthe
button is pushed for longer than
1.5 seconds on the multi-remote control-
ler.
Replace the battery in the multi-remote con-
troller as follows:
1. Open the lid using a coin.
2. Replace the battery with a new one.
Insert the battery as illustrated above.Recommended battery: Sanyo CR2025
or equivalent.
3. Close the lid securely.
4. Press the
button, then thebutton
two or three times to check the multi-
remote controller operation.
APD0535
BATTERY REPLACEMENT
2-6
ZX
Page 67 of 203

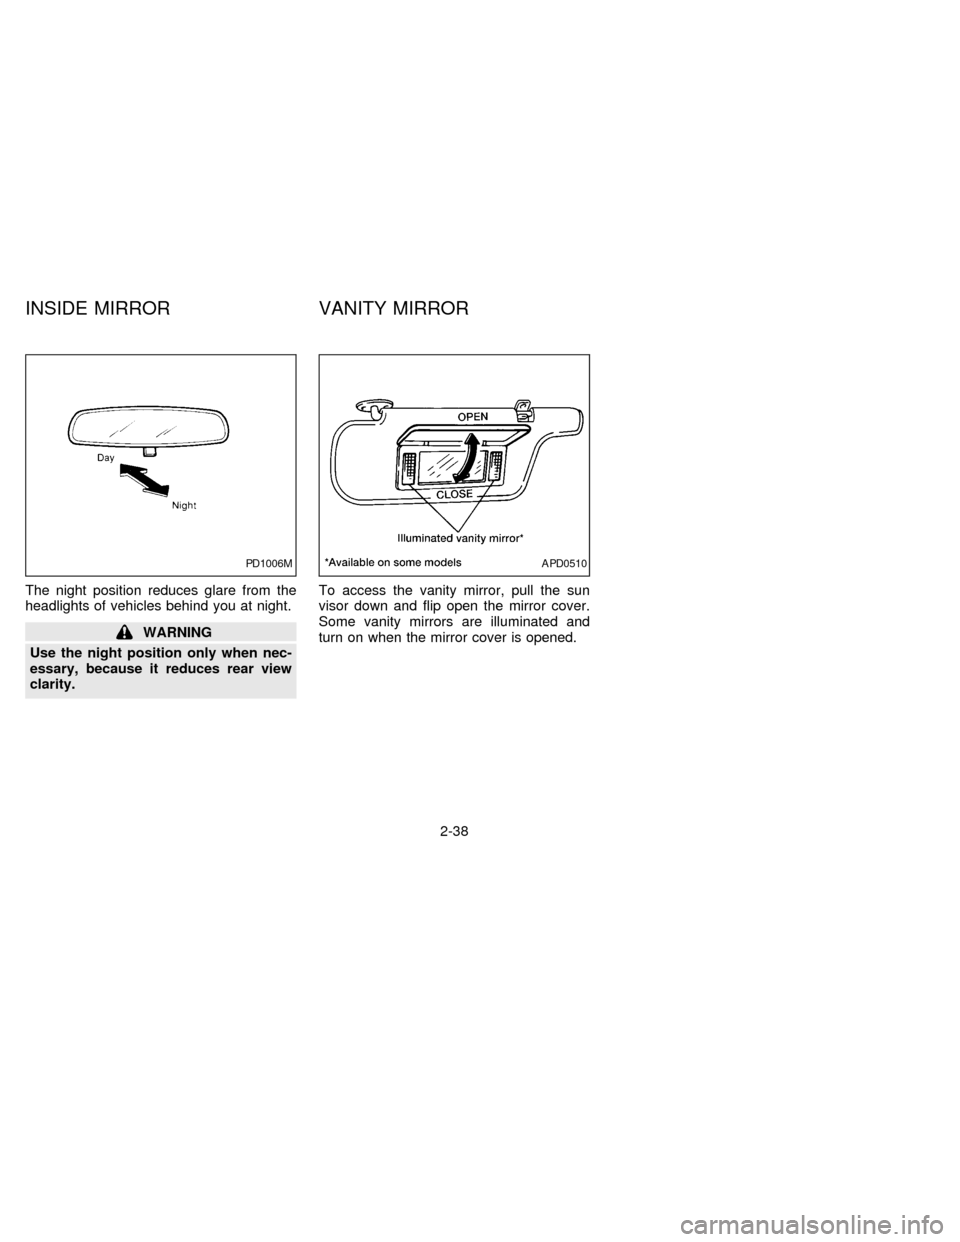
The night position reduces glare from the
headlights of vehicles behind you at night.
WARNING
Use the night position only when nec-
essary, because it reduces rear view
clarity.To access the vanity mirror, pull the sun
visor down and flip open the mirror cover.
Some vanity mirrors are illuminated and
turn on when the mirror cover is opened.
PD1006MAPD0510
INSIDE MIRROR VANITY MIRROR
2-38
ZX
Page 131 of 203

7Do-it-yourself operations
Maintenance precautions .......................................7-2
Engine compartment check locations ....................7-3
Engine cooling system ...........................................7-4
Checking engine coolant level ...............................7-4
Changing engine coolant .......................................7-5
Engine oil ...............................................................7-7
Checking engine oil level .......................................7-7
Changing engine oil ...............................................7-8
Changing engine oil filter .......................................7-9
Automatic transmission fluid (ATF) ........................7-9
Temperature conditions for checking ATF ...........7-10
Power steering fluid..............................................7-11
Brake and clutch fluid...........................................7-11
Window washer fluid ............................................7-12
Battery ..................................................................7-13
Jump starting ........................................................7-14
Drive belts ............................................................7-14Spark plug replacement .......................................7-15
Air cleaner housing filter ......................................7-16
Wiper blades ........................................................7-17
Parking brake check.............................................7-18
Brake pedal ..........................................................7-18
Brake booster .......................................................7-19
Clutch pedal .........................................................7-20
Fuses ....................................................................7-20
Fusible links..........................................................7-21
Light bulbs ............................................................7-22
Headlights ............................................................7-22
Headlight aiming adjustment ................................7-23
Adjustment after headlight assembly
replacement ..........................................................7-24
Bulb replacement .................................................7-25
Wheels and tires ..................................................7-29
ZX
Page 152 of 203

HEADLIGHTS
The headlight is a semi-sealed beam type
which uses a replaceable headlight (halo-
gen) bulb.
CAUTION
cHigh pressure halogen gas is sealed
inside the halogen bulb. The bulb
may break if the glass envelope is
scratched or the bulb is dropped.
cWhen handling the bulb, do not
touch the glass envelope.
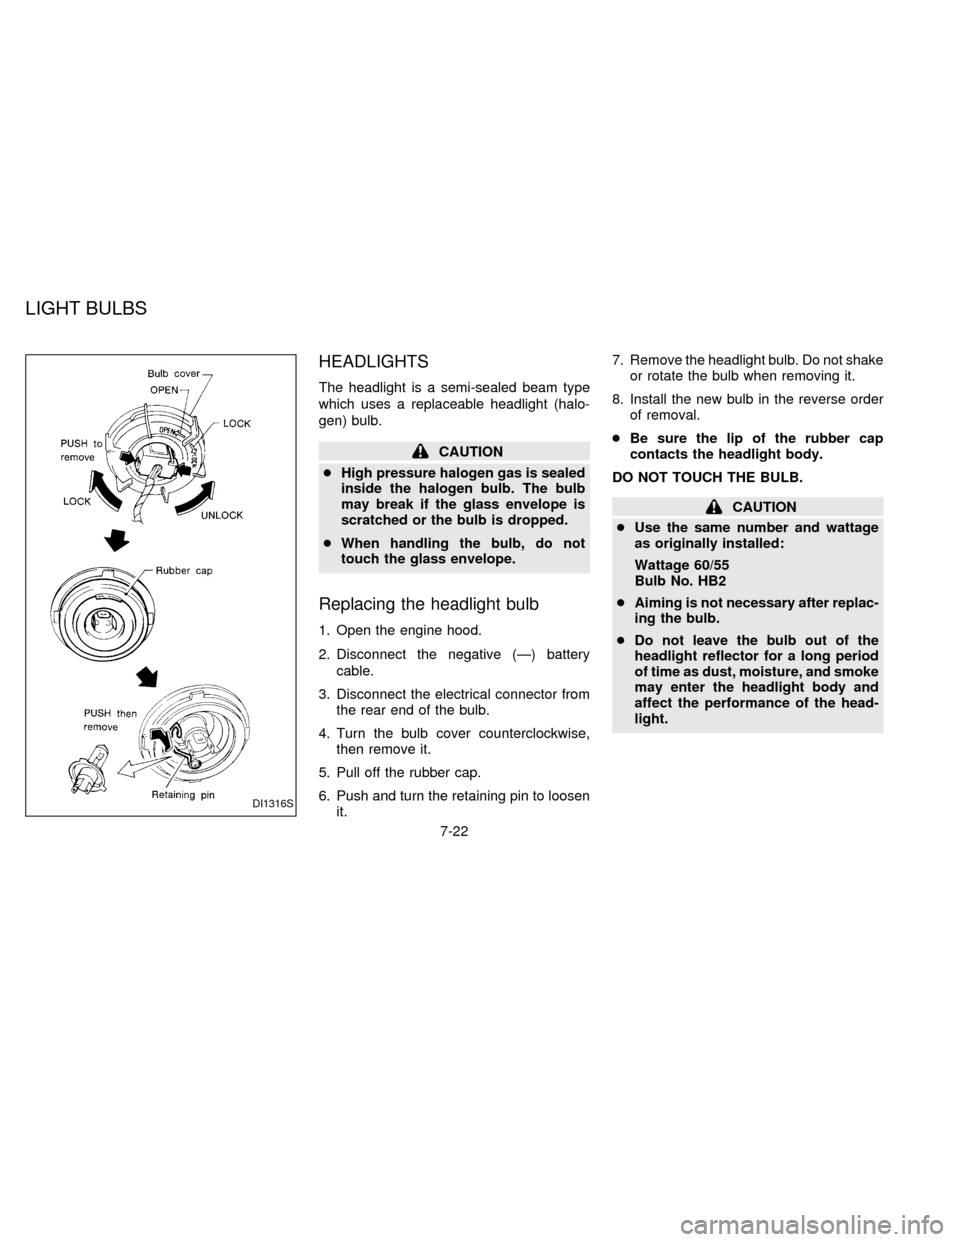
Replacing the headlight bulb
1. Open the engine hood.
2. Disconnect the negative (Ð) battery
cable.
3. Disconnect the electrical connector from
the rear end of the bulb.
4. Turn the bulb cover counterclockwise,
then remove it.
5. Pull off the rubber cap.
6. Push and turn the retaining pin to loosen
it.7. Remove the headlight bulb. Do not shake
or rotate the bulb when removing it.
8. Install the new bulb in the reverse order
of removal.
cBe sure the lip of the rubber cap
contacts the headlight body.
DO NOT TOUCH THE BULB.
CAUTION
cUse the same number and wattage
as originally installed:
Wattage 60/55
Bulb No. HB2
cAiming is not necessary after replac-
ing the bulb.
cDo not leave the bulb out of the
headlight reflector for a long period
of time as dust, moisture, and smoke
may enter the headlight body and
affect the performance of the head-
light.
DI1316S
LIGHT BULBS
7-22
ZX
Page 154 of 203

ADJUSTMENT AFTER
HEADLIGHT ASSEMBLY
REPLACEMENT
If the vehicle has had front body repair and
the headlight assembly has been replaced,
the aiming should be checked using the
aiming chart as shown in the illustration.
a. Adjust headlights so that main axis of
light is parallel to center line of body
and is aligned with point P shown in
the illustration.
b. Dotted lines in illustration show cen-
ter of headlight.
H: Horizontal center line of head-
lights
W: Distance between each headlight
center
L: Distance between the headlights
and the wall that the lights are
tested against. 7.62 m (25 ft)
C: Distance below the horizontal cen-
ter line of the light (ªHº) used in
determining the main axis of light.
106 mm (4.17 in)
H-C=M
M = main axis of lightEven if the horizontal indicator does not
align with the indicator line or the bubble is
not centered in the water level after aiming
by the chart, it is acceptable if the lines are
within the OK ranges.
ADI0505
7-24
ZX