Page 699 of 4133
232
Engine compartment
Te ch n ica l
data
Instruments
and controls Operation Driving
Instrument
cluster display Practical hints
Car care Index
Wa r n i n g !
To help prevent personal injury, stay clear of
moving parts when the hood is open and the engine
is running. Be sure the hood is properly closed
before driving. When closing hood, use extreme
caution not to catch hands or fingers.The radiator fan may continue to run for
approximately 30 seconds or even restart after the
engine has been turned off. Stay clear from fan
blades.
The engine is equipped with a transistorized
ignition system. Because of the high voltage it is
dangerous to touch any components (ignition coils,
spark plug sockets, diagnostic socket) of the
ignition system
• with the engine running,
• while starting the engine,
• if ignition is “on” and the engine is turned manually.If you see flames, steam or smoke coming from the
engine compartment, or if the coolant temperature
gauge indicates that the engine is overheated, do
not open the hood. Move away from vehicle and do
not open the hood until the engine has cooled. If
necessary, call a fire department.
Page 702 of 4133
235
Engine compartment
Te ch n ica l
data
Instruments
and controls Operation Driving
Instrument
cluster display Practical hints
Car care Index
Adding coolant
If coolant has to be added, a 50 / 50 mixture of water and
MB anticorrosion / antifreeze should be added.
After adding coolant, close cap until you hear it click a
few times.
The drain plugs for the cooling system are located on
the left and right side of the engine block directly above
the engine mounts and at the bottom of the radiator.
Anticorrosion / antifreeze mixture, see page 297.
Wa r n i n g !
In order to avoid possible serious burns or injury: • Use extreme caution when opening the hood if there are any signs of steam or coolant leaking
from the cooling system, or if the coolant
temperature gauge indicates that the coolant is
overheated.
• Do not remove pressure cap on coolant reservoir if engine temperature is above 194 °F
(90 °C). Allow engine to cool down before
removing cap. The coolant reservoir contains
hot fluid and is under pressure.• Using a rag, slowly open cap approximately 1/2 turn to relieve excess pressure. If opened
immediately, scalding hot fluid and steam will
be blown out under pressure.• Do not spill antifreeze on hot engine parts. Antifreeze contains ethylene glycol which may
burn if it comes into contact with hot engine
parts.
Page 730 of 4133
263
Exterior lamps
Te ch n ica l
data
Instruments
and controls Operation Driving
Instrument
cluster display Practical hints
Car care Index
Bulbs for high beam (only Halogen headlamps)
H1 U (55 W)
Bulbs for low beam
H7 (55 W)
Open hood.
Push down tab at top end of cover (3) and remove. Pull
off electrical connector (5 or 6). Unhook and move aside
clamping ring. Remove bulb.
Insert new bulb (seating properly in cutouts of bulb
socket), mount clamping ring. Reinstall and push
electrical connector on securely. Reinstall cover (3). Xenon
(optional)
Bulb for low beam
Xenon (optional)
Bulb for high beam
Note:
Vehicles with Xenon headlamps:
We recommend that you have changed the bulb for the
high beam by a qualified technician.
Wa r n i n g !
Because of high voltage in Xenon lamps, it is
dangerous to replace the bulb or repair the lamp
and its components. We recommend that you have
such work done by a qualified technician.
Page 731 of 4133
264
Exterior lamps
Te ch n ica l
data
Instruments
and controls Operation Driving
Instrument
cluster display Practical hints
Car care Index
Parking, standing, side marker and turn signal lamp
115 6 N A ( 3 2 / 4 c p b u l b )
Open hood.
Twist bulb socket (4) counterclockwise and pull out.
Push bulb into socket, turn counterclockwise and
remove.
Insert new bulb in socket, push in and twist clockwise.
Reinstall bulb socket. Bulbs for auxiliary fog lamp
(optional)
H3 U (55 W)
Open hood.
Remove cover (9). Unhook clamping ring and remove
bulb. Pull off electrical connector.
Insert new bulb in socket (seating properly in cutouts of
bulb socket), and mount clamping ring. Reinstall and
push electrical connector on securely.
Reinstall cover (9).
Page 735 of 4133
268
Exterior lamps
Te ch n ica l
data
Instruments
and controls Operation Driving
Instrument
cluster display Practical hints
Car care Index
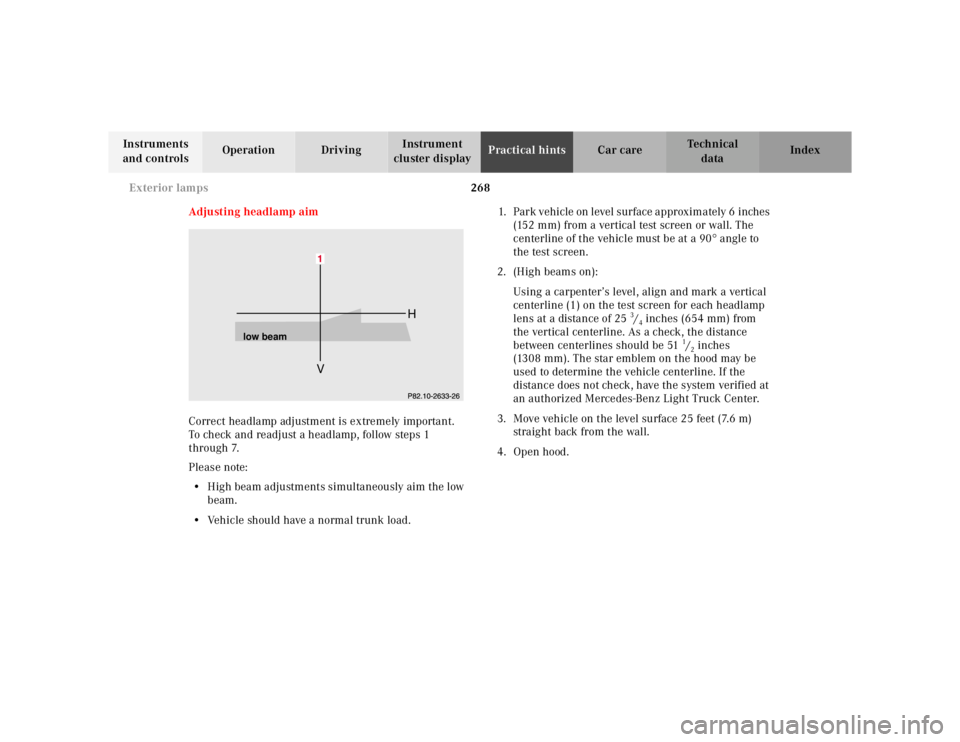
Adjusting headlamp aim
Correct headlamp adjustment is extremely important.
To check and readjust a headlamp, follow steps 1
through 7.
Please note:
• High beam adjustments simultaneously aim the low
beam.
• Vehicle should have a normal trunk load. 1. Park vehicle on level surface approximately 6 inches
(152 mm) from a vertical test screen or wall. The
centerline of the vehicle must be at a 90 ° angle to
the test screen.
2. (High beams on):
Using a carpenter’s level, align and mark a vertical
centerline (1) on the test screen for each headlamp
lens at a distance of 25
3/4inches (654 mm) from
the vertical centerline. As a check, the distance
between centerlines should be 51
1/2inches
(1308 mm). The star emblem on the hood may be
used to determine the vehicle centerline. If the
distance does not check, have the system verified at
an authorized Mercedes-Benz Light Truck Center.
3. Move vehicle on the level surface 25 feet (7.6 m) straight back from the wall.
4. Open hood.
V H
low beam
Page 742 of 4133
275
Replacing wiper blades
Te ch n ica l
data
Instruments
and controls Operation Driving
Instrument
cluster display Practical hints
Car care Index
Replacing wiper blades
For safety reasons, remove key from steering lock before
replacing the wiper blade, otherwise the motor can
suddenly turn on and cause injury.
Notes:
Do not open engine hood with wiper arm folded forward.
Do not allow the wiper arm to contact the windshield
glass without a wiper blade inserted. The glass may be
scratched or broken.
Make certain that the wiper blade is properly installed.
An improperly installed wiper blade may cause
windshield damage.
The wiper with air spoiler should be mounted on the
driver’s side. Replacing windshield/rear window wiper blade
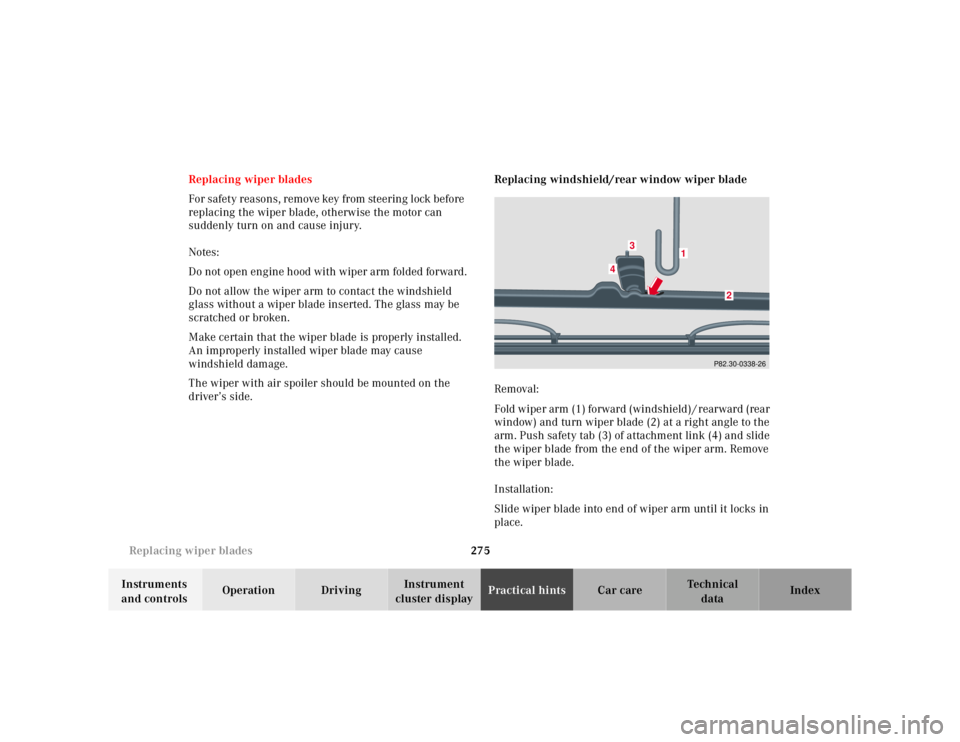
Removal:
Fold wiper arm (1) forward (windshield) / rearward (rear
window) and turn wiper blade (2) at a right angle to the
arm. Push safety tab (3) of attachment link (4) and slide
the wiper blade from the end of the wiper arm. Remove
the wiper blade.
Installation:
Slide wiper blade into end of wiper arm until it locks in
place.
P82.30-0338-26
1
2
3
4
Page 887 of 4133
83 Safety and Security
Anti-theft systems
�Anti-theft systems
Immobilizer
The immobilizer prevents unauthorized
persons from starting your vehicle.
Activating
Removing the key from the steering lock
activates the immobilizer.
Deactivating
Turning the key in the steering lock to
position2 (
�page 33) deactivates the im-
mobilizer.
Anti-theft alarm
Once the alarm system has been armed, a
visual and audible alarm is triggered when
someone:�
opens a door
�
opens the liftgate
�
opens the hood
The alarm will stay on even if the activating
element (a door, for example) is immedi-
ately closed.
The alarm system will also be triggered
when
�
someone attempts to raise the vehicle
�
unlocking and opening the driver’s
door with the mechanical keyArming the alarm system
The alarm system is armed after locking
the vehicle with the remote control. The
turn signal lamps flash three times to indi-
cate that the alarm system is activated. A
red lamp in the center console will flash af-
ter approximately 10 seconds when the
alarm system is completely armed
(
�page 27).
iIn case the engine cannot be started
(vehicle’s battery is in order), the sys-
tem is not operational. Contact an au-
thorized Mercedes-Benz Light Truck
Center or call 1-800-FOR-MERCedes
(in the USA), or 1-800-387-0100 (in
Canada).
iIf the alarm stays on for more than
20 seconds, an emergency call is initi-
ated automatically by the Tele Aid* sys-
tem (
�page 171) provided Tele Aid
service was subscribed to and properly
activated, and that necessary cellular
service and GPS coverage are avail-
able.
Page 888 of 4133
84 Safety and SecurityAnti-theft systemsDisarming the alarm system
The alarm system is disarmed when you
unlock your vehicle with the remote con-
trol. The turn signal lamps flash once to in-
dicate that the alarm system is
deactivated.Canceling the alarm
To cancel the alarm:
�
Switch on the ignition by turning the
key in the steering lock to position2.
or
�
Press theŒ or ‹button on the
remote control.
The alarm is canceled.
Tow-away alarm, glass breakage
sensor
The tow-away alarm and the glass break-
age sensor are part of the anti-theft alarm
system.Once the tow-away alarm is armed, a visual
and audible alarm will be triggered when
someone:
�
attempts to raise the vehicle
�
breaks a window and reaches into the
passenger compartment
iIf the turn signal lamps do not flash
three times, the tow-away - glass
breakage sensor is malfunctioning or
one of the following elements may not
be properly closed:�
a door
�
the liftgate
�
the hood
Close the respective element and lock
the vehicle again.
iThe alarm system will rearm automati-
cally again after approximately
40 seconds if one of the doors or the
liftgate is not opened.
iThe tow-away protection alarm is trig-
gered, for example, if the vehicle is
lifted on one side.
If the alarm stays on for more than
20 seconds, an emergency call is initi-
ated automatically by the Tele Aid* sys-
tem (
�page 171) provided Tele Aid
service was subscribed to and properly
activated, and that necessary cellular
service and GPS coverage are avail-
able.