Page 1900 of 4133
Fig. 331: Identifying CAN Bus Adapter And Lead
14. Connect brown and black wire (br, sw) from GPS ante nna lead (3) with brown and black lead (br, sw)
from TrafficStar wiring harness (4) and slide flat plug insulations together.
15. Attach flat plug connectors and GPS antenna lead (3) to TrafficStar wiring harness (4) with felt.
Fig. 332: Identifying GPS Antenna Connector And GPS Antenna Lead
16. Install counter plug (7) from TrafficS tar wiring harness (4) to radio connector (A2) and wrap with felt (c).
Fig. 333: Identifying Radio Connector And Counter Plug
17. Connect radio connector (A) and GPS antenna conn ector (C3) with TrafficStar radio and navigation
system (1).
18. Connect radio antenna.
2001 Mercedes-Benz ML320
1998-2005 ACCESSORIES & BODY, CAB Electr ical System - Body - 163 Chassis
me
Saturday, October 02, 2010 3:30:12 PMPage 405 © 2006 Mitchell Repair Information Company, LLC.
Page 1901 of 4133
19. Install TrafficStar (1) ra dio and navigation system.
Fig. 334: Identifying GPS Antenna Connector And Sound Connector
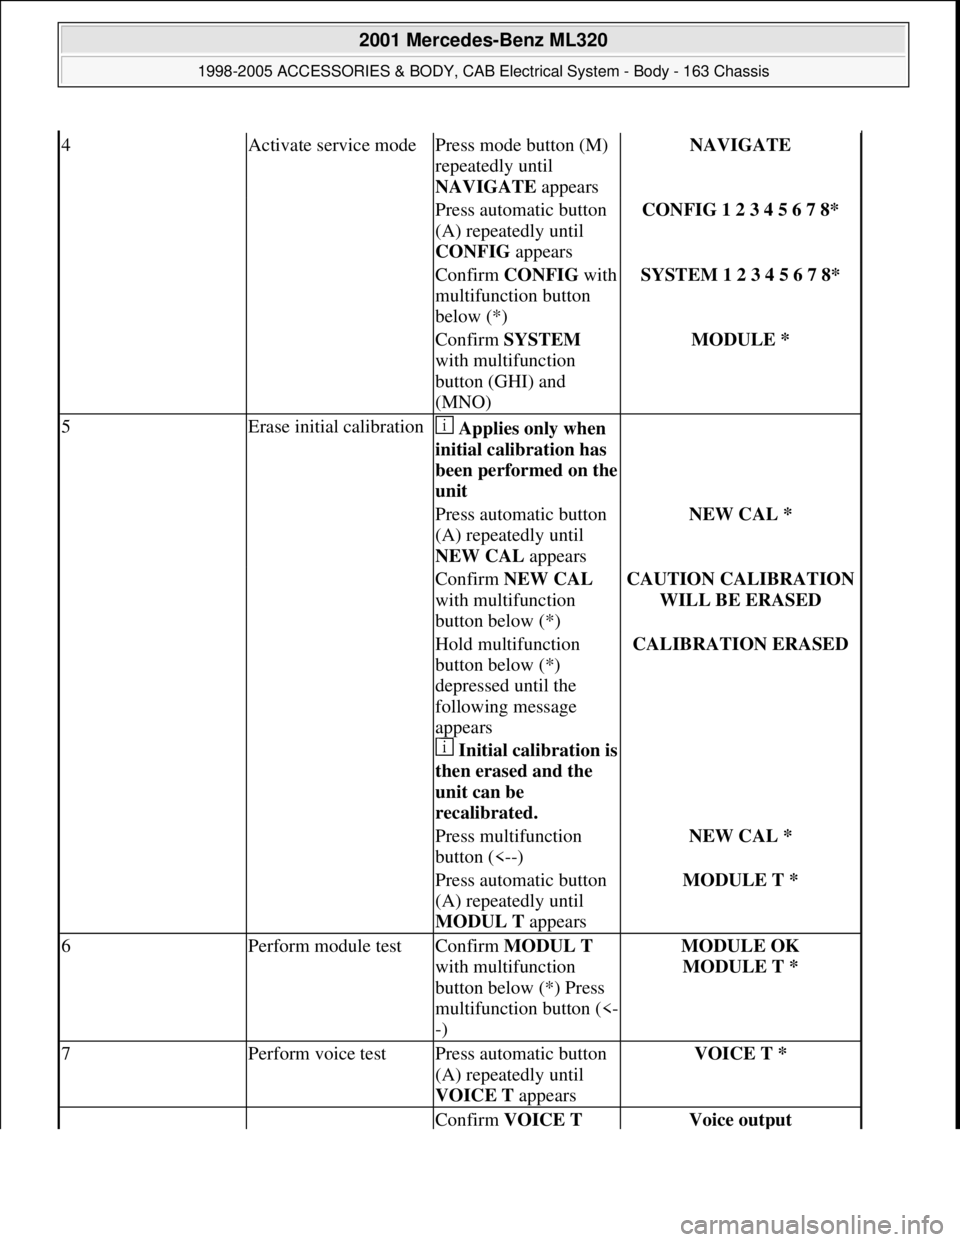
CARRYING OUT START-UP AND FU NCTION CHECK - AZ82.61-P-0001-04A
Models 129, 140, 163, 168, 170, 202, 208, 210
System description
Fig. 335: Identifying Trafficstar Display Fi eld, Automatic Button And Mode Button
Step 5 for initial start-up only applies for equipment which has already been installed in a vehicle and on
which initial calibration has been performed.
Start-up step
Entry with TrafficStar
keysFeedback on TrafficStar display field
1Start engine
2Switch on TrafficStarEnter code (see CODE
card) with
multifunction buttons
below the numbers on
the display field.CODE 1 2 3 4 5 6 7 8
3Insert navigation CD
into TrafficStarLoading time approx. 1
min.
2001 Mercedes-Benz ML320
1998-2005 ACCESSORIES & BODY, CAB Electr ical System - Body - 163 Chassis
me
Saturday, October 02, 2010 3:30:12 PMPage 406 © 2006 Mitchell Repair Information Company, LLC.
Page 1902 of 4133

4Activate service modePress mode button (M)
repeatedly until
NAVIGATE appearsNAVIGATE
Press automatic button
(A) repeatedly until
CONFIG appearsCONFIG 1 2 3 4 5 6 7 8*
Confirm CONFIGwith
multifunction button
below (*)SYSTEM 1 2 3 4 5 6 7 8*
Confirm SYSTEM
with multifunction
button (GHI) and
(MNO)MODULE *
5Erase initial calibration Applies only when
initial calibration has
been performed on the
unit
Press automatic button
(A) repeatedly until
NEW CAL appearsNEW CAL *
Confirm NEW CAL
with multifunction
button below (*)CAUTION CALIBRATION
WILL BE ERASED
Hold multifunction
button below (*)
depressed until the
following message
appears
Initial calibration is
then erased and the
unit can be
recalibrated. CALIBRATION ERASED
Press multifunction
button (<--)NEW CAL *
Press automatic button
(A) repeatedly until
MODUL T appearsMODULE T *
6Perform module testConfirm MODUL T
with multifunction
button below (*) Press
multifunction button (<-
-)MODULE OK
MODULE T *
7Perform voice testPress automatic button
(A) repeatedly until
VOICE T appearsVOICE T *
Confirm VOICE T Voice output
2001 Mercedes-Benz ML320
1998-2005 ACCESSORIES & BODY, CAB Electrical System - Body - 163 Chassis
me
Saturday, October 02, 2010 3:30:13 PMPage 407 © 2006 Mitchell Repair Information Company, LLC.
Page 1904 of 4133

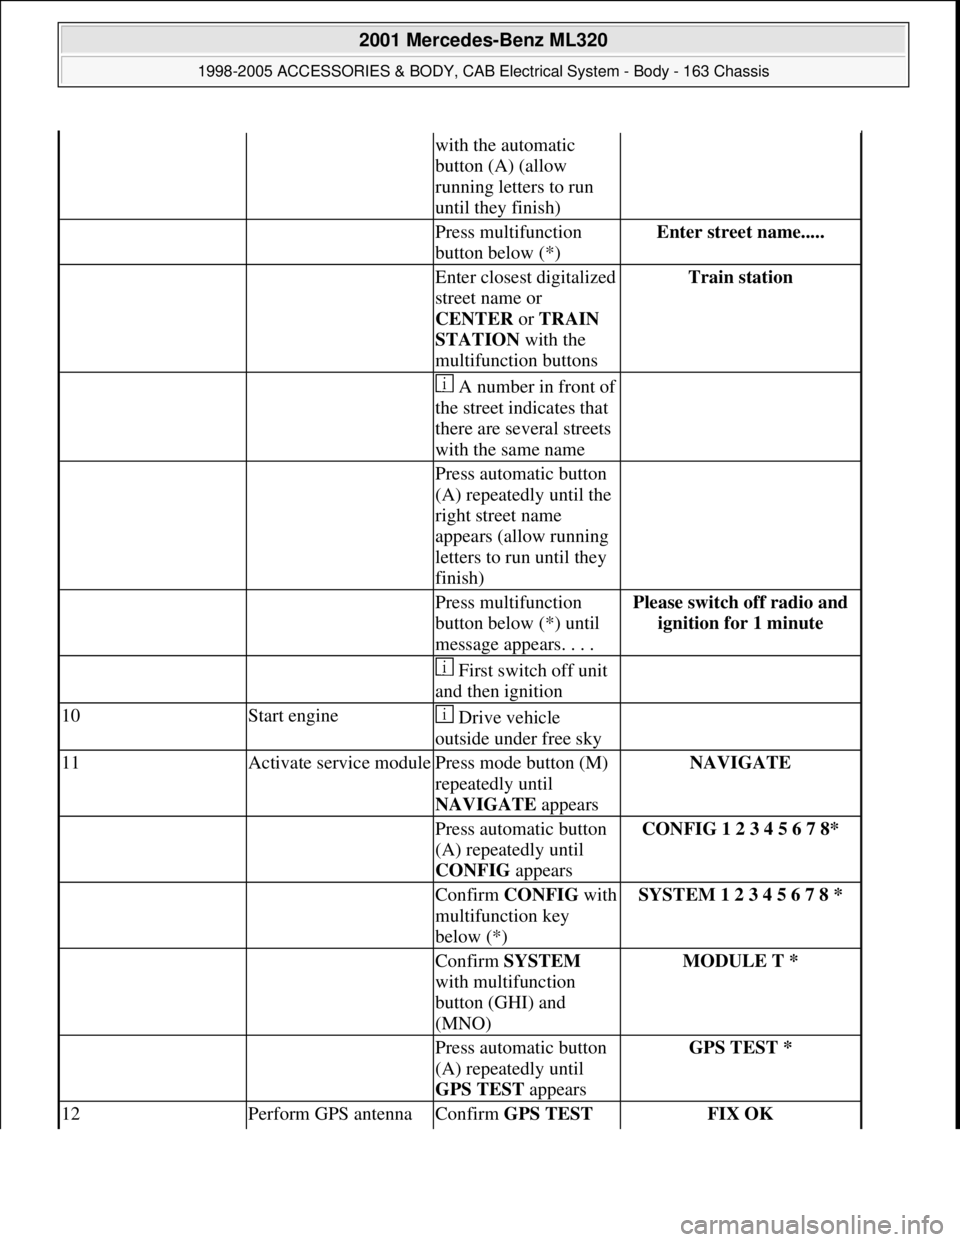
with the automatic
button (A) (allow
running letters to run
until they finish)
Press multifunction
button below (*)Enter street name.....
Enter closest digitalized
street name or
CENTER or TRAIN
STATION with the
multifunction buttonsTrain station
A number in front of
the street indicates that
there are several streets
with the same name
Press automatic button
(A) repeatedly until the
right street name
appears (allow running
letters to run until they
finish)
Press multifunction
button below (*) until
message appears. . . .Please switch off radio and
ignition for 1 minute
First switch off unit
and then ignition
10Start engine Drive vehicle
outside under free sky
11Activate service modulePress mode button (M)
repeatedly until
NAVIGATE appearsNAVIGATE
Press automatic button
(A) repeatedly until
CONFIG appearsCONFIG 1 2 3 4 5 6 7 8*
Confirm CONFIGwith
multifunction key
below (*)SYSTEM 1 2 3 4 5 6 7 8 *
Confirm SYSTEM
with multifunction
button (GHI) and
(MNO)MODULE T *
Press automatic button
(A) repeatedly until
GPS TEST appearsGPS TEST *
12Perform GPS antenna Confirm GPS TEST FIX OK
2001 Mercedes-Benz ML320
1998-2005 ACCESSORIES & BODY, CAB Electrical System - Body - 163 Chassis
me
Saturday, October 02, 2010 3:30:13 PMPage 409 © 2006 Mitchell Repair Information Company, LLC.
Page 1905 of 4133

RETROFITTING TRAFFICSTAR NAVIGATION SYSTEM - AZ82.61-P-0001I
MODEL 163 up to 30.6.99 except CODE (819) 6-disk CD changer in trunk
System illustration
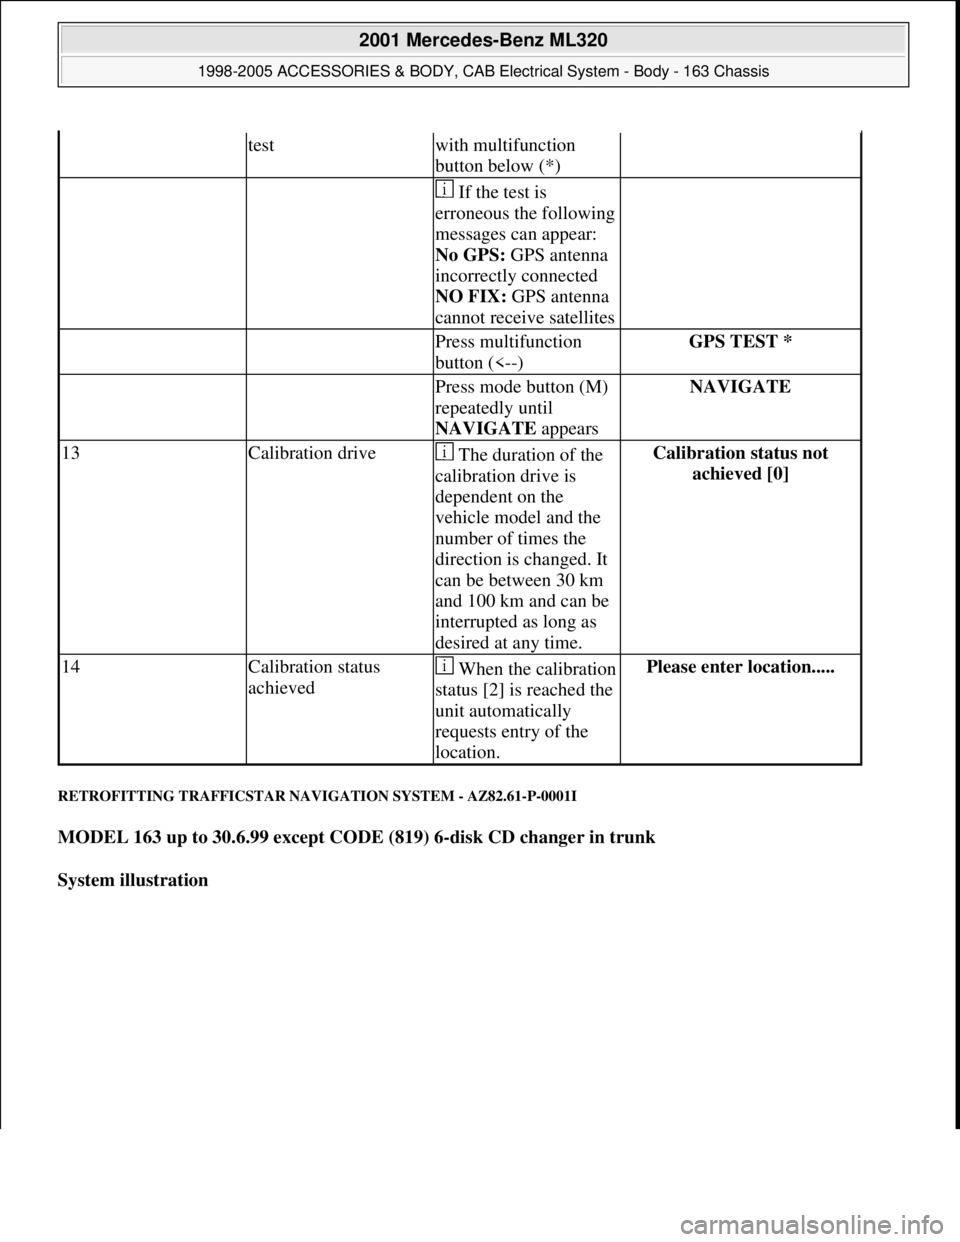
testwith multifunction
button below (*)
If the test is
erroneous the following
messages can appear:
No GPS: GPS antenna
incorrectly connected
NO FIX: GPS antenna
cannot receive satellites
Press multifunction
button (<--)GPS TEST *
Press mode button (M)
repeatedly until
NAVIGATE appearsNAVIGATE
13Calibration drive The duration of the
calibration drive is
dependent on the
vehicle model and the
number of times the
direction is changed. It
can be between 30 km
and 100 km and can be
interrupted as long as
desired at any time.Calibration status not
achieved [0]
14Calibration status
achievedWhen the calibration
status [2] is reached the
unit automatically
requests entry of the
location.Please enter location.....
2001 Mercedes-Benz ML320
1998-2005 ACCESSORIES & BODY, CAB Electrical System - Body - 163 Chassis
me
Saturday, October 02, 2010 3:30:13 PMPage 410 © 2006 Mitchell Repair Information Company, LLC.
Page 1906 of 4133
Fig. 336: Identifying Trafficstar Navigation System Components
Notes on TrafficStar
navigation systemModels 129, 140, 163,
168, 170, 202, 208, 210AH82.61-P-0001-03A
Removal
1Disconnect ground lead
from battery
AR54.10-P-0003A
2Remove radio
AR82.60-P-7502EA
3Remove center console
AR68.20-P-2000GH
4Remove cover below
right instrument panel
AR68.10-P-1520GH
5Remove paneling from
A-pillar Only in area of
instrument panel
AR68.30-P-4050GH
Installation
6Retrofit TrafficStar GPS
antenna on instrument
panel AZ82.61-P-0001-01F
7Connect TrafficStar radio Only on vehicles with AZ82.61-P-0001-02G
2001 Mercedes-Benz ML320
1998-2005 ACCESSORIES & BODY, CAB Electrical System - Body - 163 Chassis
me
Saturday, October 02, 2010 3:30:13 PMPage 411 © 2006 Mitchell Repair Information Company, LLC.
Page 1907 of 4133

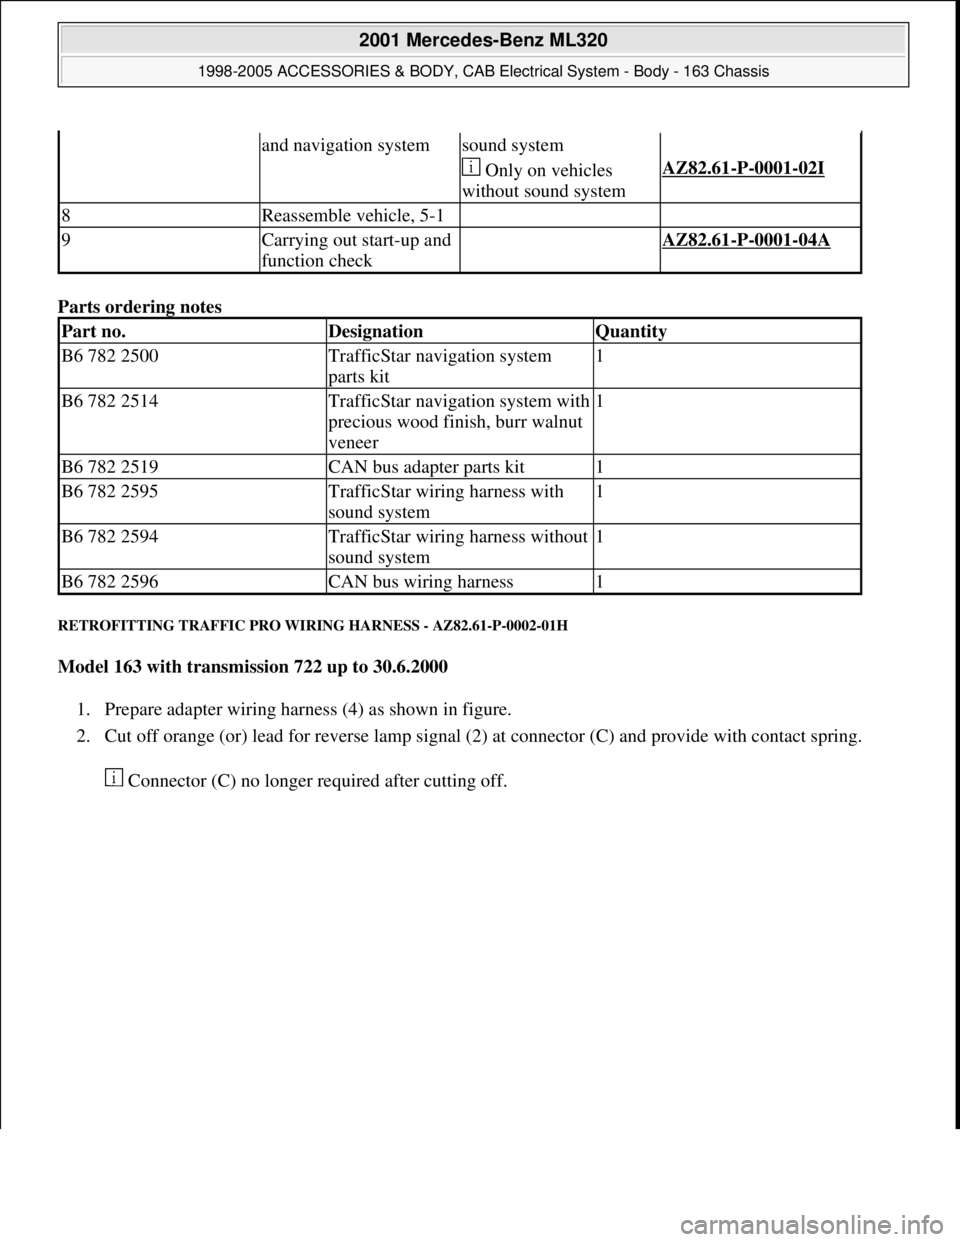
Parts ordering notes
RETROFITTING TRAFFIC PRO WIRING HARNESS - AZ82.61-P-0002-01H
Model 163 with transmission 722 up to 30.6.2000
1. Prepare adapter wiring harness (4) as shown in figure.
2. Cut off orange (or) lead for reverse lamp signal (2) at connector (C) and provide with contact spring.
Connector (C) no lon
ger required after cutting off.
and navigation systemsound system
Only on vehicles
without sound systemAZ82.61-P-0001-02I
8Reassemble vehicle, 5-1
9Carrying out start-up and
function check AZ82.61-P-0001-04A
Part no.DesignationQuantity
B6 782 2500TrafficStar navigation system
parts kit1
B6 782 2514TrafficStar navigation system with
precious wood finish, burr walnut
veneer1
B6 782 2519CAN bus adapter parts kit1
B6 782 2595TrafficStar wiring harness with
sound system1
B6 782 2594TrafficStar wiring harness without
sound system1
B6 782 2596CAN bus wiring harness1
2001 Mercedes-Benz ML320
1998-2005 ACCESSORIES & BODY, CAB Electrical System - Body - 163 Chassis
me
Saturday, October 02, 2010 3:30:13 PMPage 412 © 2006 Mitchell Repair Information Company, LLC.
Page 1909 of 4133
Fig. 339: Identifying Telephone/GPS Antenna Splitter And CAN Bus Adapter
5. Connect adapter wiring harness (4) to radio counter connector (7) on standard wiring harness and Traffic
Pro navigation system (1).
Fig. 340: Identifying Adapter Wiring Harness And Radio Counter Connector
6. Connect antenna extension lead (41) to Traffic Pro navi
gation system as shown in figure.
2001 Mercedes-Benz ML320
1998-2005 ACCESSORIES & BODY, CAB Electrical System - Body - 163 Chassis
me
Saturday, October 02, 2010 3:30:13 PMPage 414 © 2006 Mitchell Repair Information Company, LLC.