1997 MERCEDES-BENZ ML430 battery
[x] Cancel search: batteryPage 3899 of 4133

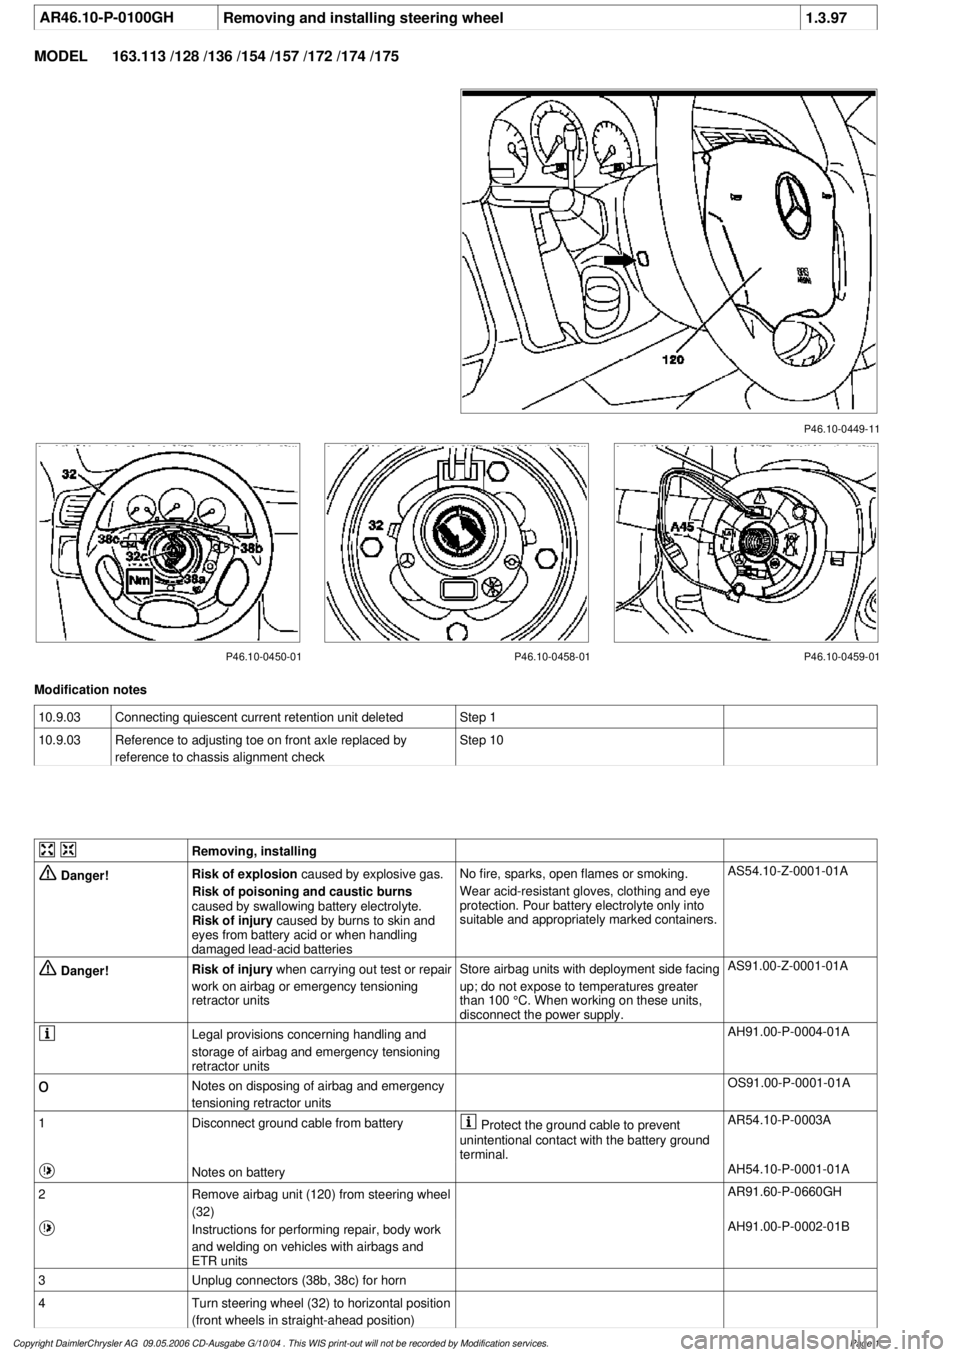
AR46.10-P-0100GHRemoving and installing steering wheel
1.3.97
MODEL
163.113 /128 /136 /154 /157 /172 /174 /175
P46.10-0449-11
P46.10-0450-01 P46.10-0458-01 P46.10-0459-01
Modification notes
10.9.03
Connecting quiescent current retention unit deleted
Step 1
10.9.03
Reference to adjusting toe on front axle replaced by
reference to chassis alignment check
Step 10
Removing, installing
Danger!
Risk of explosion
caused by explosive gas.
Risk of poisoning and caustic burns
caused by swallowing battery electrolyte.
Risk of injury
caused by burns to skin and
eyes from battery acid or when handling
damaged lead-acid batteries
No fire, sparks, open flames or smoking.
Wear acid-resistant gloves, clothing and eye
protection. Pour battery electrolyte only into
suitable and appropriately marked containers.
AS54.10-Z-0001-01A
Danger!
Risk of injury
when carrying out test or repair
work on airbag or emergency tensioning
retractor units
Store airbag units with deployment side facing
up; do not expose to temperatures greater
than 100 °C. When working on these units,
disconnect the power supply.
AS91.00-Z-0001-01A
Legal provisions concerning handling and
storage of airbag and emergency tensioning
retractor units
AH91.00-P-0004-01A
o
Notes on disposing of airbag and emergency
tensioning retractor units
OS91.00-P-0001-01A
1
Disconnect ground cable from battery
Protect the ground cable to prevent
unintentional contact with the battery ground
terminal.
AR54.10-P-0003A
Notes on battery
AH54.10-P-0001-01A
2
Remove airbag unit (120) from steering wheel
(32)
AR91.60-P-0660GH
Instructions for performing repair, body work
and welding on vehicles with airbags and
ETR units
AH91.00-P-0002-01B
3
Unplug connectors (38b, 38c) for horn
4
Turn steering wheel (32) to horizontal position
(front wheels in straight-ahead position)
Copyright DaimlerChrysler AG 09.05.2006 CD-Ausgabe G/10/04 . This WIS print-out will not be recorde
d by Modification services.
Page 1
Page 3967 of 4133

4
Refer to the user’s guide for your phone for information on the following:
• Installing and charging your phone’s battery
• Turning the phone on and off
• Placing, receiving, and ending calls
• Redialing numbers
• Reading your phone’s indicators
• Controlling phone volume
• Storing numbers in your phone’s built-in phonebook
• Other phone options and features
NN N N
oo o o
tt t t
ee e e
::: :
Your cellular carrier may not support some of the features of your new Mercedes-Benz Integrated System; to find out
what features are available, contact your cellular carrier.
Page 3968 of 4133

5
Vehicular Mode Operation
When you connect your phone to your Mercedes-Benz vehicle, the phone is ready to operate in Vehicular Mode.
In Vehicular Mode, your phone is connected to many integrated features of your vehicle and its audio system, offering
these advantages:
• You can use your phone in either Hands Free mode or in privacy mode.
• Your phone uses your vehicle’s speakers for better sound fidelity in Hands Free mode.
• Your vehicle charges your phone’s battery when the vehicle is running.
• When you place or receive a call, your vehicle’s radio, CD, and/or tape player volume is automatically muted so you
can hear the person on the other end.
Before you use your phone in Vehicular Mode, you should familiarize yourself with how this system operates.
Switching into Vehicular Mode
Switch your phone into Vehicular Mode by
docking
it.
To dock your phone:
Step
11 1 1
Angle the phone into the cradle so that the connector on the bottom of the phone engages the connector built into
the cradle.
22 2 2
Pivot the top end of the phone down to latch it into place.
NN N N
oo o o
tt t t
ee e e
::: :
If you are using the slim or high performance battery with your phone, you must ensure that the battery insert
is installed correctly. See “Installing the Special Battery Insert” on page 6.
33 3 3
To latch the cradle into the holder, close the phone’s flip, and angle the coilcord end of the cradle into the shrouded
end of the holder.
Page 3969 of 4133

6
Notes:
• Your phone plays a confirmation beep when docked. Wait for this beep before undocking.
• While in Vehicular Mode, the phone operates on the vehicle’s integrated cellular antenna.
CC C C
aa a a
uu u u
tt t t
iii i
oo o o
nn n n
::: :
Mercedes-Benz recommends keeping the phone docked in the cradle while operating the vehicle. If you
must use the handset for privacy operation, stop the vehicle prior to removing the phone from the cradle.
Installing the Special Battery Insert
The V60 cradle is supplied with a special insert to make it easier to align the phone with the cradle’s embedded connector
when you use certain batteries.
YY Y Y
oo o o
uu u u
ss s s
hh h h
oo o o
uu u u
lll l
dd d d
oo o o
nn n n
lll l
yy y y
iii i
nn n n
ss s s
tt t t
aa a a
lll l
lll l
tt t t
hh h h
iii i
ss s s
iii i
nn n n
ss s s
ee e e
rr r r
tt t t
iii i
ff f f
yy y y
oo o o
uu u u
aa a a
rr r r
ee e e
uu u u
ss s s
iii i
nn n n
gg g g
tt t t
hh h h
ee e e
ss s s
lll l
iii i
mm m m
oo o o
rr r r
hh h h
iii i
gg g g
hh h h
pp p p
ee e e
rr r r
ff f f
oo o o
rr r r
mm m m
aa a a
nn n n
cc c c
ee e e
bb b b
aa a a
tt t t
tt t t
ee e e
rr r r
yy y y
... .
The slim battery is supplied as a standard component in the CDMA V60 kit, while the high performance battery is standard
in the TDMA V60 kit. You should remove the insert when using the optional extra capacity battery.
To install the insert:
44 4 4
Pivot the cradle down to securely latch it.
NN N N
oo o o
tt t t
ee e e
::: :
The cradle should never be placed into the holder with the phone’s flip open.
CC C C
lll l
oo o o
ss s s
ee e e
tt t t
hh h h
ee e e
ff f f
lll l
iii i
pp p p
bb b b
ee e e
ff f f
oo o o
rr r r
ee e e
ss s s
ee e e
cc c c
uu u u
rr r r
iii i
nn n n
gg g g
tt t t
hh h h
ee e e
cc c c
rr r r
aa a a
dd d d
lll l
ee e e
iii i
nn n n
tt t t
hh h h
ee e e
hh h h
oo o o
lll l
dd d d
ee e e
rr r r
in order to prevent damage to the phone when the console cover is closed.
Step
11 1 1
Align the four tabs on the side of the insert with the corresponding slots in the cradle.
22 2 2
Gently push the insert into the slots until it snaps into place.
If you are using the slim battery, the side marked “FOR USE WITH SLIM BATTERY” should face up.
If you are using the high performance battery, the side marked “FOR USE WITH HIGH PERFORMANCE BATTERY” should face up.
33 3 3
If you plan to use the extra capacity battery with your phone, remove the insert by gently prying it out with a small
flat screwdriver, exercising care not to mar the side walls of the cradle.
Step
Page 3970 of 4133

7
When in Vehicular Mode
In Vehicular Mode, the phone turns on automatically each time you turn on the vehicle ignition if the head unit is turned
on.
To turn off the phone, open the flip, and press P
. If your ignition is on when you turn your phone off, a flashing battery
icon and
Pwr
will appear in the display. While in this mode, calls cannot be placed or received. The next time the ignition is
turned on, the phone will turn on. To turn the phone back on, press P
again.
If your phone is on for more than five minutes when your vehicle’s ignition is off, the phone automatically turns itself off to
conserve your vehicle’s battery.
Switching Out of Vehicular Mode
To disengage your phone from Vehicular Mode:
To remove the cradle from the holder, press the release button on the holder.
NN N N
oo o o
tt t t
ee e e
::: :
If you switch out of Vehicular Mode during a call, the party on the other end will hear a click.
Step
Remove the phone from the cradle by pressing the black tab on the top of the cradle.
You can remove the phone with the cradle in or out of the holder.
Page 3975 of 4133

12
Entering and Exiting Vehicular Mode During a Call
To Continue a Call While Leaving the Vehicle
You can now continue your conversation outside the vehicle.
NN N N
oo o o
tt t t
ee e e
::: :
The call will be disconnected if the phone and cradle are removed from the holder when the flip is closed.
To Continue a Call While Entering the Vehicle
NN N N
oo o o
tt t t
ee e e
::: :
Before attaching the phone and cradle to the holder, be sure the vehicle is ON.
When your phone is properly docked, your vehicle’s electrical system begins to recharge the phone’s battery. If the phone
is properly docked, the battery icon in the phone’s display will blink on and off.
Operation from the Radio
Features available through your vehicle’s radio controls include:
• Digit dialing (to dial any phone number)
• Memory scrolling (alpha or numeric)
Step
11 1 1
Open the flip.
22 2 2Remove the phone and cradle from the holder.
Step
11 1 1
Attach the phone and cradle to the holder.
22 2 2Ensure the vehicle is running before closing the flip.
Page 3984 of 4133

36
Install remaining covers under rear seat bench
Replace cover under rear seat bench at
rear with cover from the conversion kit.
f
Remove and install cover on bottom of rear
seat
AR91.12-P-1100GH
37
Disconnect ground lead from battery
f
Disconnect ground lead from battery
AR54.10-P-0003A
38
Retrofit voltage supply for central interface
module (1)
AZ82.60-P-0004-06A
39
Install glove compartment
f
Remove/install glove compartment
AR68.10-P-1400GI
Torx bit set
*000589011000
40
Connect ground cable for battery
f
Disconnect ground lead from battery
AR54.10-P-0003A
41.1
Initialize DVD player
As of VIN A289565, X754620.
AZ82.60-P-0004-07GH
Rear seats
Number
Designation
Model
163 as of
09/99
BA91.12-P-1005-03A
Nuts for rear seat console on vehicle floor
NM
40
BA91.12-P-1008-03A
Screws for rear seat console on vehicle floor
NM
40
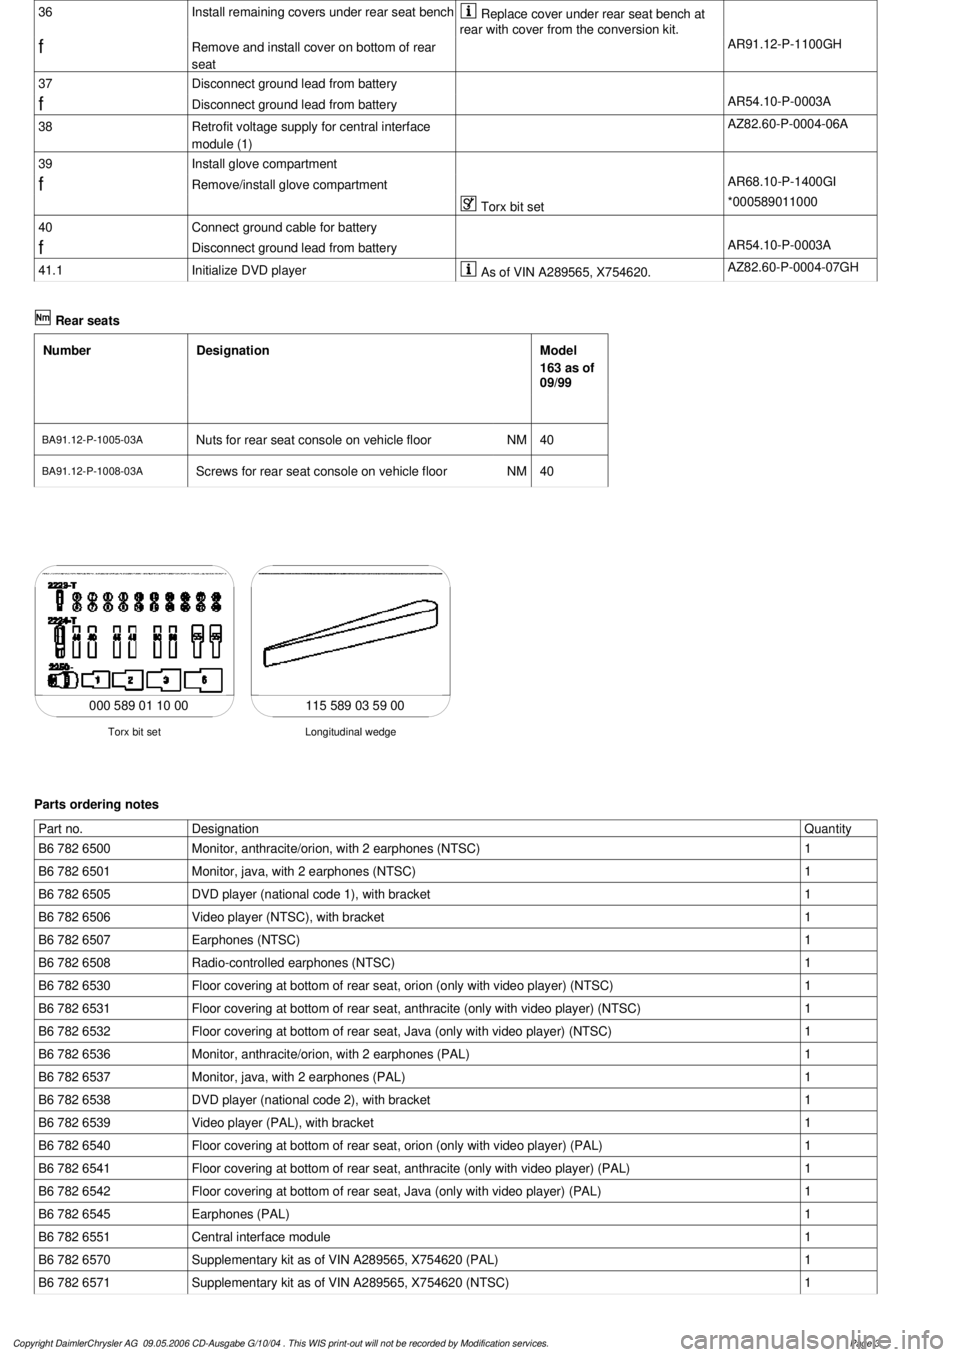
115 589 03 59 00
Longitudinal wedge
Torx bit set
000 589 01 10 00
Parts ordering notes
Part no.
Designation
Quantity
B6 782 6500
Monitor, anthracite/orion, with 2 earphones (NTSC)
1
B6 782 6501
Monitor, java, with 2 earphones (NTSC)
1
B6 782 6505
DVD player (national code 1), with bracket
1
B6 782 6506
Video player (NTSC), with bracket
1
B6 782 6507
Earphones (NTSC)
1
B6 782 6508
Radio-controlled earphones (NTSC)
1
B6 782 6530
Floor covering at bottom of rear seat, orion (only with video player) (NTSC)
1
B6 782 6531
Floor covering at bottom of rear seat, anthracite (only with video player) (NTSC)
1
B6 782 6532
Floor covering at bottom of rear seat, Java (only with video player) (NTSC)
1
B6 782 6536
Monitor, anthracite/orion, with 2 earphones (PAL)
1
B6 782 6537
Monitor, java, with 2 earphones (PAL)
1
B6 782 6538
DVD player (national code 2), with bracket
1
B6 782 6539
Video player (PAL), with bracket
1
B6 782 6540
Floor covering at bottom of rear seat, orion (only with video player) (PAL)
1
B6 782 6541
Floor covering at bottom of rear seat, anthracite (only with video player) (PAL)
1
B6 782 6542
Floor covering at bottom of rear seat, Java (only with video player) (PAL)
1
B6 782 6545
Earphones (PAL)
1
B6 782 6551
Central interface module
1
B6 782 6570
Supplementary kit as of VIN A289565, X754620 (PAL)
1
B6 782 6571
Supplementary kit as of VIN A289565, X754620 (NTSC)
1
Copyright DaimlerChrysler AG 09.05.2006 CD-Ausgabe G/10/04 . This WIS print-out will not be recorde
d by Modification services.
Page 3