Page 3549 of 4133
Fig. 24: Identifying Torx Bit Set (000 589 01 10 00)
REMOVING AND INSTALLING COVER BELOW INSTRUMENT PANEL (LEFT) - AR68.10-P-1500GH
MODELS 163.113 /128 /136 /154 /157 /172 /174 /175
Fig. 25: Identifying Cover Below Instrument Panel (Left)
REMOVE/INSTALL COVER BELOW INSTRUMENT PANEL (RIGHT) - AR68.10-P-1520GH
MODEL 163.136 /154 /172 #A up to 145272,163.136 /154 /172 #X up to 708318
Remove/install
1Remove plug (1) 2 each.
2Unscrew screw (2) 2 each.
Installation: Observe clips (3).
3Unlock and remove data link connector (X11/4)
4Take off cover (4)
5Install in the reverse order
2001 Mercedes-Benz ML320
1998-2005 ACCESSORIES & BODY, CAB Interior Equipment - 163 Chassis
me
Saturday, October 02, 2010 3:35:21 PMPage 31 © 2006 Mitchell Repair Information Company, LLC.
Page 3550 of 4133
Fig. 26: Identifying Cover Below Instrument Panel (Right)
REMOVE/INSTALL COVER BELOW INSTRUMENT PANEL (RIGHT) - AR68.10-P-1520GI
MODEL 163.136 /154 /172 #A as of 145273,163.136 /154 /172 #X as of 708319,163.113 /128 /157 /174 /175
Remove/Install
1Unhook catch (3) on blower motor Risk of breakage!
2Unclip cover (1) Cover is fastened with 2 clips
(2).
3Disconnect electrical connector from interior socket
(X58/1)
4Install in the reverse order
2001 Mercedes-Benz ML320
1998-2005 ACCESSORIES & BODY, CAB Interior Equipment - 163 Chassis
me
Saturday, October 02, 2010 3:35:21 PMPage 32 © 2006 Mitchell Repair Information Company, LLC.
Page 3551 of 4133
Fig. 27: Identifying Cover Below Instrument Panel (Right)
REMOVE/INSTALL STOWAGE COMPARTMENT OR BEVERAGE HOLDER - AR68.10-P-1600GH
MODEL 163.113 /128 /136 /154 /157 /172 /174 /175 driver's side
Instrument panel is illustrated disassembled for clarity.
Vehicles up to VIN A145272, X708318
Remove/Install
1Unscrew Torx screws (1) form cover (2)
2Fold locking lever (3) downward
3Pull cover (2) downward and lay down
4Disconnect electrical connector from interior socket (X58/1)
5Install in the reverse order
2001 Mercedes-Benz ML320
1998-2005 ACCESSORIES & BODY, CAB Interior Equipment - 163 Chassis
me
Saturday, October 02, 2010 3:35:21 PMPage 33 © 2006 Mitchell Repair Information Company, LLC.
Page 3552 of 4133
Fig. 28: Identifying Stowage Compartment Components (Driver's Side Vehicles Up To VIN A145272,
X708318)
Instrument panel is illustrated disassembled for clarity
Vehicles as of VIN A145273, X708319
2001 Mercedes-Benz ML320
1998-2005 ACCESSORIES & BODY, CAB Interior Equipment - 163 Chassis
me
Saturday, October 02, 2010 3:35:21 PMPage 34 © 2006 Mitchell Repair Information Company, LLC.
Page 3553 of 4133

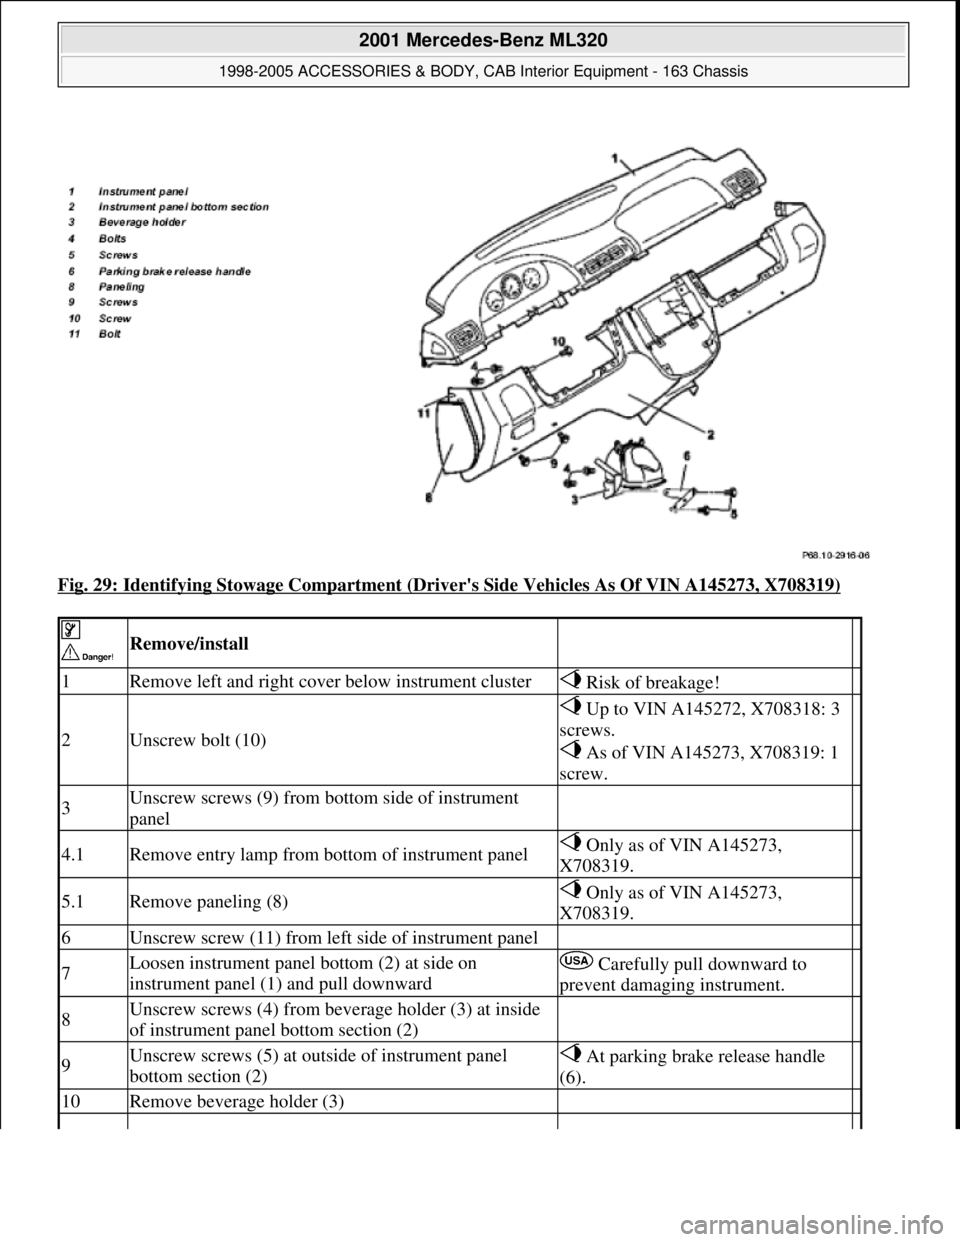
Fig. 29: Identifying Stowage Compartment (Driver's Side Vehicles As Of VIN A145273, X708319)
Remove/install
1Remove left and right cover below instrument cluster Risk of breakage!
2Unscrew bolt (10)
Up to VIN A145272, X708318: 3
screws.
As of VIN A145273, X708319: 1
screw.
3Unscrew screws (9) from bottom side of instrument
panel
4.1Remove entry lamp from bottom of instrument panel Only as of VIN A145273,
X708319.
5.1Remove paneling (8) Only as of VIN A145273,
X708319.
6Unscrew screw (11) from left side of instrument panel
7Loosen instrument panel bottom (2) at side on
instrument panel (1) and pull downward Carefully pull downward to
prevent damaging instrument.
8Unscrew screws (4) from beverage holder (3) at inside
of instrument panel bottom section (2)
9Unscrew screws (5) at outside of instrument panel
bottom section (2) At parking brake release handle
(6).
10Remove beverage holder (3)
2001 Mercedes-Benz ML320
1998-2005 ACCESSORIES & BODY, CAB Interior Equipment - 163 Chassis
me
Saturday, October 02, 2010 3:35:21 PMPage 35 © 2006 Mitchell Repair Information Company, LLC.
Page 3554 of 4133
REMOVE/INSTALL STOWAGE COMPARTMENT OR BEVERAGE HOLDER - AR68.10-P-1600GI
MODEL 163.113 /128 /136 /154 /157 /172 /174 /175 passenger side
Instrument panel is illustrated disassembled for clarity.
Vehicles up to VIN A145272, X708318
Fig. 30: Identifying Stowage Compartment Components (Passenger Side Vehicles Up To VIN A145272,
X708318)
Instrument panel is illustrated disassembled for clarity.
Vehicles as of VIN A145273, X708319
11Install in the reverse order
2001 Mercedes-Benz ML320
1998-2005 ACCESSORIES & BODY, CAB Interior Equipment - 163 Chassis
me
Saturday, October 02, 2010 3:35:21 PMPage 36 © 2006 Mitchell Repair Information Company, LLC.
Page 3555 of 4133

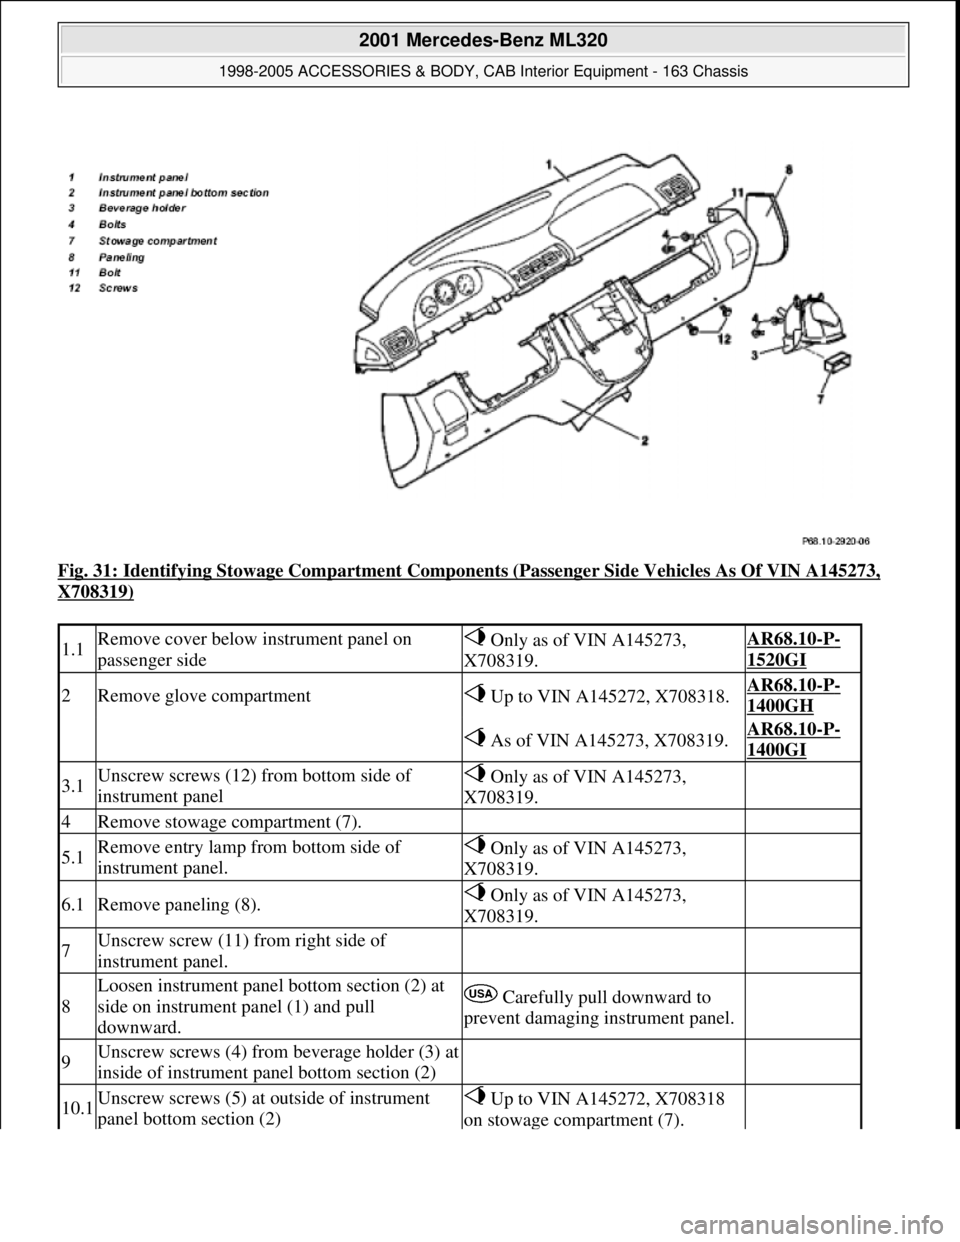
Fig. 31: Identifying Stowage Compartment Components (Passenger Side Vehicles As Of VIN A145273,
X708319)
1.1Remove cover below instrument panel on
passenger side Only as of VIN A145273,
X708319.AR68.10-P-
1520GI
2Remove glove compartment Up to VIN A145272, X708318.AR68.10-P-
1400GH
As of VIN A145273, X708319.AR68.10-P-
1400GI
3.1Unscrew screws (12) from bottom side of
instrument panel Only as of VIN A145273,
X708319.
4Remove stowage compartment (7).
5.1Remove entry lamp from bottom side of
instrument panel. Only as of VIN A145273,
X708319.
6.1Remove paneling (8). Only as of VIN A145273,
X708319.
7Unscrew screw (11) from right side of
instrument panel.
8
Loosen instrument panel bottom section (2) at
side on instrument panel (1) and pull
downward. Carefully pull downward to
prevent damaging instrument panel.
9Unscrew screws (4) from beverage holder (3) at
inside of instrument panel bottom section (2)
10.1Unscrew screws (5) at outside of instrument
panel bottom section (2) Up to VIN A145272, X708318
on stowage compartment (7).
2001 Mercedes-Benz ML320
1998-2005 ACCESSORIES & BODY, CAB Interior Equipment - 163 Chassis
me
Saturday, October 02, 2010 3:35:21 PMPage 37 © 2006 Mitchell Repair Information Company, LLC.
Page 3561 of 4133

1Remove front seats 1000GH
2.1Remove bass module speaker Only with Sound-System, Code 810.AR82.62-P-
7839GH
3.1Remove control module for
emergency call system Only with emergency call system E-Call,
Code 349.AR82.95-P-
0008GH
4Remove bench 1/3 bench seat, up to 31.8.99.AR91.12-P-
1010GH
40% bench seat, as of 01.9.99.AR91.12-P-
1010GI
2/3 bench seat, up to 31.8.99.AR91.12-P-
1010GJ
60% bench seat, as of 01.9.99.AR91.12-P-
1010GK
5Remove rear seat anchors (2) Up to 31.8.99, unscrew internal Torx drive
bolts (3).
Torx bit setFig. 24
6Remove center console (4) AR68.20-P-
2000GH
7Remove cover below instrument
panel on left (6) AR68.10-P-
1500GH
8Remove cover below instrument
panel on right (5) Up to 31.8.99.AR68.10-P-
1520GH
As of 01.9.99.AR68.10-P-
1520GI
9Unscrew plastic nuts (11) in right
footwell
10Remove condensate water drain
hose from heater housing
11
Remove door sill molding on
right (9) and door sill molding on
left (10)
AR68.30-P-
4100GH
12
Remove paneling in footwell on
right (7) and paneling in footwell
on left (8)
AR68.30-P-
4010GH
13Remove insulating mat under the
center console
14Remove air duct for ventilation in
the rear
15Remove radio AR82.60-P-
7502EA
16Disconnect all the electrical
connectors and lay aside
17Detach shift-lock cable at the
electronic selector module
2001 Mercedes-Benz ML320
1998-2005 ACCESSORIES & BODY, CAB Interior Equipment - 163 Chassis
me
Saturday, October 02, 2010 3:35:22 PMPage 43 © 2006 Mitchell Repair Information Company, LLC.