1997 MERCEDES-BENZ ML350 sensor
[x] Cancel search: sensorPage 3420 of 4133
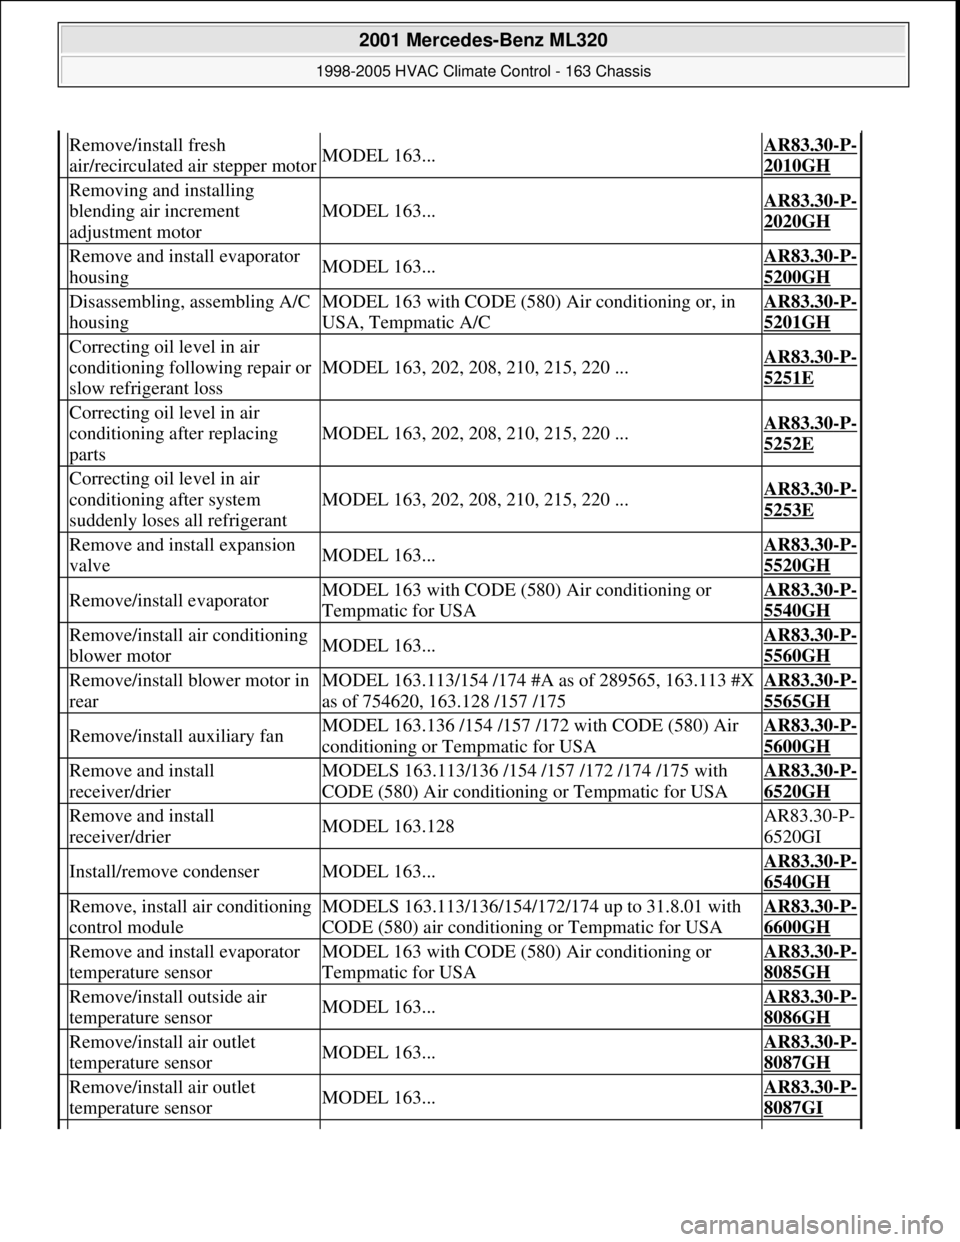
Remove/install fresh
air/recirculated air stepper motorMODEL 163...AR83.30-P-
2010GH
Removing and installing
blending air increment
adjustment motor
MODEL 163...AR83.30-P-
2020GH
Remove and install evaporator
housingMODEL 163...AR83.30-P-
5200GH
Disassembling, assembling A/C
housingMODEL 163 with CODE (580) Air conditioning or, in
USA, Tempmatic A/CAR83.30-P-
5201GH
Correcting oil level in air
conditioning following repair or
slow refrigerant loss
MODEL 163, 202, 208, 210, 215, 220 ...AR83.30-P-
5251E
Correcting oil level in air
conditioning after replacing
parts
MODEL 163, 202, 208, 210, 215, 220 ...AR83.30-P-
5252E
Correcting oil level in air
conditioning after system
suddenly loses all refrigerant
MODEL 163, 202, 208, 210, 215, 220 ...AR83.30-P-
5253E
Remove and install expansion
valveMODEL 163...AR83.30-P-
5520GH
Remove/install evaporatorMODEL 163 with CODE (580) Air conditioning or
Tempmatic for USAAR83.30-P-
5540GH
Remove/install air conditioning
blower motorMODEL 163...AR83.30-P-
5560GH
Remove/install blower motor in
rearMODEL 163.113/154 /174 #A as of 289565, 163.113 #X
as of 754620, 163.128 /157 /175AR83.30-P-
5565GH
Remove/install auxiliary fanMODEL 163.136 /154 /157 /172 with CODE (580) Air
conditioning or Tempmatic for USAAR83.30-P-
5600GH
Remove and install
receiver/drierMODELS 163.113/136 /154 /157 /172 /174 /175 with
CODE (580) Air conditioning or Tempmatic for USAAR83.30-P-
6520GH
Remove and install
receiver/drierMODEL 163.128AR83.30-P-
6520GI
Install/remove condenserMODEL 163...AR83.30-P-
6540GH
Remove, install air conditioning
control moduleMODELS 163.113/136/154/172/174 up to 31.8.01 with
CODE (580) air conditioning or Tempmatic for USAAR83.30-P-
6600GH
Remove and install evaporator
temperature sensorMODEL 163 with CODE (580) Air conditioning or
Tempmatic for USAAR83.30-P-
8085GH
Remove/install outside air
temperature sensorMODEL 163...AR83.30-P-
8086GH
Remove/install air outlet
temperature sensorMODEL 163...AR83.30-P-
8087GH
Remove/install air outlet
temperature sensorMODEL 163...AR83.30-P-
8087GI
2001 Mercedes-Benz ML320
1998-2005 HVAC Climate Control - 163 Chassis
me
Saturday, October 02, 2010 3:23:17 PMPage 176 © 2006 Mitchell Repair Information Company, LLC.
Page 3421 of 4133
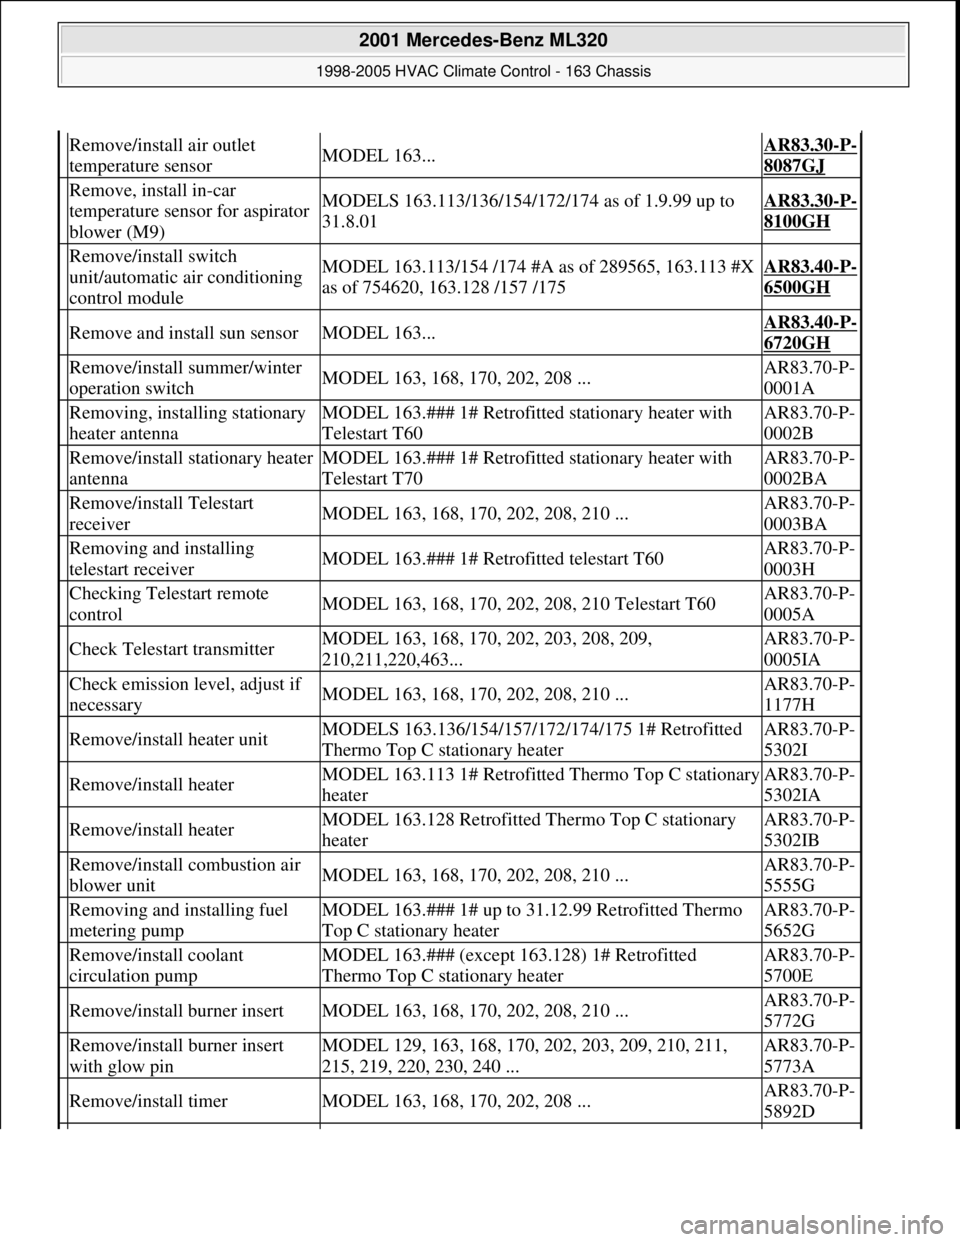
Remove/install air outlet
temperature sensorMODEL 163...AR83.30-P-
8087GJ
Remove, install in-car
temperature sensor for aspirator
blower (M9)MODELS 163.113/136/154/172/174 as of 1.9.99 up to
31.8.01AR83.30-P-
8100GH
Remove/install switch
unit/automatic air conditioning
control moduleMODEL 163.113/154 /174 #A as of 289565, 163.113 #X
as of 754620, 163.128 /157 /175AR83.40-P-
6500GH
Remove and install sun sensorMODEL 163...AR83.40-P-
6720GH
Remove/install summer/winter
operation switchMODEL 163, 168, 170, 202, 208 ...AR83.70-P-
0001A
Removing, installing stationary
heater antennaMODEL 163.### 1# Retrofitted stationary heater with
Telestart T60AR83.70-P-
0002B
Remove/install stationary heater
antennaMODEL 163.### 1# Retrofitted stationary heater with
Telestart T70AR83.70-P-
0002BA
Remove/install Telestart
receiverMODEL 163, 168, 170, 202, 208, 210 ...AR83.70-P-
0003BA
Removing and installing
telestart receiverMODEL 163.### 1# Retrofitted telestart T60AR83.70-P-
0003H
Checking Telestart remote
controlMODEL 163, 168, 170, 202, 208, 210 Telestart T60AR83.70-P-
0005A
Check Telestart transmitterMODEL 163, 168, 170, 202, 203, 208, 209,
210,211,220,463...AR83.70-P-
0005IA
Check emission level, adjust if
necessaryMODEL 163, 168, 170, 202, 208, 210 ...AR83.70-P-
1177H
Remove/install heater unitMODELS 163.136/154/157/172/174/175 1# Retrofitted
Thermo Top C stationary heaterAR83.70-P-
5302I
Remove/install heaterMODEL 163.113 1# Retrofitted Thermo Top C stationary
heaterAR83.70-P-
5302IA
Remove/install heaterMODEL 163.128 Retrofitted Thermo Top C stationary
heaterAR83.70-P-
5302IB
Remove/install combustion air
blower unitMODEL 163, 168, 170, 202, 208, 210 ...AR83.70-P-
5555G
Removing and installing fuel
metering pumpMODEL 163.### 1# up to 31.12.99 Retrofitted Thermo
Top C stationary heaterAR83.70-P-
5652G
Remove/install coolant
circulation pumpMODEL 163.### (except 163.128) 1# Retrofitted
Thermo Top C stationary heaterAR83.70-P-
5700E
Remove/install burner insertMODEL 163, 168, 170, 202, 208, 210 ...AR83.70-P-
5772G
Remove/install burner insert
with glow pinMODEL 129, 163, 168, 170, 202, 203, 209, 210, 211,
215, 219, 220, 230, 240 ...AR83.70-P-
5773A
Remove/install timerMODEL 163, 168, 170, 202, 208 ...AR83.70-P-
5892D
2001 Mercedes-Benz ML320
1998-2005 HVAC Climate Control - 163 Chassis
me
Saturday, October 02, 2010 3:23:17 PMPage 177 © 2006 Mitchell Repair Information Company, LLC.
Page 3430 of 4133
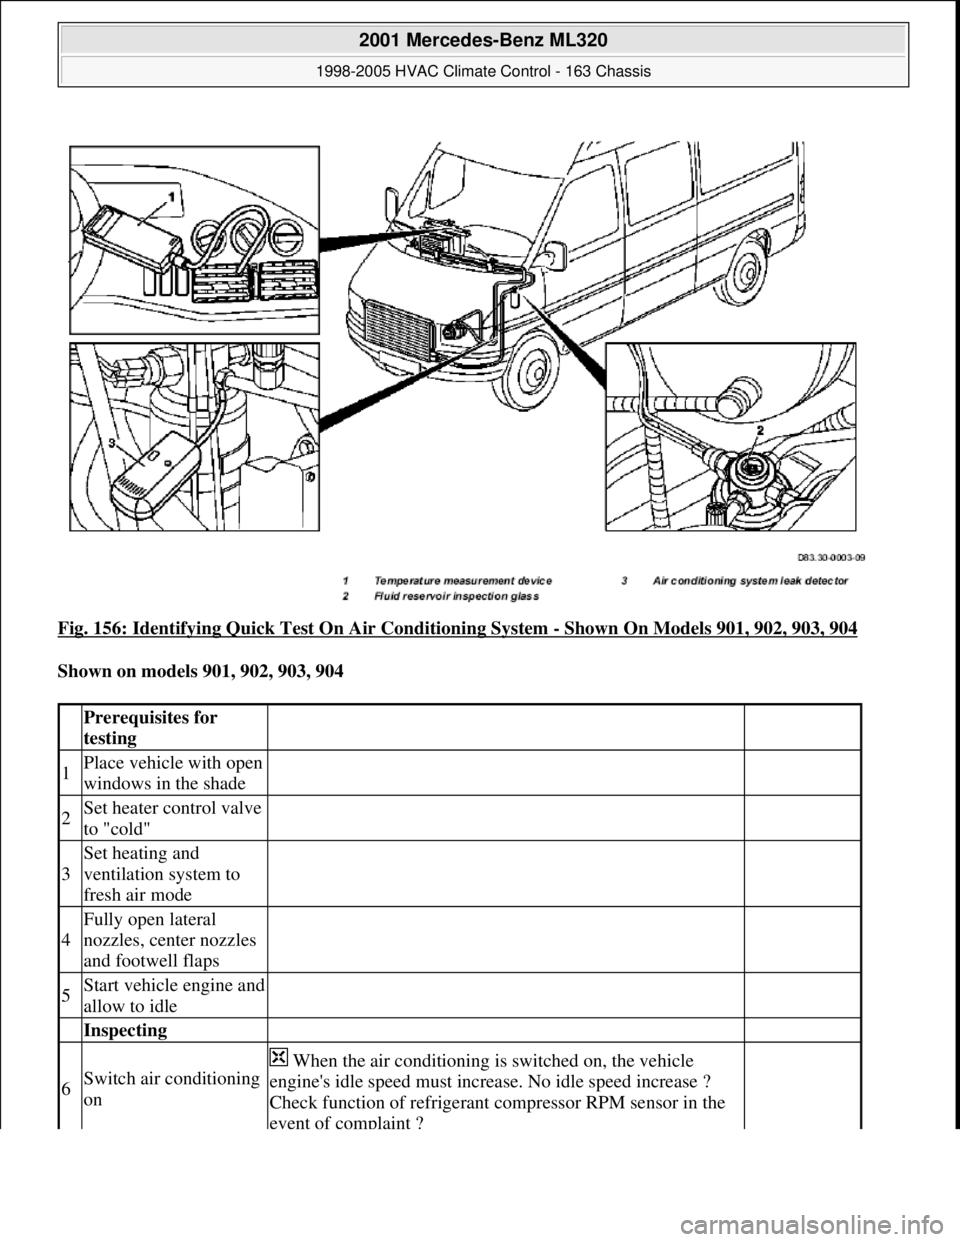
Fig. 156: Identifying Quick Test On Air Conditioning System - Shown On Models 901, 902, 903, 904
Shown on models 901, 902, 903, 904
Prerequisites for
testing
1Place vehicle with open
windows in the shade
2Set heater control valve
to "cold"
3
Set heating and
ventilation system to
fresh air mode
4
Fully open lateral
nozzles, center nozzles
and footwell flaps
5Start vehicle engine and
allow to idle
Inspecting
6Switch air conditioning
on
When the air conditioning is switched on, the vehicle
engine's idle speed must increase. No idle speed increase ?
Check function of refrigerant compressor RPM sensor in the
event of complaint ?
2001 Mercedes-Benz ML320
1998-2005 HVAC Climate Control - 163 Chassis
me
Saturday, October 02, 2010 3:23:18 PMPage 186 © 2006 Mitchell Repair Information Company, LLC.
Page 3431 of 4133
Commercially available tools
Workshop equipment
DRAINING, EVACUATING AND REFILLING AIR CONDITIONING, CHECKING FUNCTION AND CHECKING FOR
LEAKS - AR83.30-P-1760GH
MODELS 163.113 /128 /136 /154 /157 /172 /174 /175 with CODE (580) Air conditioning or Tempmatic for
USA
Replace refrigerant compressor RPM sensor
Models 901-904
Not in model 163AR83.55-D-
5320A
7
Set blower rotary
switch to maximum
blower setting
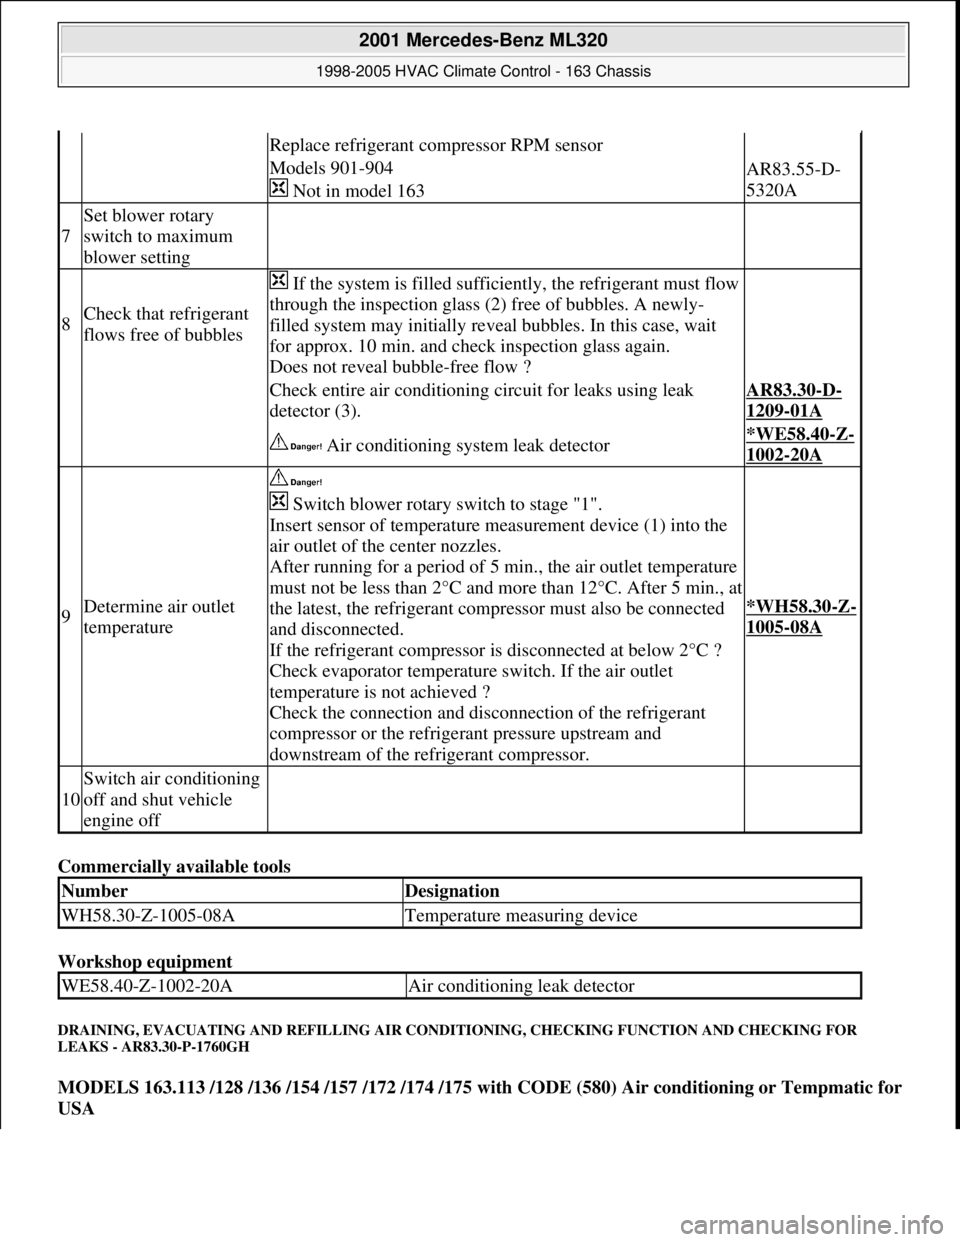
8Check that refrigerant
flows free of bubbles
If the system is filled sufficiently, the refrigerant must flow
through the inspection glass (2) free of bubbles. A newly-
filled system may initially reveal bubbles. In this case, wait
for approx. 10 min. and check inspection glass again.
Does not reveal bubble-free flow ?
Check entire air conditioning circuit for leaks using leak
detector (3).AR83.30-D-
1209-01A
Air conditioning system leak detector*WE58.40-Z-
1002-20A
9Determine air outlet
temperature
Switch blower rotary switch to stage "1".
Insert sensor of temperature measurement device (1) into the
air outlet of the center nozzles.
After running for a period of 5 min., the air outlet temperature
must not be less than 2°C and more than 12°C. After 5 min., at
the latest, the refrigerant compressor must also be connected
and disconnected.
If the refrigerant compressor is disconnected at below 2°C ?
Check evaporator temperature switch. If the air outlet
temperature is not achieved ?
Check the connection and disconnection of the refrigerant
compressor or the refrigerant pressure upstream and
downstream of the refrigerant compressor.
*WH58.30-Z-
1005-08A
10
Switch air conditioning
off and shut vehicle
engine off
NumberDesignation
WH58.30-Z-1005-08ATemperature measuring device
WE58.40-Z-1002-20AAir conditioning leak detector
2001 Mercedes-Benz ML320
1998-2005 HVAC Climate Control - 163 Chassis
me
Saturday, October 02, 2010 3:23:18 PMPage 187 © 2006 Mitchell Repair Information Company, LLC.
Page 3442 of 4133
Air conditioning system
DISASSEMBLING, ASSEMBLING A/C HOUSING - AR83.30-P-5201GH
MODEL 163 with CODE (580) Air conditioning or, in USA, Tempmatic A/C
13Unclip ETC control module
(N15/3)
14Detach connector from blend air
flap actuator (M16/8)
15Detach connector from recirculated
air flap actuator motor (M39)
16Detach evaporator temperature
sensor connector (B10/6x1)
17Detach blower motor series resistor
connector (6)
18Detach blower motor connector (5)
19.1Remove air conditioning control
module (N19) Only up to 31.08.01.AR83.30-
P-6600GH
20Unclip cable set at evaporator
housing Installation: Ensure correct routing of
cable set.
21Remove sound deadener (2)
22Detach water drain hose from AC
housing lower side(1)
23Remove AC housing (1) Unclip evaporator housing from air
distributor and remove upward.
24Install in the reverse order
25Inspect cooling system for leaks AR20.00-
P-1010HA
NumberDesignationModel Series 163
BA83.30-P-1003-01BNut to pipeline on expansion valveNM10
2001 Mercedes-Benz ML320
1998-2005 HVAC Climate Control - 163 Chassis
me
Saturday, October 02, 2010 3:23:18 PMPage 198 © 2006 Mitchell Repair Information Company, LLC.
Page 3444 of 4133
CORRECTING OIL LEVEL IN AIR CONDITIONING FOLLOWING REPAIR OR SLOW REFRIGERANT LOSS - AR83.30-P-
5251E
MODEL 163 with CODE (580) Air conditioning or Tempmatic for USA
A/C compressor 7SB16
MODEL 202 with CODE (580) Air conditioning or Tempmatic for USA with CODE (581a) Air
conditioning (Automatic) A/C compressor ND6CA17, A/C compressor 7SB16
MODEL 208 with CODE (580) Air conditioning or Tempmatic for USA with CODE (581a) Air
conditioning (Automatic) A/C compressor 7SB16
MODEL 210 with CODE (580) Air conditioning or Tempmatic for USA with CODE (581a) Air
conditioning (Automatic) A/C compressor 7SB16
MODELS 215,220 A/C compressor 7SE16
3Remove air mixture flap actuator
(M16/8) AR83.30-
P-2010GH
4Unscrew screws (2) from upper section
of A/C housing (3)
5Remove upper section of A/C housing
(3) Replace gasket between firewall and A/C
housing
6Remove dust filter (7) from bottom
section of A/C housing (5)
7Remove evaporator (6) AR83.30-
P-5540GH
8Remove evaporator temperature sensor
(B10/4) AR83.30-
P-8085GH
9Remove blower motor (M2) AR83.30-
P-5560GH
10Reinstall in opposite order
Correct oil level
Carry out work quickly,
compressor oil is
hygroscopic.
When evacuating
refrigerant, the quantity of
compressor oil evacuated
must be added again to
refrigerant circuit when
refilling air conditioning
(new oil)
2001 Mercedes-Benz ML320
1998-2005 HVAC Climate Control - 163 Chassis
me
Saturday, October 02, 2010 3:23:18 PMPage 200 © 2006 Mitchell Repair Information Company, LLC.
Page 3451 of 4133
Air conditioning system
REMOVE/INSTALL EVAPORATOR - AR83.30-P-5540GH
MODEL 163 with CODE (580) Air conditioning or Tempmatic for USA
Fig. 167: Identifying Evaporator Temperature Sensor Components
3Detach piping bracket (4) from
expansion valve (6) Installation: Install new self-locking nut (3).
*BA83.30-
P-1003-01B
4Detach piping fastening clamps (5)
from firewall
5Pull both pipes out of the expansion
valve (6) Press pipes to the side.
6Unscrew bolts (7) from expansion
valve (6) *BA83.30-
P-1004-01B
7Remove expansion valve (6) Installation: Install new sealing rings and
moisten with compressor oil.
8Install in the reverse order
NumberDesignationModel Series 163
BA83.30-P-1003-01BNut to pipeline on expansion valveNM10
BA83.30-P-1004-01BBolt, expansion valve to evaporator coreNM10
2001 Mercedes-Benz ML320
1998-2005 HVAC Climate Control - 163 Chassis
me
Saturday, October 02, 2010 3:23:18 PMPage 207 © 2006 Mitchell Repair Information Company, LLC.
Page 3452 of 4133
Refrigerant compressor
Remove/Install
Risk of explosion from welding or
soldering work on closed air
conditioning system. Risk of
poisoning . Inhaling overheated
refrigerant vapors may be toxic. Risk
of injury. Contact with liquid
refrigerant may result in injury to the
skin and eyes.Do not carry out any welding work on the
closed air conditioning system or in the
surrounding area. No smoking or open
flames. Wear eye protection and protective
gloves. Work only in well ventilated areas.
Carry out repair work on the air
conditioning system circuit only after the
system has been discharged.
AS83.00-Z-
0001-01A
Procedures if air conditioning system
is damaged or leakingAll models
AH83.30-
N-0004-
01A
Protect air conditioning circuit and
components from moisture when
carrying out repair work
All models fitted with air conditioning
AH83.30-
N-0005-
01A
Notes on handling refrigerant R134aAll models fitted with air conditioning
AH83.30-
N-0003-
01A
1Remove evaporator housing AR83.30-
P-5200GH
2Remove expansion valve
Installation: Replace sealing rings
between the expansion valve and
evaporator and moisten with compressor
oil.
AR83.30-
P-5520GH
3Disassemble AC housing AR83.30-
P-5201GH
4Remove evaporator (1) from AC
housing Observe oil filling capacity when
replacing the evaporator.
*BF83.55-
P-1004-
01A
5Remove evaporator temperature sensor
(B10/6) AR83.30-
P-8085GH
6Install in the reverse order
NumberDesignationRefrigerant
compressor 7SB16,
refrigerant R134a
in model 163
BF83.55-P-1004-
01AAdditional oil filling
capacity when
replacing evaporatorCompressor oilcm3 40
Specifications for
Service ProductsSheetBB00.40-P-0362-
00A
2001 Mercedes-Benz ML320
1998-2005 HVAC Climate Control - 163 Chassis
me
Saturday, October 02, 2010 3:23:18 PMPage 208 © 2006 Mitchell Repair Information Company, LLC.