1997 MERCEDES-BENZ ML320 remove seats
[x] Cancel search: remove seatsPage 3801 of 4133
AR91.29-P-1420GH
Removing and installing front power seat motor group (seat cushion)
7.3.97
MODEL
163 with CODE (221b) Electrically adjustable left and right front seats
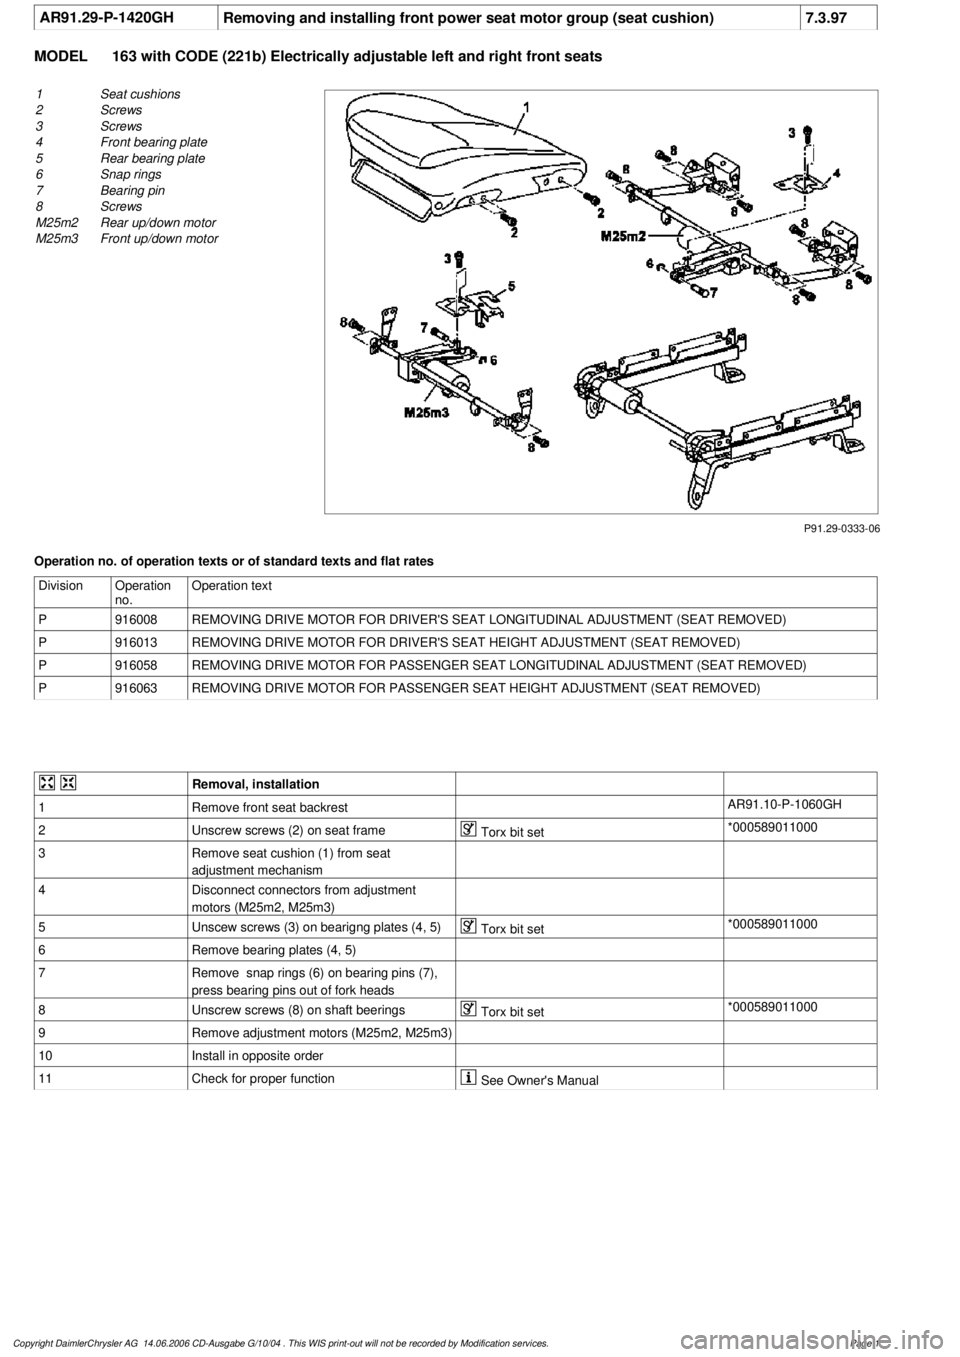
P91.29-0333-06
1
Seat cushions
2
Screws
3
Screws
4
Front bearing plate
5
Rear bearing plate
6
Snap rings
7
Bearing pin
8
Screws
M25m2
Rear up/down motor
M25m3
Front up/down motor
Operation no. of operation texts or of standard texts and flat rates
Division
Operation
no.
Operation text
P
916008
REMOVING DRIVE MOTOR FOR DRIVER'S SEAT LONGITUDINAL ADJUSTMENT (SEAT REMOVED)
P
916013
REMOVING DRIVE MOTOR FOR DRIVER'S SEAT HEIGHT ADJUSTMENT (SEAT REMOVED)
P
916058
REMOVING DRIVE MOTOR FOR PASSENGER SEAT LONGITUDINAL ADJUSTMENT (SEAT REMOVED)
P
916063
REMOVING DRIVE MOTOR FOR PASSENGER SEAT HEIGHT ADJUSTMENT (SEAT REMOVED)
Removal, installation
1
Remove front seat backrest
AR91.10-P-1060GH
2
Unscrew screws (2) on seat frame
Torx bit set
*000589011000
3
Remove seat cushion (1) from seat
adjustment mechanism
4
Disconnect connectors from adjustment
motors (M25m2, M25m3)
5
Unscew screws (3) on bearigng plates (4, 5)
Torx bit set
*000589011000
6
Remove bearing plates (4, 5)
7
Remove snap rings (6) on bearing pins (7),
press bearing pins out of fork heads
8
Unscrew screws (8) on shaft beerings
Torx bit set
*000589011000
9
Remove adjustment motors (M25m2, M25m3)
10
Install in opposite order
11
Check for proper function
See Owner's Manual
Copyright DaimlerChrysler AG 14.06.2006 CD-Ausgabe G/10/04 . This WIS print-out will not be recorde
d by Modification services.
Page 1
Page 3803 of 4133
AR91.10-P-1000GH
Remove/install front seat
3.3.97
MODEL
163.113 /128 /136 /154 /157 /172 /174 /175 with CODE (221b) Electrically adjustable driver and passe
nger seat
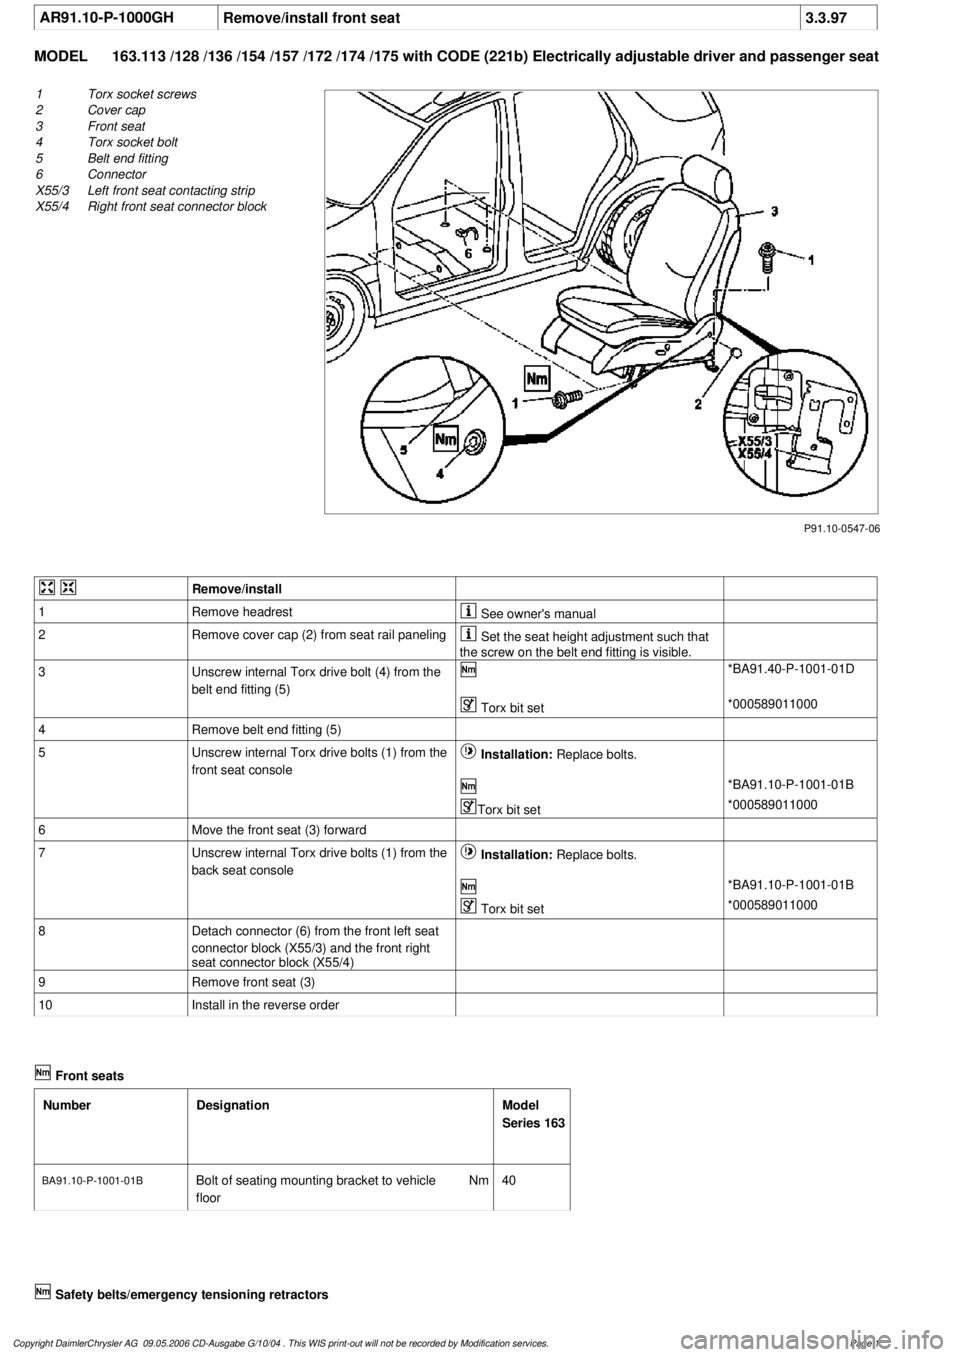
P91.10-0547-06
1
Torx socket screws
2
Cover cap
3
Front seat
4
Torx socket bolt
5
Belt end fitting
6
Connector
X55/3
Left front seat contacting strip
X55/4
Right front seat connector block
Remove/install
1
Remove headrest
See owner's manual
2
Remove cover cap (2) from seat rail paneling
Set the seat height adjustment such that
the screw on the belt end fitting is visible.
3
Unscrew internal Torx drive bolt (4) from the
belt end fitting (5)
*BA91.40-P-1001-01D
Torx bit set
*000589011000
4
Remove belt end fitting (5)
5
Unscrew internal Torx drive bolts (1) from the
front seat console
Installation:
Replace bolts.
*BA91.10-P-1001-01B
Torx bit set
*000589011000
6
Move the front seat (3) forward
7
Unscrew internal Torx drive bolts (1) from the
back seat console
Installation:
Replace bolts.
*BA91.10-P-1001-01B
Torx bit set
*000589011000
8
Detach connector (6) from the front left seat
connector block (X55/3) and the front right
seat connector block (X55/4)
9
Remove front seat (3)
10
Install in the reverse order
Front seats
Number
Designation
Model
Series 163
BA91.10-P-1001-01BBolt of seating mounting bracket to vehicle
floor
Nm
40
Safety belts/emergency tensioning retractors
Copyright DaimlerChrysler AG 09.05.2006 CD-Ausgabe G/10/04 . This WIS print-out will not be recorde
d by Modification services.
Page 1
Page 3810 of 4133
13
Unhook vertical adjustment cable (6) from
vertical adjustment handle (5)
14
Guide vertical adjustment cable (6) through
grommet (12)
Installation:
If a new rear seat cushion
frame is used, the grommet must be installed
in the new rear seat cushion frame.
15
Remove handle locking device (13) from rear
seat cushion frame
16
Unhook horizontal adjustment cable (8) at clip
(10) and at front of rear seat cushion frame
Risk of breakage!
17
Unscrew bolts from horizontal adjustment
handle
18
Detach horizontal adjustment cable (8) from
horizontal adjustment handle
Risk of breakage!
Pull out horizontal adjustment handle.
19
Remove rear seat seat belt buckle
40% rear seat without side airbag in left
and right rear, code 293.
AR91.40-P-1516GH
40% rear seat with side airbag in left and
right rear, code 293.
AR91.40-P-1516GK
60% rear seat outer seat.
AR91.40-P-1516GJ
20
Unscrew mounting screws for rear seat
cushion frame (2)
Installation:
Replace damaged shims at
the diagonal supports of the rear seat.
*BA91.12-P-1010-03A
21
Remove rear seat cushion frame (3)
Remove rear seat cushion frame through
tailgate
22
Install in the reverse order
Rear seats
Number
Designation
Model
163 as of
09/99
BA91.12-P-1009-03A
Bolt for clamping band to seat frame
Nm
45
BA91.12-P-1010-03A
Screw for bracket to seat frame
Nm
23
Torx bit set
000 589 01 10 00
Copyright DaimlerChrysler AG 14.06.2006 CD-Ausgabe G/10/04 . This WIS print-out will not be recorde
d by Modification services.
Page 2
Page 3811 of 4133
AR91.12-P-1730GI
Remove and install locking mechanism for folding rear seat backrest
5.5.99
MODELS
163.136 /154 /172 as of 1.9.99,
163.113 /128 /157 /174 /175
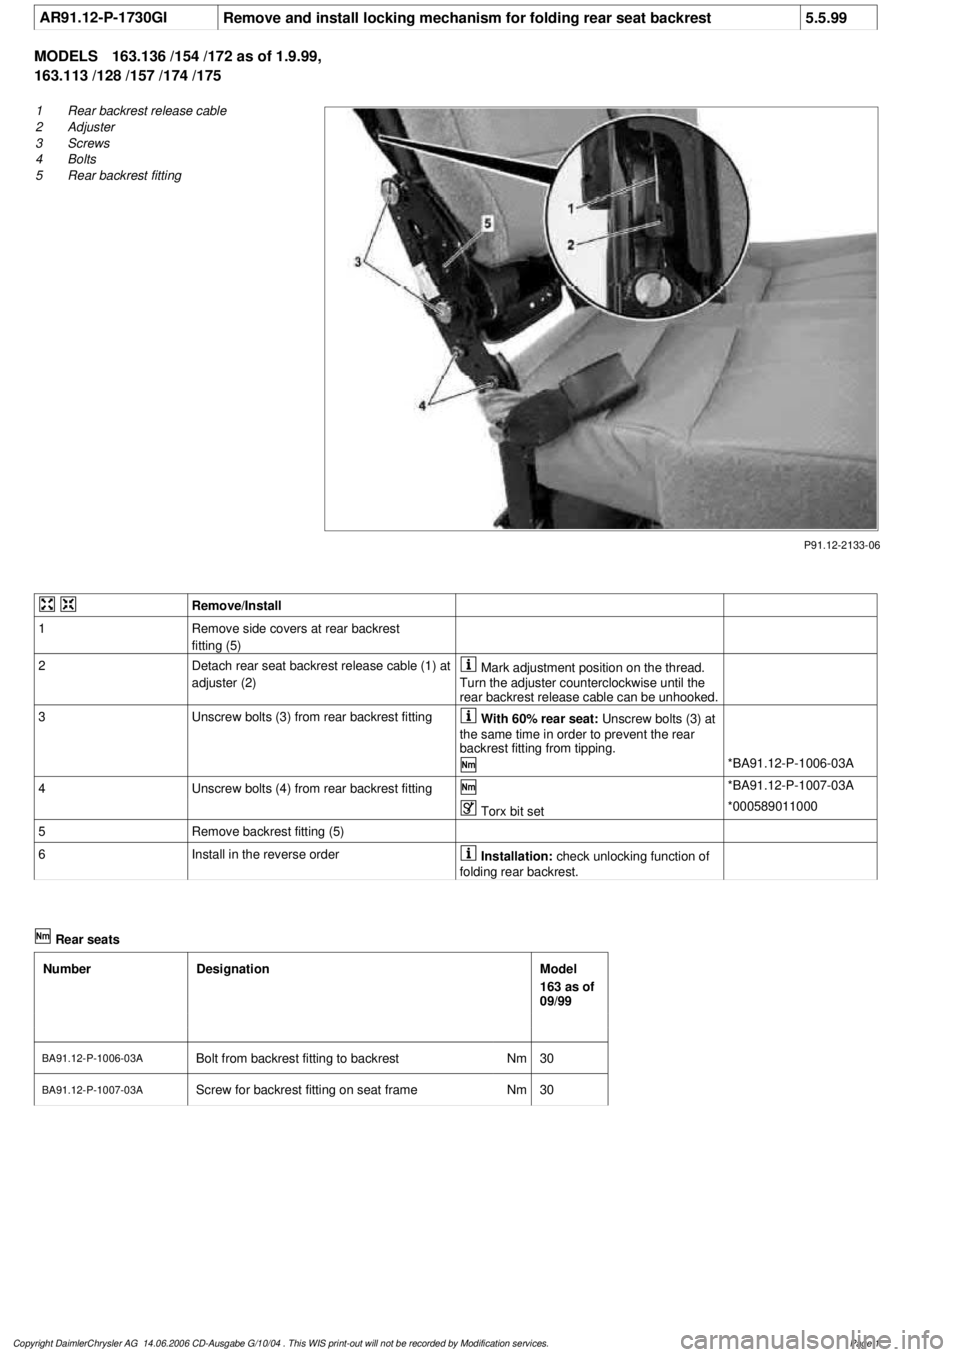
P91.12-2133-06
1
Rear backrest release cable
2
Adjuster
3
Screws
4
Bolts
5
Rear backrest fitting
Remove/Install
1
Remove side covers at rear backrest
fitting (5)
2
Detach rear seat backrest release cable (1) at
adjuster (2)
Mark adjustment position on the thread.
Turn the adjuster counterclockwise until the
rear backrest release cable can be unhooked.
3
Unscrew bolts (3) from rear backrest fitting
With 60% rear seat:
Unscrew bolts (3) at
the same time in order to prevent the rear
backrest fitting from tipping.
*BA91.12-P-1006-03A
4
Unscrew bolts (4) from rear backrest fitting
*BA91.12-P-1007-03A
Torx bit set
*000589011000
5
Remove backrest fitting (5)
6
Install in the reverse order
Installation:
check unlocking function of
folding rear backrest.
Rear seats
Number
Designation
Model
163 as of
09/99
BA91.12-P-1006-03A
Bolt from backrest fitting to backrest
Nm
30
BA91.12-P-1007-03A
Screw for backrest fitting on seat frame
Nm
30
Copyright DaimlerChrysler AG 14.06.2006 CD-Ausgabe G/10/04 . This WIS print-out will not be recorde
d by Modification services.
Page 1
Page 3814 of 4133
14.1
Remove belt end fitting (10) together with
buckle through the rear seat cushion (9)
Do not damage seat cover!
Applies to 60% seat bench only.
15
Install in the reverse order
Rear seats
Number
Designation
Model
163 as of
09/99
BA91.12-P-1006-03A
Bolt for backrest fitting to rear seat backrest
Nm
30
Seat belts/belt tensioners
Number
Designation
Model 163 up to
08/99
Model 163 as of
09/99
BA91.40-P-1001-01D
Screw on belt end fitting
Nm
3535
Torx bit set
000 589 01 10 00
Copyright DaimlerChrysler AG 14.06.2006 CD-Ausgabe G/10/04 . This WIS print-out will not be recorde
d by Modification services.
Page 2
Page 3815 of 4133
AR91.40-P-2000GHRemove/install seat belts for third row of seats
12.3.97
MODEL
163.113 /128 /136 /154 /157 /172 /175 with CODE (847) 3rd seat row
P91.40-0361-06
1
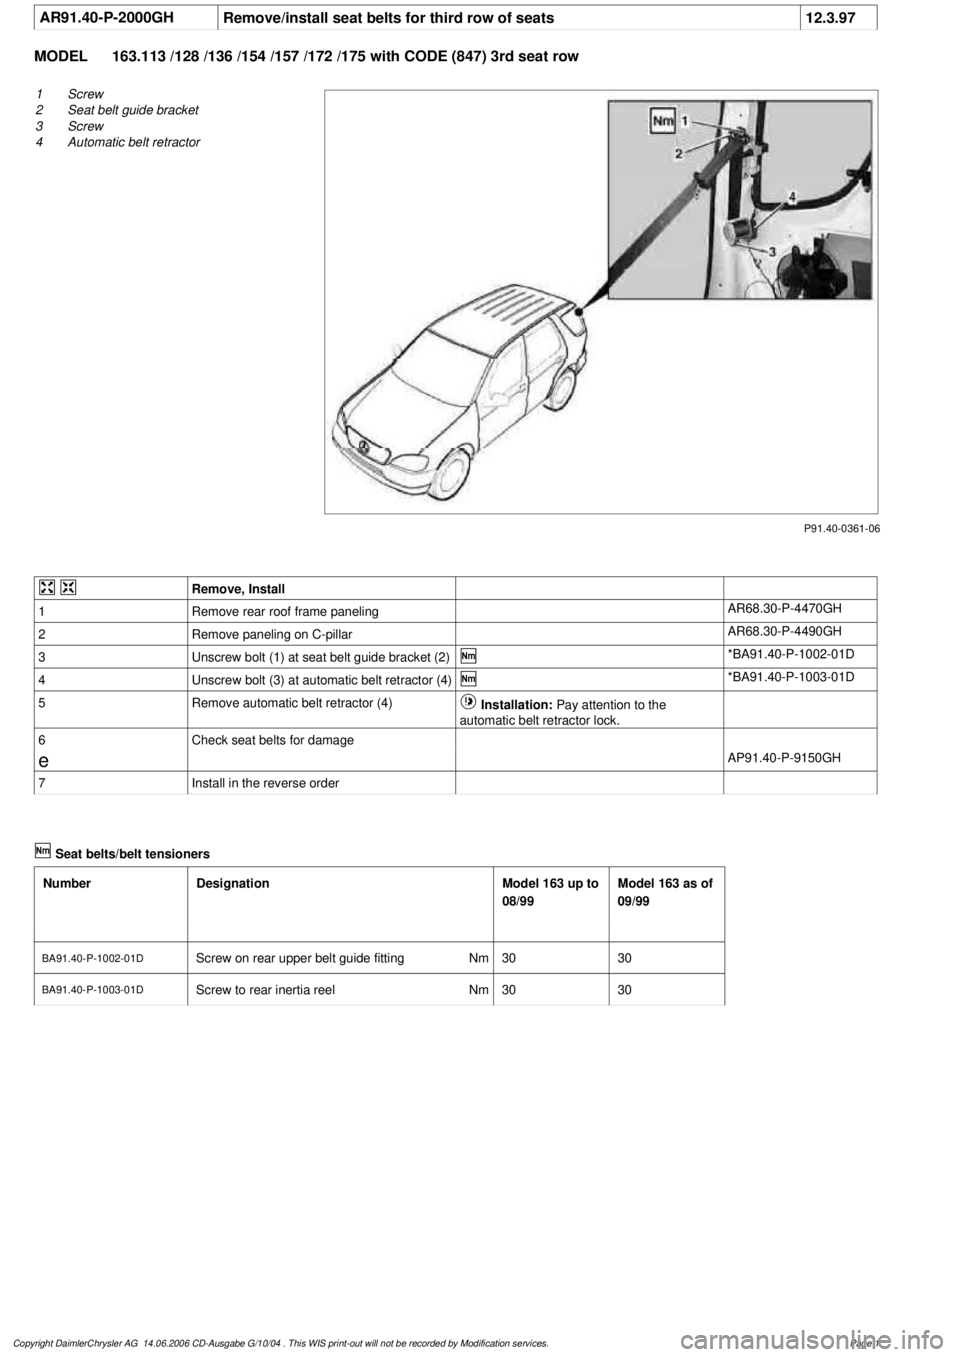
Screw
2
Seat belt guide bracket
3
Screw
4
Automatic belt retractor
Remove, Install
1
Remove rear roof frame paneling
AR68.30-P-4470GH
2
Remove paneling on C-pillar
AR68.30-P-4490GH
3
Unscrew bolt (1) at seat belt guide bracket (2)
*BA91.40-P-1002-01D
4
Unscrew bolt (3) at automatic belt retractor (4)
*BA91.40-P-1003-01D
5
Remove automatic belt retractor (4)
Installation:
Pay attention to the
automatic belt retractor lock.
6
Check seat belts for damage
e
AP91.40-P-9150GH
7
Install in the reverse order
Seat belts/belt tensioners
Number
Designation
Model 163 up to
08/99
Model 163 as of
09/99
BA91.40-P-1002-01D
Screw on rear upper belt guide fitting
Nm
3030
BA91.40-P-1003-01D
Screw to rear inertia reel
Nm
3030
Copyright DaimlerChrysler AG 14.06.2006 CD-Ausgabe G/10/04 . This WIS print-out will not be recorde
d by Modification services.
Page 1
Page 3984 of 4133
36
Install remaining covers under rear seat bench
Replace cover under rear seat bench at
rear with cover from the conversion kit.
f
Remove and install cover on bottom of rear
seat
AR91.12-P-1100GH
37
Disconnect ground lead from battery
f
Disconnect ground lead from battery
AR54.10-P-0003A
38
Retrofit voltage supply for central interface
module (1)
AZ82.60-P-0004-06A
39
Install glove compartment
f
Remove/install glove compartment
AR68.10-P-1400GI
Torx bit set
*000589011000
40
Connect ground cable for battery
f
Disconnect ground lead from battery
AR54.10-P-0003A
41.1
Initialize DVD player
As of VIN A289565, X754620.
AZ82.60-P-0004-07GH
Rear seats
Number
Designation
Model
163 as of
09/99
BA91.12-P-1005-03A
Nuts for rear seat console on vehicle floor
NM
40
BA91.12-P-1008-03A
Screws for rear seat console on vehicle floor
NM
40
115 589 03 59 00
Longitudinal wedge
Torx bit set
000 589 01 10 00
Parts ordering notes
Part no.
Designation
Quantity
B6 782 6500
Monitor, anthracite/orion, with 2 earphones (NTSC)
1
B6 782 6501
Monitor, java, with 2 earphones (NTSC)
1
B6 782 6505
DVD player (national code 1), with bracket
1
B6 782 6506
Video player (NTSC), with bracket
1
B6 782 6507
Earphones (NTSC)
1
B6 782 6508
Radio-controlled earphones (NTSC)
1
B6 782 6530
Floor covering at bottom of rear seat, orion (only with video player) (NTSC)
1
B6 782 6531
Floor covering at bottom of rear seat, anthracite (only with video player) (NTSC)
1
B6 782 6532
Floor covering at bottom of rear seat, Java (only with video player) (NTSC)
1
B6 782 6536
Monitor, anthracite/orion, with 2 earphones (PAL)
1
B6 782 6537
Monitor, java, with 2 earphones (PAL)
1
B6 782 6538
DVD player (national code 2), with bracket
1
B6 782 6539
Video player (PAL), with bracket
1
B6 782 6540
Floor covering at bottom of rear seat, orion (only with video player) (PAL)
1
B6 782 6541
Floor covering at bottom of rear seat, anthracite (only with video player) (PAL)
1
B6 782 6542
Floor covering at bottom of rear seat, Java (only with video player) (PAL)
1
B6 782 6545
Earphones (PAL)
1
B6 782 6551
Central interface module
1
B6 782 6570
Supplementary kit as of VIN A289565, X754620 (PAL)
1
B6 782 6571
Supplementary kit as of VIN A289565, X754620 (NTSC)
1
Copyright DaimlerChrysler AG 09.05.2006 CD-Ausgabe G/10/04 . This WIS print-out will not be recorde
d by Modification services.
Page 3