Page 874 of 4133

70 Safety and SecurityOccupant safetyBabySmart
TM
airbag deactivation
system
Special BabySmart
TM1
compatible child
seats, designed for use with the
Mercedes-Benz system and available at
any authorized Mercedes-Benz Light Truck
Center, are required for use with the
BabySmart
TM airbag deactivation system.
With the special seat properly installed,
the passenger front airbag will not deploy.
The 7indicator lamp located in the in-
strument cluster will be illuminated, ex-
cept with the key removed or in steering
lock position0 (
�page 33).Self-test BabySmart
TM
without special
child seat installed
After turning the key in the steering lock to
position1 or2, the 7indicator lamp lo-
cated in the instrument cluster comes on
for approximately six seconds, extin-
guishes, then flashes once.
If the indicator lamp should not come on or
is continuously lit, the system is not func-
tioning. You must see an authorized
Mercedes-Benz Light Truck Center before
seating any child on the front passenger
seat.
More information can be found in the
“Practical hints” section (�page 243).
1BabySmart
TMis a trademark of Siemens
Automotive Corp.
iThe system does not deactivate the
door mounted side impact airbag, the
window curtain airbags and the emer-
gency tensioning device.
Warning!
G
The BabySmart
TM airbag deactivation sys-
tem will ONLY work with a special child seat
designed to operate with it. It will not work
with child seats which are not BabySmart
TM
compatible.
Never place anything between seat cushion
and child seat (e.g. pillow), since it reduces
the effectiveness of the deactivation sys-
tem. The bottom of the child seat must
make full contact with the passenger seat
cushion. An incorrectly mounted child seat
could cause injuries to the child in case of an
accident, instead of protecting the child.
Follow the manufacturer’s instructions for
installation of special child seats.
When using a BabySmart
TM compatible
child seat on the front passenger seat, the
passenger front airbag will not deploy only if
the 7indicator lamp remains illumi-
nated.
Page 878 of 4133
74 Safety and SecurityOccupant safetyFor more information on power windows,
see the “Controls in detail” section
(�page 144).Warning!
G
Activate the override switch when children
are riding in the back seats of the vehicle.
The children may otherwise injure them-
selves, e.g. by becoming trapped in the win-
dow opening.
When leaving the vehicle, always remove the
key from the steering lock, and lock the ve-
hicle. Do not leave children unattended in
the vehicle, or with access to an unlocked
vehicle. Unsupervised use of vehicle equip-
ment may cause an accident and / or seri-
ous personal injury.
Page 902 of 4133
.
�
If necessary, remove cargo floor plates,
see “Removing cargo floor plates”
(�page 162).
�
Slide rear seats forward, s")
98 Controls in detailSeats�
Remove rear center head restraint
(�page 96).
�
If necessary, remove cargo floor plates,
see “Removing cargo floor plates”
(�page 162).
�
Slide rear seats forward, see “Adjusting
rear seat fore and aft” (
�page 99).
�
Fold rear seat backrests down, see
“Folding down the backrest”
(�page 100).
�
From cargo compartment, attach rear
center head restraint1 to underside
of rear center seat.
Make sure front side of head
restraint1 is facing upward.
�
Press bar2 on both sides into
clips3.
Heated seats*
Both switches for the front seats are loca-
ted in the center console.
1Normal heating
2Rapid heating�
Start the engine.
Switching on seat heating
�
Press upper switch position1.
A red indicator lamp on the switch
lights up.Switching off seat heating
�
Press upper switch position1 again.
The indicator lamp on the switch turns
off.
Switching on rapid seat heating
�
Press lower switch position2.
Both red indicator lamps on the switch
turn on.iThe seat heater will be automatically
switched off after approximately
20 minutes.iThe system switches over to normal
heating mode after approximately five
minutes. Only one red indicator lamp
remains on.
��
Page 904 of 4133
 and
ashtray (
�page 169) in rear center
console (�page 167).
�
Move front seats forward. Manual seat")
100 Controls in detailSeatsFolding down the backrest
1Lock button�
Close cup holder (
�page 167) and
ashtray (
�page 169) in rear center
console (�page 167).
�
Move front seats forward. Manual seat
(�page 35) or power seat (
�page 37).
�
Slide seat forward.
�
Remove head restraint(s) (
�page 95).
�
Pull lock button1 up and fold back-
rest forward until it locks in place.The red backrest lock indicator at lock
button1 is not visible in the locked
position.
Folding up the backrest
�
Close cup holder (
�page 167) and
ashtray (
�page 169) in rear center
console.
�
Pull lock button1 up and unfold back-
rest until it locks in place.
M a k e s u r e t h e s e a t b e l t i s n o t c a u g h t i n
the seat.
�
Check for secure locking by pulling and
pushing on the backrest.
The red backrest lock indicator at lock
button1 is not visible in the locked
position.
�
Install head restraint (
�page 96).
�
Slide seat rearward to desired position
(�page 99).
�
Adjust front seats to desired position.
Manual seats (
�page 35) or power
seats (
�page 37).
Lowering the rear seat
1Release button
2Lever
3Release lever
Page 905 of 4133
.
�
Move front seats forward. Manual seat
(�page 35) or power seat (
�page 37).
�
Press and hold release button1 to u")
101 Controls in detailSeats
�
Close cup holder in rear center console
(�page 167).
�
Move front seats forward. Manual seat
(�page 35) or power seat (
�page 37).
�
Press and hold release button1 to un-
lock lever2.
�
Pull lever2 in direction of arrow.
�
Pull release lever3 and push down
rear seat until it locks in place.
�
Fold down the backrest (
�page 100).
�
Adjust front seats to desired position.
Manual seats (
�page 35) or power
seats (
�page 37).Folding up the rear seat
�
Move front seats forward. Manual seat
(�page 35) or power seat (
�page 37).
�
Pull release lever3 and raise rear seat
until it locks in place.
Easy entry / exit feature*
The easy entry / exit feature allows access
to the third row seats*. The right cargo
floor plate must be removed (
�page 162).Folding rear seat forward
1Lever
�
Move right seat forward. Manual seats
(�page 35) or power seats
(�page 37).
�
Move rear seat forward (
�page 99).
�
Push head restraint fully down and tilt
it forward.
�
Fold backrest forward (
�page 100).
�
Pull lever1 up and fold the rear seat
forward.
Warning!
G
Failure to assure that seats are locked into
place could result in an increased chance of
injury in an accident.Warning!
G
Never drive with the second row right seat
folded forward (easy entry / exit feature). It
could open and fold back unintentionally.
Page 906 of 4133
 up
and unfold backrest until it locks into
place.
�
Check for se")
102 Controls in detailSeatsResetting rear seat�
Pull down on seat bench until it locks
into place.
�
Pull lock button1 (
�page 100) up
and unfold backrest until it locks into
place.
�
Check for secure locking by pulling and
pushing on the backrest.
The red backrest lock indicator at lock
button1 (
�page 100) is not visible in
the locked position.
�
Move the rear and front seats in de-
sired position.
�
Pull up and adjust head restraint
(�page 36).
Third row seats*Folding down single seat
1Head restraint
2Hook
3Tensioner
4Hook and loop velcro strip
�
Remove cargo floor plate
(�page 162).
�
Remove head restraint1 from seat
cushion.
�
Lift tensioner3 upward to a horizon-
tal position to release tension of the
belt.
�
Disengage hook2 while holding onto
the seat firmly with one hand.
Warning!
G
For your protection, drive only with properly
positioned head restraints.
Adjust head restraint so that head restraint
supports the back of the head at eye level.
This will reduce the potential for injury to the
head and neck in the event of an accident or
similar situation.
Failure to assure that seats are locked into
place could result in an increased chance of
injury in an accident.
Never place hands under seat or near any
moving parts while a seat is being adjusted.
Page 907 of 4133
 on underside of
seat.
5Backrest release
6Seat release
�
Fold seat down until it locks securely in
place.
The re")
103 Controls in detailSeats
�
Attach belt at hook and loop velcro
strip4 (
�page 102) on underside of
seat.
5Backrest release
6Seat release
�
Fold seat down until it locks securely in
place.
The red marking on the seat release6
should not be visible.
�
Store cargo floor plates inside the
backrest (
�page 162).
�
Pull backrest release5 and unfold
backrest until it locks securely in place.
�
Install head restraint1 in backrest
(�page 102).
Storing single seat
�
Remove head restraint from backrest
(�page 102).
�
Pull backrest release5 and fold back-
rest forward until it locks securely in
place.
�
Remove cargo floor plates from the
backrest.
�
Pull seat release6 (
�page 103) and
fold seat up.
�
Disengage belt and engage hook2
(�page 102) in ceiling mount.
�
Pull on free end of belt until tight.
�
Install head restraint in openings
provided in seat cushion.
�
Install cargo floor plates (
�page 162).
Warning!
G
After folding the seats up, manually place
the lap belt portion of the seat belt behind
the seat (arrow). Otherwise, the lap belt may
be subject to damage and could rip.
Page 964 of 4133
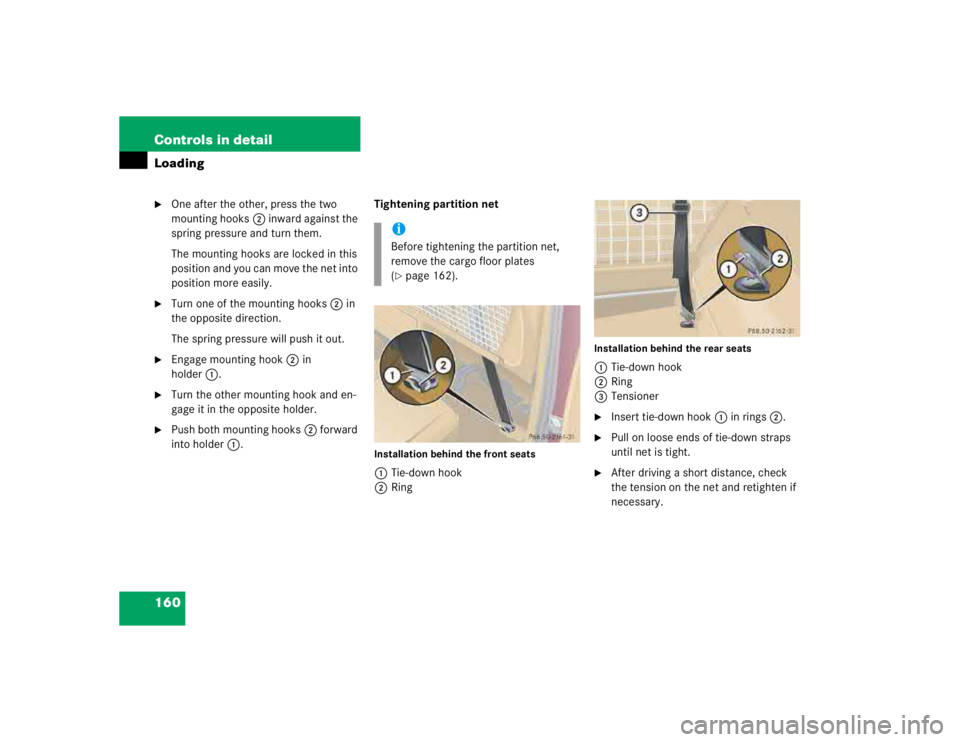
160 Controls in detailLoading�
One after the other, press the two
mounting hooks2 inward against the
spring pressure and turn them.
The mounting hooks are locked in this
position and you can move the net into
position more easily.
�
Turn one of the mounting hooks2 in
the opposite direction.
The spring pressure will push it out.
�
Engage mounting hook2 in
holder1.
�
Turn the other mounting hook and en-
gage it in the opposite holder.
�
Push both mounting hooks2 forward
into holder1.Tightening partition net
Installation behind the front seats1Tie-down hook
2Ring
Installation behind the rear seats1Tie-down hook
2Ring
3Tensioner�
Insert tie-down hook1 in rings2.
�
Pull on loose ends of tie-down straps
until net is tight.
�
After driving a short distance, check
the tension on the net and retighten if
necessary.
iBefore tightening the partition net,
remove the cargo floor plates
(�page 162).