1997 LINCOLN CONTINENTAL display
[x] Cancel search: displayPage 35 of 321

31
Using the Digital Signal Processing
(DSP) FeaturePush the ª(
aDSP
b)º button to activate the
feature. The display will indicate which signal mode
is in effect. To change the signal mode press either
the left (
b) or right (
a) side of the selector
button (located under the ª(
aDSP
b)º button).
The following signal modes may be selected:
1. ªHALLº Ð Rectangular concert hall capacity of
about 2,000.
2. ªCHURCHº Ð Church with a high vault.
3. ªJAZZº Ð Jazz club with clearly reflected
sounds.
4. ªSTADIUMº Ð Outdoor stadium with a
capacity of about 30,000.
5. ªNEWSº Ð ªVoice-onlyº type of sound with a
limited audio band.To deactivate the DSP feature, press the
ª(
aDSP
b)º button again.
Delayed Accessory Feature
(If Equipped)If the ignition is turned off while the radio is on,
the radio will continue to play for up to ten
minutes or until a door is opened.Speaker LocationsYour Ford JBL sound system is equipped with a
total of ten speakers: two speakers in each of the
four doors and two subwoofers located in the rear
package tray.Your AntennaAntennas for both AM and FM reception are hidden
in the back glass of your vehicle. There is an
internal antenna module that will switch between
AM and FM, when bands are changed, for
maximum reception performance.
File:04fnasc.ex
Update:Mon Jun 17 14:15:17 1996
Page 36 of 321

32NOTE:Do not attempt to adapt any other type of
antenna system to your audio system.Using the Controls of Your Cassette
Tape PlayerNOTE:Radio power must be on to use the cassette
tape player.How to insert a tapeYour cassette tape player is equipped with power
loading. Once you insert a tape and push slightly
(with theopen edge to the right), the loading
mechanism draws the tape the rest of the way in
and play will begin after a momentary tape
tightening process. Display indicates ªTAPEº while
tape is playing.
If the player is in the tape mode but not in play,
pressing the ªTAPEº button will activate play. If the
ªTAPEº button is pressed with no tape inserted, the
display will flash ªNO TAPEº.
How to locate a desired track on the tapeThere are six ways to quickly locate a desired
selection on the tape. You can use the fast forward,
rewind, Blank Skip, ªSEEKº, ªSCANº or ªSIDE 1-2º
functions. Following are brief descriptions of each:q
Fast forwarding the tape
To fast forward the tape, press the ªFFº button.
The radio will play while the tape is in fast
forward. The light above the ªFFº button will
blink while in the fast forward mode. Press
ªFFº again or press the ªTAPEº button to stop
fast forwarding. At the end of the tape, the
direction automatically reverses and plays the
other side of the tape.
File:04fnasc.ex
Update:Mon Jun 17 14:15:17 1996
Page 38 of 321

34How to store the tapePress the ªAM/FMº button to stop the tape player
and resume radio play.Using the DolbyHB noise reduction
featureNOTE:Noise reduction system manufactured under
license from Dolby Labs Licensing Corporation.
ªDolbyº and double-D symbol are trademarks of
Dolby Laboratories Licensing Corporation.
Push thekbutton to activate. When activated,
the light above thekbutton will be illuminated.Tape error messagesYour cassette tape player is equipped to diagnose
certain problems you may experience. Error codes
are as follows:
TD E1Ð Radio tries to change sides of tape 3
times in a 10 second span. Push ªEJECTº and try
another tape. If problem persists, refer problem to
qualified personnel for service.TD E2Ð Tape eject failure. Radio tries to eject
tape and it will not eject. Push ªEJECTº to eject
tape. If the tape will not eject, refer problem to
qualified personnel for service.
TD E3Ð Loading error. Push ªEJECTº to eject
tape. Reload tape. If the same error code appears in
the display, try another tape.
Tips on Caring for the Cassette Player
and TapesIn order to keep your cassette tape player
performing the way it was meant to, read and
follow these simple precautions:q
Using a Ford Cassette Cleaning Cartridge or
equivalent to clean the tape player head after
10-12 hours of play will help maintain the best
playback sound and proper tape operation.
q
Only cassettes that are 90 minutes long or less
should be used. Tapes longer than 90 minutes
are thinner and subject to breakage or may jam
the tape player mechanism.
File:04fnasc.ex
Update:Mon Jun 17 14:15:17 1996
Page 42 of 321

38The Compact Disc Changer unit is now ready to
play using the controls of your Luxury Audio
System.How to Operate the Ford 6-CD
Changer Using the Controls on the
RadioIf your vehicle is equipped with the Ford 6-CD
Changer System, you can operate it through the
controls of your Luxury Audio System.
Several of the controls on the radio operate in the
same manner in CD mode as they do in radio or
cassette mode: turning the power on, volume
control and adjusting the bass, treble, speaker
balance or fade.
How to begin CD Changer playNOTE:Radio power must be on to operate the
Compact Disc Changer.
Push the ªCDº button to begin CD play. The CD
Changer will automatically begin playing the first
track (selection) of the first disc loaded in the unit.
The display will indicate ªCD-##º for disc number
then display ªTR-##º for track number, then
ªDD-TTº for disc number and track number.How to change the disc being playedWhen in the CD mode, you can change discs by
pressing the right (
a) side of the ªTUNE DISCSº
button (to select the next disc) or the left (
b) side
of the ªTUNE DISCSº button (to select the previous
disc). Play will begin on the first track of the
selected disc.
When either side of the button is pressed and held,
the CD changer will continue fast-forwarding or
reversing through the discs in the disc magazine.
File:04fnasc.ex
Update:Mon Jun 17 14:15:17 1996
Page 43 of 321

39
During these functions, the display will indicate the
disc number.How to change the track being playedPress the right (
a) side of the ªSEEKº button to
seek forward to the next track of current disc. After
the last track has been completed, the CD player
automatically wraps back to the first track of the
current disc.
Press the left (
b) side of the SEEK button to seek
in reverse to the previous track on the current disc.
If a selection has been playing for three seconds or
more and you press the left (
b) side of the SEEK
button, the CD Changer will replay that selection
from the beginning.
Operating the CD Compression featureThe compression feature will bring soft and loud
passages closer together for a more consistent
listening level.
To turn the compression on, press the #5
ªk/COMPº button. (While in the CD Changer
mode, the Dolby button controls the compression
function.) When the compression feature is
activated, the display will indicate ªCº. Press again
to deactivate.Operating the Shuffle featureThe shuffle feature on your CD player allows you to
listen to your disc selections in a different order.
When this feature is activated, your CD player will
randomly select and play tracks on the disc.
Press the #6 ªSHUFFLEº button to turn on, press it
again to turn off. When on, the light above the
ªSHUFFLEº button will illuminate.
File:04fnasc.ex
Update:Mon Jun 17 14:15:17 1996
Page 47 of 321

43
TerrainThe terrain (hilly, mountainous, tall buildings) of the
area over which the signal travels may prevent the
FM signal from being noise-free.
Repeated pops and hisses which are heard during
an otherwise clear broadcast can occur near the
station because of the ªline of sightº characteristic
of FM radio waves.
If there is a building or large structure between the
antenna and station, some of the signal ªbendsº
around the building, but certain spots receive almost
no signal. Moving out of the ªshadowº of the
structure will allow the station to return to normal.
When the radio waves are reflected off objects or
structures, the reflected signal cancels the normal
signal, causing the antenna to pick up noise and
distortion. Cancellation effects are most prominent
in metropolitan areas, but also can become quite
severe in hilly terrain and depressed roadways.To minimize these conditions, a stereo/mono blend
circuit has been incorporated into this system. This
feature automatically switches a weak stereo signal
to a clearer monaural signal, which improves the
quality of reception.
Several sources of static are normal conditions on
AM frequencies. These can be caused by power
lines, electric fences, traffic lights and
thunderstorms.
Another reception phenomenon isStrong Signal
Capture and Overload. This can occur when
listening to a weak station and when passing
another broadcast tower. The close station may
capture the more distant station, although the
displayed frequency does not change. While passing
the tower, the station may switch back and forth a
few times before returning to the original station.
File:04fnasc.ex
Update:Mon Jun 17 14:15:17 1996
Page 50 of 321

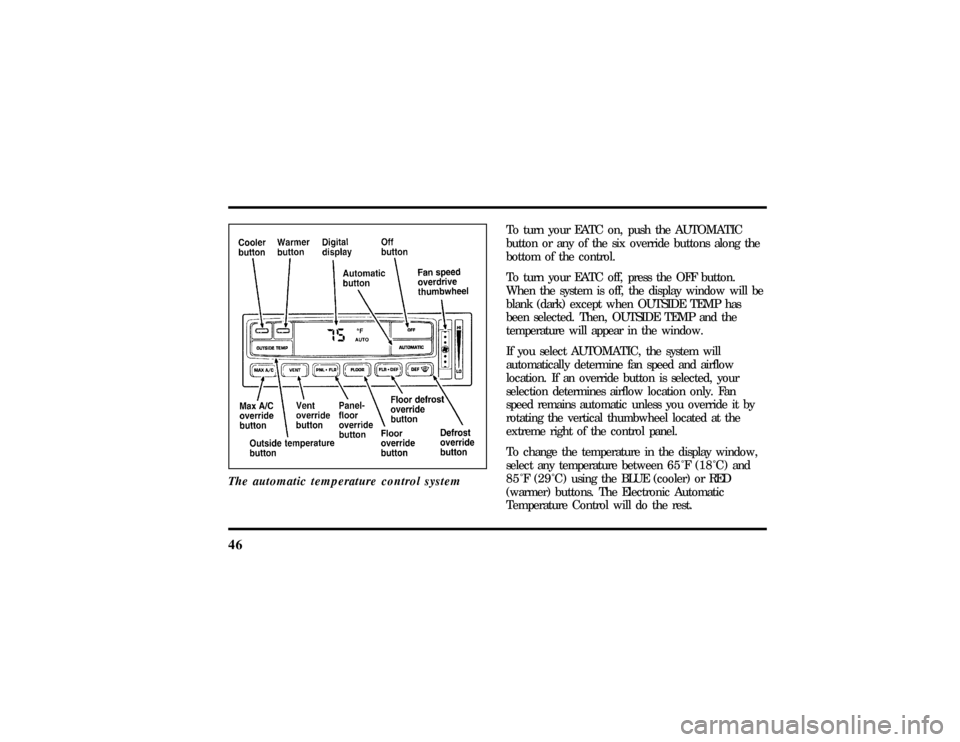
46The automatic temperature control system
To turn your EATC on, push the AUTOMATIC
button or any of the six override buttons along the
bottom of the control.
To turn your EATC off, press the OFF button.
When the system is off, the display window will be
blank (dark) except when OUTSIDE TEMP has
been selected. Then, OUTSIDE TEMP and the
temperature will appear in the window.
If you select AUTOMATIC, the system will
automatically determine fan speed and airflow
location. If an override button is selected, your
selection determines airflow location only. Fan
speed remains automatic unless you override it by
rotating the vertical thumbwheel located at the
extreme right of the control panel.
To change the temperature in the display window,
select any temperature between65ÊF(18ÊC) and
85ÊF(29ÊC)using the BLUE (cooler) or RED
(warmer) buttons. The Electronic Automatic
Temperature Control will do the rest.
File:05fncfc.ex
Update:Fri Sep 6 14:53:57 1996
Page 51 of 321

47
If you want continuous maximum cooling, push the
BLUE button until60ÊF(16ÊC) isshown in the
display window. Your EATC will cool at maximum
and disregard the60ÊF(16ÊC)setting until you
select a warmer temperature with the RED button.
If you want continuous maximum heating, push the
RED button until90ÊF(32ÊC) isshown in the
display window. Your EATC will provide maximum
heat regardless of the90ÊF(32ÊC)setting until you
select a cooler temperature with the BLUE button.
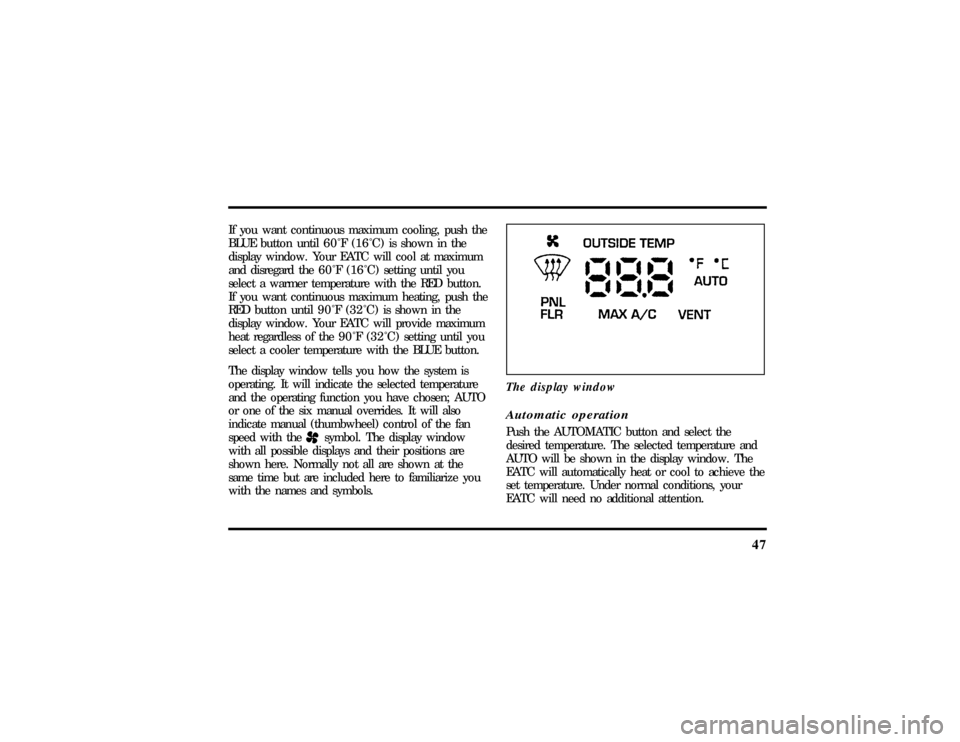
The display window tells you how the system is
operating. It will indicate the selected temperature
and the operating function you have chosen; AUTO
or one of the six manual overrides. It will also
indicate manual (thumbwheel) control of the fan
speed with the
Hsymbol. The display window
with all possible displays and their positions are
shown here. Normally not all are shown at the
same time but are included here to familiarize you
with the names and symbols.The display window
Automatic operationPush the AUTOMATIC button and select the
desired temperature. The selected temperature and
AUTO will be shown in the display window. The
EATC will automatically heat or cool to achieve the
set temperature. Under normal conditions, your
EATC will need no additional attention.
File:05fncfc.ex
Update:Fri Sep 6 14:53:57 1996