1997 HONDA ODYSSEY instrument panel
[x] Cancel search: instrument panelPage 1 of 241

1997 Odyssey Online Reference Owner's Manual
Use these links (and links throughout this manual) to navigate through\
this reference.
For a printed owner's manual, click on authorized manuals or go to www.h\
elminc.com.
Contents
Owner's Identification Form
Introduction ........................................................................\
............................................................... i
A Few Words About Safety........................................................................\
....................................... ii
Driver and Passenger Safety ........................................................................\
.................................... 3
Proper use and care of your vehicle's seat belts, and Supplemental Restr\
aint System.
Instruments and Control s........................................................................\
........................................ 31
Instrument panel indicator and gauge, and how to use dashboard and steering colu\
mn controls.
Comfort and Convenience Features ........................................................................\
...................... 73
How to operate the climate control system, the audio system, and other c\
onvenience features.
Before Driving........................................................................\
..........................................................107
What gasoline to use, how to break -in your new vehicle, and how to load luggage and other cargo.
Driving ........................................................................\
......................................................................117
The proper way to start the engine, shift the transmission, and park, pl\
us towing a trailer.
Maintenance........................................................................\
.............................................................137
The Maintenance Schedule shows you when you need to take you r vehicle to the dealer.
Appearance Car e........................................................................\
..................................................... .185
Tips on cleaning and protecting your vehicle. Things to look for if your\
vehicle ever needs body repairs.
Taking Care of the Unexpecte d........................................................................\
..............................193
This section covers several problems motorists sometimes experience, an d how to handle them.
Technical Informatio n........................................................................\
.............................................217
ID numbers, dimensions, capacities, and technical information.
Warranty and Customer Relations (U.S. and Canada)................................................................229
A summary of the warranties covering your new Acura, and how to contact \
us.
Authorized Manu als (U.S. only)........................................................................\
..............................235
How to order manuals and other technical literature.
Index........................................................................\
.............................................................................. I
Gas Station Information
A summary of information you need when you pull up to the fuel pump.
ProCarManuals.com
Page 7 of 241
The Seat Belt System and How It Works
Seat Belt System Components
Your Honda has seat belts in all seating positions. All the seat belts in
the six-passenger model are lap/ shoulder belts. In the seven-
passenger model, the center position
of the bench-type second seat has a
lap belt.
Your seat belt system also includes a light on the instrument panel to
remind you to fasten your seat belt,
and to make sure your passengers
fasten theirs. This light comes on
when you turn on the ignition if you
have not fastened your seat belt. A beeper also sounds for severalseconds (see page 34).
The following pages cover more about the seat belt components and
how they work.
Lap/Shoulder Belt
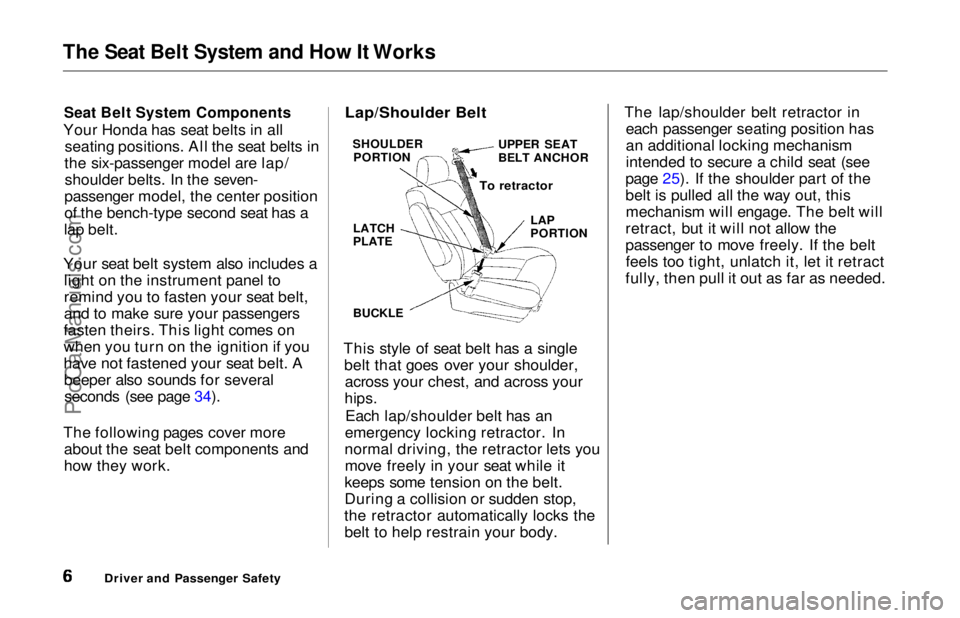
This style of seat belt has a single belt that goes over your shoulder,across your chest, and across your
hips.
Each lap/shoulder belt has an
emergency locking retractor. In
normal driving, the retractor lets you move freely in your seat while it
keeps some tension on the belt.
During a collision or sudden stop,
the retractor automatically locks the belt to help restrain your body. The lap/shoulder belt retractor in
each passenger seating position has
an additional locking mechanism
intended to secure a child seat (see
page 25). If the shoulder part of the
belt is pulled all the way out, this mechanism will engage. The belt will
retract, but it will not allow the
passenger to move freely. If the belt feels too tight, unlatch it, let it retract
fully, then pull it out as far as needed.
Driver and Passenger Safety
SHOULDER
PORTION UPPER SEAT
BELT ANCHOR
To retractor
LAP
PORTION
LATCH
PLATE
BUCKLEProCarManuals.comMain Menu Table of Contents s t
Page 17 of 241
Supplemental Restraint System
The passenger's airbag is stored near the top of the dashboard, under
a lid marked SRS. Do not place any
objects on top of this lid. If the airbag
inflates, those objects can be
propelled inside the car and possibly
hurt someone. How the SRS Indicator
Light Works
The purpose of the SRS light on your instrument panel is to alert you to a
potential problem with your supple- mental restraint system.
Have the system checked if: The light does not come on when
you turn the ignition ON (II). The light stays on after the engine
starts. The light comes on or flashes
while you are driving.
If you see any of these indications,
the airbag may not work when needed in an accident. Take the car
to your dealer promptly for diagnosis and service.
System Service
Your supplemental restraint system is virtually maintenance-free. Theonly scheduled maintenance is an
inspection of the system by the
dealer when the car is ten years old.
For your convenience, the car's
production date is on a label on thedriver's doorjamb.
If either of the following happens,
you must have an authorized Honda dealer service the system. There are
no parts you can safely service. If your airbags ever inflate, the
airbags and control unit must be
replaced. Do not try to remove or discard the airbags yourself. This
must be done by a Honda dealer.
Driver and Passenger Safety
S R S
ProCarManuals.comMain Menu Table of Contents s t
Page 32 of 241
Instruments and Controls
This section gives information about the controls and displays thatcontribute to the daily operation of
your Honda. All the essential controls are within easy reach.
Control Locations............................ 32
Indicator Lights................................ 33 Gauges.............................................. 37
Speedometer................................ 37
Trip Meter.................................... 37
Odometer...................................... 37
Temperature Gauge.................... 38 Fuel Gauge................................... 38
Maintenance Required Indicator.................................... 38
Controls Near the Steering
Wheel........................................ 39
Headlights.................................... 40
Daytime Running Lights............. 40
Instrument Panel Brightness..... 41
Turn Signals................................. 41
Windshield Wipers...................... 42
Windshield Washers................... 43 Rear Window Wiper and Washer......................................
43
Hazard Warning...........................
43
Rear Window Defogger.............. 44
Steering Wheel Adjustment....... 44
Steering Wheel Controls ................ 46 Cruise Control.............................. 46
Keys and Locks................................ 49
Keys...............................................49
Ignition Switch............................. 49
Power Door Locks....................... 50
Remote Transmitter....................
51
Childproof Door
Locks............... 52
Tailgate......................................... 52 Glove Box..................................... 53
Seats.................................................. 54
Passenger Seating....................... 54
Seat Adjustments......................... 54
Driver's Seat Power Height Adjustment............................... 55
Head Restraints........................... 56
Third Seat Access........................ 56
Removing the Second Seats
in the Six-Passenger Model.... 57
Folding the Second Seats in the Seven-PassengerModel.................................... 58
Reclining the Second Seat.......... 59
Folding the Third Seat in All Models............................ 60
Power Windows............................... 62
Sunroof.............................................. 63
Mirrors.............................................. 64
Adjusting the Power Mirrors..... 64
Parking Brake.................................. 65
Digital Clock..................................... 66
Beverage Holder.............................. 66
Dashboard Compartment............... 68
Center Pocket.................................. 68
Vanity Mirror................................... 68
Cigarette Lighter............................. 69
Ashtrays............................................ 69
Interior Lights.................................. 70
Ceiling Lights............................... 70
Spotlights...................................... 70
Tailgate Light............................... 71
Courtesy Lights........................... 71
Instruments and ControlsProCarManuals.comMain Menu s t
Page 34 of 241
Indicator Lights
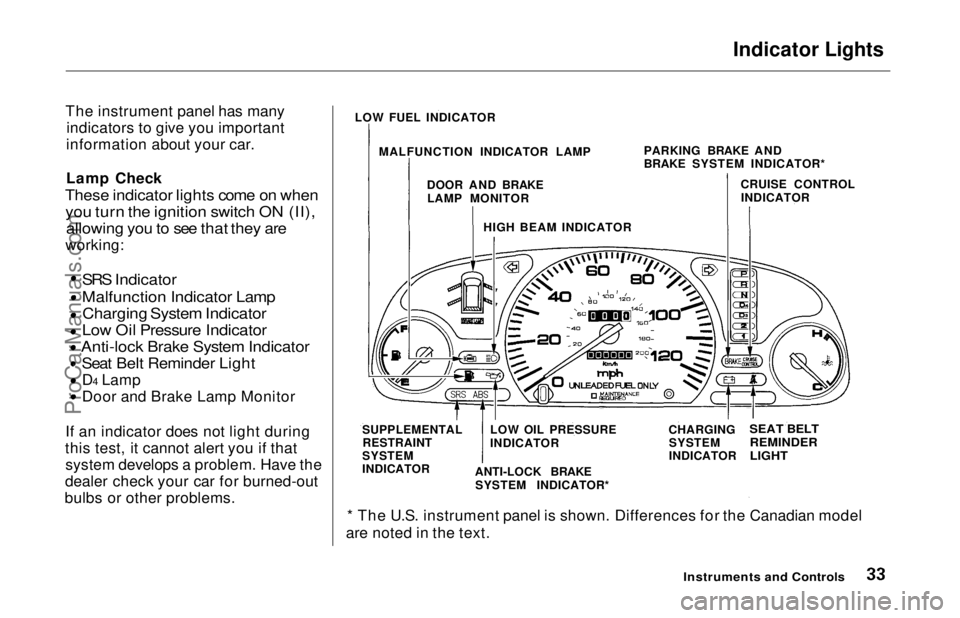
The instrument panel has many indicators to give you important
information about your car.
Lamp Check
These indicator lights come on when
you turn the ignition switch ON (II),
allowing you to see that they are
working:
SRS Indicator
Malfunction Indicator Lamp
Charging System Indicator
Low Oil Pressure Indicator
Anti-lock Brake System Indicator
Seat Belt Reminder Light
D4 Lamp
Door and Brake Lamp Monitor
If an indicator does not light during
this test, it cannot alert you if that system develops a problem. Have the
dealer check your car for burned-out
bulbs or other problems.
* The U.S. instrument panel is shown. Differences for the Canadian model
are noted in the text.
Instruments and Controls
LOW FUEL INDICATOR
MALFUNCTION INDICATOR LAMP DOOR AND BRAKELAMP MONITOR
HIGH BEAM INDICATOR PARKING BRAKE AND
BRAKE SYSTEM INDICATOR*
CRUISE CONTROLINDICATOR
SUPPLEMENTAL RESTRAINT
SYSTEM
INDICATOR LOW OIL PRESSURE
INDICATOR
ANTI-LOCK BRAKE SYSTEM INDICATOR* CHARGING
SYSTEM
INDICATOR
SEAT BELT
REMINDER
LIGHTProCarManuals.comMain Menu Table of Contents s t
Page 40 of 241
Controls Near the Steering Wheel
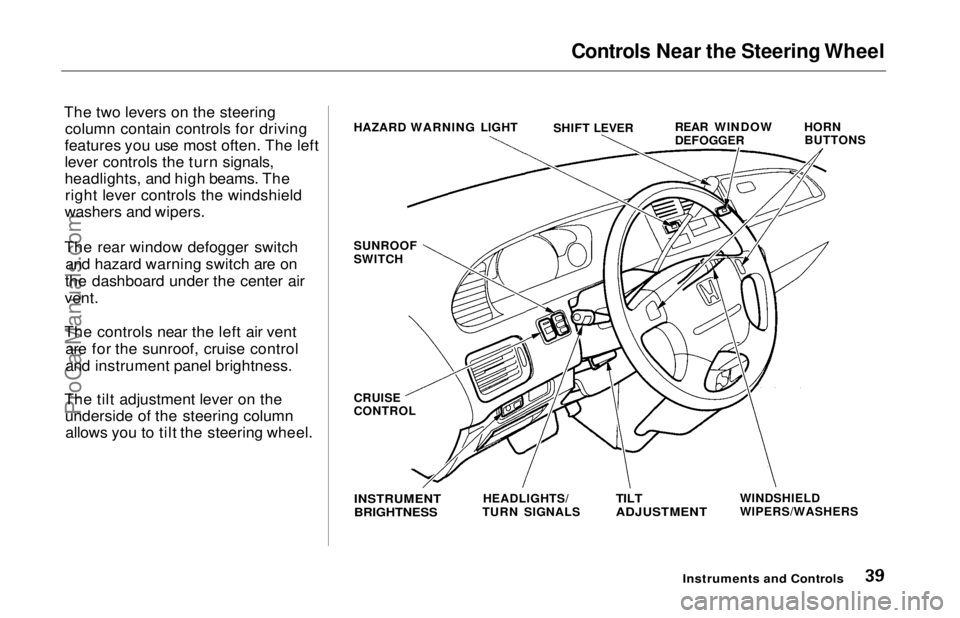
The two levers on the steering column contain controls for driving
features you use most often. The left
lever controls the turn signals,
headlights, and high beams. The right lever controls the windshield
washers and wipers.
The rear window defogger switch and hazard warning switch are on
the dashboard under the center air
vent.
The controls near the left air vent are for the sunroof, cruise control
and instrument panel brightness.
The tilt adjustment lever on the underside of the steering columnallows you to tilt the steering wheel. HAZARD WARNING LIGHT
REAR WINDOW
DEFOGGER
SUNROOF
SWITCH
CRUISE
CONTROL HORN
BUTTONS
INSTRUMENT
BRIGHTNESS
HEADLIGHTS/
TURN SIGNALS
TILT
ADJUSTMENT
WINDSHIELD
WIPERS/WASHERS
Instruments and Controls
SHIFT LEVERProCarManuals.comMain Menu Table of Contents s t
Page 41 of 241
Controls Near the Steering Wheel
Headlights
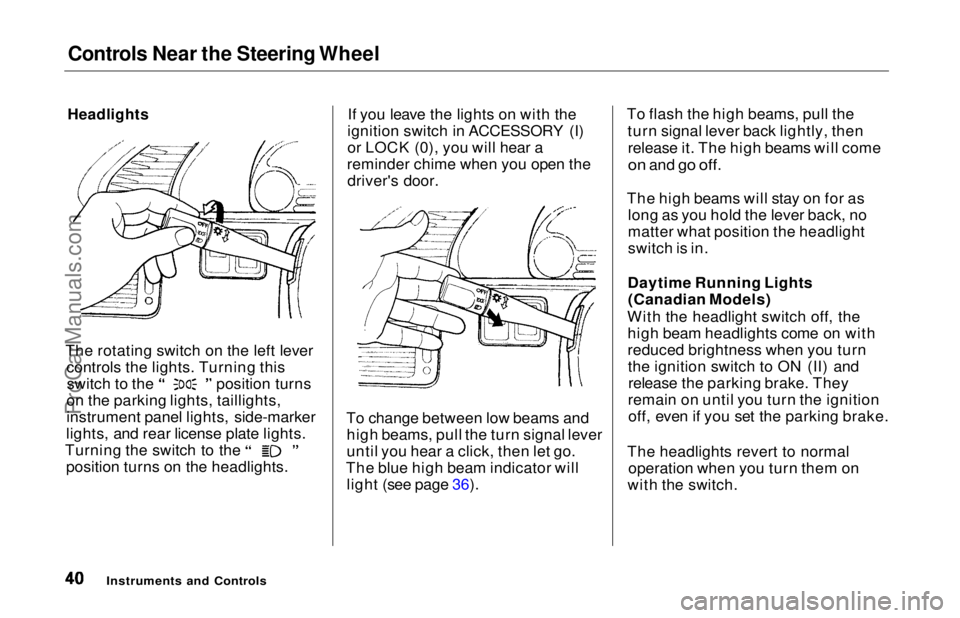
The rotating switch on the left lever controls the lights. Turning this switch to the position turns
on the parking lights, taillights,
instrument panel lights, side-marker
lights, and rear license plate lights. Turning the switch to the
position turns on the headlights. If you leave the lights on with the
ignition switch in ACCESSORY (I)
or LOCK (0), you will hear a
reminder chime when you open the driver's door.
To change between low beams and high beams, pull the turn signal lever
until you hear a click, then let go.
The blue high beam indicator will light (see page 36). To flash the high beams, pull the
turn signal lever back lightly, thenrelease it. The high beams will come
on
and
go off.
The high beams will stay on for as long as you hold the lever back, no
matter what position the headlight
switch is in.
Daytime Running Lights (Canadian Models)
With the headlight switch off, the high beam headlights come on with
reduced brightness when you turnthe ignition switch to ON (II) andrelease the parking brake. They
remain on until you turn the ignition off, even if you set the parking brake.
The headlights revert to normal operation when you turn them on
with the switch.
Instruments and ControlsProCarManuals.comMain Menu Table of Contents s t
Page 42 of 241
Controls Near the Steering Wheel
Instrument Panel Brightness
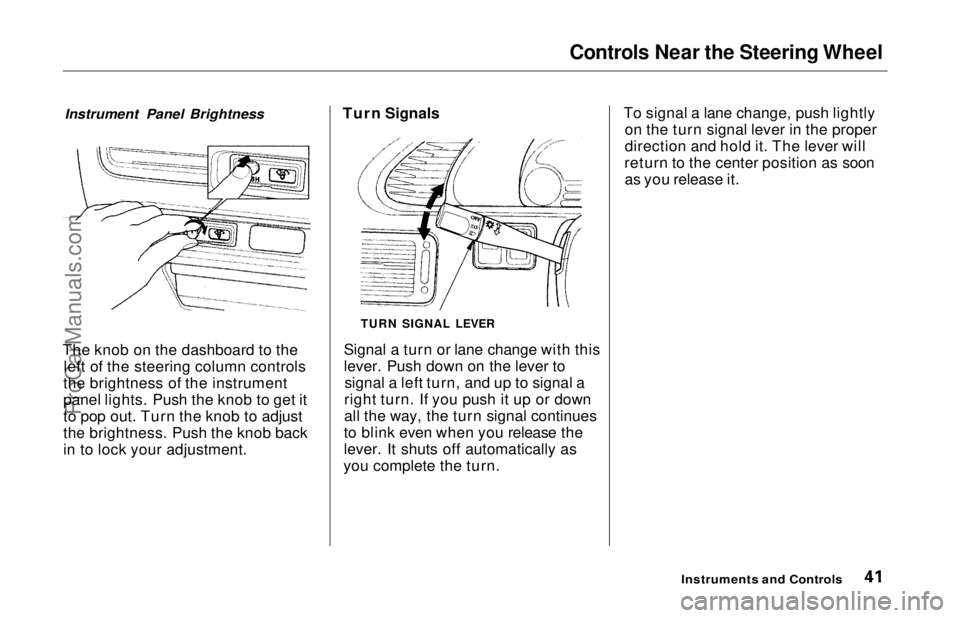
The knob on the dashboard to the left of the steering column controls
the brightness of the instrument
panel lights. Push the knob to get it
to pop out. Turn the knob to adjust
the brightness. Push the knob back
in to lock your adjustment. Turn Signals
Signal a turn or lane change with this
lever. Push down on the lever tosignal a left turn, and up to signal a
right turn. If you push it up or down
all the way, the turn signal continues
to blink even when you release the
lever. It shuts off automatically as
you complete the turn. To signal a lane change, push lightly
on the turn signal lever in the proper
direction and hold it. The lever will
return to the center position as soon as you release it.
Instruments and Controls
TURN SIGNAL LEVERProCarManuals.comMain Menu Table of Contents s t