1997 HONDA ODYSSEY windshield wipers
[x] Cancel search: windshield wipersPage 32 of 241
Instruments and Controls
This section gives information about the controls and displays thatcontribute to the daily operation of
your Honda. All the essential controls are within easy reach.
Control Locations............................ 32
Indicator Lights................................ 33 Gauges.............................................. 37
Speedometer................................ 37
Trip Meter.................................... 37
Odometer...................................... 37
Temperature Gauge.................... 38 Fuel Gauge................................... 38
Maintenance Required Indicator.................................... 38
Controls Near the Steering
Wheel........................................ 39
Headlights.................................... 40
Daytime Running Lights............. 40
Instrument Panel Brightness..... 41
Turn Signals................................. 41
Windshield Wipers...................... 42
Windshield Washers................... 43 Rear Window Wiper and Washer......................................
43
Hazard Warning...........................
43
Rear Window Defogger.............. 44
Steering Wheel Adjustment....... 44
Steering Wheel Controls ................ 46 Cruise Control.............................. 46
Keys and Locks................................ 49
Keys...............................................49
Ignition Switch............................. 49
Power Door Locks....................... 50
Remote Transmitter....................
51
Childproof Door
Locks............... 52
Tailgate......................................... 52 Glove Box..................................... 53
Seats.................................................. 54
Passenger Seating....................... 54
Seat Adjustments......................... 54
Driver's Seat Power Height Adjustment............................... 55
Head Restraints........................... 56
Third Seat Access........................ 56
Removing the Second Seats
in the Six-Passenger Model.... 57
Folding the Second Seats in the Seven-PassengerModel.................................... 58
Reclining the Second Seat.......... 59
Folding the Third Seat in All Models............................ 60
Power Windows............................... 62
Sunroof.............................................. 63
Mirrors.............................................. 64
Adjusting the Power Mirrors..... 64
Parking Brake.................................. 65
Digital Clock..................................... 66
Beverage Holder.............................. 66
Dashboard Compartment............... 68
Center Pocket.................................. 68
Vanity Mirror................................... 68
Cigarette Lighter............................. 69
Ashtrays............................................ 69
Interior Lights.................................. 70
Ceiling Lights............................... 70
Spotlights...................................... 70
Tailgate Light............................... 71
Courtesy Lights........................... 71
Instruments and ControlsProCarManuals.comMain Menu s t
Page 40 of 241
Controls Near the Steering Wheel
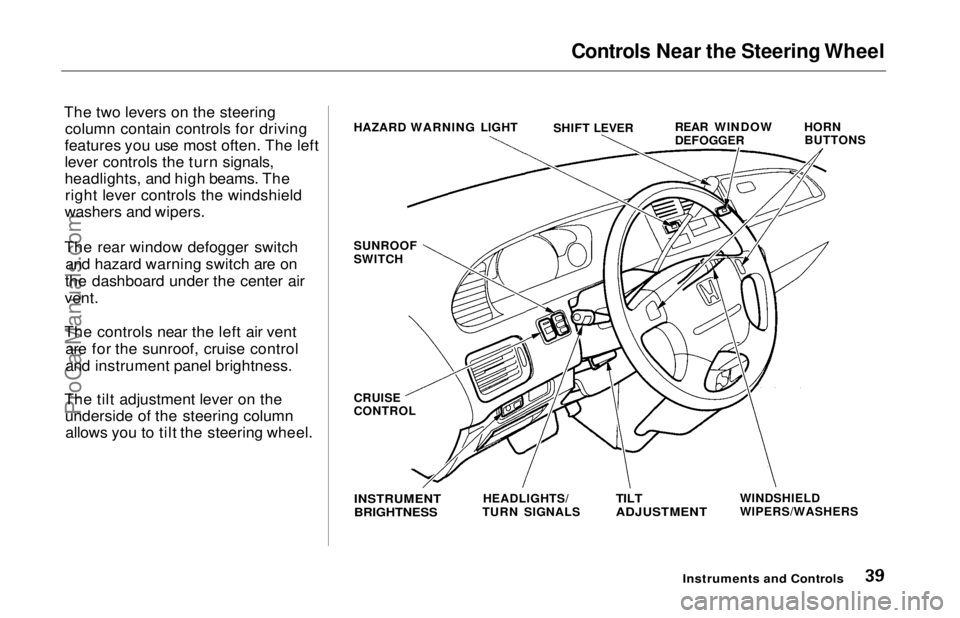
The two levers on the steering column contain controls for driving
features you use most often. The left
lever controls the turn signals,
headlights, and high beams. The right lever controls the windshield
washers and wipers.
The rear window defogger switch and hazard warning switch are on
the dashboard under the center air
vent.
The controls near the left air vent are for the sunroof, cruise control
and instrument panel brightness.
The tilt adjustment lever on the underside of the steering columnallows you to tilt the steering wheel. HAZARD WARNING LIGHT
REAR WINDOW
DEFOGGER
SUNROOF
SWITCH
CRUISE
CONTROL HORN
BUTTONS
INSTRUMENT
BRIGHTNESS
HEADLIGHTS/
TURN SIGNALS
TILT
ADJUSTMENT
WINDSHIELD
WIPERS/WASHERS
Instruments and Controls
SHIFT LEVERProCarManuals.comMain Menu Table of Contents s t
Page 43 of 241
Controls Near the Steering Wheel
Windshield Wipers
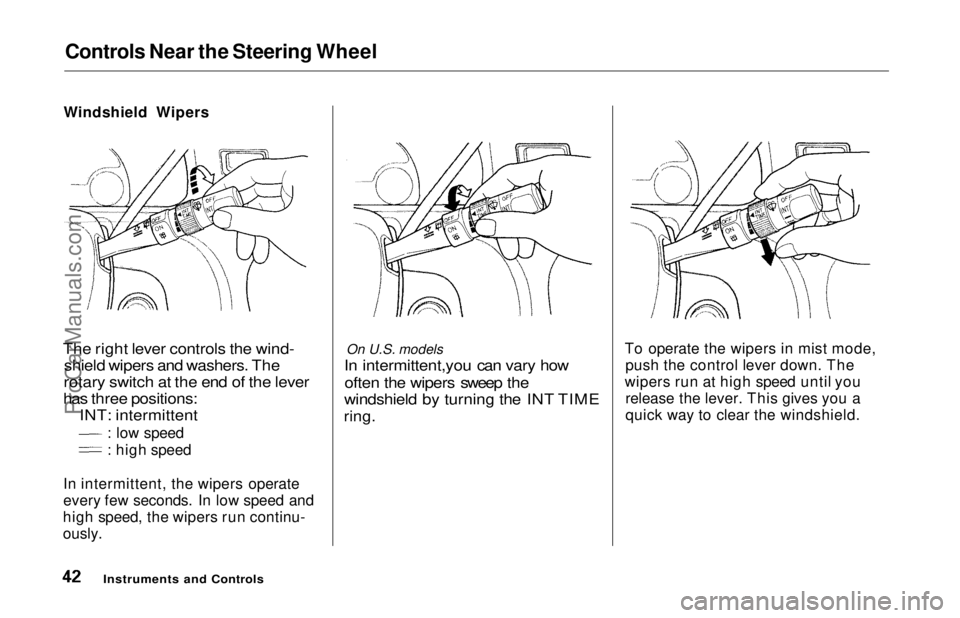
The right lever controls the wind- shield wipers and washers. The
rotary switch at the end of the lever
has three positions: INT: intermittent
: low speed
: high speed
In intermittent, the wipers operate
every few seconds. In low speed and
high speed, the wipers run continu-
ously. On U.S. models
In intermittent,you can vary how
often the wipers sweep the
windshield by turning the INT TIME
ring.
To operate the wipers in mist mode,
push the control lever down. The
wipers run at high speed until you release the lever. This gives you a
quick way to clear the windshield.
Instruments and ControlsProCarManuals.comMain Menu Table of Contents s t
Page 44 of 241
Controls Near the Steering Wheel
Windshield Washers
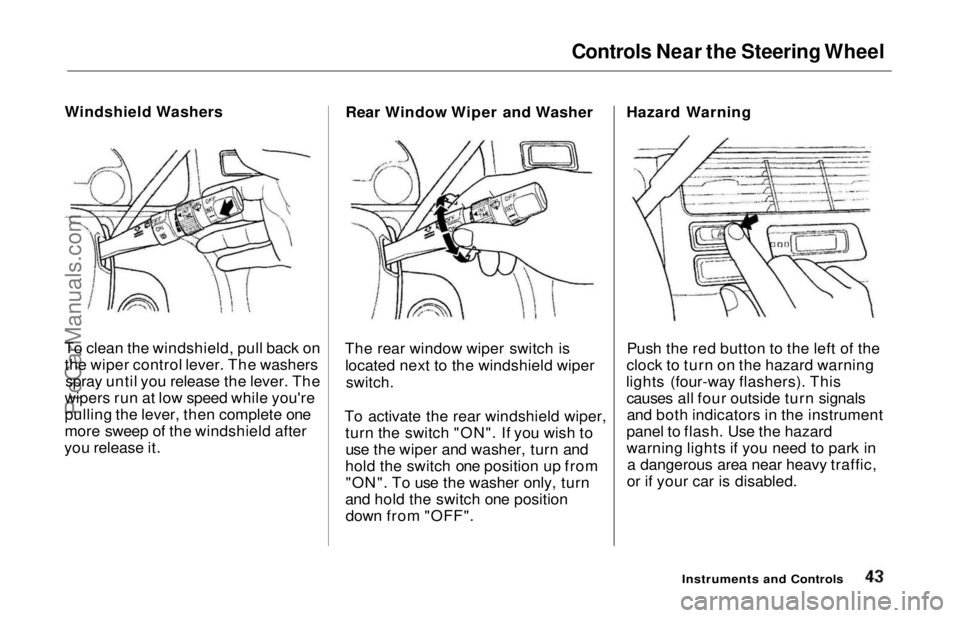
To clean the windshield, pull back on the wiper control lever. The washers spray until you release the lever. The
wipers run at low speed while you're
pulling the lever, then complete one
more sweep of the windshield after
you release it. Rear Window Wiper and Washer
The rear window wiper switch is located next to the windshield wiper
switch.
To activate the rear windshield wiper, turn the switch "ON". If you wish touse the wiper and washer, turn and
hold the switch one position up from "ON". To use the washer only, turn
and hold the switch one position down from "OFF". Hazard Warning
Push the red button to the left of the
clock to turn on the hazard warning
lights (four-way flashers). This causes all four outside turn signalsand both indicators in the instrument
panel to flash. Use the hazard
warning lights if you need to park in a dangerous area near heavy traffic,
or if your car is disabled.
Instruments and ControlsProCarManuals.comMain Menu Table of Contents s t
Page 129 of 241
Driving in Bad Weather
Visibility — Being able to see clearly in all directions and being
visible to other drivers are important in all weather conditions. This is
more difficult in bad weather. To be seen more clearly during daylight
hours, turn on your headlights.
Inspect your windshield wipers and
washers frequently. Keep the wind- shield washer reservoir full of the
proper fluid. Have the windshield
wiper blades replaced if they start to streak the windshield or leave parts
unwiped. Use the defrosters and air conditioning to keep the windows
from fogging up on the inside (see
page 79).
Traction — Check your tires
frequently for wear and properpressure. Both are important in
preventing "hydroplaning" (loss of
traction on a wet surface). In the
winter, mount snow tires on all four wheels for the best handling.
Watch road conditions carefully, they can change from moment tomoment. Wet leaves can be as slip-
pery as ice. "Clear" roads can have patches of ice. Driving conditions
can be very hazardous when the
outside temperature is near freezing.
The road surface can become covered with areas of water puddles
mixed with areas of ice, so your
traction can change without warning.
Be careful when downshifting. If
traction is low, you can lock up the drive wheels for a moment and cause
a skid. Be very cautious when passing, or
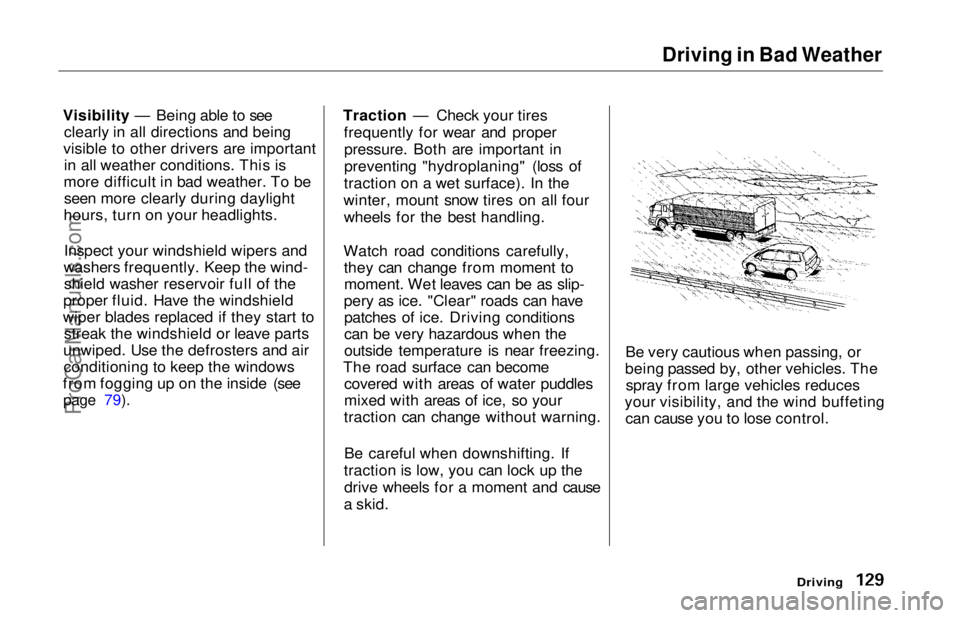
being passed by, other vehicles. The spray from large vehicles reduces
your visibility, and the wind buffeting can cause you to lose control.
DrivingProCarManuals.comMain Menu Table of Contents s t
Page 136 of 241
Maintenance
This section explains why it is important to keep your car well
maintained and to follow basic
maintenance safety precautions.
This section also includes Maintenance Schedules for normaldriving and severe driving conditions,
a Maintenance Record, and instruc-
tions for simple maintenance tasks
you may want to take care of
yourself.
If you have the skills and tools to per-
form more complex maintenance
tasks on your Honda, you may want to purchase the Service Manual. See
page 235 for information on how toobtain a copy, or see your Honda
dealer.
Maintenance Safety....................... 138
Important Safety Precautions.. 139
Maintenance Schedule.................. 140
Maintenance Record..................... 144
Owner Maintenance Checks........ 146
Fluid Locations............................... 147
Engine Oil....................................... 148
Adding Oil................................... 148Recommended Oil..................... 148
Synthetic Oil............................... 149
Additives..................................... 150
Changing the Oil and Filter...... 150
Cooling System.............................. 152
Adding Engine Coolant............. 152Replacing Engine Coolant........ 154
Windshield Washers..................... 156
Automatic Transmission Fluid..... 157
Brake Fluid..................................... 158
Brake System............................. 158
Anti-lock Brake System............ 159
Power Steering............................... 159
Air Cleaner Element...................... 160
Spark Plugs..................................... 162
Replacement............................... 162
Specifications............................. 163
Battery............................................ 164
Windshield Wipers........................ 166
Air Conditioning System............... 169
Drive Belts...................................... 170
Timing Belt..................................... 170
Tires................................................ 171 Inflation....................................... 171
Inspection................................... 173
Maintenance............................... 173
Tire Rotation.............................. 174 Replacing Tires and Wheels .... 174
Wheels and Tires....................... 175
Winter Driving........................... 175 Snow Tires.............................. 176
Tire Chains............................. 176
Lights.............................................. 177
Headlight Aiming...................... 177
Replacing Bulbs......................... 179
Storing Your Car............................ 184
MaintenanceProCarManuals.comMain Menu s t
Page 165 of 241
Windshield Wipers
Check the condition of the wind-
shield wiper blades at least every six
months. Look for signs of cracking
in the rubber, or areas that are
getting hard. Replace the blades if
you find these signs, or they leave streaks and unwiped areas when
used.
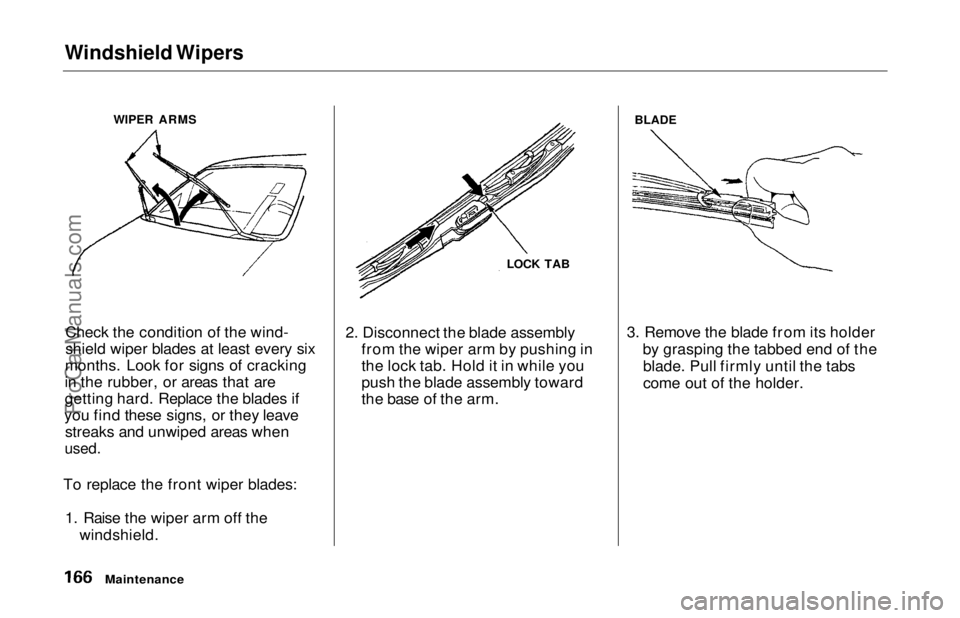
To replace the front wiper blades: 1. Raise the wiper arm off the windshield. 2. Disconnect the blade assembly
from the wiper arm by pushing in
the lock tab. Hold it in while you
push the blade assembly toward
the base of the arm. 3. Remove the blade from its holder
by grasping the tabbed end of theblade. Pull firmly until the tabs
come out of the holder.
Maintenance
WIPER ARMS
LOCK TABBLADEProCarManuals.comMain Menu Table of Contents s t
Page 166 of 241
Windshield Wipers
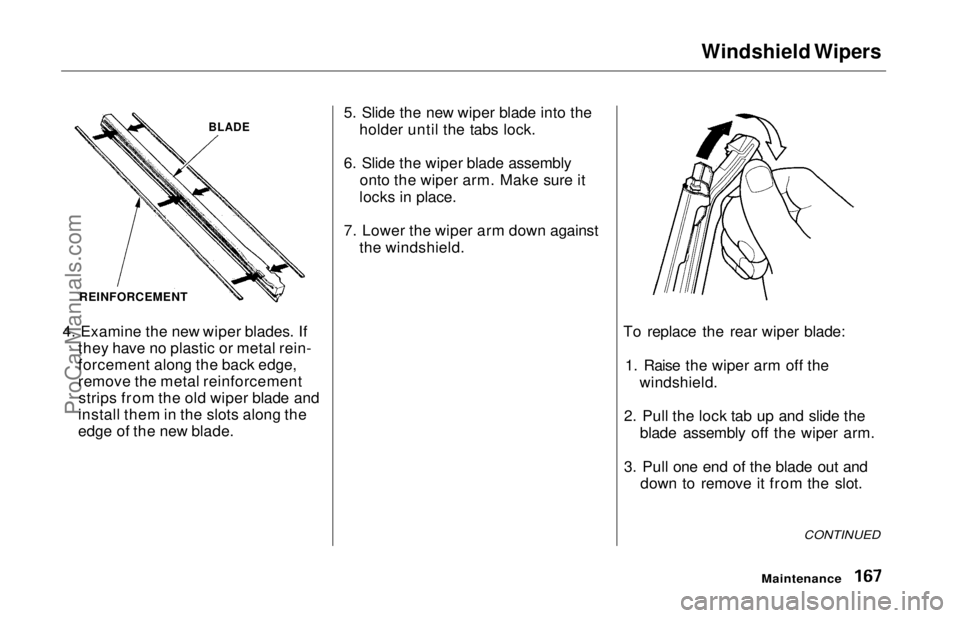
4. Examine the new wiper blades. If they have no plastic or metal rein-
forcement along the back edge,
remove the metal reinforcementstrips from the old wiper blade and
install them in the slots along the
edge of the new blade. 5. Slide the new wiper blade into the
holder until the tabs lock.
6. Slide the wiper blade assembly onto the wiper arm. Make sure it
locks in place.
7. Lower the wiper arm down against the windshield.
To replace the rear wiper blade:1. Raise the wiper arm off the windshield.
2. Pull the lock tab up and slide the blade assembly off the wiper arm.
3. Pull one end of the blade out and down to remove it from the slot.
CONTINUED
Maintenance
BLADE
REINFORCEMENTProCarManuals.comMain Menu Table of Contents s t