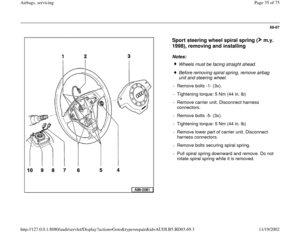
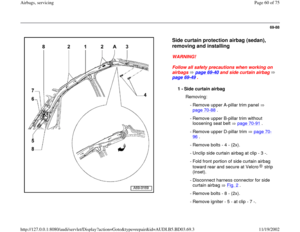
Page 49 of 75
69-80
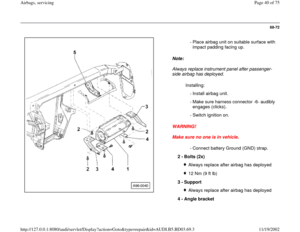
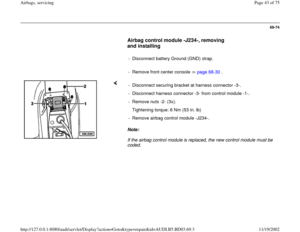
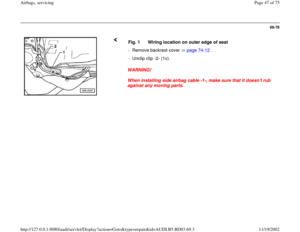
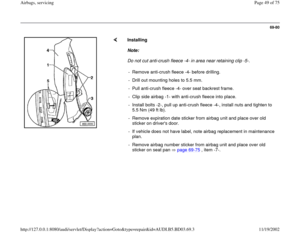
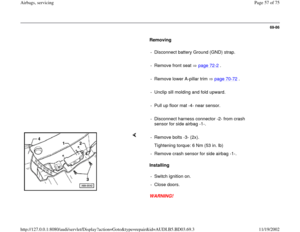
Installing
Note:
Do not cut anti-crush fleece -4- in area near retaining clip -5-.
- Remove anti-crush fleece -4- before drilling.
- Drill out mounting holes to 5.5 mm.
- Pull anti-crush fleece -4- over seat backrest frame.
- Clip side airbag -1- with anti-crush fleece into place.
- Install bolts -2-, pull up anti-crush fleece -4-, install nuts and tighten to
5.5 Nm (49 ft lb).
- Remove expiration date sticker from airbag unit and place over old
sticker on driver's door.
- If vehicle does not have label, note airbag replacement in maintenance
plan.
- Remove airbag number sticker from airbag unit and place over old
sticker on seat pan page 69
-75
, item -7-.
Pa
ge 49 of 75 Airba
gs, servicin
g
11/19/2002 htt
p://127.0.0.1:8080/audi/servlet/Dis
play?action=Goto&t
yp
e=re
pair&id=AUDI.B5.BD03.69.3
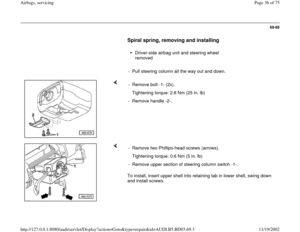
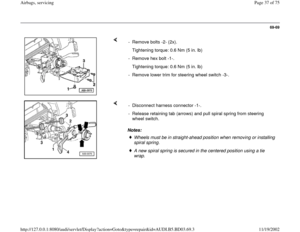
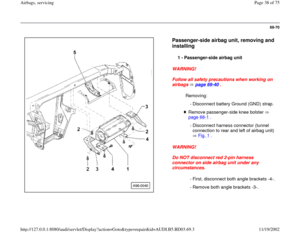
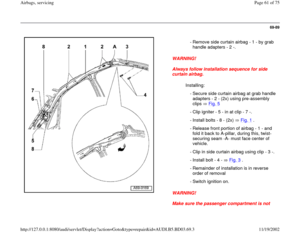
Page 50 of 75
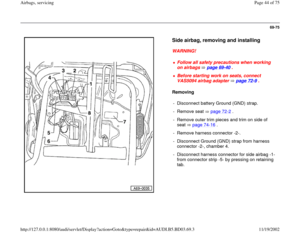
69-81
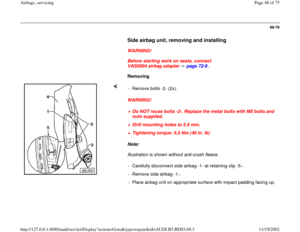
Side airbag for Recaro seat, removing and
installing
WARNING!
Follow all safety precautions when working
on side airbag.
Before starting work on seats, connect
VAS5094 airbag adapter page 72
-9 .
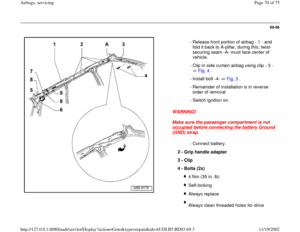
1 -
Backrest
2 -
Side airbag unit
Removing:
- Remove Recaro seat page 72
-25
.
- Remove mounting trim page 72
-41
.
- Disconnect yellow airbag harness
connector under seat.
- Disconnect black Ground (GND) harness
connector for airbag, located under seat.
- Unbolt bolt -4- on retainer -6- on
underside of side airbag unit -2-.
- Push side airbag unit -2- downward.
- Carefully pull out side airbag unit -2-.
Pa
ge 50 of 75 Airba
gs, servicin
g
11/19/2002 htt
p://127.0.0.1:8080/audi/servlet/Dis
play?action=Goto&t
yp
e=re
pair&id=AUDI.B5.BD03.69.3
Page 51 of 75
69-82
WARNING!
Make sure vehicle is not occupied.
Note:
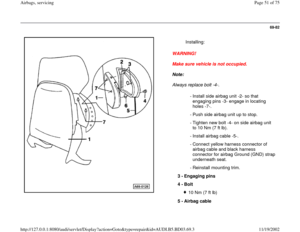
Always replace bolt -4-. Installing:
- Install side airbag unit -2- so that
engaging pins -3- engage in locating
holes -7-.
- Push side airbag unit up to stop.
- Tighten new bolt -4- on side airbag unit
to 10 Nm (7 ft lb).
- Install airbag cable -5-.
- Connect yellow harness connector of
airbag cable and black harness
connector for airbag Ground (GND) strap
underneath seat.
- Reinstall mounting trim.
3 -
Engaging pins
4 -
Bolt
10 Nm (7 ft lb)
5 -
Airbag cable
Pa
ge 51 of 75 Airba
gs, servicin
g
11/19/2002 htt
p://127.0.0.1:8080/audi/servlet/Dis
play?action=Goto&t
yp
e=re
pair&id=AUDI.B5.BD03.69.3
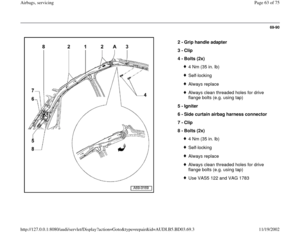
Page 52 of 75
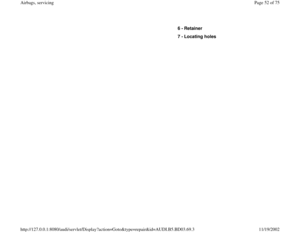
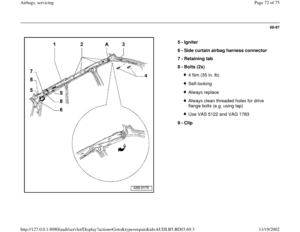
6 -
Retainer
7 -
Locating holes
Pa
ge 52 of 75 Airba
gs, servicin
g
11/19/2002 htt
p://127.0.0.1:8080/audi/servlet/Dis
play?action=Goto&t
yp
e=re
pair&id=AUDI.B5.BD03.69.3
Page 53 of 75
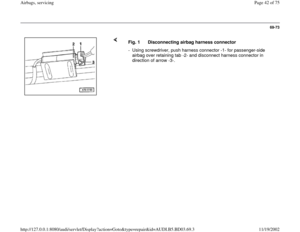
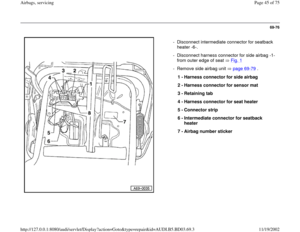
69-83
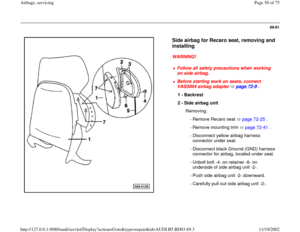
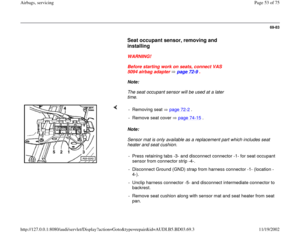
Seat occupant sensor, removing and
installing
WARNING!
Before starting work on seats, connect VAS
5094 airbag adapter page 72
-9 .
Note:
The seat occupant sensor will be used at a later
time.
Note:
Sensor mat is only available as a replacement part which includes seat
heater and seat cushion. - Removing seat page 72
-2 .
- Remove seat cover page 74
-15
.
- Press retaining tabs -3- and disconnect connector -1- for seat occupant
sensor from connector strip -4-.
- Disconnect Ground (GND) strap from harness connector -1- (location -
4-).
- Unclip harness connector -5- and disconnect intermediate connector to
backrest.
- Remove seat cushion along with sensor mat and seat heater from seat
pan.
Pa
ge 53 of 75 Airba
gs, servicin
g
11/19/2002 htt
p://127.0.0.1:8080/audi/servlet/Dis
play?action=Goto&t
yp
e=re
pair&id=AUDI.B5.BD03.69.3
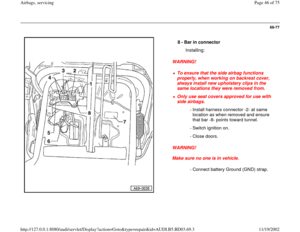
Page 54 of 75
69-84
- When installing, make sure bar -2- points toward
tunnel.
- After installing sensor mat, test sensor mat
function using VAG1551 Scan Tool (ST) page
69
-84
.
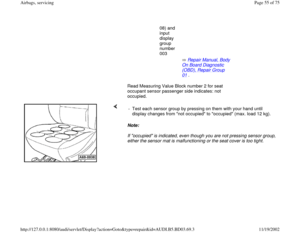
Testing sensor mat function
Note:
Illustration is shown without cover.
- Remove any seat mats before testing sensor
mats.
- Connect
VAG1551
scan tool
Repair Manual, Body
On Board Diagnostic (OBD), Repair Group 01
.
-
Select
Read
Measuring
Value
Block
(function
Pa
ge 54 of 75 Airba
gs, servicin
g
11/19/2002 htt
p://127.0.0.1:8080/audi/servlet/Dis
play?action=Goto&t
yp
e=re
pair&id=AUDI.B5.BD03.69.3
Page 55 of 75
08) and
input
display
group
number
003
Repair Manual, Body
On Board Diagnostic (OBD), Repair Group 01
.
Read Measuring Value Block number 2 for seat
occupant sensor passenger side indicates: not
occupied.
Note:
If "occupied" is indicated, even though you are not pressing sensor group,
either the sensor mat is malfunctioning or the seat cover is too tight. - Test each sensor group by pressing on them with your hand until
display changes from "not occupied" to "occupied" (max. load 12 kg).
Pa
ge 55 of 75 Airba
gs, servicin
g
11/19/2002 htt
p://127.0.0.1:8080/audi/servlet/Dis
play?action=Goto&t
yp
e=re
pair&id=AUDI.B5.BD03.69.3
Page 56 of 75
69-85
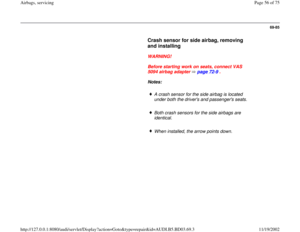
Crash sensor for side airbag, removing
and installing
WARNING!
Before starting work on seats, connect VAS
5094 airbag adapter page 72
-9 .
Notes:
A crash sensor for the side airbag is located
under both the driver's and passenger's seats.
Both crash sensors for the side airbags are
identical.
When installed, the arrow points down.
Pa
ge 56 of 75 Airba
gs, servicin
g
11/19/2002 htt
p://127.0.0.1:8080/audi/servlet/Dis
play?action=Goto&t
yp
e=re
pair&id=AUDI.B5.BD03.69.3


 page
69
-84
.
Testing")
 and
input
display
group
number
003
Repair Manual, Body
On Board Diagnostic (OBD), Repair Group 01
.
Read Measuring Value Block number 2 for seat
occupant sensor passenger si")
