Page 505 of 1202

EM0JS-04
P20490
P20482
SST
P20564
Cut PositionTape
P20563
SST
P20492
- ENGINE MECHANICALCYLINDER BLOCK
EM-83
1996 TERCEL (RM440U)
REPLACEMENT
1. REPLACE CRANKSHAFT FRONT OIL SEAL
HINT:
There are 2 methods to replace the oil seal which are as follows:
If oil pump is removed from cylinder block
(a) Using a screwdriver, pry out the oil seal.
(b) Using SST and a hammer, tap in a new oil seal until its sur-
face is flush with the oil pump case edge.
SST 09309-37010
(c) Apply MP grease to the oil seal lip.
If oil pump is installed to the cylinder block
(d) Using a knife, cut off the oil seal lip.
(e) Using a screwdriver, pry out the oil seal.
NOTICE:
Be careful not to damage the crankshaft.
Tape the screwdriver tip.
(f) Apply MP grease to a new oil seal lip.
(g) Using SST and a hammer, tap in the oil seal until its sur-
face is flush with the oil pump case edge.
SST 09309-37010
2. REPLACE CRANKSHAFT REAR OIL SEAL
HINT:
There are 2 methods to replace the oil seal which are as follows:
If rear oil retainer is removed from cylinder block
(a) Using a screwdriver and hammer, tap out the oil seal.
Page 506 of 1202
N00264
Tape
Cut Position
EM-84
- ENGINE MECHANICALCYLINDER BLOCK
1996 TERCEL (RM440U)
(b) Using SST and a hammer, tap in a new oil seal until its sur-
face is flush with the rear oil seal edge.
SST 09223-15030, 09550-10012 (09552-10010)
(c) Apply MP grease to the oil seal lip.
If rear oil seal retainer is installed to cylinder block
(d) Using a knife, cut off the oil seal lip.
(e) Using a screwdriver, pry out the oil seal.
NOTICE:
Be careful not to damage the crankshaft.
Tape the screwdriver tip.
(f) Apply MP grease to a new oil seal lip.
(g) Using SST and a hammer, tap in the oil seal until its sur-
face is flush with the rear oil seal retainer edge.
SST 09223-15030, 09550-10012 (09552-10010)
Page 510 of 1202

EM3481
Front Mark
(Protrusion)
Front
EM3448
P20475
Seal Packing
A'B'
A
B
A - A' B - B' EM-88
- ENGINE MECHANICALCYLINDER BLOCK
1996 TERCEL (RM440U)
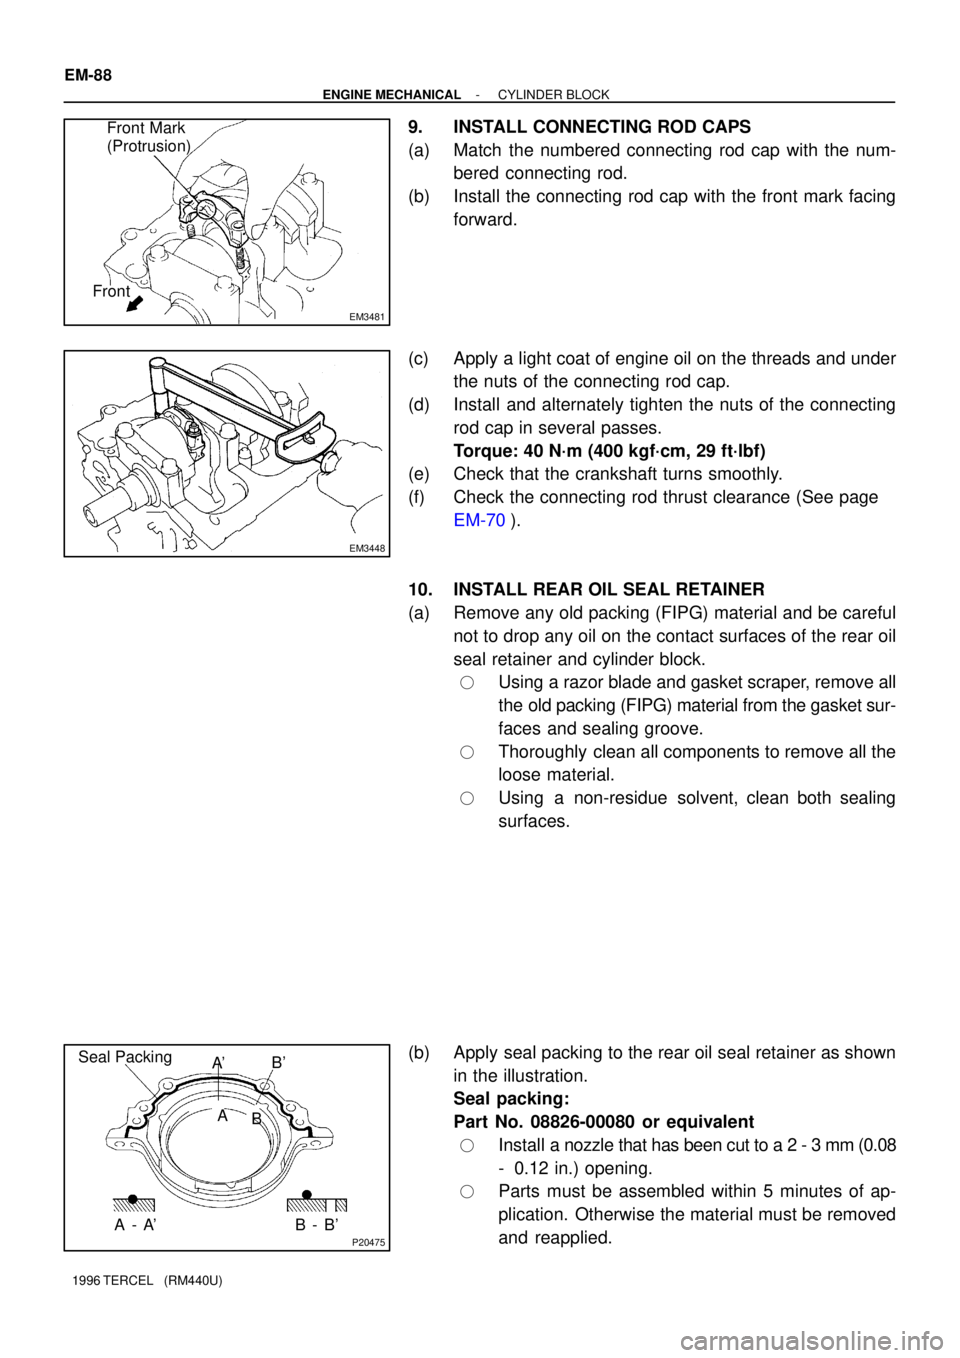
9. INSTALL CONNECTING ROD CAPS
(a) Match the numbered connecting rod cap with the num-
bered connecting rod.
(b) Install the connecting rod cap with the front mark facing
forward.
(c) Apply a light coat of engine oil on the threads and under
the nuts of the connecting rod cap.
(d) Install and alternately tighten the nuts of the connecting
rod cap in several passes.
Torque: 40 N´m (400 kgf´cm, 29 ft´lbf)
(e) Check that the crankshaft turns smoothly.
(f) Check the connecting rod thrust clearance (See page
EM-70).
10. INSTALL REAR OIL SEAL RETAINER
(a) Remove any old packing (FIPG) material and be careful
not to drop any oil on the contact surfaces of the rear oil
seal retainer and cylinder block.
�Using a razor blade and gasket scraper, remove all
the old packing (FIPG) material from the gasket sur-
faces and sealing groove.
�Thoroughly clean all components to remove all the
loose material.
�Using a non-residue solvent, clean both sealing
surfaces.
(b) Apply seal packing to the rear oil seal retainer as shown
in the illustration.
Seal packing:
Part No. 08826-00080 or equivalent
�Install a nozzle that has been cut to a 2 - 3 mm (0.08
- 0.12 in.) opening.
�Parts must be assembled within 5 minutes of ap-
plication. Otherwise the material must be removed
and reapplied.
Page 631 of 1202

Z14807
Oil Pump
Oil PanFIPG
A' - A
Front
Seal Diameter
a: 7mm
b: 4mm
c: 5mmB' - B C' - C ab
bc
B'
BC'
C
- LUBRICATIONOIL PUMP
LU-15
1996 TERCEL (RM440U)
�Parts must be assembled within 5 minutes of ap-
plication. Otherwise the material must be removed
and reapplied.
�Immediately remove nozzle from the tube and rein-
stall cap.
(f) Place a new O-ring into the cylinder block side groove.
(g) Install the oil pump and tension spring bracket with the 9
bolts.
Torque: 7.5 N´m (75 kgf´cm, 65 in.´lbf)
2. INSTALL PRESSURE REGULATOR VALVE
Torque: 30 N´m (300 kgf´cm, 22 ft´lbf)
3. INSTALL OIL STRAINER
(a) Apply a little engine oil to a new O-ring.
(b) Install the O-ring to the oil strainer.
(c) Install the oil strainer with the 3 bolts.
Torque: 10 N´m (100 kgf´cm, 7 ft´lbf)
4. INSTALL OIL PAN
(a) Remove any old packing (FIPG) material and be careful
not to drop any oil on the contact surfaces of the oil pan,
oil pump, rear oil seal retainer and cylinder block.
�Using a razor blade and gasket scraper, remove all
the packing (FIPG) material from the contact sur-
faces.
�Thoroughly clean all components to remove all the
loose material.
�Using a non-residue solvent, clean both sealing
surfaces.
NOTICE:
Do not use a solvent which will affect the painted surfaces.
(b) Apply seal packing to the oil pump, rear oil seal retainer
and oil pan as shown in the illustration.
Seal packing:
Part No. 08826-00080 or equivalent
Seal diameter:
7 mm ( 0.28 in.) for a
4 mm ( 0.16 in.) for b
5 mm ( 0.17 in.) for c
�Install a nozzle that has been cut to a 4 mm ( 0.16
in.) or 7 mm (0.28 in.) or 5 mm (0.17 in.) opening.
HINT:
Avoid applying an excess amount to the surface.
�Parts must be assembled within 15 minutes of ap-
plication. Otherwise, the material must be removed
and reapplied.
�Immediately remove nozzle from tube and reinstall
cap after use.
(c) Install the oil pan with the 10 bolts.
Torque: 13 N´m (130 kgf´cm, 10 ft´lbf)
5. CONNECT FRONT EXHAUST PIPE