Page 40 of 1202

INSIDE VEHICLE
GENERAL MAINTENANCE
The owners are responsible for these maintenance and inspection items.
They can b")
MA002-30
MA-2
- MAINTENANCEINSIDE VEHICLE
40 Author�: Date�:
1996 TERCEL (RM440U)
INSIDE VEHICLE
GENERAL MAINTENANCE
The owners are responsible for these maintenance and inspection items.
They can be done by the owner or they can have them done at a service shop.
These items include those which should be checked on a daily basis, those which, in most cases, do not
require (special) tools and those which are considered to be reasonable for the owner to do.
Items and procedures for general maintenance are as follows.
1. GENERAL NOTES
�Maintenance items may vary from country to country. Check the owner's manual supplement in which
the maintenance schedule is shown.
�Every service item in the periodic maintenance schedule must be performed.
�Periodic maintenance service must be performed according to whichever interval in the periodic main-
tenance schedule occurs first, the odometer reading (miles) or the time interval (months).
�Maintenance service after the last period should be performed at the same interval as before unless
otherwise noted.
�Failure to do even one item can cause the engine to run poorly and increase exhaust emissions.
2. LIGHTS
(a) Check that the headlights, stop lights, taillights, turn signal lights, and other lights are all working.
(b) Check the headlight aim.
3. WARNING LIGHTS AND BUZZERS
Check that all warning lights and buzzers function properly.
4. HORN
Check that it is working.
5. WINDSHIELD
Check for scratches, pits or abrasions.
6. WINDSHIELD WIPER AND WASHER
(a) Check operation of the wipers and washer.
(b) Check that the wipers do not streak.
7. WINDSHIELD DEFROSTER
Check that air comes out from the defroster outlet when operating the heater or air conditioner.
8. REAR VIEW MIRROR
Check that it is mounted securely.
9. SUN VISORS
Check that they move freely and are mounted securely.
10. STEERING WHEEL
Check that it has the specified freeplay. Be alert for changes in steering condition, such as hard steering,
excessive freeplay or strange noises.
11. SEATS
(a) Check that all front seat controls such as seat adjusters, seatback reliner, etc. operate smoothly.
(b) Check that all latches lock securely in any position.
(c) Check that the locks hold securely in any latched position.
(d) Check that the head restraints move up and down smoothly and that the locks hold securely in any
latched position.
(e) For fold-down rear seat backs, check that the latches lock securely.
12. SEAT BELTS
(a) Check that the seat belt system such as the buckles, retractors and anchors operate properly and
smoothly.
(b) Check that the belt webbing is not cut, frayed, worn or damaged.
Page 44 of 1202

BRAKE
INSPECTION
1. INSPECT BRAKE LINE PIPES AND HOSES
HINT:
Check in a well lighted area. Check the entire circumfere")
P19770
MA00S-13
MA-6
- MAINTENANCEBRAKE
44 Author�: Date�:
1996 TERCEL (RM440U)
BRAKE
INSPECTION
1. INSPECT BRAKE LINE PIPES AND HOSES
HINT:
Check in a well lighted area. Check the entire circumference
and length of the brake hoses using a mirror as required. Turn
the front wheels fully right or left before checking the front brake.
(a) Check all brake lines and hoses.
�Check for damage.
�Check for wear.
�Check for deformation.
�Check for cracks.
�Check for corrosion.
�Check for leaks.
�Check for bends.
�Check for twists.
(b) Check all clamps for tightness and connections for leak-
age.
(c) Check that the hoses and lines are clear of sharp edges,
moving parts and the exhaust system.
(d) Check that the lines installed in grommets pass through
the center of the grommets.
2. INSPECT FRONT BRAKE PADS AND DISCS (See page
BR-26)
HINT:
If a squealing or scraping noise comes from the brake during
driving, check the pad wear indicator to see if it is contacting the
disc. If so, the disc pad should be replaced.
3. INSPECT REAR BRAKE LININGS AND DRUMS (See
page BR-32)
Page 48 of 1202
PP18P-01
- PREPARATIONMAINTENANCE
PP-1
48 Author�: Date�:
1996 TERCEL (RM440U)
MAINTENANCE
EQUIPMENT
MirrorBrake hose
Torque wrench
Page 1080 of 1202
BO1HB-03
N15574
2-Door:
� Precoated partDoor Glass Run
Door Belt Moulding
Outside Handle
Door Lock Cylinder
Door Glass
Rear View Mirror
Inner Cover
Door Hinge
Door Hinge Control Link Door Lock
Front Lower Frame
Service Hole Cover
Grommet
Inside Handle
Door Trim
Plate
Snap Ring Armrest Door Trim
Armrest
Cover w/ Power Window:w/ Power Window: w/ Power Door Lock:
�
Speaker
Window Regulator Door Lock
Door CheckerWindow Regulator
Armrest Panel
Regulator Handle
- BODYFRONT DOOR
BO-9
1103 Author�: Date�:
1996 TERCEL (RM440U)
FRONT DOOR
COMPONENTS
Page 1081 of 1202
N15573
4-Door:
Door Glass RunFront Door Belt Moulding
Outside Handle Door Lock Cylinder
Door Glass
Rear View Mirror
Inner Cover
Door Hinge Control Link Door Lock
Front Lower
Frame
Service Hole Cover
Window Regulator
Inside Handle
Snap Ring Armrest Door Trim
Armrest Cover w/ Power Window:
w/ Power Window: w/ Power Door Lock:
Speaker
Plate Door Trim
� Precoated partRegulator HandleGrommetDoor Hinge Door Checker Door Lock
Window Regulator�
Armrest Panel
BO-10
- BODYFRONT DOOR
1104 Author�: Date�:
1996 TERCEL (RM440U)
Page 1082 of 1202

DISASSEMBLY
1. w/o Power Window:
REMOVE RE")
BO47Y-01
BO0020
N00132
N12057
BO2455
Cotton
TapePanel
Cover
N12580
4 Door: 6 Clips
2 Door: 7 Clips
2 Door only
- BODYFRONT DOOR
BO-1 1
1996 TERCEL (RM440U)
DISASSEMBLY
1. w/o Power Window:
REMOVE REGULATOR HANDLE
Pull off the snap ring with a shop rag and remove the regulator
handle and plate.
2. REMOVE DOOR INSIDE HANDLE
(a) Remove the screw and slide the inside handle forward.
(b) Disconnect the inside handle from the control link and re-
move the inside handle.
3. REMOVE OUTSIDE REAR VIEW MIRROR
(a) w/ Manual Remote Control Mirror:
Remove the screw and the knob.
(b) Using a screwdriver, pry off the cover, as shown.
HINT:
Tape the screwdriver tip before use.
NOTICE:
Make sure you pry off the cover from the correct position.
(c) Remove the 3 nuts and the mirror.
4. w/ Power Window:
REMOVE ARMREST PANEL
5. REMOVE ARMREST COVER
6. REMOVE DOOR TRIM
7. REMOVE SPEAKER
8. REMOVE SERVICE HOLE COVER
Remove the 2 grommets.
HINT:
Bring out the links through the service hole cove.
9. REMOVE DOOR BELT MOULDING
Pry out the clips from the edge of the weatherstrip and remove
the weatherstrip.
10. REMOVE DOOR GLASS RUN
11. REMOVE DOOR GLASS
12. REMOVE FRONT LOWER FRAME
Page 1104 of 1202
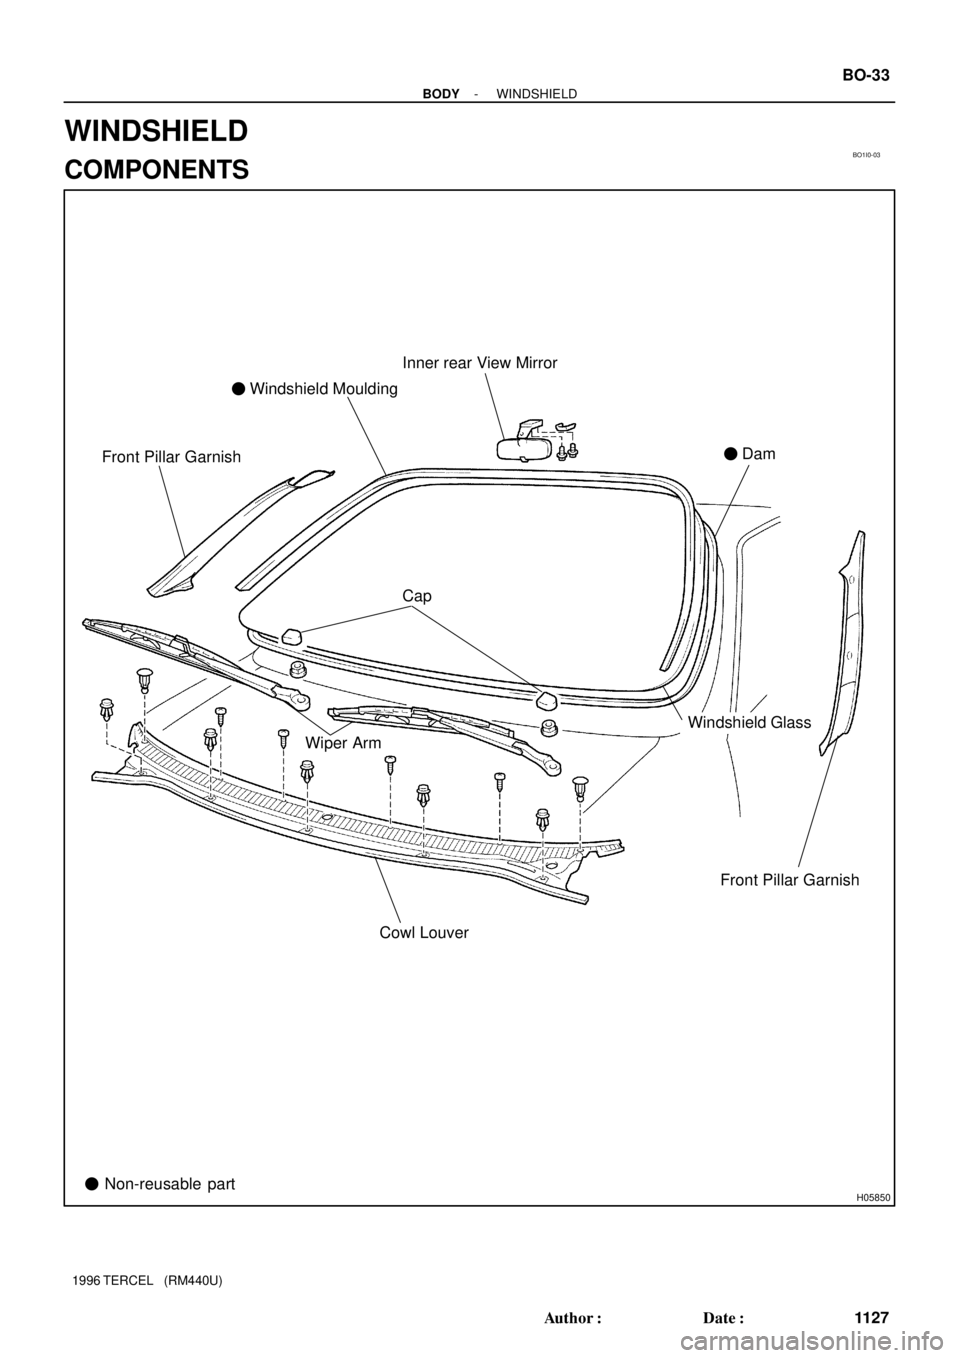
BO1I0-03
H05850
Inner rear View Mirror
� Windshield Moulding
� Dam
Front Pillar Garnish Cap
Wiper Arm
Windshield Glass
Cowl Louver
� Non-reusable partFront Pillar Garnish
- BODYWINDSHIELD
BO-33
1127 Author�: Date�:
1996 TERCEL (RM440U)
WINDSHIELD
COMPONENTS
Page 1105 of 1202

REMOVAL
1. REMOVE WIPER ARMS AND COWL LOUVER (See
page BO-27)
2. REMOVE FRONT PILLAR GARNISHES
Remove the garnishes b")
BO47Z-01
BO5841
N12299
BO5232
BO1689
BO-34
- BODYWINDSHIELD
1996 TERCEL (RM440U)
REMOVAL
1. REMOVE WIPER ARMS AND COWL LOUVER (See
page BO-27)
2. REMOVE FRONT PILLAR GARNISHES
Remove the garnishes by pulling.
3. REMOVE INNER REAR VIEW MIRROR
Remove the 2 bolts and the inner rear view mirror.
4. REMOVE WINDSHIELD MOULDING
Using a knife, cut off the moulding as shown.
NOTICE:
Do not damage the body with the knife.
5. REMOVE WINDSHIELD GLASS
(a) Push piano wire through between the body and glass
from the interior.
(b) Tie both wire ends to wooden blocks or like object.
HINT:
Apply adhesive tape to the outer surface to keep the surface
from being scratched.
NOTICE:
When separating, take care not to damage the paint and in-
terior and exterior ornaments. To prevent scratching the
safety pad when removing the windshield, place a plastic
sheet between the piano wire and safety pad.
(c) Cut the adhesive by pulling the piano wire around it.
(d) Remove the glass.
NOTICE:
Leave as much of the adhesive on the body as possible
when cutting off the glass.