Page 590 of 1202
CO0HX-01
- COOLINGTHERMOSTAT
CO-9
1996 TERCEL (RM440U)
REMOVAL
NOTICE:
Do not remove the thermostat unless absolutely necessary.
HINT:
Removal of the thermostat would have an adverse effect, causing a lowering of cooling efficiency.
1. REMOVE AIR CLEANER INLET
2. DRAIN ENGINE COOLANT
3. REMOVE WATER INLET AND THERMOSTAT
(a) Remove the 2 nuts, water inlet and thermostat from the water inlet housing.
(b) Remove the gasket from the thermostat.
Page 597 of 1202
CO0Y2-02
(b)
(a)
P20609
(c)(d)
P20754
Plug
(e)
P20755
A/T
(A)
P20610
Radiator Lower Hose
Radiator Lower Support CO-16
- COOLINGRADIATOR
1996 TERCEL (RM440U)
REMOVAL
1. REMOVE ENGINE UNDER COVERS
2. DRAIN ENGINE COOLANT
3. REMOVE RADIATOR RESERVOIR TANK ASSEMBLY
4. REMOVE RADIATOR ASSEMBLY
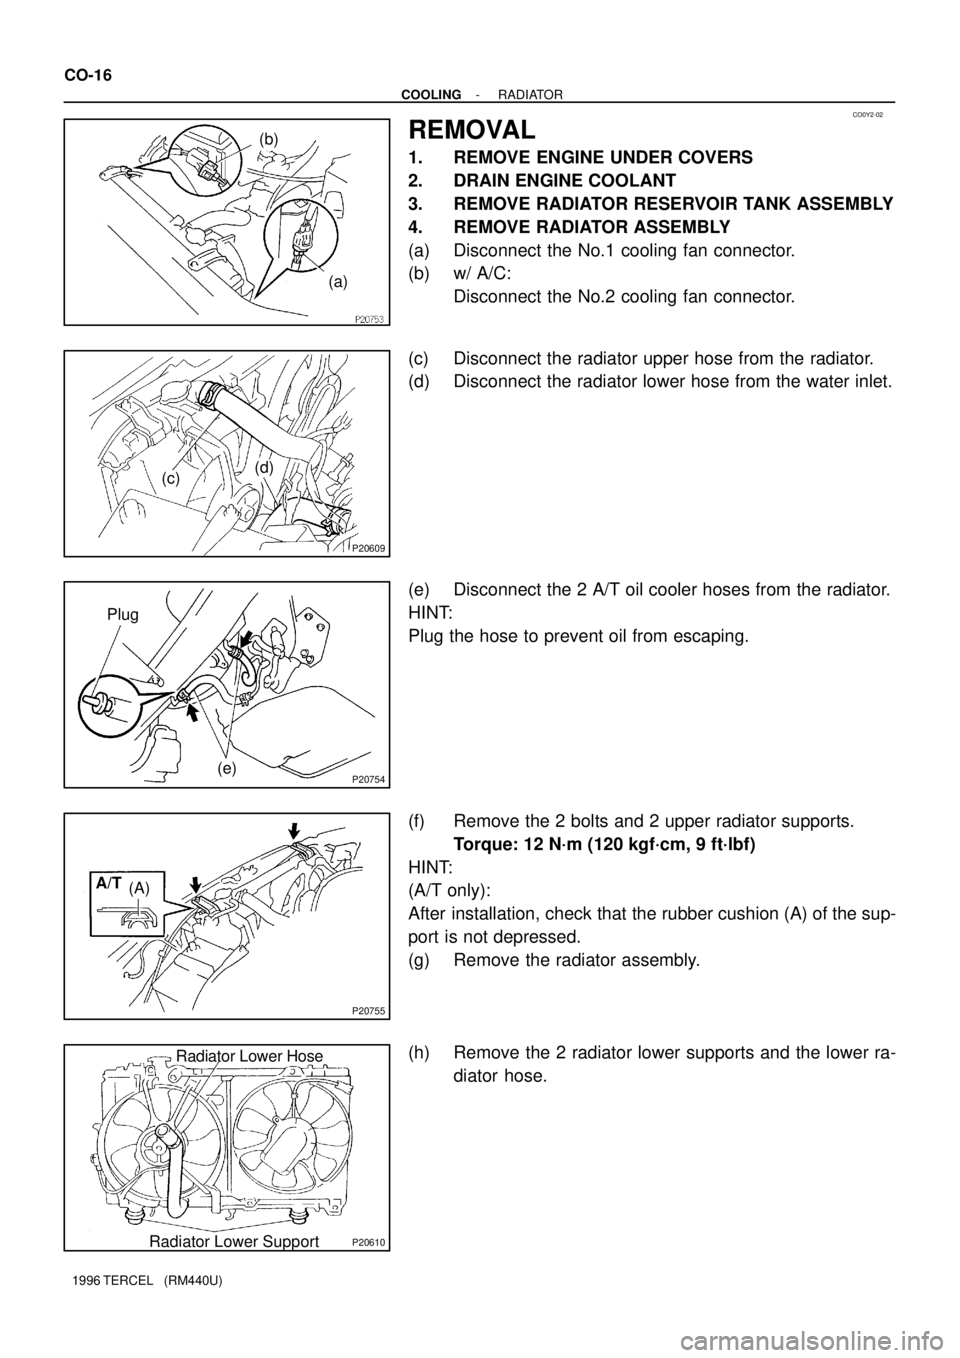
(a) Disconnect the No.1 cooling fan connector.
(b) w/ A/C:
Disconnect the No.2 cooling fan connector.
(c) Disconnect the radiator upper hose from the radiator.
(d) Disconnect the radiator lower hose from the water inlet.
(e) Disconnect the 2 A/T oil cooler hoses from the radiator.
HINT:
Plug the hose to prevent oil from escaping.
(f) Remove the 2 bolts and 2 upper radiator supports.
Torque: 12 N´m (120 kgf´cm, 9 ft´lbf)
HINT:
(A/T only):
After installation, check that the rubber cushion (A) of the sup-
port is not depressed.
(g) Remove the radiator assembly.
(h) Remove the 2 radiator lower supports and the lower ra-
diator hose.
Page 602 of 1202
P21775
H
P21097
SST
CO0766
Clearance
Lock
Plate
O-Ring
- COOLINGRADIATOR
CO-21
1996 TERCEL (RM440U)
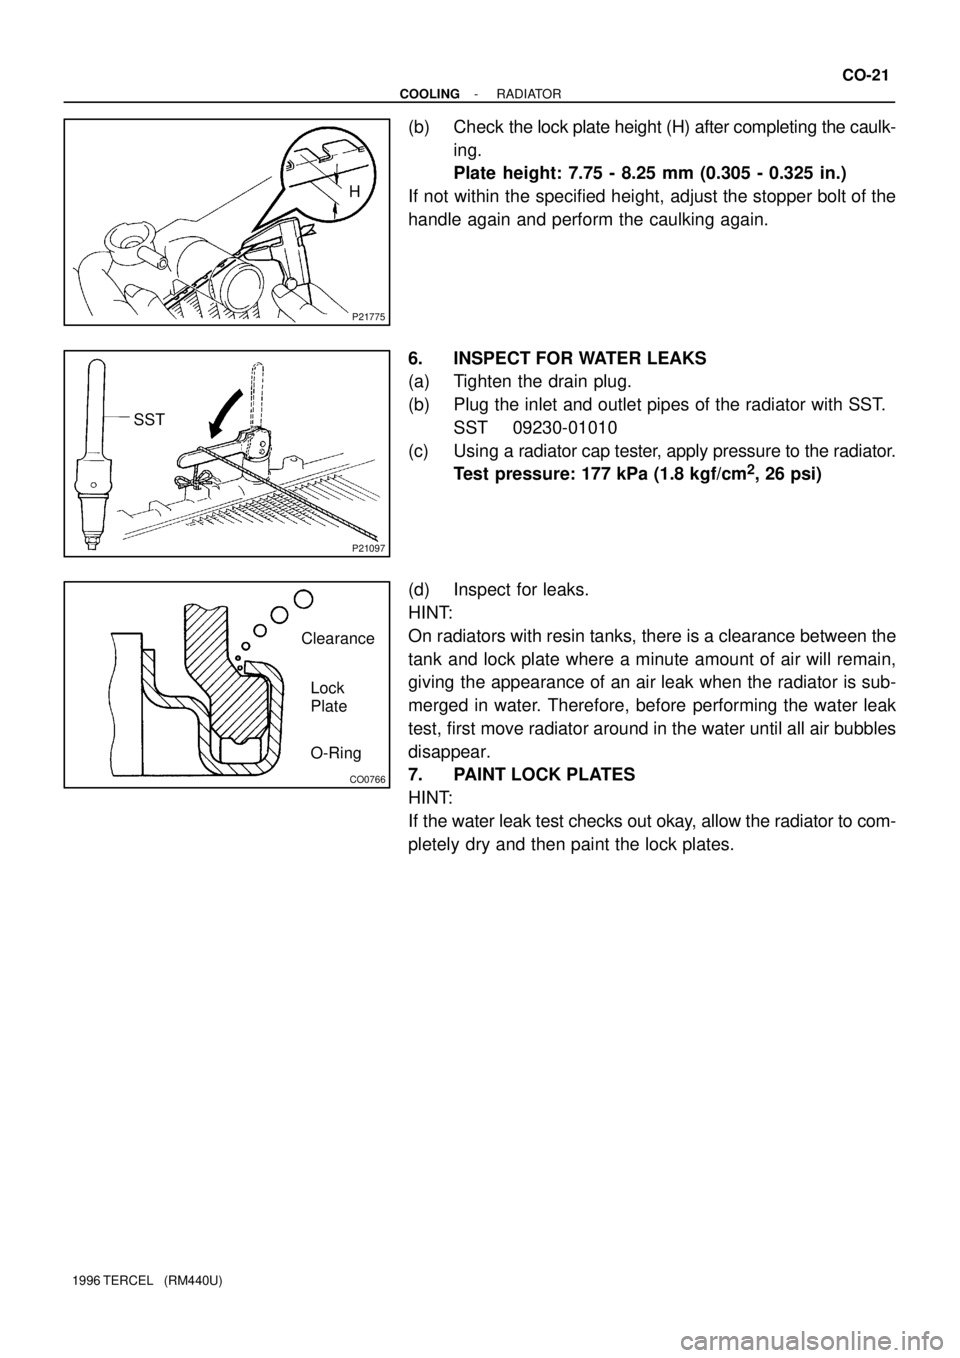
(b) Check the lock plate height (H) after completing the caulk-
ing.
Plate height: 7.75 - 8.25 mm (0.305 - 0.325 in.)
If not within the specified height, adjust the stopper bolt of the
handle again and perform the caulking again.
6. INSPECT FOR WATER LEAKS
(a) Tighten the drain plug.
(b) Plug the inlet and outlet pipes of the radiator with SST.
SST 09230-01010
(c) Using a radiator cap tester, apply pressure to the radiator.
Test pressure: 177 kPa (1.8 kgf/cm
2, 26 psi)
(d) Inspect for leaks.
HINT:
On radiators with resin tanks, there is a clearance between the
tank and lock plate where a minute amount of air will remain,
giving the appearance of an air leak when the radiator is sub-
merged in water. Therefore, before performing the water leak
test, first move radiator around in the water until all air bubbles
disappear.
7. PAINT LOCK PLATES
HINT:
If the water leak test checks out okay, allow the radiator to com-
pletely dry and then paint the lock plates.
Page 609 of 1202
CO0I9-04
P20884
CO-28
- COOLINGELECTRIC COOLING FAN
1996 TERCEL (RM440U)
REMOVAL
1. REMOVE NO.1 COOLING FAN
(a) Remove the engine under covers.
(b) Drain the engine coolant.
(c) Remove the air cleaner inlet.
(d) Remove the reservoir tank assembly.
(e) Remove the No.1 cooling fan.
(1) Disconnect the upper radiator hose from the radia-
tor.
(2) Disconnect the cooling fan connector.
(3) Remove the 2 bolts and cooling fan.
Torque: 7.0 N´m (70 kgf´cm, 61 in.´lbf)
2. REMOVE NO.2 COOLING FAN
(a) Disconnect the cooling fan connector.
(b) Remove the 3 bolts and cooling fan.
Torque: 7.0 N´m (70 kgf´cm, 61 in.´lbf)
Page 613 of 1202
P21098
ECT SwitchCO0ID-04
P05962
Ohmmeter CO-32
- COOLINGENGINE COOLANT TEMPERATURE (ECT) SWITCH
612 Author�: Date�:
1996 TERCEL (RM440U)
ENGINE COOLANT
TEMPERATURE (ECT) SWITCH
INSPECTION
1. DRAIN ENGINE COOLANT
2. REMOVE ECT SWITCH
3. INSPECT ECT SWITCH
(a) Using an ohmmeter, check that there is no continuity be-
tween the terminals when the coolant temperature is
above 94°C (201°F).
If there is continuity, replace the switch.
(b) Using an ohmmeter, check that there is continuity be-
tween the terminals when the coolant temperature is be-
low 83°C (181°F).
If there is no continuity, replace the switch.
4. REINSTALL ECT SWITCH
5. REFILL WITH ENGINE COOLANT
6. START ENGINE AND CHECK FOR COOLANT LEAKS
Page 619 of 1202
LU08B-04
P20919
SST
LU0490
SST
- LUBRICATIONOIL AND FILTER
LU-3
1996 TERCEL (RM440U)
REPLACEMENT
CAUTION:
�Prolonged and repeated contact with mineral oil will
result in the removal of natural fats from the skin,
leading to dryness, irritation and dermatitis. In addi-
tion, used engine oil contains potentially harmful
contaminants which may cause skin cancer. Ade-
quate means of skin protection and washing facilities
should be provided.
�Care should be taken, therefore, when changing en-
gine oil, to minimize the frequency and length of time
your skin is exposed to used engine oil. Protective
clothing and gloves, that cannot be penetrated by oil,
should be worn. Wash your skin throughly with soap
and water, or use waterless hand cleaner, to remove
any used engine oil. Do not use gasoline, thinners, or
solvents.
�In order to preserve the environment, used oil must
be disposed of only at designated disposal sites.
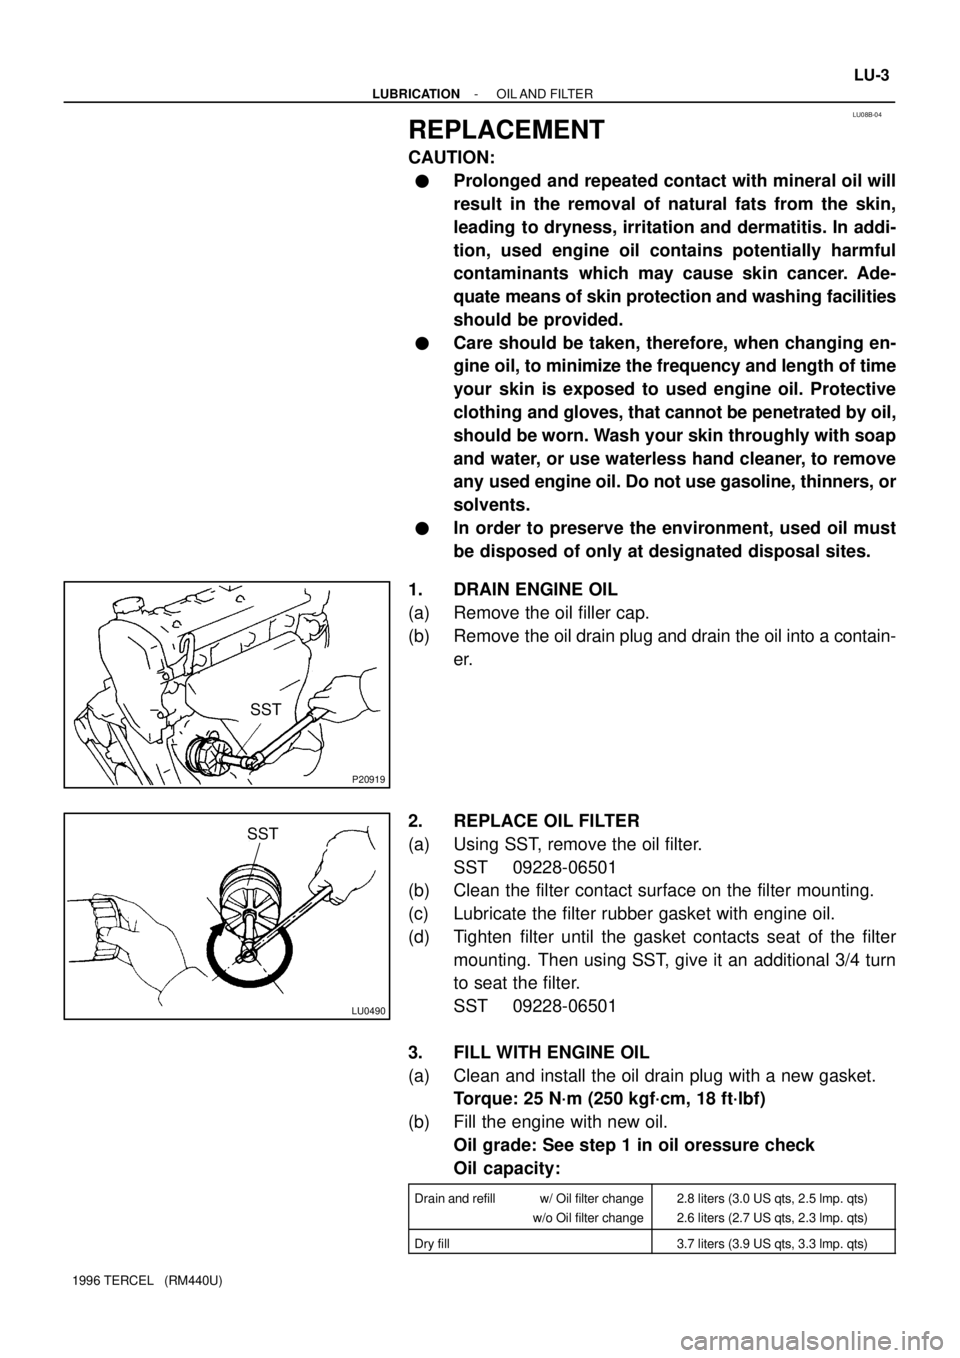
1. DRAIN ENGINE OIL
(a) Remove the oil filler cap.
(b) Remove the oil drain plug and drain the oil into a contain-
er.
2. REPLACE OIL FILTER
(a) Using SST, remove the oil filter.
SST 09228-06501
(b) Clean the filter contact surface on the filter mounting.
(c) Lubricate the filter rubber gasket with engine oil.
(d) Tighten filter until the gasket contacts seat of the filter
mounting. Then using SST, give it an additional 3/4 turn
to seat the filter.
SST 09228-06501
3. FILL WITH ENGINE OIL
(a) Clean and install the oil drain plug with a new gasket.
Torque: 25 N´m (250 kgf´cm, 18 ft´lbf)
(b) Fill the engine with new oil.
Oil grade: See step 1 in oil oressure check
Oil capacity:
Drain and refill w/ Oil filter change
w/o Oil filter change2.8 liters (3.0 US qts, 2.5 lmp. qts)
2.6 liters (2.7 US qts, 2.3 lmp. qts)
Dry fill3.7 liters (3.9 US qts, 3.3 lmp. qts)
Page 622 of 1202
P21171
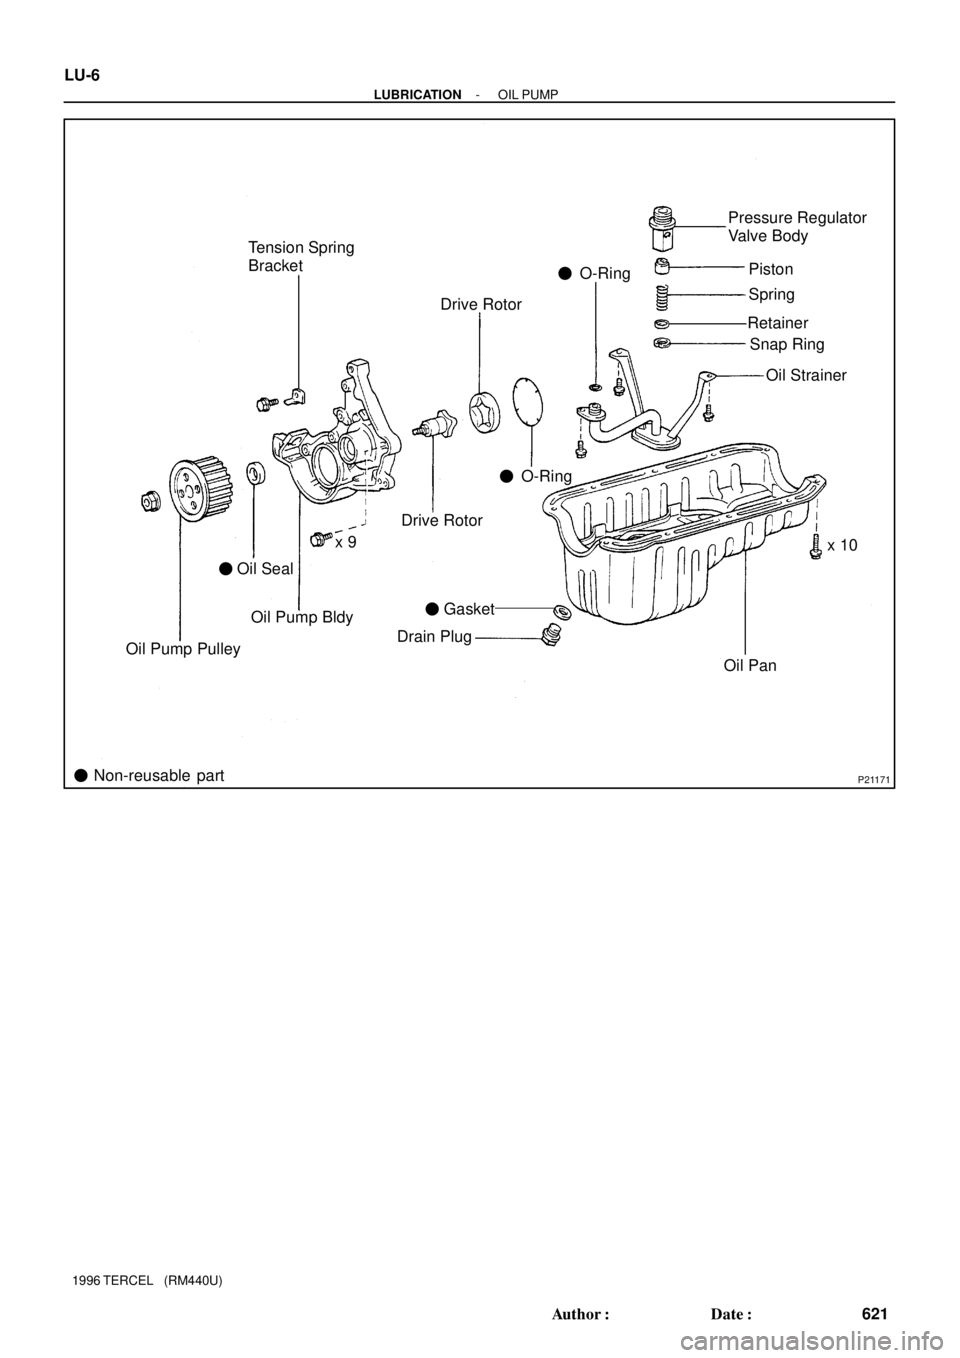
Tension Spring
Bracket
Drive Rotor� O-RingPressure Regulator
Valve Body
Piston
Drain PlugDrive Rotor
Oil Pump Bldy
Oil Pump Pulleyx 9
� Non-reusable partOil Panx 10 Oil Strainer RetainerSpring
Snap Ring
� O-Ring
� Oil Seal
� Gasket
LU-6
- LUBRICATIONOIL PUMP
621 Author�: Date�:
1996 TERCEL (RM440U)
Page 623 of 1202
LU08D-05
P20907
EM9278
EM9755
P20160
- LUBRICATIONOIL PUMP
LU-7
1996 TERCEL (RM440U)
REMOVAL
HINT:
When repairing the oil pump, the oil pan and strainer should be
removed and cleaned.
1. REMOVE HOOD
2. REMOVE OIL DIPSTICK
3. DRAIN ENGINE OIL
4. REMOVE TIMING BELT (See page EM-12)
5. SUSPEND ENGINE WITH ENGINE SLING DEVICE
6. REMOVE CRANKSHAFT TIMING PULLEY(See page
EM-12)
7. w/ A/C:
REMOVE A/C COMPRESSOR AND MOUNTING
BRACKET
(a) Disconnect the compressor connector.
(b) Remove the 4 compressor mounting bolts.
HINT:
Put a side compressor, and suspend it.
(c) Remove the 4 bolts and compressor mounting
bracket.
8. DISCONNECT FRONT EXHAUST PIPE
(a) Remove the 2 bolts and the 2 compresson springs.
(b) Disconnect the exhaust pipe.