Page 440 of 1202
P20556
P20558
P20535
Tension
P20555
EM-18
- ENGINE MECHANICALTIMING BELT
1996 TERCEL (RM440U)
(b) Using the crankshaft pulley bolt, turn the crankshaft and
align the timing marks of the crankshaft timing pulley and
oil pump body.
6. INSTALL TIMING BELT
NOTICE:
The engine should be cold.
HINT:
When re-using timing belt:
Align the points marked during removal, and install the belt with
the arrow pointing in the direction of engine revolution.
(a) Remove any oil or water on the pulleys, and keep them
clean.
NOTICE:
Only wipe the pulleys; do not use any cleansing agent.
(b) Install the timing belt, and check the tension between the
crankshaft timing pulley and camshaft timing pulley.
7. CHECK VALVE TIMING
(a) Loosen the No.1 idler pulley mount bolt, until the pulley is
moved slightly by the spring tension.
Page 441 of 1202
P21439
2 Revolutions
P20537
Timing Mark
P20552
P20745
P20157
SST
- ENGINE MECHANICALTIMING BELT
EM-19
1996 TERCEL (RM440U)
(b) Slowly turn the crankshaft pulley 2 revolutions from TDC
to TDC.
NOTICE:
Always turn the crankshaft clockwise.
(c) Check that each pulley aligns with the timing marks as
shown in the illustration.
If the timing marks do not align, remove the timing belt and rein-
stall it.
(d) Tighten the No.1 idler pulley bolt.
Torque: 18.5 N´m (185 kgf´cm, 13 ft´lbf)
(e) Remove the crankshaft pulley bolt.
8. INSTALL TIMING BELT GUIDE
Install the guide, facing the cup side outward.
9. INSTALL NO.1 TIMING BELT COVER
(a) Install the gasket to the belt cover.
(b) Install the belt cover with the 3 bolts.
10. INSTALL NO.3 TIMING BELT COVER
11. INSTALL CRANKSHAFT PULLEY
(a) Align the pulley set key with the key groove of the pulley,
and slide on the pulley.
(b) Using SST, install the pulley bolt.
SST 09213-14010, 09330-00021
Torque: 155 N´m (1,550 kgf´cm, 112 ft´lbf)
Page 454 of 1202
P20354
P20421
Cylinder Block Side
Intake Manifold Side
Exhaust Manifold Side
P20351
EM0580
EM-32
- ENGINE MECHANICALCYLINDER HEAD
1996 TERCEL (RM440U)
(g) Clean the cylinder head.
(h) Using a soft brush and solvent, thoroughly clean the cylin-
der head.
3. INSPECT CYLINDER HEAD
(a) Inspect the for flatness.
(b) Using a precision straight edge and feeler gauge, mea-
sure the surfaces contacting the cylinder block and the
manifolds for warpage.
Maximum warpage:
Cylinder block side0.05 mm (0.0020 in.)
Manifold side0.05 mm (0.0020 in.)
If warpage is greater than maximum, replace the cylinder head.
(c) Inspect the for cracks.
(d) Using a dye penetrant, check the combustion chambers,
intake ports, exhaust ports and cylinder block surface for
cracks.
If cracked, replace the cylinder head.
4. CLEAN VALVES
(a) Using a gasket scraper, chip off any carbon from the valve
head.
(b) Using a wire brush, thoroughly clean the valve.
Page 455 of 1202

P20382
Z00052
Z00054
44.5°
EM0181
Margin Thickness
- ENGINE MECHANICALCYLINDER HEAD
EM-33
1996 TERCEL (RM440U)
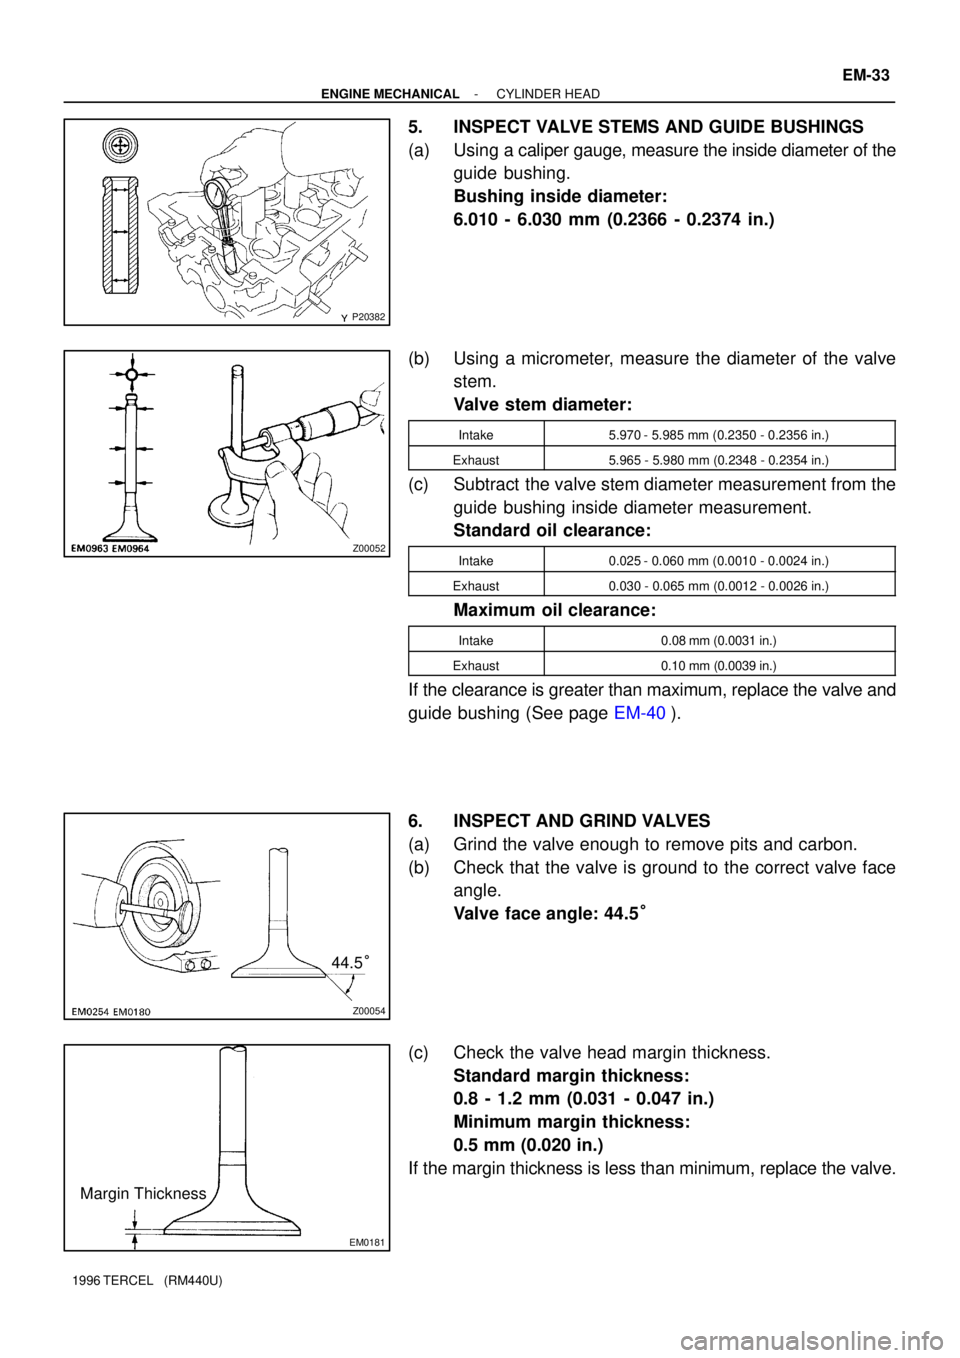
5. INSPECT VALVE STEMS AND GUIDE BUSHINGS
(a) Using a caliper gauge, measure the inside diameter of the
guide bushing.
Bushing inside diameter:
6.010 - 6.030 mm (0.2366 - 0.2374 in.)
(b) Using a micrometer, measure the diameter of the valve
stem.
Valve stem diameter:
Intake5.970 - 5.985 mm (0.2350 - 0.2356 in.)
Exhaust5.965 - 5.980 mm (0.2348 - 0.2354 in.)
(c) Subtract the valve stem diameter measurement from the
guide bushing inside diameter measurement.
Standard oil clearance:
Intake0.025 - 0.060 mm (0.0010 - 0.0024 in.)
Exhaust0.030 - 0.065 mm (0.0012 - 0.0026 in.)
Maximum oil clearance:
Intake0.08 mm (0.0031 in.)
Exhaust0.10 mm (0.0039 in.)
If the clearance is greater than maximum, replace the valve and
guide bushing (See page EM-40).
6. INSPECT AND GRIND VALVES
(a) Grind the valve enough to remove pits and carbon.
(b) Check that the valve is ground to the correct valve face
angle.
Valve face angle: 44.5°
(c) Check the valve head margin thickness.
Standard margin thickness:
0.8 - 1.2 mm (0.031 - 0.047 in.)
Minimum margin thickness:
0.5 mm (0.020 in.)
If the margin thickness is less than minimum, replace the valve.
Page 456 of 1202

P03849
Overall Length
EM0255
P20367
45° Carbide Cutter
Z07819
Width
Z08336
45°
1.0 - 1.4 mm30° EM-34
- ENGINE MECHANICALCYLINDER HEAD
1996 TERCEL (RM440U)
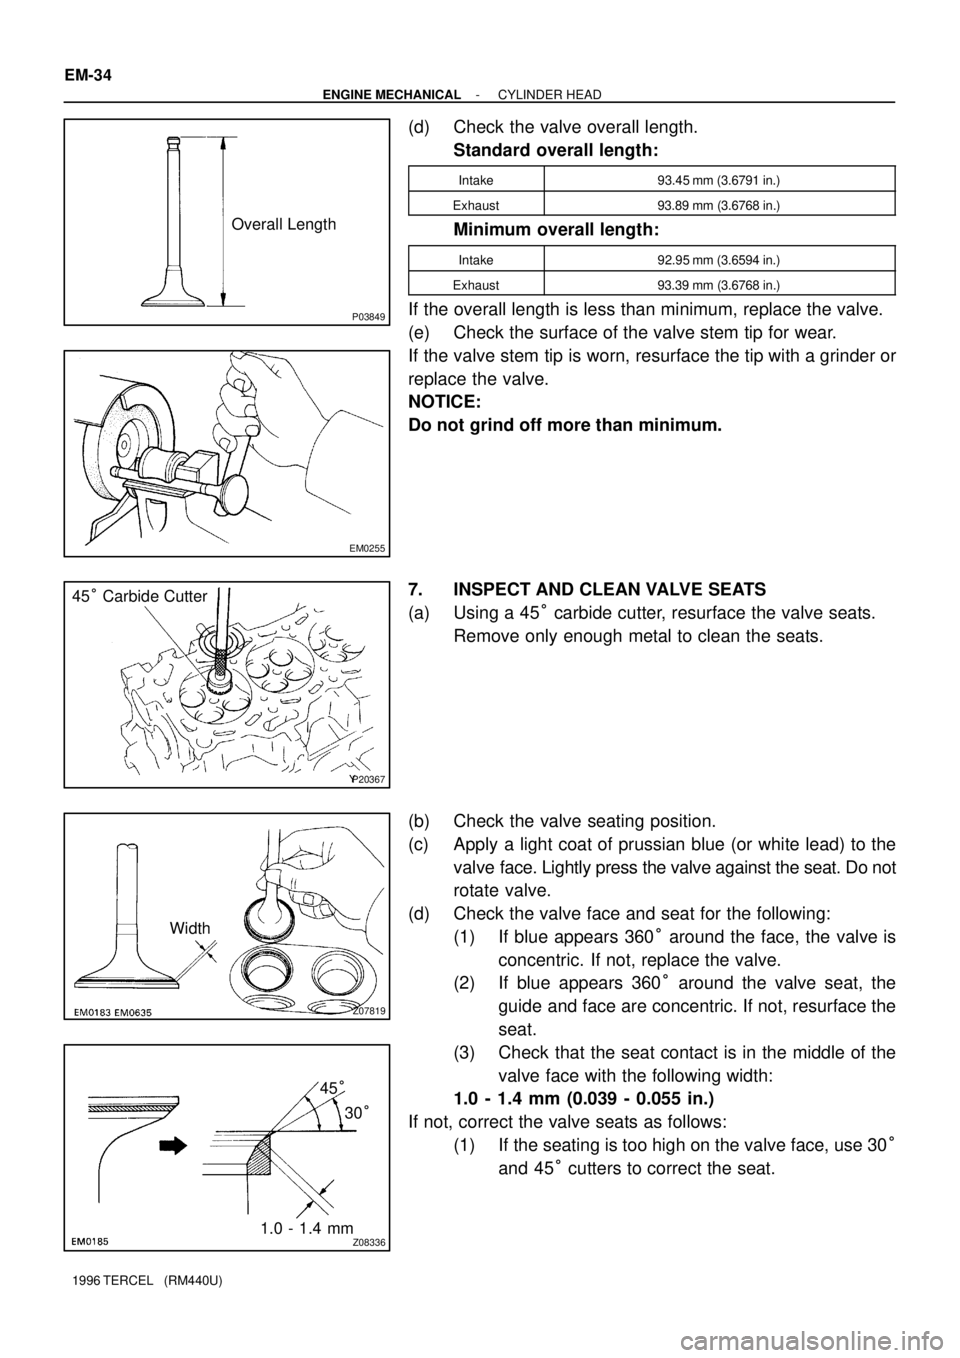
(d) Check the valve overall length.
Standard overall length:
Intake93.45 mm (3.6791 in.)
Exhaust93.89 mm (3.6768 in.)
Minimum overall length:
Intake92.95 mm (3.6594 in.)
Exhaust93.39 mm (3.6768 in.)
If the overall length is less than minimum, replace the valve.
(e) Check the surface of the valve stem tip for wear.
If the valve stem tip is worn, resurface the tip with a grinder or
replace the valve.
NOTICE:
Do not grind off more than minimum.
7. INSPECT AND CLEAN VALVE SEATS
(a) Using a 45° carbide cutter, resurface the valve seats.
Remove only enough metal to clean the seats.
(b) Check the valve seating position.
(c) Apply a light coat of prussian blue (or white lead) to the
valve face. Lightly press the valve against the seat. Do not
rotate valve.
(d) Check the valve face and seat for the following:
(1) If blue appears 360° around the face, the valve is
concentric. If not, replace the valve.
(2) If blue appears 360° around the valve seat, the
guide and face are concentric. If not, resurface the
seat.
(3) Check that the seat contact is in the middle of the
valve face with the following width:
1.0 - 1.4 mm (0.039 - 0.055 in.)
If not, correct the valve seats as follows:
(1) If the seating is too high on the valve face, use 30°
and 45° cutters to correct the seat.
Page 458 of 1202

P20379
P20385
P20386
EG0008
EM-36
- ENGINE MECHANICALCYLINDER HEAD
1996 TERCEL (RM440U)
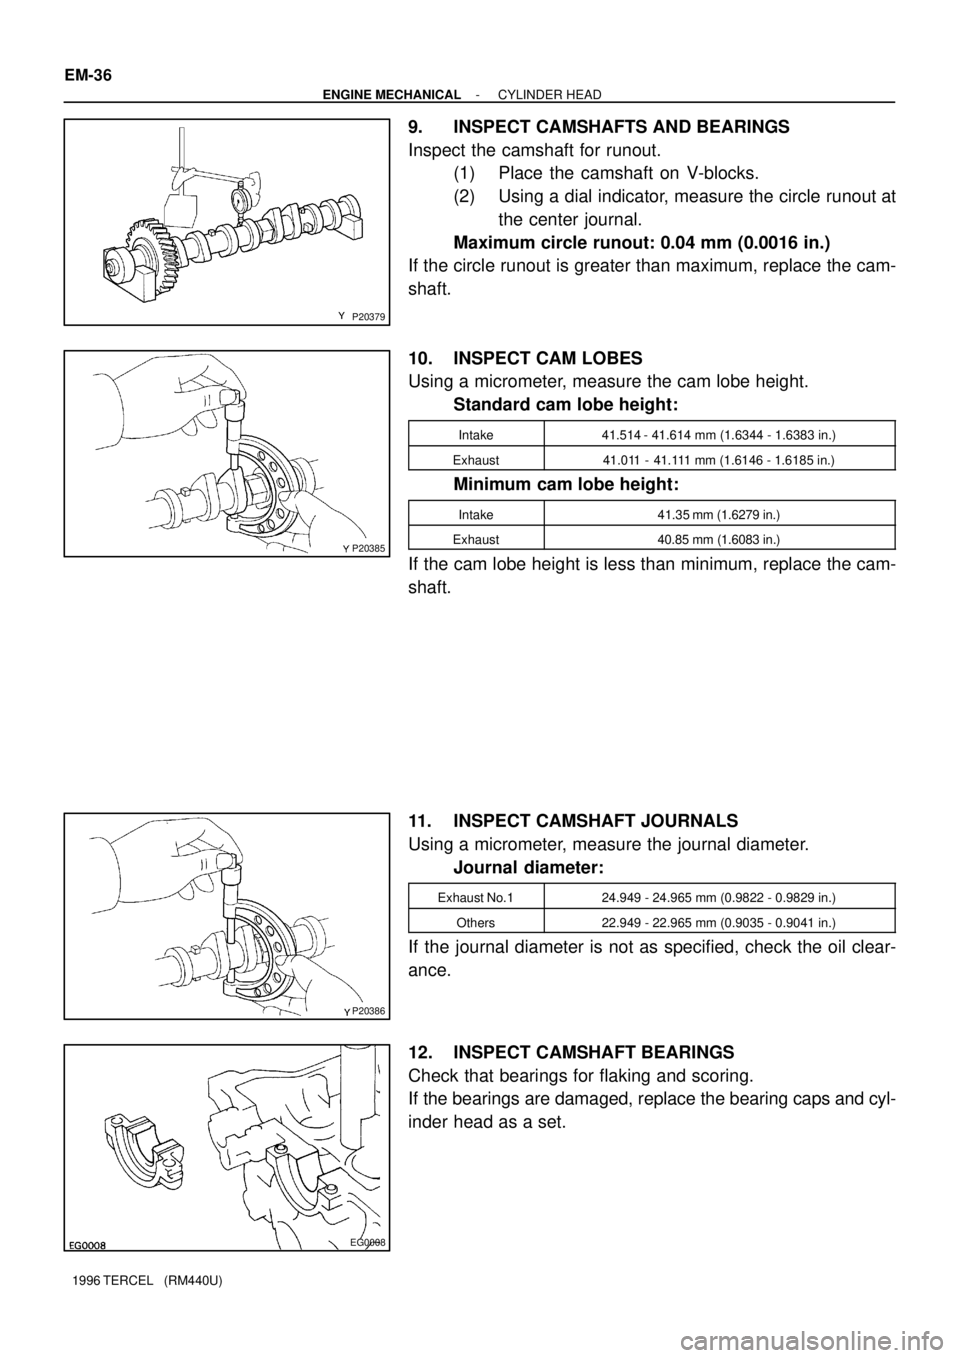
9. INSPECT CAMSHAFTS AND BEARINGS
Inspect the camshaft for runout.
(1) Place the camshaft on V-blocks.
(2) Using a dial indicator, measure the circle runout at
the center journal.
Maximum circle runout: 0.04 mm (0.0016 in.)
If the circle runout is greater than maximum, replace the cam-
shaft.
10. INSPECT CAM LOBES
Using a micrometer, measure the cam lobe height.
Standard cam lobe height:
Intake41.514 - 41.614 mm (1.6344 - 1.6383 in.)
Exhaust41.011 - 41.111 mm (1.6146 - 1.6185 in.)
Minimum cam lobe height:
Intake41.35 mm (1.6279 in.)
Exhaust40.85 mm (1.6083 in.)
If the cam lobe height is less than minimum, replace the cam-
shaft.
11. INSPECT CAMSHAFT JOURNALS
Using a micrometer, measure the journal diameter.
Journal diameter:
Exhaust No.124.949 - 24.965 mm (0.9822 - 0.9829 in.)
Others22.949 - 22.965 mm (0.9035 - 0.9041 in.)
If the journal diameter is not as specified, check the oil clear-
ance.
12. INSPECT CAMSHAFT BEARINGS
Check that bearings for flaking and scoring.
If the bearings are damaged, replace the bearing caps and cyl-
inder head as a set.
Page 465 of 1202
Z14254
Painted
Black Painted Silver Intake Exhaust
P20416
SST
EM9933
- ENGINE MECHANICALCYLINDER HEAD
EM-43
1996 TERCEL (RM440U)
HINT:
The intake valve oil seal is silver and the exhaust valve oil seal
is black.
(b) Install the valve.
(c) Install the spring seat.
(d) Install the valve spring.
(e) Install the spring retainer.
(f) Using SST, compress the valve spring and place the 2
keepers around the valve stem.
SST 09202-70010
(g) Using a plastic-faced hammer, lightly tap the valve stem
tip to assure proper fit.
3. INSTALL VALVE LIFTERS AND SHIMS
(a) Install the valve lifter and shim.
(b) Check that the valve lifter rotates smoothly by hand.
4. INSTALL STUD BOLT FOR CYLINDER HEAD COVER
5. INSTALL NO.2 ENGINE HANGER
Torque:
No. 1
21 N´m (210 kgf´cm, 15 ft´lbf)
No. 2
53 N´m (530 kgf´cm, 38 ft´lbf)
Page 466 of 1202

P20389
Gasket
EM1OG-01
P20419
EX
(A)
Bi-Hexagon Wrench
(B)IN
(B)
(A)(B)
(B)(B)
(B)
8
61 3
9
10 4 257
(A) (A) (A)(A) IN
EX
P20413
Painted Mark
90°
P20174
(b)(c)
(d)(e)
EM-44
- ENGINE MECHANICALCYLINDER HEAD
1996 TERCEL (RM440U)
INSTALLATION
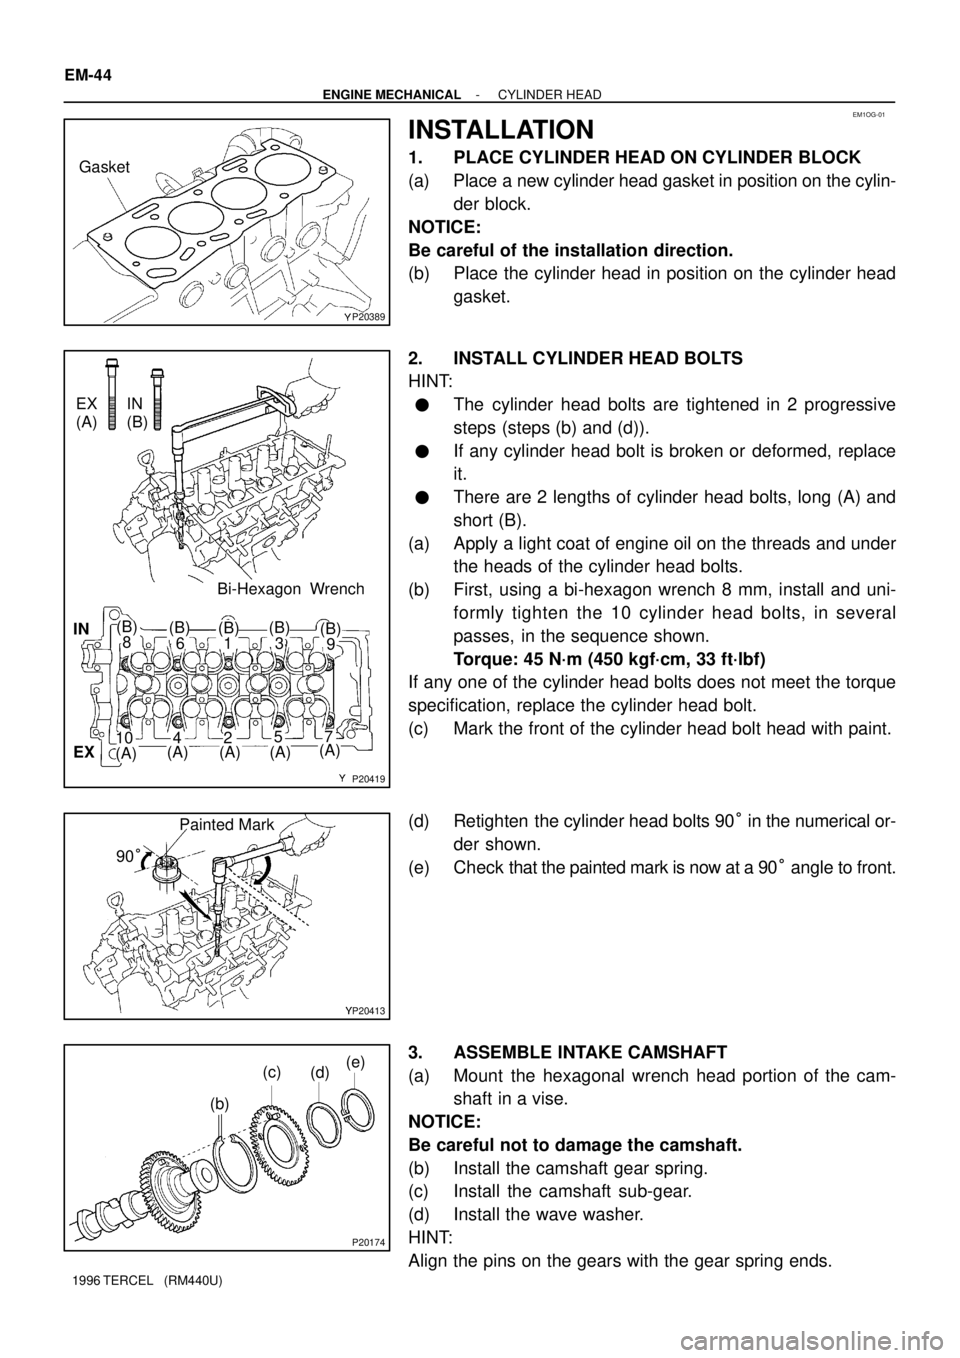
1. PLACE CYLINDER HEAD ON CYLINDER BLOCK
(a) Place a new cylinder head gasket in position on the cylin-
der block.
NOTICE:
Be careful of the installation direction.
(b) Place the cylinder head in position on the cylinder head
gasket.
2. INSTALL CYLINDER HEAD BOLTS
HINT:
�The cylinder head bolts are tightened in 2 progressive
steps (steps (b) and (d)).
�If any cylinder head bolt is broken or deformed, replace
it.
�There are 2 lengths of cylinder head bolts, long (A) and
short (B).
(a) Apply a light coat of engine oil on the threads and under
the heads of the cylinder head bolts.
(b) First, using a bi-hexagon wrench 8 mm, install and uni-
formly tighten the 10 cylinder head bolts, in several
passes, in the sequence shown.
Torque: 45 N´m (450 kgf´cm, 33 ft´lbf)
If any one of the cylinder head bolts does not meet the torque
specification, replace the cylinder head bolt.
(c) Mark the front of the cylinder head bolt head with paint.
(d) Retighten the cylinder head bolts 90° in the numerical or-
der shown.
(e) Check that the painted mark is now at a 90° angle to front.
3. ASSEMBLE INTAKE CAMSHAFT
(a) Mount the hexagonal wrench head portion of the cam-
shaft in a vise.
NOTICE:
Be careful not to damage the camshaft.
(b) Install the camshaft gear spring.
(c) Install the camshaft sub-gear.
(d) Install the wave washer.
HINT:
Align the pins on the gears with the gear spring ends.