Page 159 of 188

157
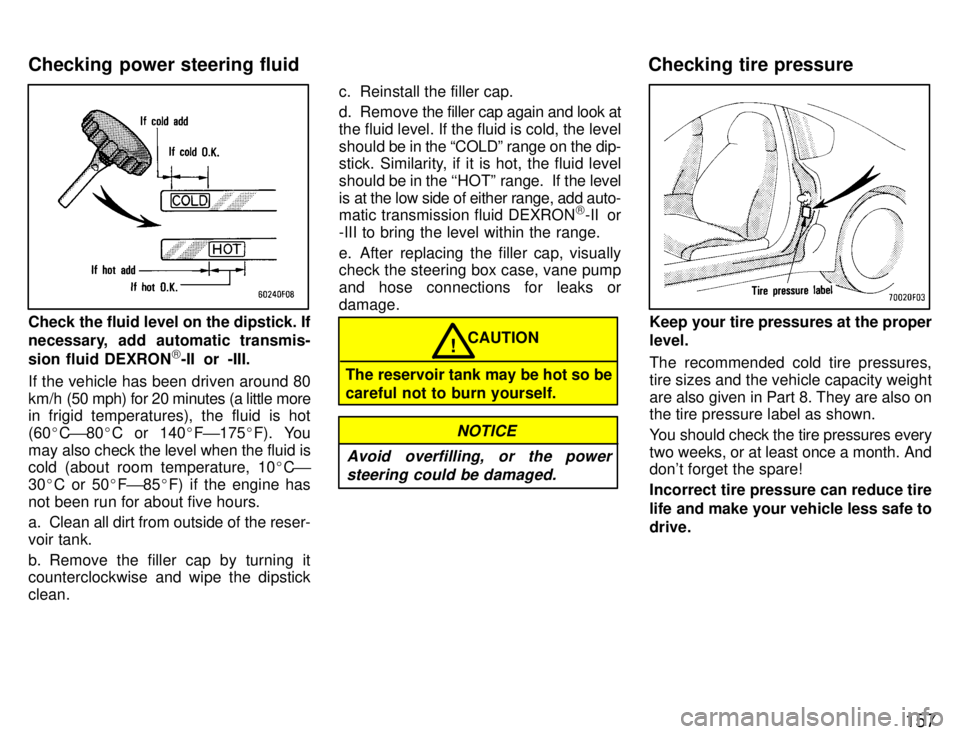
Check the fluid level on the dipstick. If
necessary, add automatic transmis-
sion fluid DEXRON)
-II or -III.
If the vehicle has been driven around 80
km/h (50 mph) for 20 minutes (a little more
in frigid temperatures), the fluid is hot(60 �C ' 80 �C or 140 �F ' 175 �F). You
may also check the level when the fluid is
cold (about room temperature, 10 �C '
30 �C or 50 �F ' 85 �F) if the engine has
not been run for about five hours.
a. Clean all dirt from outside of the reser- voir tank.
b. Remove the filler cap by turning it
counterclockwise and wipe the dipstick clean. c. Reinstall the filler cap.
d. Remove the filler cap again and look at the fluid level. If the fluid is cold, the level
should be in
the COLDº range on the dip-
stick. Similarity, if it is hot, the fluid level
should be in the ``HOTº range. If the level
is at the low side of either range, add auto-
matic transmission fluid DEXRON )
-II or
-III to bring the level within the range.
e. After replacing the filler cap, visually check the steering box case, vane pump
and hose connections for leaks ordamage.
CAUTION
The reservoir tank may be hot so be
careful not to burn yourself.!
Avoid overfilling, or the power steering could be damaged.
NOTICE
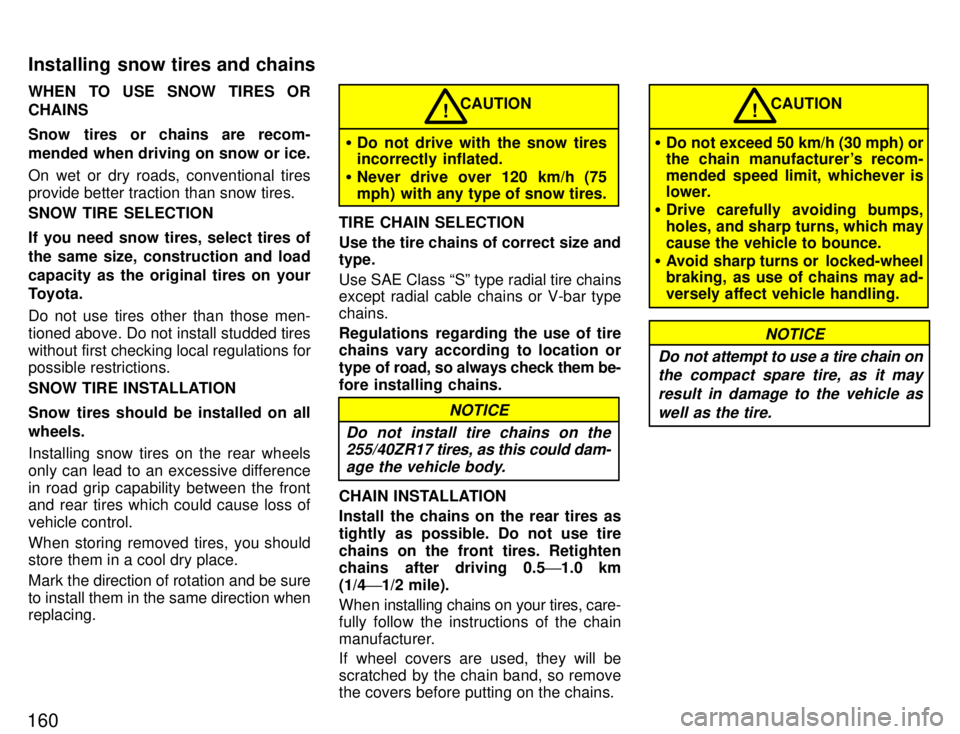
Keep your tire pressures at the proper level.
The recommended cold tire pressures, tire sizes and the vehicle capacity weightare also given in Part 8. They are also on the tire pressure label as shown.
You should check the tire pressures every
two weeks, or at least once a month. And
don't forget the spare!
Incorrect tire pressure can reduce tire
life and make your vehicle less safe to drive.
Checking power steering fluid
Checking tire pressure
Page 162 of 188

160WHEN TO USE SNOW TIRES OR CHAINS
Snow tires or chains are recom-
mended when driving on snow or ice.
On wet or dry roads, conventional tires
provide better traction than snow tires. SNOW TIRE SELECTION
If you need snow tires, select tires of
the same size, construction and loadcapacity as the original tires on your
Toyota.
Do not use tires other than those men-
tioned above. Do not install studded tires
without first checking local regulations for
possible restrictions.
SNOW TIRE INSTALLATION
Snow tires should be installed on all wheels.
Installing snow tires on the rear wheels
only can lead to an excessive difference
in road grip capability between the front
and rear tires which could cause loss of
vehicle control.
When storing removed tires, you should
store them in a cool dry place.
Mark the direction of rotation and be sure to install them in the same direction when replacing.
�
Do not drive with the snow tires
incorrectly inflated.
� Never drive over 120 km/h (75
mph) with any type of snow tires.
CAUTION!
TIRE CHAIN SELECTION Use the tire chains of correct size and type. Use SAE Class Sº type radial tire chains
except radial cable chains or V-bar type chains.
Regulations regarding the use of tire
chains vary according to location or
type of r oad, so always check them be-
fore installing chains.
Do not install tire chains on the
255/40ZR17 tires, as this could dam-
age the vehicle body.
NOTICE
CHAIN INSTALLATION
Install the chains on the rear tires as
tightly as possible. Do not use tirechains on the front tires. Retighten
chains after driving 0.5 '1.0 km
(1/4 '1/2 mile).
When installing chains on your tires, care-fully follow the instructions of the chain
manufacturer.
If wheel covers are used, they will be
scratched by the chain band, so removethe covers before putting on the chains.
� Do not exceed 50 km/h (30 mph) or
the chain manufacturer's recom-
mended speed limit, whichever is
lower.
� Drive carefully avoiding bumps,
holes, and sharp turns, which maycause the vehicle to bounce.
� Avoid sharp turns or locked-wheel
braking, as use of chains may ad-
versely affect vehicle handling.
CAUTION!
Do not attempt to use a tire chain on
the compact spare tire, as it may
result in damage to the vehicle as well as the tire.
NOTICE
Installing snow tires and chains
Page 172 of 188
170Light Bulbs
Bulb No.WType
Stop and tail lights115727/8D
Back-up lights115627D
License plate lightsÐ5E
Interior lightsÐ8D
Glovebox lightÐ1.2E
Luggage compartment lightÐ5F
A: HB4 halogen bulbs B: HB3 halogen bulbs C: H3 halogen bulbsD: Single end bulbs
E: Wedge base bulbs F: Double end bulbs
1. Open the hood.
RIGHT SIDE HEADLIGHT: Release the
clips of the air cleaner and remove the
air cleaner cover.2. Unplug the connector while de-
pressing the lock release. If the connector is tight, wiggle it.
ÐHeadlights (low beam)
Page 173 of 188
171
3. Turn the bulb clockwise and re- move it. Install a new bulb, turn it
counterclockwise, then plug in the
connector.
To install a bulb, align the tab of the bulb
socket with the cutouts of the mountinghole.
RIGHT SIDE HEADLIGHT: Install the air
cleaner cover securely.
Aiming is not necessary after replacing
the bulb. When aiming adjustment is nec-
essary, contact your Toyota dealer.1. Open the hood.
RIGHT SIDE HEADLIGHT: Release the
clips of the air cleaner and remove the
air cleaner cover.2. Unplug the connector while de-
pressing the lock release. If the connector is tight, wiggle it.
ÐHeadlights (high beam)
Page 174 of 188
172
3. Turn the bulb counterclockwise
and remove it. Install a new bulb, turn
it clockwise, then plug in the connec-
tor.
To install a bulb, align the tab of the bulb
socket with the cutouts of the mountinghole.
RIGHT SIDE HEADLIGHT: Install the air
cleaner cover securely.
Aiming is not necessary after replacing
the bulb. When aiming adjustment is nec-
essary, contact your Toyota dealer.1. Open the hood.
RIGHT SIDE HEADLIGHT: Release the
clips of the air cleaner and remove the
air cleaner cover.2. Turn the cover counterclockwise
and remove it.
ÐFront fog lights
Page 175 of 188
173
3. Disconnect the cords.4. Release the bulb retaining spring
and remove the bulb. Install a new
bulb and the bulb retaining spring.
To install the bulb, align the cutouts of the
bulb with the protrusions of the mountinghole.5. Connect the cords and install the cover by turning it clockwise.
RIGHT SIDE HEADLIGHT: Install the air
cleaner cover securely.
Page 185 of 188

183
9. STOP 15 A: Stop lights, cruise control
system cancel device
10. CIG 15 A: Cigarette lighter, air condi-
tioning system, SRS airbag system, theft
deterrent system, shift lock control sys-tem
11. RAD NO.2 7.5 A: Radio, cassette
tape player, power antenna
12. TAIL 10 A: Tail lights, parking lights,
front side marker lights, rear side marker lights, licence plate lights
13. ECU-IG 10 A: Cruise control system,
anti-lock brake system, power steering,
power antenna, theft deterrent system,
shift lock control system, traction control system14. GAUGE 10 A: Gauges and meters,
service reminder indicators and warning
buzzers (except discharge and open door
warning lights), rear window defogger,
charging system, cruise control system,
electronically controlled automatic trans-mission system, traction control system
15. ECU-B 10 A: Air conditioning sys-
tem, cruise control system, anti-lock brake system, SRS airbag system, trac-tion control system
16. EFI NO.2 30 A: Multiport fuel injection
system/sequential multiport fuel injection
system17. EFI NO.1 30 A: Multiport fuel injection
system/sequential multiport fuel injection
system
18. AM2 30 A: Starter system
19. FOG 15 A: Front fog lights
20. HAZ-HORN 15 A: Emergency flash-
ers, horns
21. TRAC 7.5 A: Traction control system
22. ALT-S 7.5 A: Charging system
23. DOME 7.5 A: Interior lights, personal
lights, door courtesy lights, luggage
compartment light, ignition switch light,
open door warning light, theft deterrent
system, daytime running light system
Page 186 of 188

18424. RAD NO.1 20 A:
Radio cassette tape
player
25. HEAD (RH) 15 A: Right-hand head-
light
26. HEAD (LH) 15 A: Left-hand head-
light
27. HEAD (RH-LWR) 15 A: Right-hand
headlight (low beam)
28. HEAD (LH-LWR) 15 A: Left-hand
headlight (low beam)
29. HEAD (RH-UPR) 15 A: Right-hand
headlight (high beam)
30. HEAD (LH-UPR) 15 A: Left-hand
headlight (high beam)
31. DRL 7.5 A: Daytime running light sys-
tem
32. 30 A: Spare fuse
33. 7.5 A: Spare fuse
34. 15 A: Spare fuse
35. OBD-II 7.5 A: On-board diagnosis
system
Fuses (type B)
36. DOOR 30 A: Power window, power
door lock system, theft deterrent system
37. DEFOG 30 A: Rear window defogger
Fuses (type C)
38. ALT 120 A: Charging system
39. MAIN 50 A: Starter system, head-
lights
40. HTR 50 A: Air conditioning system
41. FAN 30 A: Electric cooling fan 42. ABS NO.1 60 A:
Anti-lock brake sys-
tem, traction control system
43. AM1 50 A: Electronic ignition system/
distributor ignition system
44. AM1 60 A: Electronic ignition system/
distributor ignition system
45. POWER 60 A: PANELº, STOPº,
TAILº, ECU-B, DEFOGº and DOORº fuses