Page 1053 of 1354
MX02J−02
Z17561
Tapered Roller Bearing and Outer Race
Snap Ring
Spacer
Vehicle Speed Sensor
Drive Gear
No.1 Differential
Case No.2 Differential Side
Gear Thrust Washer
Differential Side Gear
Subassembly
Differential Pinion Shaft
Differential Pinion Thrust Washer
Differential Pinion
Differential Pinion
Thrust Washer
Differential Pinion
No.2 Front Differential Pinion Shaft
Front Differential Pinion
Shaft Holder
Spacer
Snap Ring Conical Spring
Washer
Pinion Shaft
Holder
No.2 Differential Side
Gear Thrust Washer
Front Differential Case
Front Differential
Pinion Shaft Conical Spring
Washer
No.2 Differential Case
Differential Ring Gear
x16
Oil Baffle Front Differential Side
Gear Thrust Washer
Tapered Roller Bearing and Outer Race
Oil Seal
N·m (kgf·cm, ft·lbf): Specified torque
� Non−reusable partFront Differential Side Gear
Shim�
�
124 (1,260, 91)
� MX−58
− MANUAL TRANSAXLEDIFFERENTIAL CASE (4WD)
1996 RAV4 (RM447U)
DIFFERENTIAL CASE (4WD)
COMPONENTS
Page 1058 of 1354
Z12494
MX0DY−01
Z12381
SST
Z12496
Q06288
SST
− MANUAL TRANSAXLEDIFFERENTIAL CASE (4WD)
MX−63
1996 RAV4 (RM447U)
REPLACEMENT
1. Transmission Case Side:
REPLACE OIL SEAL AND TAPERED ROLLER BEAR-
ING OUTER RACE
(a) Using a screwdriver, remove the oil seal.
(b) Remove the transmission oil baffle.
(c) Using a brass bar and hammer, drive out the bearing out-
er race lightly and evenly.
(d) Remove the adjust shim.
(e) Install the adjust shim.
(See page MX−65)
HINT:
First select and install a shim of less thickness than before.
(f) Using SST and a press, install the tapered roller bearing
outer race.
SST 09316−60011 (09316−00011, 09316−00041)
(g) Install the transmission oil baffle.
HINT:
Install the transmission oil baffle projection into the case side
cutout.
(h) Using SST, drive in a new oil seal.
SST 09223−15020, 09950−70010 (09951−07150)
(i) Coat the lip of the oil seal with MP grease.
Page 1060 of 1354
Q06211
SST
MX02M−03
Q06212
SST
Q06224
Thrust Washer
Thickness
1.0 mm (0.039 in.)
− MANUAL TRANSAXLEDIFFERENTIAL CASE (4WD)
MX−65
1996 RAV4 (RM447U)
REASSEMBLY
HINT:
Coat all of the sliding and rotating surfaces with gear oil before
reassembly.
1. No.1 Differential Case Side:
INSTALL TAPERED ROLLER BEARING
Using SST, install a new tapered roller bearing.
SST 09316−20011
2. No.2 Differential Case Side:
INSTALL TAPERED ROLLER BEARING
Using SST, install a new tapered roller bearing.
SST 09316−20011
3. CHECK AND ADJUST CENTER DIFFERENTIAL SIDE
GEAR BACKLASH (DIFFERENTIAL SIDE GEAR SUB-
ASSEMBLY SIDE)
(a) Install these parts to the No.1 differential case:
�No.2 differential side gear thrust washer
�Temporarily install a 1.0 mm (0.039 in.) thick thrust
washer
�Differential side gear subassembly
�Pinion shaft holder
�4 differential pinions
�4 differential pinion thrust washers
�4 differential pinion shafts
Page 1063 of 1354

1996 RAV4 (RM447U)
8. CHECK AND ADJUST FRONT DIFFERENTIAL SIDE
GEAR THRUST CLEARANCE (NO.2 DIFFERENTIAL
CASE SIDE)
(a) Install these")
Q06221
Q06196
MX−68
− MANUAL TRANSAXLEDIFFERENTIAL CASE (4WD)
1996 RAV4 (RM447U)
8. CHECK AND ADJUST FRONT DIFFERENTIAL SIDE
GEAR THRUST CLEARANCE (NO.2 DIFFERENTIAL
CASE SIDE)
(a) Install these parts to the No.2 differential case:
�No.2 differential side gear thrust washer
�Front differential side gear thrust washer
�Front differential side gear
�Front differential case assembly
HINT:
Engage the front differential side gear and pinion gear of the
front differential case.
(b) Using a dial indicator, measure the thrust clearance of the
front differential side gear while holding the front differen-
tial case on the No.2 differential case side.
Standard clearance: 0.17−0.26 mm (0.007−0.010 in.)
HINT:
Turning the side gear a bit, check the maximum value of the
thrust clearance.
If the backlash is out of the specification, refer to the table below
and select a thrust washer which will ensure that the backlash
is within the specification.
MarkThickness mm (in.)MarkThickness mm (in.)
A0.95 (0.0374)F1.20 (0.0472)
B1.00 (0.0394)G1.25 (0.0492)
C1.05 (0.0413)H1.30 (0.0512)
D1.10 (0.0433)J1.35 (0.0531)
E1.15 (0.0453)K1.40 (0.0551)
(c) Disassemble the No.2 differential case.
9. INSTALL RING GEAR
(a) Clean the contact surface of the differential left case.
(b) Heat the ring gear to about 100°C (212°F) in boiling wa-
ter.
(c) Carefully take the ring gear out of the water.
(d) Clean the contact surface of the ring gear with cleaning
solvent.
(e) Quickly install the ring gear on the differential case.
HINT:
Align the matchmarks on the No.2 differential case and connect
the ring gear.
Page 1073 of 1354
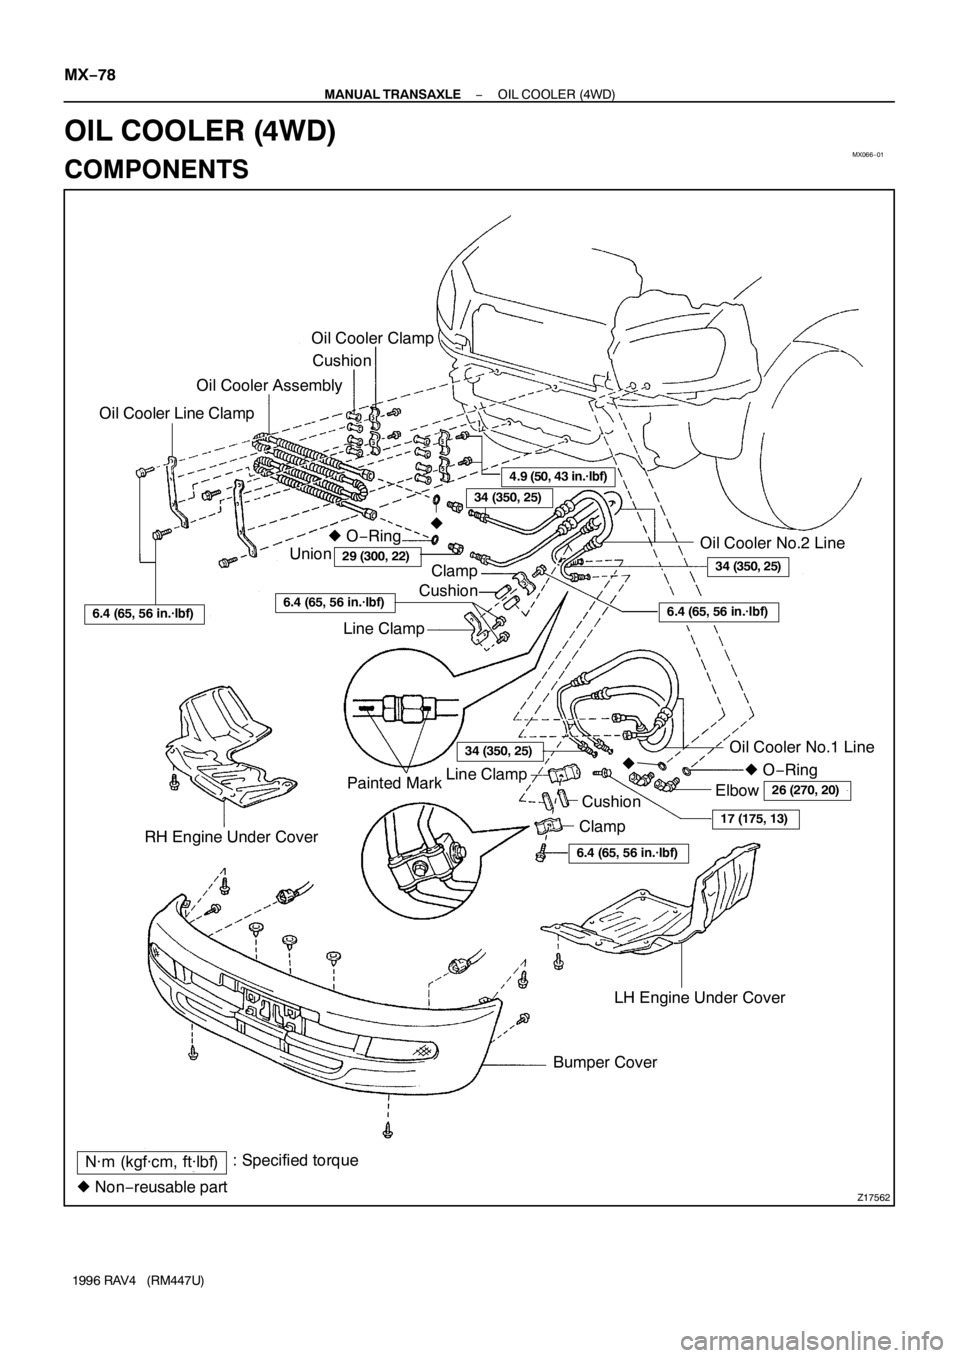
MX066−01
Z17562
Oil Cooler Clamp
Cushion
Oil Cooler Assembly
Oil Cooler Line Clamp
� O−Ring
Union
LH Engine Under Cover
� Non−reusable partOil Cooler No.2 Line
Painted Mark Line Clamp
Oil Cooler No.1 Line
: Specified torque
N·m (kgf·cm, ft·lbf)Bumper Cover RH Engine Under Cover
17 (175, 13)
34 (350, 25)
4.9 (50, 43 in.·lbf)
29 (300, 22)34 (350, 25)
6.4 (65, 56 in.·lbf)
� O−Ring
Elbow
26 (270, 20)
6.4 (65, 56 in.·lbf)
ClampCushion
6.4 (65, 56 in.·lbf)6.4 (65, 56 in.·lbf)CushionClamp
� �
Line Clamp
34 (350, 25)
MX−78
− MANUAL TRANSAXLEOIL COOLER (4WD)
1996 RAV4 (RM447U)
OIL COOLER (4WD)
COMPONENTS
Page 1074 of 1354
MX0C1−01
Q09037
Adjusting Shim
Transfer Oil PipeExtension Housing
x6
Dust Deflector
Transfer Pinion Bearing
Cage Assembly
Differential Lock
Indicator Switch Cushion
Differential Bearing
Adjusting Nut
Ring Gear Mounting
Case Assembly
Bearing Outer Race
Plate Washer
Transfer Left Case
Drain Plug Snap Ring
Shift Fork Shaft
Differential
Side Gear
Shaft Holder
Side Gear Shaft
Holder Bearing
Snap Ring
Adjusting Nut Lock Plate
N·m (kgf·cm, ft·lbf): Specified torque
Non−reusable part
Precoated part �
�x10Transfer Right CaseDifferential Lock
Sleeve Differential Lock
Shift Fork Plug
Transfer Inspection
Hole Cover O−Ring
�
Plug
Oil Seal Dust BootGasket
� Oil Seal
44 (450, 33)
��
�
39 (400, 29)
�
16 (160, 12)
Gasket
�
39 (400, 29)
Gasket �
25 (250, 18)
40 (410, 30)16 (160, 12)
�
25 (260, 19)
Dynamic Damper
25 (260, 19)
� Bearing
Outer Race ��
13 (130, 9)
O−Ring �
39 (400, 29)Oil Seal
�
− MANUAL TRANSAXLETRANSFER (4WD)
MX−79
1996 RAV4 (RM447U)
TRANSFER (4WD)
COMPONENTS
Page 1077 of 1354

1996 RAV4 (RM447U)
DISASSEMBLY
1. REMOVE DUST BOOT
2. REMOVE DYNAMIC DAMPER
Remove the 4 bolts and dynamic damper.
3. R")
MX0DZ−01
Q06131
Q06157
SST
Q06158
MX−82
− MANUAL TRANSAXLETRANSFER (4WD)
1996 RAV4 (RM447U)
DISASSEMBLY
1. REMOVE DUST BOOT
2. REMOVE DYNAMIC DAMPER
Remove the 4 bolts and dynamic damper.
3. REMOVE EXTENSION HOUSING
(a) Remove the 4 bolts, tap the extension housing with a
plastic hammer and remove it.
(b) Remove the O−ring from the extension housing.
4. REMOVE PLUG AND DIFFERENTIAL LOCK INDICA-
TOR SWITCH
(a) Using a hexagon wrench (6 mm), remove the plug.
(b) Using a hexagon wrench (10 mm), remove the plug and
gasket.
(c) Remove the differential lock indicator switch and gasket.
5. REMOVE TRANSFER RIGHT CASE OIL SEAL
Using a screwdriver and hammer, remove the oil seal.
6. CHECK PRELOAD
(a) Using SST and a spring tension gauge, measure the driv-
en pinion preload of the backlash between the driven pin-
ion and ring gear.
SST 09326−20011
Preload (at starting):
9−14 N (0.9−1.4 kgf, 2−3 lbf)
(b) Using SST and a spring tension gauge, measure the total
preload.
SST 09326−20011
Total preload (at starting):
Driven pinion preload plus
5−9 N (0.5−0.9 kgf, 1−2 lbf)
7. REMOVE TRANSFER INSPECTION HOLE COVER
(a) Remove the 3 bolts.
(b) Using a screwdriver and hammer, remove the transfer in-
spection hole cover.
8. CHECK RING GEAR BACKLASH
Using a dial indicator, measure the ring gear backlash.
Backlash: 0.13−0.18 mm (0.0051−0.0071 in.)
9. CHECK TOOTH CONTACT (See page MX−89)
Page 1081 of 1354
Q05709
SST
MX0E0−01
Z12397
SST
Z12546
Q08760
SST SST
Z16232
Socket Wrench MX−86
− MANUAL TRANSAXLETRANSFER (4WD)
1996 RAV4 (RM447U)
REPLACEMENT
1. REPLACE DRIVEN PINION FRONT BEARING
(a) Using SST and a press, remove the front bearing.
SST 09950−00020
(b) Using SST and a press, install a new front bearing.
SST 09316−60011 (09316−00051)
2. REPLACE FRONT AND REAR BEARING OUTER
RACE
(a) Using a brass bar and hammer, drive out the front and
rear bearing outer race lightly and evenly.
(b) Using SST and a press, install a new front bearing outer
race.
SST 09950−60020 (09951−00780), 09950−70010
(09951−07150)
(c) Using SST and a press, install a new rear bearing outer
race.
SST 09950−60010 (09951−00590), 09950−70010
(09951−07150)
3. REPLACE SHIFT FORK SHAFT OIL SEAL
(a) Using a screwdriver, remove the oil seal from the transfer
right case.
(b) Using a socket wrench and hammer, install a new oil seal.


MX−63
1996 RAV4 (RM447U)
REPLACEMENT
1. Transmission Case Side:
REPLACE OIL SEAL AND TAPERED ROLLER BEAR")

− MANUAL TRANSAXLEDIFFERENTIAL CASE (4WD)
MX−65
1996 RAV4 (RM447U)
REASSEMBLY
HINT:
Coat all of the sliding and")


1996 RAV4 (RM447U)
REPLACEMENT
1. REPLACE DRIVEN PINION FRONT BEARING
(a) Using")